Handling Patient Visits
This document provides instructions for the tasks that are done from the time an existing patient calls to schedule an appointment until his or her visit is complete.
1. Scheduling
Schedule an appointment for the patient
Scheduling appointments for existing patients
You can schedule an appointment for an existing patient.
To schedule an appointment for an existing patient
-
Do one of the following:
-
Click (or tap) the Schedule menu.
-
On the Schedule menu, select Calendar.
The Calendar page opens.
-
-
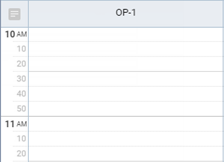
Navigate to a day or week.

-
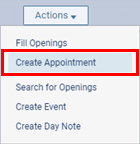
Do one of the following:
-
Click (or tap) an open time slot.
-
On the Actions menu, select Create Appointment.
The Appointment Information panel opens.
-
-
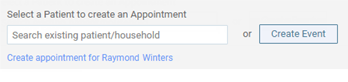
Do one of the following:
-
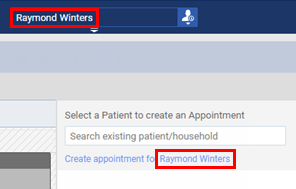
If you are currently accessing the record of the patient for whom you are scheduling the appointment (the patient's name appears in the Patient Search box), click (or tap) the Create Appointment for [patient name] link.
-
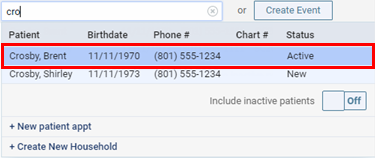
Click (or tap) in the Search for a patient record box. Start typing a patient's first name, last name, chart number, or phone number (at least the first four digits). Continue typing as needed to narrow the search results list. Then, select a patient name.
Note: You can include inactive patients in the search results by setting the Include inactive patients switch to On.
The options for the patient's appointment become available.
-
-
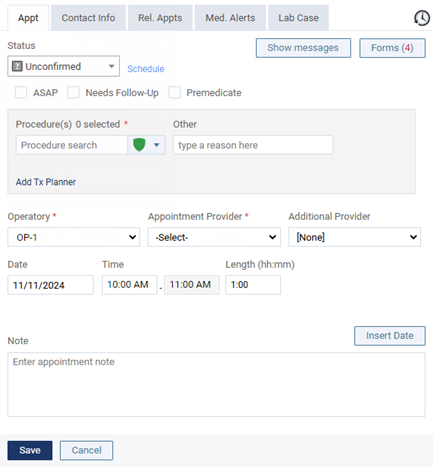
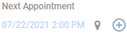
Select the procedures that are to be performed, and set up the other options as needed.
Set up the following options:
-
Orthodontia Patient - Select the checkbox if the patient is currently undergoing orthodontic treatment, or leave the checkbox clear if the patient is not currently undergoing orthodontic treatment.

-
Status - By default, all new appointments have Unconfirmed selected, but you can select a different status if necessary. The corresponding status icon appears on the appointment (for example, Unconfirmed is a question mark
 ).
). -
ASAP - Select this check box if the patient wants to be contacted if an earlier date and/or time becomes available. With this option selected, the patient will show on the ASAP List. With this option selected, the patient will show on the ASAP List, and an ASAP icon
 appears on the appointment.
 -
Needs Follow-up - Select this check box if any of the procedures for this appointment require you to follow up with the patient after his or her visit. The patient will show up on the Patient Follow-up list after his or her appointment.
-
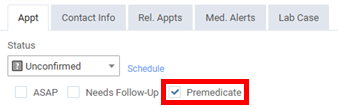
Premedicate - Select this check box if the patient prefers to be medicated before any of the procedures are performed or if any of the procedures require premedication.
Note: This checkbox is selected by default if the patient has an active medical alert that has the SNOMED code 398193008 assigned to it (such as "Pre-medicate need") in his or her record. You can clear the checkbox if premedication is not needed for this appointment.
-
Procedure(s) - Click (or tap) in the box, begin typing procedure code, multi-code, or description, continue typing as needed to narrow the results, and then select the appropriate procedure from the results list. To select other procedures, repeat this process.
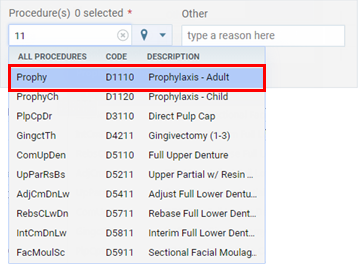
When you are searching for a procedure, procedures appear in the results list not only according to your search criteria but according to the selected filter.
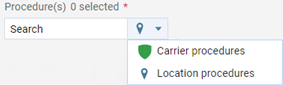
Select one of the following procedure filters as needed:
-
Carrier procedures - Only the carriers' allowed procedures are available. If the patient has any active insurance plans attached to his or her record, and if the selected Provider is contracted with any of the patient's carriers, Carrier procedures is selected by default.
-
Location procedures - Only the location's allowed procedures are available. If the patient is not covered by an insurance carrier that the provider is contracted with, Location procedures is selected by default.
Note: Carrier procedures is available only if the patient has any active insurance plans attached to his or her record, and if the selected Provider is contracted with any of the patient's carriers. Location procedures is available for any patient.
Important: If you schedule an appointment using a multi-code that includes some procedures that are not allowed by the the location or any of the patient's carriers, those procedures will not be attached to the appointment.
Note: If you select a procedure that is associated with a recare type, that recare type is attached to this patient's appointment automatically. However, if the same recare procedure is already attached to another appointment for this patient, and the other appointment's status is not Complete, an orange warning icon appears, and when you save this appointment, a message will appear so you can confirm that you want to attach the recare procedure to multiple appointments.
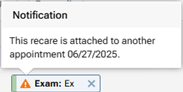
On the Appointment Information panel, a recare procedure that is attached to an appointment has a green stripe. A non-recare procedure does not have a colored stripe.

Note: To remove a procedure from the appointment, click (or tap) the corresponding Remove button
 .
. -
-
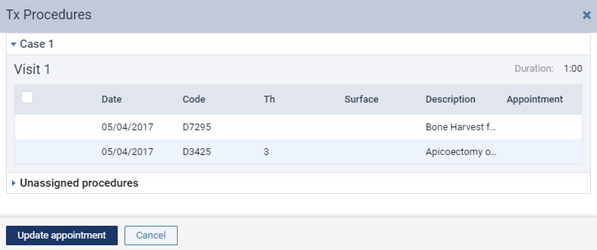
Add Tx Planner - Click (or tap) this link to open the Tx Procedures dialog box. Select the checkbox of the visit (associated with a case) or the checkboxes of the individual treatment-planned procedures (not assigned to a case) that you want to attach to the appointment. Then, click (or tap) Update appointment.
Notes:
-
If a visit (associated with a case) contains completed treatment-planned procedures, a message appears and informs you that the visit cannot be attached to the appointment until after those procedures have been moved to another visit. You can click the Treatment Planner link in the message to navigate to the Tx Planner tab of the patient's clinical record to make the change.
-
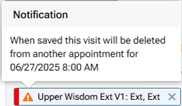
If you attach treatment-planned procedures that are already scheduled, an orange warning icon appears. When you save this appointment, a message will appear so you can confirm that you want to remove the planned procedures from the other appointment.
On the Appointment Information panel, a treatment plan that is attached to the appointment has a red stripe.

Note: When you position your mouse pointer over an attached treatment plan, one of the following occurs:
-
For a procedure that is not assigned to a case, details of that procedure appear.
-
For procedures that are assigned to a case, the case name, the visit number, and details of all the procedures in that visit appear.
-
-
Other - Enter a reason, other than that of the selected procedures, for the appointment.
-
Operatory - Select an operatory from the list. If you selected a time slot in step 3 while viewing by operatory, an operatory is already selected, but you can select a different one. Alternatively, to quickly change the operatory, click (or tap) and hold and then click (or tap) an open time slot in a different operatory.
Note: The provider's default operatory (if one has been set up) will be selected automatically if you are viewing the schedule by provider.
-
Appointment Provider - Select an appointment provider from the list. If you selected a time slot in step 3 while viewing the schedule by provider, a provider is already selected, but you can select a different one. Alternatively, if you are viewing the schedule by provider, to quickly change the provider, click (or tap) and hold and then click (or tap) the column of a different provider. Only providers who have access to the current location are available. The exception to this is when a provider is associated with the appointment and no longer has access to the current location; that provider is available in the list unless you select a different provider and then save the change.
-
Other Provider - Select a secondary provider, such as a hygienist, for the appointment from the list. A colored box
 (determined by the provider color assigned to this provider) appears on the appointment. Only providers who have access to the current location are available. The exception to this is when a provider is associated with the appointment and no longer has access to the current location; that provider is available in the list unless you select a different provider and then save the change.
 -
Date - The date being viewed on the schedule is already selected by default, but you can change it. Click (or tap) in the box to select a different date. Alternatively, if you are viewing the schedule by week, to quickly change the date, click (or tap) and hold and then click (or tap) an open time slot on a different date.
-
Time - Click (or tap) in the box, and then enter a time. If you selected a time slot in step 3, the time is already entered, but you can change it. Alternatively, to quickly change the time, click (or tap) and hold and then click (or tap) a different open time slot.
Tip: You can enter a time using various formats. For example, you can type 08:30, 8:30a, or 8:30 AM; 8a or 8am; 13:30, 1:30p, or 1:30 PM; or 1p or 1pm.
-
Length - By default, the length of the appointment is determined by the location's default appointment length, but you can change the length as needed. The end time of the appointment changes accordingly.
-
Time Pattern - Add a time pattern to the appointment to represent who is providing care to the patient during the appointment.
-
Note - Enter a note regarding the appointment. To insert the current date where the text cursor is positioned in the box, click (or tap) Insert Date. If there is an appointment note, a note icon
 appears on the appointment.
 -
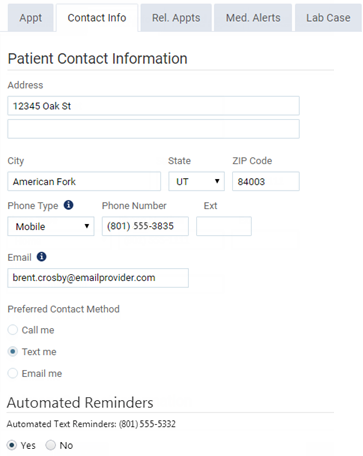
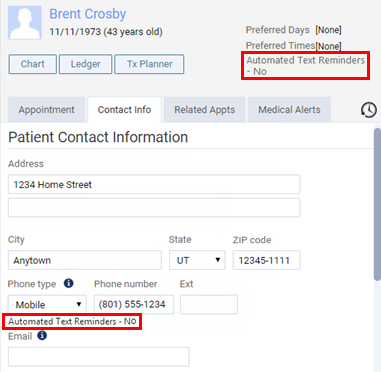
Contact Info - On the Contact Info tab, you can view or update the patient's contact information, contact preferences, and automated reminders preference (this option is available only if the patient is the primary contact for himself or herself or anyone else and has a supported mobile phone number). Any changes that you save from the appointment will be reflected in the patient's record.
Notes:
-
If the patient has someone else as his or her primary contact, but an email address has not been entered in that primary contact's patient record, "No email provided" appears. Also, a message to add the primary contact's email address appears below the Email box
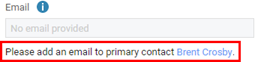
-
If the patient has someone else as his or her primary contact, and an email address has been entered in that primary contact's patient record, that primary contact's email address appears and will be used for this patient.
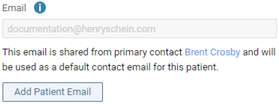
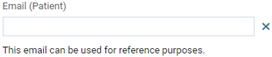
To enter a different email address for this patient, click (or tap) Add Patient Email, and then enter an address in the Email (Patient) box that appears. To clear the patient's email, click the X. This email address is for reference only. Dentrix Ascend will not use this email address to send out automated patient communications.
-
If the patient is his or her own primary contact, an email address is not entered, and the Preferred Contact Method is set to Email me, an error icon and message appear as a reminder for you to either enter an email address or change the preferred contact method.

-
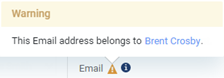
If you enter an email address that is already associated with another patient's record, a yellow warning icon appears next to the label of the Email box. Dentrix Ascend allows you to save a patient's record with a duplicate email address; the warning is only there for your reference in case, for example, your organization requires unique email addresses for all patients.
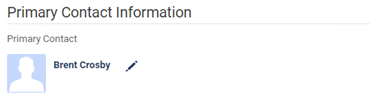
The patient's primary contact also appears.
Tips:
-
To change the primary contact person for the patient, click (or tap) the Edit button
 . In the search box, begin typing the contact's name, continue typing as needed to narrow the results, and then select the appropriate name from the list of matching results. Or, to make the patient whose appointment you are viewing the primary contact, click (or tap) Switch to "Self" at the bottom of the results list.
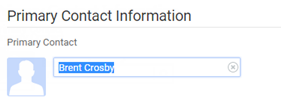
-
To assign the primary phone number of the patient's primary contact (if different from the patient) as the primary phone number of the patient on the appointment, click (or tap) the Copy Up button
 . To assign the patient's primary phone number as the primary phone number of the patient's primary contact (if different from the patient), click (or tap) the Copy Down button
  .
.
-
-
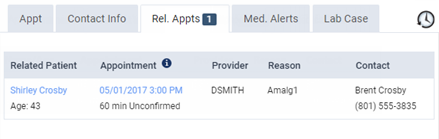
Rel. Appts - On the Rel. Appts tab, you can view the appointment information for other members of the patient's household who have appointments scheduled on the same day as this appointment. For your reference, the number of related appointments, if any, appears next to the name of the tab.
-
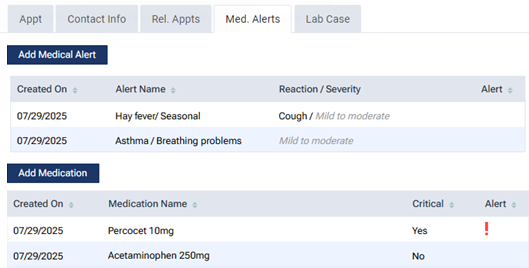
Med. Alerts - On the Med. Alerts tab, you can view the medical alerts (allergies and problems) and medications that are attached to the patient's record. You can also add medical alerts and medications to the patient's record as needed.
-
Lab Case - On the Lab Case tab, you can attach a lab case to the patient's appointment.

-
-
Click (or tap) Save.
-
Do one of the following if applicable:
-
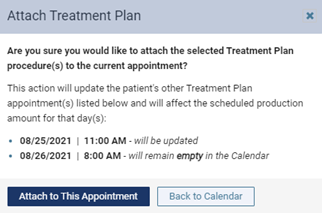
If you have attached treatment-planned procedures that are already scheduled, the Attach Treatment Plan message box appears so you can confirm that you want to remove the procedures from the other appointment. The message displays the date and time of the affected appointment and a note that it will be updated. However, if removing those procedures leaves another appointment empty, the message displays the date and time of the affected appointment and a note that it will remain scheduled on the calendar but be empty. To confirm that you want to move the procedures, click (or tap) Attach to This Appointment.
-
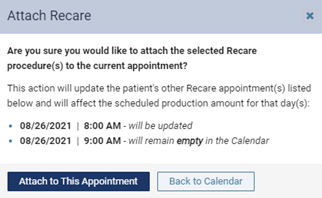
If you have attached recare procedures that are already attached to another appointment for this patient, and the other appointment's status is not Complete, the Attach Recare message box appears so you can confirm that you want the recare procedures to be attached to multiple appointments. The message displays the date and time of the other appointment. To confirm that you want to attach the recare procedures to mutliple appointments, click (or tap) Verify.
-
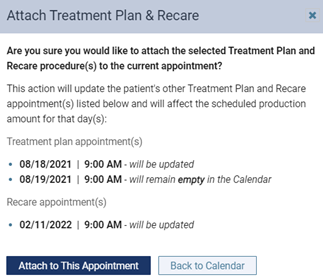
If you have attached treatment-planned procedures that are already scheduled, and if you have attached recare procedures that are already attached to another appointment for this patient, the Attach Treatment Plan & Recare message box appears so you can confirm that you want to remove the treatment-planned procedures from the other appointment and that you want the recare procedures to be attached to multiple appointments. The message displays the date and time of the affected treatment-planned appointment and a note that it will be updated; however, if removing those procedures leaves another appointment empty, the message displays the date and time of the affected appointment and a note that it will remain scheduled on the calendar but be empty. Also, the message displays the date and time of the other recare appointment. To confirm that you want to move the planned procedures and attach the recare procedures to multiple appointments, click (or tap) Verify.
-
Schedule appointments for related patients (if applicable)
Scheduling appointments for related patients
If you are scheduling appointments for an entire family, you can quickly schedule appointments for those related patients without having to search for each patient individually.
To schedule appointments for related patients
-
With a patient selected so his or her name appears in the Patient Search box, schedule an appointment for that family member.

-
On the Patient Information ribbon, expand the Related Patients list.

Note: To show the Patient Information ribbon if it is hidden, click (or tap) the down arrow button below the Patient Search box.

-
Next to the name of the next family member you want to schedule, click (or tap) the Schedule new appointment button
 .
.Notes:
-
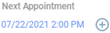
If a related person has an upcoming appointment in the location that you are currently accessing, a date and time link for that appointment appears next to his or her name in the Next Appointment column.
-
If a related person has an upcoming appointment in a different location from the location that you are currently accessing, the date and time of that appointment and a location icon appear next to his or her name in the Next Appointment column.
-
If a related person does not have an upcoming appointment, "None" appears next to his or her name in the Next Appointment column.
The Calendar page displays times near the first family member's appointment.
-
-
Schedule an appointment for this family member, selecting the procedures, operatory, provider, and other details as needed.
-
Repeat steps 2-4 as needed for any other family members you want to schedule.
2. Patient check-in
Handle the patient's arrival
-
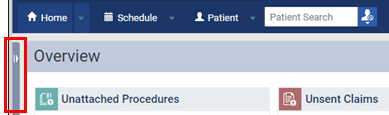
The routing panel is available at all times while you are logged in to Dentrix Ascend. To open or close the panel, click (or tap) anywhere on the thin, vertical bar on the left side of your browser window.
The routing panel is available at all times while you are logged in to Dentrix Ascend. To open or close the panel, click (or tap) anywhere on the thin, vertical bar on the left side of your browser window.
The routing panel is available at all times while you are logged in to Dentrix Ascend. To open or close the panel, click (or tap) anywhere on the thin, vertical bar on the left side of your browser window.
The routing panel is available at all times while you are logged in to Dentrix Ascend. To open or close the panel, click (or tap) anywhere on the thin, vertical bar on the left side of your browser window.
-
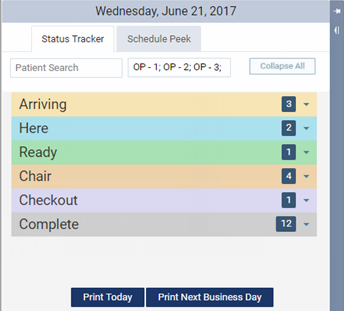
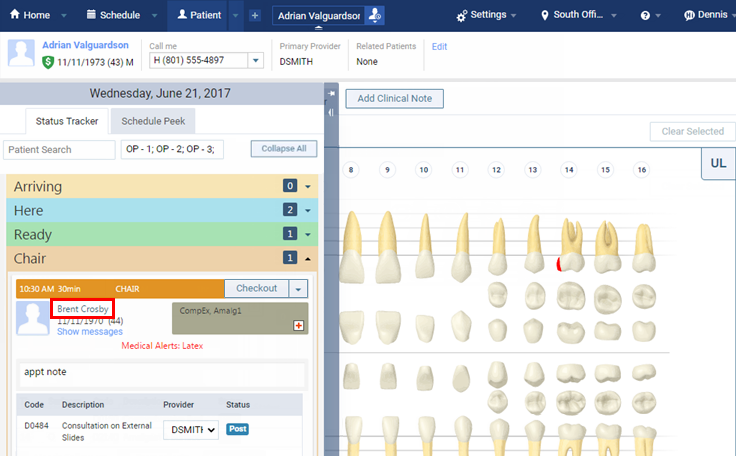
When a patient arrives at the office, the receptionist clicks (or taps) the Here status button for that patient on the routing panel.
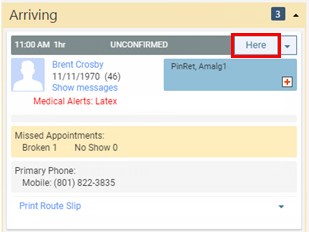
Note: The Here status button is not available if the patient is a new patient who booked the appointment online and if you have not assigned or created a patient record for the patient.
The appointment's status changes to Here, and the patient now appears on the routing panel under Here.
Update the patient's information
For established patients of record, you can edit patient information. Also, for new patients with appointments scheduled, patient records with some basic information entered exist, but you can enter additional information to complete the records.
To update a patient's information
-
The receptionist opens the routing panel (if it is not already open) and clicks (or taps) the name of the patient under Here.
The patient is now selected in the Patient Search box.

-
Do one of the following:
-
On the Patient Information ribbon, click (or tap) the Edit Patient Information button
 .
.Note: If the ribbon is not visible, click (or tap) the arrow button below the Patient Search box.
-
On the Patient menu, under General, select Patient Information.
The patient's Patient Information page opens.

-
-
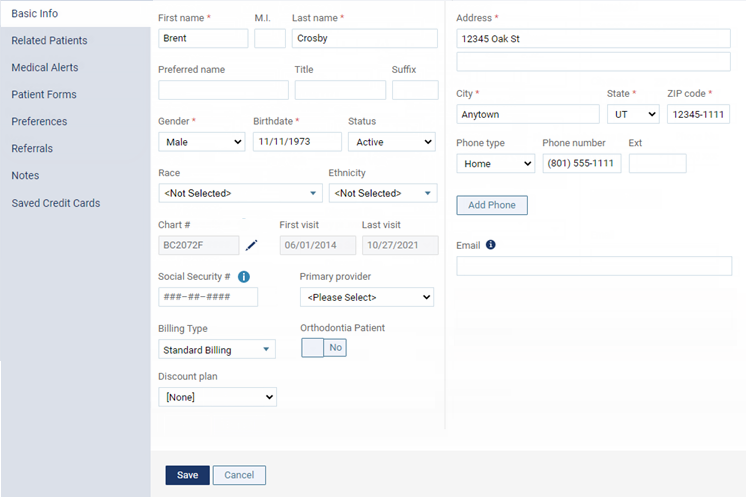
Update a patient's information on the following tabs as needed:
-
Basic Info
-
Set up the following options:
-
Name - Enter the patient's first and last name and middle initial.
-
Preferred name - The name the patient prefers you use when addressing him or her. The preferred name can also be used on correspondence from your office.
-
Title - Enter a prefix for the patient's name, such as Dr., Mr., Ms., or Mrs.
-
Suffix - Enter a suffix for the patient's name, such as Jr., Sr., or III, if applicable.
-
Gender - Select the patient's gender: Male, Female, or Other.
-
Birthdate - Enter the patient's date of birth.
Note: With a birth date entered, if you click (or tap) in the box, the date is copied to the clipboard.
-
Status - Select Active, Non-Patient, Inactive, or Duplicate as the patient's status. Changing the patient's status to Duplicate or from Duplicate to another status requires the security right to manage duplicate patients.
-
Race - On the list, select the checkboxes that correspond to the patient's races.
Note: On the Custom Pick List page (Settings > Custom Pick Lists), a user who has been granted the applicable security right can control the availability of this list for your organization.
-
Ethnicity - Select the patient's ethnicity from the list.
Note: A user who has been granted the applicable security right can control the availability of this list for your organization on the Custom Pick List page (Settings > Custom Pick Lists).
-
Chart # - By default this box is not available. To change the patient's chart number, click the Edit button
, and then enter a unique chart number (up to 10 characters in length; letters, numbers, periods, and dashes are allowed). If you change the patient's first and/or last name, to have a new chart number generated automatically for the patient, click (or tap) the Update button  .
.Notes:
-
If you access an existing patient record that was created without a chart number (the record was created before the requirement to have a chart number was instituted), a chart number is generated and saved automatically, but you can change it as needed.
-
You can edit the chart number only if the user role that your user account is assigned to has been granted the "Edit patient chart #" security right.
-
With a chart number entered, if you click (or tap) in the box, the characters are copied to the clipboard.
-
-
First visit - This is the date of the patient's first visit. This date is for reference only and cannot be edited. This date is updated automatically when you post a completed procedure for a new patient.
-
Last visit - This is the date of the patient's most recent past appointment. This date is for reference only and cannot be edited. This date is updated automatically when you post a completed procedure for a patient.
-
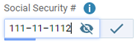
Social Security # - It may be helpful to have the patient's Social Security Number on file as a reference for patient financing and insurance coverage verification. Do one of the following:
-
Add - If the box contains hash tags (#), a Social Security Number has not been entered for the patient. You can enter the patient's Social Security Number. If you enter the correct number of digits, the SSN Save button
 appears. To save the Social Security Number immediately, click (or tap) the SSN Save button, or you can save the Social Security Number when you click (or tap) Save to save all changes to the patient's information.
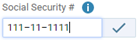
-
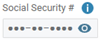
View - If the box contains dots, a Social Security Number has been entered for the patient but is being masked. To show the Social Security Number, click the Show button
 .
.
Notes:
-
If you click (or tap) the Hide button
 or anywhere else on the page, the Social Security Number becomes masked.
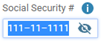
-
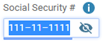
If the Social Security Number is visible, and there is no activity for five seconds, a timer starts as indicated by the progress bar that appears below the Social Security # box. If another 15 seconds elapses without there being any activity, the Social Security Number automatically becomes masked.
-
-
Edit - If the box contains dots, a Social Security Number has been entered for the patient but is being masked. To show the Social Security Number, click the Show button
. You can change or remove the Social Security Number as needed. If the correct number of digits are entered or if there are no digits, the SSN Save button appears. To save the Social Security Number immediately, click (or tap) the SSN Save button.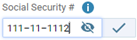
Note: If you do not click the SSN Save button or Save (to save all changes to the patient's information) within five seconds, a timer starts as indicated by the progress bar that appears below the Social Security # box. If another 15 seconds elapses without the change being saved, the Social Security Number automatically reverts back to the original number and becomes masked.
Note: Social Security Numbers are encrypted in the database, and no reports utilize Social Security Numbers. You can view a patient's Social Security Number only on the Patient Information page and only if your user account has the "Access Social Security #" security right. Additionally, the "Update patient information" security right is required to add or edit the Social Security Number.
-
-
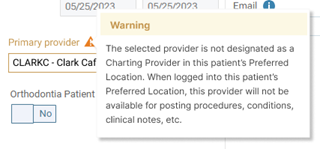
Primary provider - Select the preferred or primary provider for this patient. Only providers who have access to the patient's preferred location are available. The exception to this is when a provider is associated with the patient and no longer has access to the current location; that provider is available in the list unless you select a different provider and then save the change.
Note: A warning message appears if the selected primary provider is not designated as a charting provider in the patient's preferred location. A provider can be designated as a charting provider per location in that provider's user account settings.
-
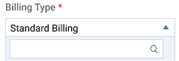
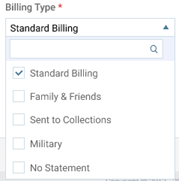
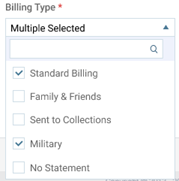
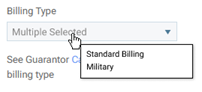
Billing Type - Do one of the following:
-
If the patient is his or her own guarantor - On the list, select the checkbox of each billing type that you want to assign to the patient, and clear the checkbox of each billing type that you want to remove from the patient. At least one billing type must be selected.
Notes:
-
If the list of available billing types is long, you can use the search box at the top of the list to quickly search for a billing type.
-
If one billing type is selected, the name of the type appears.
-
If multiple billing types are selected, "Multiple Selected" appears.
-
If you later assign a guarantor to this patient, and the assigned billing types for that guarantor are different from those that are assigned to this patient, this patient will be assigned the billing types that are assigned to that guarantor.
-
-
If someone else is the patient's guarantor - You cannot assign or remove billing types from this patient's record, but you can do so from the guarantor's record. To open the guarantor's record so you can change which billing types are assigned to the guarantor and all dependents, click (or tap) the guarantor's name, which is a link, below the box.
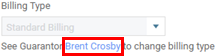
Note: While viewing this patient's record, if multiple billing types are selected for the patient's guarantor, "Multiple Selected" appears. To view the names of all the selected billing types, position your pointer over the box.
-
-
Orthodontia Patient - Specify whether the patient is an orthodontia patient or not.
-
Discount plan - To use a discount fee schedule for treatment-planned procedures and charges that are billed to this patient if the patient does not have insurance coverage, do the following:
-
Select Basic (uninsured) from the Discount plan list.
The other discount plan options become available.
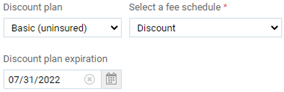
-
Select the discount fee schedule from the Select a fee schedule list.
Notes:
-
If the patient has insurance coverage, the discount plan will be ignored.
-
The difference between the provider's fee for a given procedure (or if there is no provider fee, the default fee) and the discount fee appears as a credit adjustment on a patient's ledger. However, if the patient has insurance coverage, the selected discount fee schedule is ignored.
-
Alternatively, you can assign a sliding fee schedule to determine a discount.
-
-
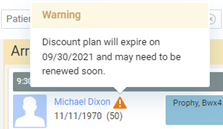
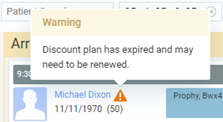
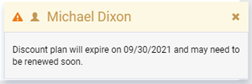
An expiration date may be required by your organization. To specify the date after which the discount plan should no longer be valid for the patient, click (or tap) in the Discount plan expiration box, and then select the correct date. With an expiration date entered, if the patient does not have insurance coverage, expiration warning icons and notifications start appearing 30 days prior to the expiration date until the discount plan's expiration date is changed or removed (if allowed) or until the discount plan is removed from the patient's record. The warnings can appear in the following areas of Dentrix Ascend:
-
A yellow warning icon appears next to the patient's name on an appointment card on the routing panel. Click (or tap) the icon to view the message.
-
A notification appears when you access the patient's Ledger page.
-
A notification appears when you access the Progress Notes tab of the patient's clinical record.
-
A notification appears when you access the Tx Planner tab of the patient's clinical record.
-
A notification appears when you attempt to complete the patient's appointment.
Examples:
Warning Icon (Expiring)
Warning Icon (Expired)
Notification (Expiring)
Notification (Expired)
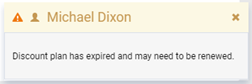
Important: Even if a discount plan expires for a patient, the patient will continue to get discounts. The expiration date only triggers notifications, it does not cause the discount plan to be removed from the patient's record.
-
-
-
Address - Enter the street address, city, state, and ZIP Code of the patient's residence. All correspondence will be sent to this address unless the patient is not the guarantor; in which case, bills, account statements, and other financial documents will be sent to the address listed for the patient's guarantor. By default, the address of the patient's primary contact, if that is someone other than the patient whose record you are adding, is entered.
Tip: To copy the address of another household member to this patient's record, click (or tap) in the Address, City, State, or ZIP Code box, and then click (or tap) the Copy button
 of a household member. Only the address of the primary contact and other household members (if different) are available.
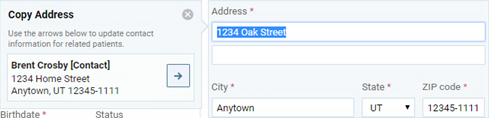
-
Phone number - Select a Phone type (Home, Mobile, Work, or Other), and enter the correct Phone number and Ext (if applicable) for the patient.
Important:
-
Sending automated text messages to mobile phone numbers is subject to the FCC's Telephone Consumer Protection Act (TCPA). That law and our terms and conditions require you to obtain consent from your patients before sending them any text messages through the Dentrix Ascend reminder system. Federal law dictates the form of prior express consent you must obtain. Prior written consent is optimal for all text messages, and may be required by law depending on the content of your text messages.
The following is an example of consent language you may consider adapting for your practice.
As a service to our patients, we provide courtesy appointment and recare reminder messages, and other important messages, such office closures, by using text messages. We also may send text messages notifying you of promotions our practice may offer from time to time. By providing your cell phone number, you consent to receiving text messages reminders and notifications at this number. You may opt out of receiving text messages by texting STOP in reply to a message at any time.
-
If you do not have a patient's prior consent, turn off reminders for the patient by selecting Home as the patient's phone number type instead of Mobile.
To add another phone number for the patient, click (or tap) Add Phone.
Tips:
-
To copy the phone number of another household member to this patient's record, click (or tap) in one of the phone number boxes, and then click (or tap) the Copy button
of a household member. Only the first (primary) phone number of the primary contact and other household members (if different) are available.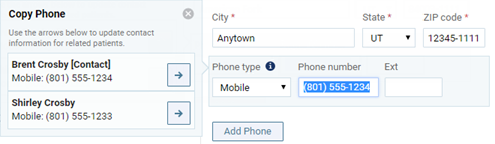
-
To change the priority of the patient's phone numbers, click (or tap) the Move Up button
 of the phone number that you want to move up in the list. To remove a phone number from the patient's record, click (or tap) the Remove button
  of that phone number. These buttons are not available for the first (primary) phone number.
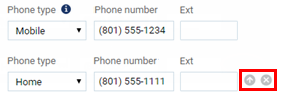
-
If you enter a mobile phone number for the patient and then click (or tap) Save, below that phone number, the text Automated Text Reminders appears along with a status message (Yes or Carrier not Supported) to indicate that the number you entered has been verified as either a supported or unsupported mobile phone number. Then, if it is a supported number, a welcome text message is immediately sent. However, if the mobile phone number for the patient comes from a conversion from another practice management software, a welcome text message and a thank-you-for-scheduling text message are sent at the same time when an appointment is scheduled for the patient.
-
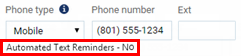
If the patient already has a mobile phone number entered, the status message next to the Automated Text Reminders text for that number can be, in addition to Yes or Carrier not Supported, No if the patient is the primary contact for himself or herself or for anyone else and has been opted out of receiving automated text message reminders (any other patients who have this patient as their primary contact have also been opted out).
-
The patient's text message reminder status also appears in the upper-right corner and on the Contact Info tab of the Appointment Information panel that appears when you click (or tap) any of that patient's appointments on the schedule.
-
Once a supported mobile phone number is entered, and the patient's record is saved, the patient is automatically opted in to receiving automated text message reminders. Any other patients who have this patient as their primary contact or who have the same mobile number as this patient entered in their patient records are also automatically opted in. However, if the patient has someone else as his or her primary contact, the patient will receive text messages only if the patient's primary contact has a supported mobile phone number and that person is opted in.
-
If you do not have patient consent, or a patient informs you that he or she no longer wants to receive text messages, turn off reminders for the patient by selecting Home as the patient's phone number type instead of Mobile. A patient who has consented may also opt-out from their mobile phone by texting STOP in reply to a message. Any other patients who have this patient as their primary contact or who have the same mobile number as this patient entered in their patient records are also opted out.
-
-
Email - Enter the patient's email address.
Notes:
-
If the patient has someone else as his or her primary contact, but an email address has not been entered in that primary contact's patient record, "No email provided" appears.

-
If the patient has someone else as his or her primary contact, and an email address has been entered in that primary contact's patient record, that primary contact's email address appears and will be used for this patient.
To enter a different email address for this patient, click (or tap) Add Patient Email, and then enter an address in the Email (Patient) box that appears. To clear the patient's email, click the X. This email address is for reference only. Dentrix Ascend will not use this email address to send out automated patient communications.
-
If the patient has someone else as his or her primary contact, an email address is not entered in the primary contact's patient record, and the Primary Contact Method on the Preferences tab of the patient's record is set to Email me, a message to add the primary contact's email address appears below the Email box.
-
If the patient is his or her own primary contact, an email address is not entered, and the Preferred Contact Method on the Preference tab is set to Email me, an error icon and message appear as a reminder for you to either enter an email address or change the preferred contact method.
-
If you enter an email address that is already associated with another patient's record, a yellow warning icon appears next to the label of the Email box both on the Basic Info tab of the applicable patients' records and on the Contact Info tab of the Appointment Information panel that appears when you click (or tap) any of the applicable patients' appointments on the schedule. Dentrix Ascend allows you to save a patient's record with a duplicate email address; the warning is only there for your reference in case, for example, your organization requires unique email addresses for all patients.
-
-
-
Click (or tap) Save.
-
-
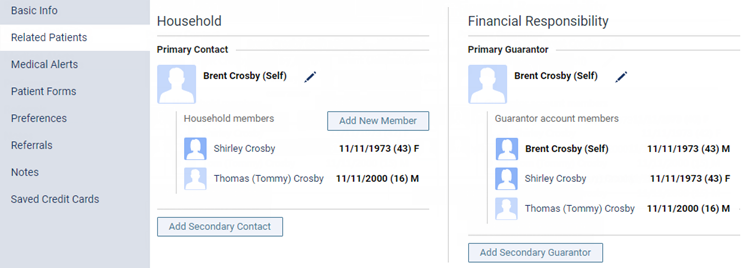
Related Patients
-
Primary Contact - To change the primary contact person for the patient, click (or tap) the Edit button
. In the search box, begin typing the contact's name, continue typing as needed to narrow the results, and then select the appropriate name from the list of matching results. Or, to make the patient whose record you are viewing the primary contact, click (or tap) Switch to "Self" at the bottom of the results list.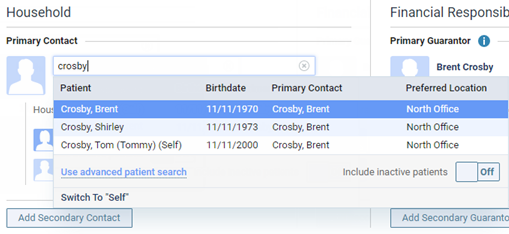
Note: If the primary contact is someone other than this patient (not "Self"), the name and Preferred Contact Method of the patient's primary contact appear on the Patient Information ribbon.
-
Add New Member - To add patient records, at one time, for others members of the same household as the current patient, click (or tap) Add New Member.
Note: A household is a group of patients who have the same primary contact person. The complete list of household members is available when you are viewing the patient record of any member of a given household.
-
Secondary Contact - To add a secondary contact person for the patient, click (or tap) Add Secondary Contact. In the Select Patient box, begin typing the contact's name, continue typing as needed to narrow the results, and then select the appropriate name from the list of matching results.
-
Primary Guarantor - To change the primary person who is financially responsible for the account, click (or tap) the Edit button
. In the search box, begin typing the guarantor's name, continue typing as needed to narrow the results, and then select the appropriate name from the list of matching results. Or, to make the patient whose record you are viewing the primary guarantor, click (or tap) Switch to "Self" at the bottom of the results list.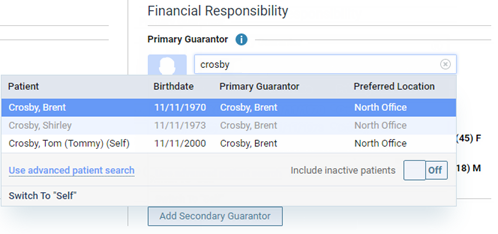
Note: If the current patient is the guarantor, that patient and all patients for whom that patient is the guarantor appear in the list. If the current patient is not the guarantor, only the guarantor and the patient appear in the list.
-
Secondary Guarantor - To add a secondary person who is financially responsible for the account, click (or tap) Add Secondary Guarantor. In the Select Patient box, begin typing the secondary guarantor's name, continue typing as needed to narrow the results, and then select the appropriate name from the list of matching results.
-
Emergency Contact - Record a patient's emergency contact information.
-
-
Medical Alerts
Medical Alerts tab

Refer to the "Add Medical Alerts" task.
-
Preferences
-
Set up the following options:
-
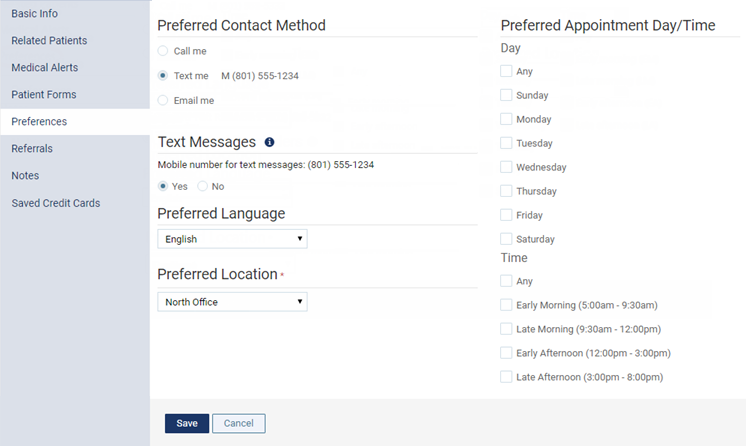
Preferred Contact Method - Select whether the patient prefers to be contacted by phone, text message, or email message. For Call me, you must enter a phone number in the box that appears if a phone number is not already entered for the patient (if it is not already, this phone number will be made the first listed phone number for the patient). For Text me, you must enter a mobile phone number in the box that appears if a mobile phone number is not already entered for the patient (if it is not already, this mobile phone number will be made the first listed phone number for the patient). For Email me, you must enter an Email address in the box that appears if an email address is not already entered for the patient. These options are available only if the patient is his or her own primary contact. Currently, this information is for reference only.
Notes:
-
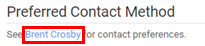
If someone else is this patient's primary contact, the preferred contact options are not available because the patient's preferred contact method is that of the primary contact, but you can click the name of the primary contact person shown to go to his or her patient record to view or change the preferred contact method for that patient.
-
The selected preferred contact method appears on the Patient Information ribbon, which is available when you are viewing the patient's record.

-
If someone else is this patient's primary contact, the name and preferred contact method of the patient's primary contact appear on the Patient Information ribbon. Similarly, if this patient is the primary contact for someone else, this patient's name and preferred contact method will appear on the other patient's Patient Information ribbon.

-
The preferred contact method is not associated with and, therefore, does not determine whether the patient will receive automated reminders as text messages or as email messages.
-
-
Text Messages - Select Yes or No to indicate that the patient (any other patients who have this patient as their primary contact) will or will not receive manual text messages and automated text message reminders for appointments and recare. These options are available only if a supported mobile phone number has been entered (on the Basic Info tab) for the patient and the patient is the primary contact for himself or herself or anyone else.
Notes:
-
Manual text messages and automated text message reminders for this patient (and any other patients who have this patient as their primary contact) will be sent to the mobile phone number displayed. If the patient has more than one mobile phone number, the first one listed (on the Basic Info tab) for the patient will be used for the automated text message reminders.
-
If No is already selected, the date that the patient was last opted out appears for your reference next to the No option. Either someone in your office opted the patient out, or the patient texted STOP in reply to a message. Any other patients who have this patient as their primary contact or who have the same mobile number as this patient entered in their patient records have also been opted out.
-
If Yes is already selected, and then you select No and click (or tap) Save, the patient is opted out, and the current date appears next to the No option as the opt-out date. Also, a text message, stating that the patient has been opted out, is sent to the patient's mobile phone. Any other patients who have this patient as their primary contact or who have the same mobile number as this patient entered in their patient records are also opted out. The primary contact can resume receiving text messages for the entire household by texting START in reply to a message.
-
-
Preferred Language - Select the patient's preferred language. English is the default. If the preference is a language other than English, the selected language appears on the Patient Information ribbon, which is available when you are viewing the patient's record. Currently, this information is for reference only.
-
Preferred Location - Select the office that the patient prefers to receive treatment at. A matching patient will appear in the results list of a patient search box throughout Dentrix Ascend if that patient's preferred location is in a location to which your user account has access unless you use the advanced search functionality. Other than for patient searches, currently the preferred location is for reference only.
-
Preferred Pharmacy - Add, change, or remove the patient's preferred pharmacy.
-
Preferred Appointment Day/Time - Select the check boxes that correspond to the days of the week and/or times that the patient prefers to have his or her appointments. The days that are available correspond to the working days set up on your practice's schedule. The selected preferred appointment days and times appear when you are scheduling an appointment for the patient, so you can offer those times to the patient. Currently, this information is for reference only.

-
-
Click (or tap) Save.
-
-
Referrals
-
On the Referred By tab, to specify or change which patient or referral source (professional, marketing, or other) referred this patient to your practice, in the Search for Patient or Referral Source box, enter all or part of the name of the referring patient or referral source, and then select the correct name in the list of matching results that appears.

-
On the Referred By tab, to remove an existing referral source from the patient's record, click (or tap) the Remove button
 next to the referral's name.
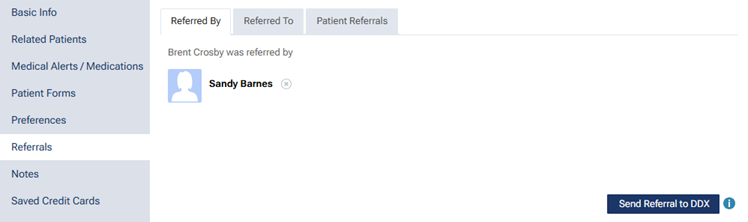
-
On the Patient Referrals tab, a list of patients (if any) whom this patient has referred to your practice appears.
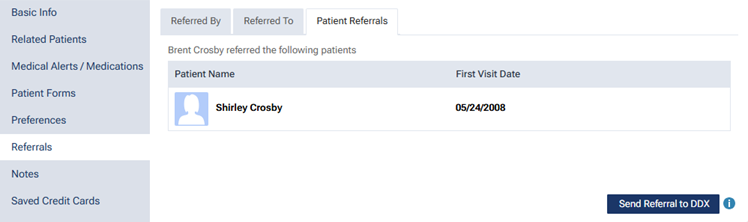
-
With any tab selected, submit a referral through DDX.
-
-
Notes
Notes tab

Refer to the "Add patient notes" task.
-
Add medical alerts
Adding medical alerts to patients
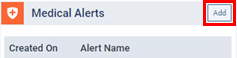
You can enter a patient's medical alerts (allergies and problems) as needed. If a patient has a medical alert, a Medical Alerts icon ![]() appears on his or her appointments.
appears on his or her appointments.
To add a medical alert to a patient
-
If the correct patient is not already selected, use the Patient Search box to access the patient's record.

-
Do one of the following:
-
If the patient has any medical alerts, the Medical Alerts icon in between the Patient menu and the Patient Search box is a red plus sign. Click (or tap) the Medical Alerts icon.

The Patient Information page opens with Medical Alerts/Medications selected on the navigation panel (on the left).
Proceed to step 3.
-
If the patient's Overview page is not already open, on the Patient menu, under General, select Overview. The patient's Overview page opens. The Medical Alerts tab of the Medical Alerts/Medications box displays any medical alerts that have been entered for the patient. Click (or tap) Add.
The Patient Information page opens with Medical Alerts/Medications selected on the navigation panel (on the left), and the Add Medical Alert dialog box appears.
Skip to step 4.
-
If the patient's Overview page is not already open, on the Patient menu, under General, select Overview. The patient's Overview page opens. Click (or tap) the Medical Alerts/Medications box.

The Patient Information page opens with Medical Alerts/Medications selected on the navigation panel (on the left).
Proceed to step 3.
-
On the Patient menu, under General, select Medical Alerts. The Patient Information page opens with Medical Alerts/Medications selected on the navigation panel (on the left).
Proceed to step 3.
-
On the Patient menu, under General, select Patient Information. The patient's Patient Information page opens. Select Medical Alerts/Medications on the navigation panel (on the left).
Proceed to step 3.
-
-
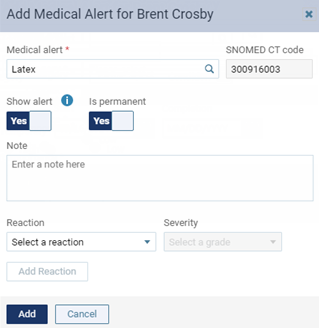
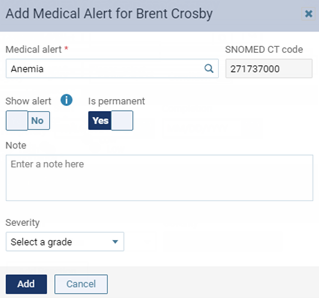
Click (or tap) Add Medical Alert.

The Add Medical Alert dialog box appears.
Allergy
Problem
-
Do one of the following:
-
To add a medical alert from your library, begin typing an allergy or a problem in the Medical Alert search box, continue typing as needed to narrow the results in the list, and then select the correct alert. The default options for the medical alert are selected automatically, but you can change any of those options as needed.
Note: If you add a medical alert that has the SNOMED code 398193008 assigned to it (such as "Pre-medicate need"), when you schedule an appointment for the patient, the Premedicate checkbox is selected by default.

-
To add an alert that is specific or unique to this patient, enter any custom text in the Medical Alert search box (for example, "Issue with Needles"), and then select Create Patient Specific Alert from the list.
-
-
Change the visibility and/or permanency, enter any applicable notes, and add a reaction and/or severity as needed.
Set up any of the following options as needed:
-
Show alert - Set the switch to one of the following states:
-
Yes - For a patient with this allergy or problem attached, a message that lists the patient's allergies, problems, and medications (as applicable) will appear and display this allergy or problem each time you access the patient's information, and the Medical Alert icon will appear where applicable.
-
No - For a patient with this allergy or problem attached, a message will not appear (or if a message does appear, this allergy or problem will not be listed on that message) when you access the patient's information, but the Medical Alert icon will appear where applicable.
-
-
Is permanent - Set the switch to one of the following states:
-
Yes - If you anticipate that this allergy or problem will be permanent, set the switch to Yes.
-
No - If you anticipate that this allergy or problem will no longer apply some time in the future, set the switch to No. If you mark the allergy or problem as not permanent, you can mark it as expired when applicable.
Notes:
-
You can change the permanency setting of the medical alert as needed in the future.
-
Regardless of its permanency setting, you can remove the medical alert from the patient's record as needed in the future.
-
-
Note - Enter details regarding the allergy or problem.
-
Reaction/Severity - Do one of the following:
-
For an allergy, select the type of Reaction that the patient has in response to the allergen, and then select the Severity of that reaction. For each additional reaction and severity that you need to record, click (or tap) Add Reaction, and then make the applicable selections.
-
For a problem, select the Severity of the patient's condition or disease.
-
-
-
Click (or tap) Add.
Notes:
-
If a patient form has an "Allergies" element, active allergies that are associated with the patient's record are selected automatically on the form. Only the allergies in your library that have been flagged to appear on forms will appear on a form.
-
If a patient form has a "Medical Conditions" element, active problems that are associated with the patient's record are selected automatically on a form. Only the problems in your library that have been flagged to appear on forms will appear on a form.
Add patient notes
Adding patient notes
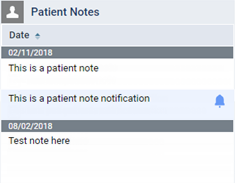
You can attach multiple notes to a patient's record. The notes that were created or last modified on the same date are grouped together. Also, you can set up a note to appear as a notification (as a pop-up in the lower-right corner) when you access certain areas of Dentrix Ascend.
To add a patient note
-
If the correct patient is not already selected, use the Patient Search box to access the patient's record.
-
Do one of the following:
-
If the patient's Overview page is not already open, on the Patient menu, under General, select Overview. The patient's Overview page opens. Click (or tap) the Patient Notes box.
Note: By default, notes are sorted chronologically in ascending order (oldest first). If you change the sort order, that sort order will persist for your user account until you change it.
The Patient Information page opens with Patient Notes selected on the navigation panel (on the left).
-
On the Patient menu, under General, select Patient Information. The patient's Patient Information page opens. Select Notes on the navigation panel (on the left).
-
-
Click (or tap) Add Note.
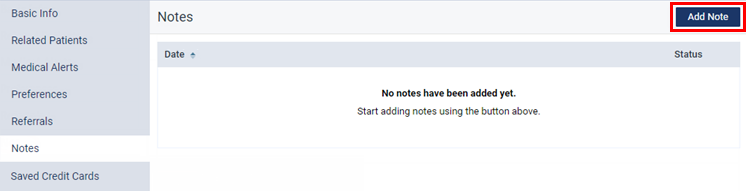
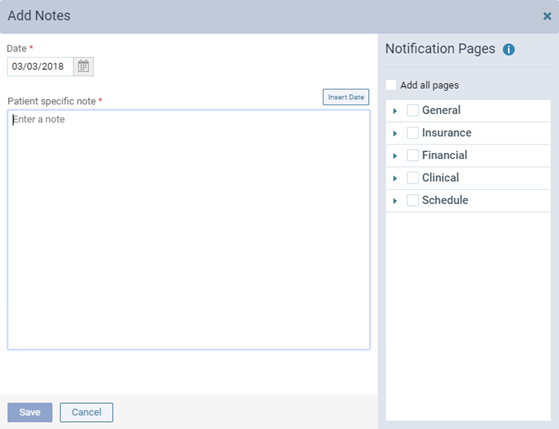
The Add Notes dialog box appears.
-
By default, the Date of the note is today's date, but you can change it if necessary.
-
In the Patient specific note box, type any important information regarding the patient, such as a conversation you have had with the patient (in person or electronically). This note will appear in the Patient Notes box of the patient's Overview page. The note can be up to 5000 characters long.
Note: To insert the current date where the text cursor is located, click (or tap) Insert Date.
-
To make the note into a notification that will appear when someone accesses specified areas of Dentrix Ascend, under Notification Pages, do one of the following:
-
To add the notification to all available areas, select the Add all pages checkbox.
-
To add the notification to only certain areas, select the desired checkboxes. To select all pages within a category (General, Insurance, Financial, Clinical, or Schedule), select the checkbox of the desired category. To select an individual page within a category, expand the category, and then select the checkbox of the desired page.
Note: To remove the notification from all pages in a category, clear the checkbox of the category. To remove the notification from an individual page within a category, expand the category, and then clear the checkbox of the page.
-
-
Click (or tap) Save.
Attach recare (if attached to appointment but not to patient)
Attaching recare to patients
You can attach recare to a patient's record as needed.
Note: Manually attaching recare is not necessary. When you post a completed procedure that is associated with a recare type (such as when you are completing an appointment), Dentrix Ascend automatically attaches the corresponding recare to the patient's record, if it is not already attached, using the default settings for that recare type.
To attach recare to a patient
-
If the correct patient is not already selected, use the Patient Search box to access the patient's record.
-
On the Patient menu, under General, select Recare.
The patient's Recare page opens.
-
Click (or tap) Add New Recare.

The options for attaching recare become available.
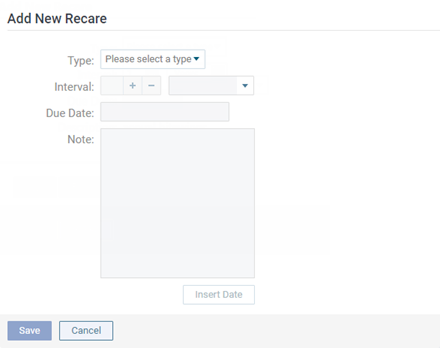
-
From the Type list, select the type of recare that you want to attach to the patient.
The other options become available.

-
Change any of the following default settings to customize the selected recare type for this patient as needed:
-
Interval - How often the patient should be seen for this type of recare. To change the interval, enter a number in the box, and select Weeks, Months, or Years from the list. The Due Date is updated automatically.
-
Due Date - The next date that the patient should be seen for this recare type. Based on the specified Interval, the applicable due date appears in the box automatically, but you can change the date. Changing the due date does not change the Interval automatically.
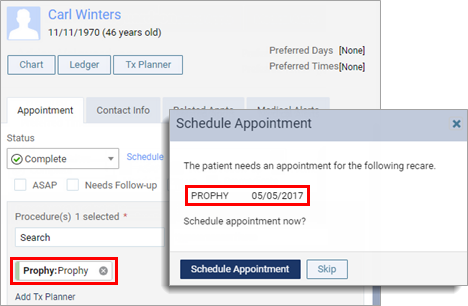
With the workflow compliance feature for your location turned off, when you complete an appointment with a recare type attached, the due date for the patient's next recare appointment (of this recare type) advances by the specified interval, and a message appears and asks if you want to schedule the next recare appointment. Click (or tap) Schedule Appointment, and then schedule the appointment.
-
Note - Information (such as thoughts, progress, and next steps) regarding the patient's recare. You can refer to and update the notes as needed when you communicate or follow up with the patient in the future.
To insert today's date where the text cursor is located in the box, click Insert Date.
-
-
Click (or tap) Save.
Update recare
Updating a patient's recare
You can change the interval and/or due date of a recare that is attached to a patient's record as needed.
To update a patient's recare
-
If the correct patient is not already selected, use the Patient Search box to access the patient's record.
-
On the Patient menu, under General, select Recare.
The patient's Recare page opens.
-
Select a recare type.
Note: Primary recare types are bold for quick identification.
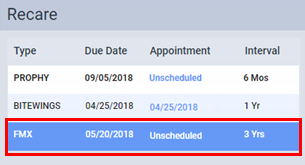
The options for editing the recare type become available.
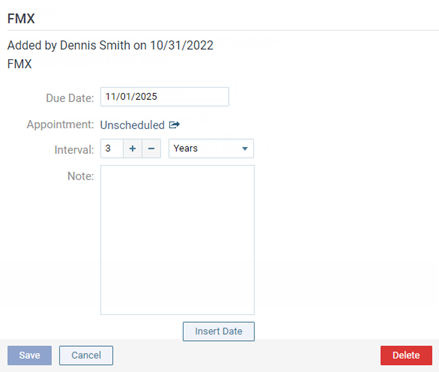
Note: Next to Appointment, if there is an Unscheduled link, you can click (or tap) the link to open the Calendar page to the corresponding due date for this recare type.
-
Change any of the following options as needed:
-
Interval - How often the patient should be seen for this type of recare. To change the interval, enter a number in the box, and select Weeks, Months, or Years from the list. The Due Date is updated automatically.
-
Due Date - The next date that the patient should be seen for this recare type. If you change the Interval, the applicable due date appears in the box automatically, but you can change the date. Changing the due date does not change the Interval automatically.
With the workflow compliance feature for your location turned off, when you complete an appointment with a recare type attached, the due date for the patient's next recare appointment (of this recare type) advances by the specified interval, and a message appears and asks if you want to schedule the next recare appointment. Click (or tap) Schedule Appointment, and then schedule the appointment.
-
Note - Information (such as thoughts, progress, and next steps) regarding the patient's recare. You can refer to and update the notes as needed when you communicate or follow up with the patient in the future.
To insert today's date where the text cursor is located in the box, click Insert Date.
-
-
Click (or tap) Save.
Update insurance information
Updating insurance information for patients
You can update the insurance information attached to a patient's record as needed.
Notes:
-
Updating a patient's insurance information requires the "Edit Ins. Plan for Patient" security right.
-
For information about changing which of a patient's plans is primary and which is secondary, see the topic about changing the coordination order of a patient's insurance plans.
-
For instructions on changing a patient's secondary insurance to primary insurance, read the blog post Changing Secondary Insurance to Primary Insurance.
To update a patient's insurance information
-
Do one of the following:
-
On a patient's Overview page, the Insurance box displays the patient's insurance plans. Click (or tap) an insurance Plan link.
-
On a patient's Insurance Information page, select an insurance plan.
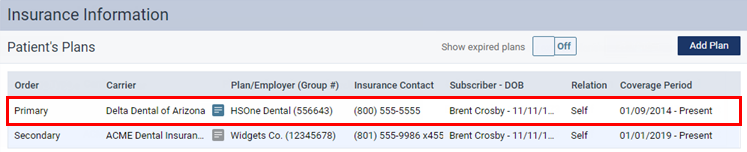
The options for editing insurance information become available.
-
-
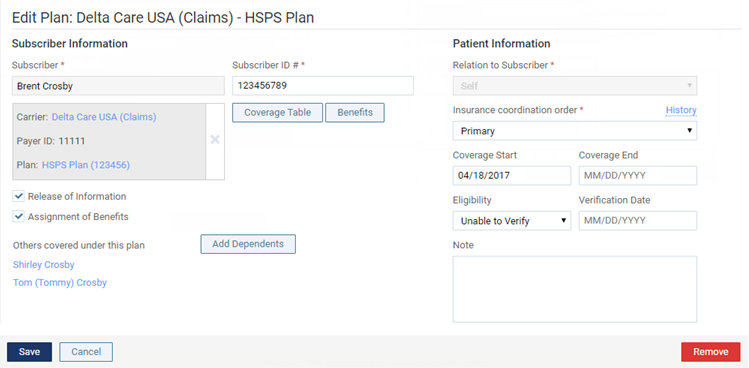
Update the information as needed, such as the subscriber ID, relation to the subscriber, coverage order, and coverage period.
Set up the following options:
-
Subscriber and Plan - The subscriber and insurance associated with that subscriber. To change the subscriber and plan, click (or tap) in the Subscriber box, search for and select a different provider, and then select a plan. To change only the plan, select a different plan for the selected subscriber. To show or hide the plan selection list, click (or tap) the Show button
 or the Hide button
  .
. -
Subscriber ID # - The ID used to identify the subscriber of the insurance plan on claims that are submitted to the corresponding carrier. The subscriber ID might not be the same as the subscriber's Social Security Number. Changing the ID will affect the subscriber and all patients covered under that subscriber.
Notes:
-
When you save the plan, Dentrix Ascend attempts to verify with the carrier that the subscriber ID is valid. You may see a notification that the carrier does not accept real-time eligibility verification, the subscriber ID is invalid, or the subscriber ID could not be verified. These issues affect the patient's eligibility status for his or her appointments on the Insurance Eligibility page.
-
You can also submit an on-demand request to validate the subscriber ID.
-
-
Release of Information - The subscriber authorizes the release of information to the practice. With this check box selected, "Signature on File" appears in box 36 on insurance claims. With this check box clear, box 36 is blank.
Note: Selecting or clearing the Release of Information check box requires the "Manage Subscriber Authorizations" security right.
-
Assignment of Benefits - The subscriber authorizes payments from the carrier to go directly to the provider. With this check box selected, "Signature on File" appears in box 37 on insurance claims, and the carrier will send payments to your practice. With this check box clear, box 37 is blank, and the carrier will send payments to the subscriber.
Note: Selecting or clearing the Assignment of Benefits check box requires the "Manage Subscriber Authorizations" security right.
-
Relation to Subscriber - For a subscriber, since he or she is the current patient, Self is selected automatically and cannot be changed. For a non-subscriber, select Spouse, Child, or Other.
-
Insurance coordination order - The coverage order of the plan (such as Primary or Secondary).
Note: The positions that are available on the list are the positions in the coverage order that have active insurance plans and the positions in the coverage order that are missing insurance plans.
-
Coverage Period - In the Coverage Start and Coverage End boxes, enter the date that coverage started and, if known, the date that the coverage will end for the subscriber and all patients who are insured under the selected plan. For a non-subscriber, you can specify an end date that is before or the same as that of the subscriber.
Notes:
-
For a secondary insurance plan, the start date cannot be earlier than the start date of the patient's primary insurance plan.
-
You cannot save a change in the coverage period if doing so would cause an outstanding claim not to be inside that coverage period. You must resolve the claim before you can change the coverage period.
-
-
Eligibility - If known, select the patient's eligibility status: Unable to Verify, Eligible, or Ineligible. Then, enter today's date (or the date that eligibility was actually checked) in the Verification Date box.
Note: Changing the eligibility status here affects the patient's eligibility status for his or her appointments on the Insurance Eligibility page and vice versa.
-
Note - Any notes regarding the insurance plan.
-
-
Click (or tap) Save.
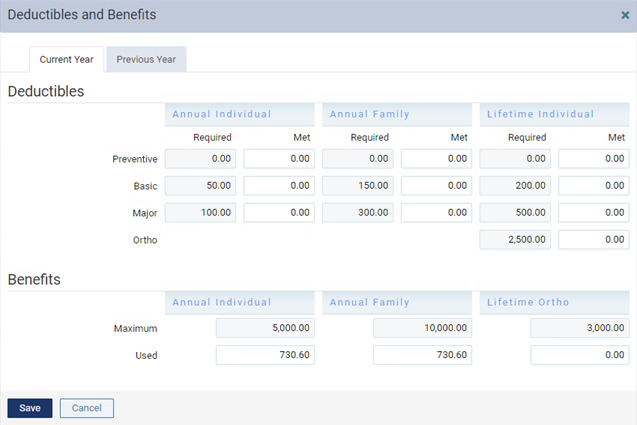
Update the met deductibles and used benefits
Updating a patient's met deductibles and used benefits
You can update the met deductibles and used benefits for the current and previous years of a patient's insurance plan. Along with coverage tables, updating deductibles and benefits allows for accurate insurance estimates.
Note: Updating the met deductibles and used benefits requires the "Edit Ins. Plan for Patient" and "Edit Ins. Benefits for Patient" security rights.
To update a patient's met deductibles and used benefits
-
Do one of the following:
-
On a patient's Overview page, the Insurance box displays the patient's insurance plans. Click (or tap) an insurance Plan link.
-
On a patient's Insurance Information page, select an insurance plan.
The options for editing insurance information become available.
-
-
Click (or tap) Benefits.
The Deductibles and Benefits dialog box appears.
-
As needed, for the Current Year and/or Previous Year, enter or change any Met amounts for Deductibles and/or Used amounts for Benefits.
Note: Currently, the benefit information for Annual Individual Implant and Lifetime Individual Implant is for informational purposes only. The values are not used to calculate insurance estimates.
-
Click (or tap) Save.
Get the patient to the back office
-
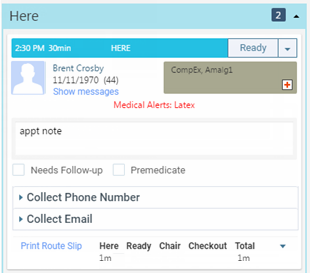
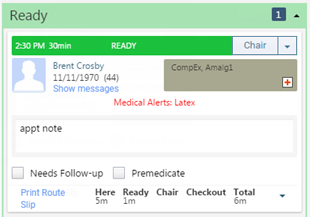
When the patient is all checked in, the receptionist opens the routing panel (if it is not already open) and then clicks (or taps) the Ready status button.
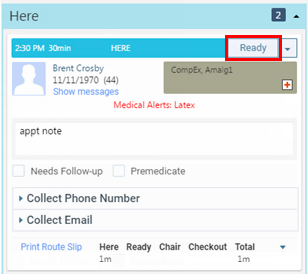
The appointment's status changes to Ready. The hygienist in the back office, at his or her computer, sees the notification of the status change, and the patient now appears on the routing panel under Ready.
-
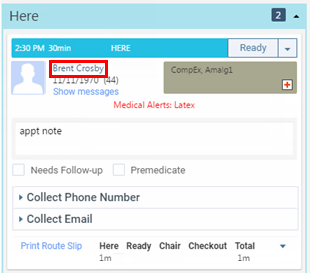
After escorting the patient to an operatory chair, the hygienist clicks (or taps) the Chair status button.
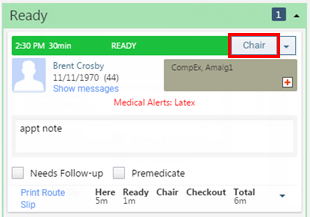
The appointment's status changes to Chair, and the appointment now appears on the routing panel under Chair.
-
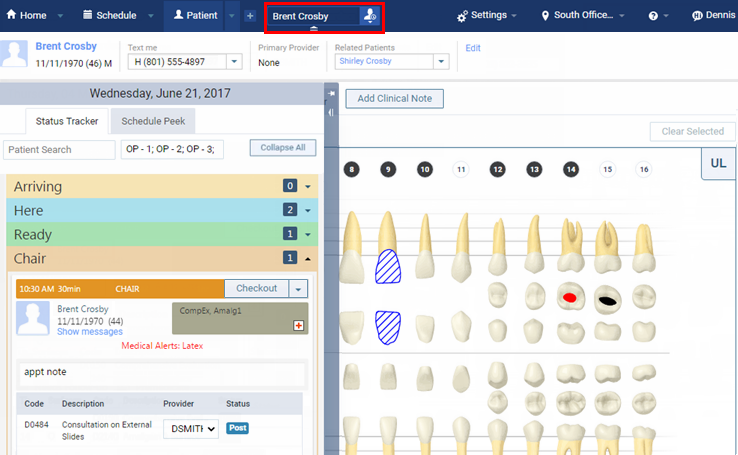
The hygienist clicks (or taps) the notification.
The corresponding patient becomes available (if not already visible) on the routing panel.
-
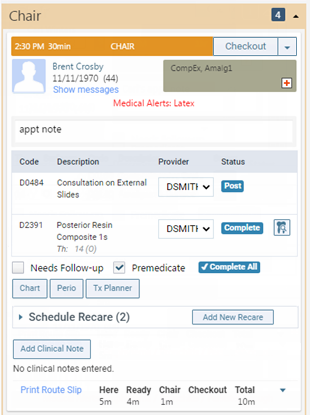
On the routing panel, the hygienist clicks (or taps) the name of the patient who is currently in the chair.
The hygienist had the clinical chart of the previous patient open, so the clinical chart of the patient in the chair now appears.
3. Clinical
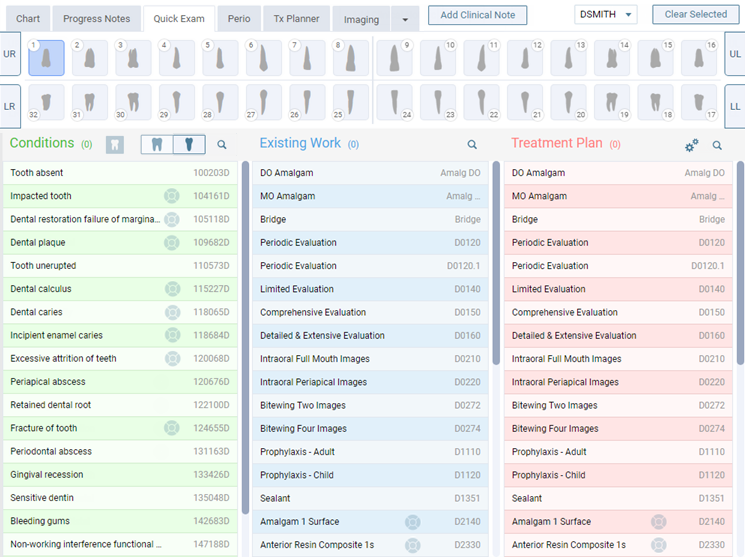
Chart a quick exam
Charting a quick exam
You can quickly chart a patient's conditions, existing treatment, treatment being referred out, and treatment needs during a full evaluative examination.
Note: Access to the quick exam features is controlled by the same security rights as those for dental charting and managing patient procedures.
To chart a quick exam
-
If the correct patient is not already selected, use the Patient Search box to access the patient's record.
-
On the Patient menu, under Clinical, select Quick Exam.
The patient's clinical record opens with the Quick Exam tab selected.
-
From the Provider list (at the top), select the provider who you want to associate with conditions, existing work, referred treatment, and treatment-planned procedures that you chart during the quick exam.

Notes:
-
Only providers who have access to the current location and who are flagged as charting providers are available. Also, the provider who is selected by default is determined by the current location's Default procedure provider setting.
-
At any time during the quick exam, you can change the provider as needed before charting a condition or procedure. Changing the provider may change which options are available in the Conditions, Existing Work, Referred, andTreatment Plan lists.
-
-
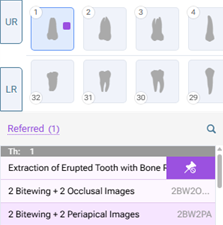
Select one or more teeth.
-
Do any of the following as needed:
-
Change the dentition.
-
Click (or tap) either the Permanent Dentition or Primary Dentition button
 in the Conditions column header. The button that is available depends on the current dentition of the selected tooth.
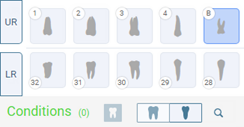
Note: To change the dentition of all the teeth to primary or permanent, click (or tap) Clear Selected to deselect all teeth before attempting to change the dentition.
-
-
Chart a condition.
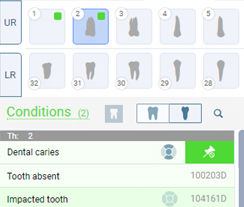
Click (or tap) a condition in the Conditions list. The posted condition is now pinned to the top of the list (and is visible while the current tooth is still selected). Also, the tooth now has a green box to indicate that a condition is associated with that tooth.
Tip: To search for a condition that is not a favorite or to filter the list, click (or tap) the column's Search button
 , and then begin typing part of a SNODENT code, SNOMED CT code, or description in the field that appears.
Notes:
-
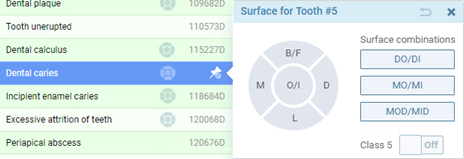
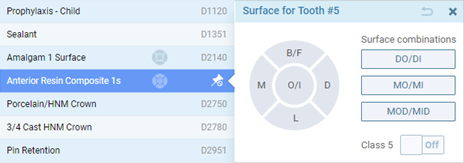
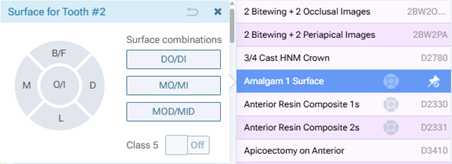
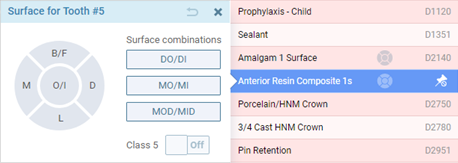
If you are posting a condition that requires a surface to be selected, in the pop-up box that appears when you click (or tap) the condition, select the applicable surfaces, and then close the pop-up box.
-
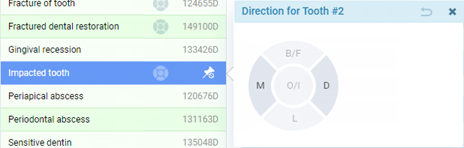
If you are posting a condition that requires a direction to be selected, in the pop-up box that appears when you click (or tap) the condition, select the applicable direction, and then close the pop-up box.
-
If clinical decision support (CDS) is turned on and procedure codes have been associated with a condition, after you select that condition, the potential treatment appears at the top of the Treatment Plan list, so you can quickly treatment plan a procedure relevant to the diagnosis.

If there is a procedure in the Potential Treatment (Clinical Decision Support) area of the Treatment Plan list that you want to use to treat the selected condition, and if the potential treatment requires treatment areas (such as tooth numbers and surfaces) that the condition does not, you can specify those treatment areas when you treatment plan the procedure, just like any of the other procedures in the Treatment Plan list.
-
To delete a posted condition, click (or tap) the corresponding Unpin button
 , and then click (or tap) Delete.
-
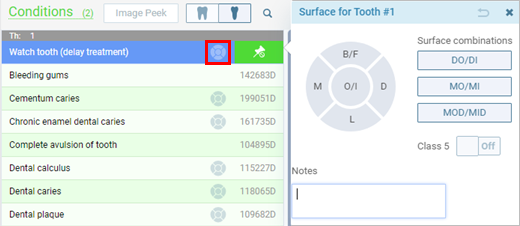
To add notes or specify surfaces for a posted "watch tooth" condition, click (or tap) the condition's surfaces diagram to view the corresponding pop-up box. Enter text in the Notes box, or select the applicable surfaces. Then, close the pop-up box.
-
-
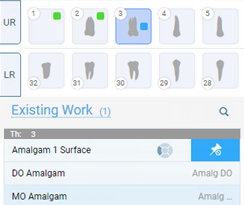
Chart existing work.
Click (or tap) a procedure in the Existing Work list. The posted procedure is now pinned to the top of the list (and is visible while the current tooth is still selected). Also, the tooth now has a blue box to indicate that an existing procedure is associated with that tooth.
Tip: To search for a procedure that is not a favorite or to filter the list, click (or tap) the column's Search button
, and then begin typing part of a procedure code or description in the box that appears.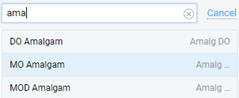
Notes:
-
The procedures that are available depend on if a tooth is selected. Also, only procedures that have been marked as favorites appear in the list.
-
If you are posting a procedure that requires a surface to be selected, in the pop-up box that appears when you click (or tap) the procedure, select the applicable surfaces, and then close the pop-up box.
-
To delete a posted procedure, click (or tap) the corresponding Unpin button
 , and then click (or tap) Delete.
-
-
Refer treatment.
Click (or tap) a procedure in the Referred list. The posted procedure is now pinned to the top of the list (and is visible while the current tooth is still selected). Also, the tooth now has a blue box to indicate that an existing procedure is associated with that tooth.
Tip: To search for a procedure that is not a favorite or to filter the list, click (or tap) the column's Search button
, and then begin typing part of a procedure code or description in the box that appears.
Notes:
-
The procedures that are available depend on if a tooth is selected. Also, only procedures that have been marked as favorites appear in the list.
-
If you are posting a procedure that requires a surface to be selected, in the pop-up box that appears when you click (or tap) the procedure, select the applicable surfaces, and then close the pop-up box.
-
To delete a posted procedure, click (or tap) the corresponding Unpin button
 , and then click (or tap) Delete.
-
-
Treatment plan a procedure.
Do the following:
-
Procedures appear in the Treatment Plan list according to the selected filter. Click (or tap) the column's Search button
to change the procedure filter.

Select one of the following filters from the list next to the Available procedure search box as needed:
-
Carrier procedures - If the patient has any active insurance plans attached to his or her record, and if the selected Provider is contracted with any of the patient's carriers, Carrier procedures is selected by default. With this option selected, only the carriers' allowed procedures are available.
-
Location procedures - If the patient is not covered by an insurance carrier that the provider is contracted with, Location procedures is selected by default. With this option selected, only the location's allowed procedures are available.
Note: Carrier procedures is available only if the patient has any active insurance plans attached to his or her record, and if the selected Provider is contracted with any of the patient's carriers. Location procedures is available for any patient.
-
-
Click (or tap) a procedure in the Treatment Plan list.
Important: If you chart a multi-code that includes some procedures that are not allowed by the the location or any of the patient's carriers, those procedures will not be posted.
The posted procedure is now pinned to the top of the list (and is visible while the current tooth is still selected). Also, the tooth now has a red box to indicate that a treatment-planned procedure is associated with that tooth.

Tip: To search for a procedure that is not a favorite or to filter the list, click (or tap) the column's Search button
, and then begin typing part of a procedure code or description in the box that appears.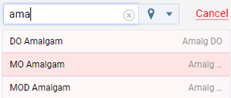
Notes:
-
The procedures that are available depend on if a tooth is selected. Also, only procedures that have been marked as favorites appear in the list.
-
If you are posting a procedure that requires a surface to be selected, in the pop-up box that appears when you click (or tap) the procedure, select the applicable surfaces, and then close the pop-up box.
-
To delete a posted procedure, click (or tap) the corresponding Unpin button
 , and then click (or tap) Delete.
Notes:
-
If you chart a tooth-specific condition (with one or more teeth, but not a whole quadrant or arch, selected) and then treatment plan a procedure for a quadrant or an arch, Dentrix Ascend will automatically assign the correct treatment area for the posted procedure.
-
If you chart a mouth-specific condition (with no teeth selected) and then attempt to treatment plan a procedure for a tooth, a quadrant, or an arch, a message appears and asks you to select the correct teeth and then try to post the procedure again.
-
If you chart conditions and then, with the same tooth (or teeth) selected, treatment plan procedures to treat those conditions, the conditions (diagnoses) are automatically associated with those procedures. When you complete the procedures, Dentrix Ascend prompts you to choose which, if any, of the associated conditions you want to mark as Treated. Also, when you create a claim or pre-authorization for the procedures, the corresponding ICD-10 codes are automatically attached to the claim or pre-authorization.
-
-
-
Create a clinical note as needed.
Notes:
-
When you create a clinical note with a tooth selected, that tooth will be associated with the clinical note by default. To create a clinical note that is not tooth specific, click (or tap) Clear Selected to deselect all teeth before attempting to add the clinical note.
-
After you create the clinical note and close the Add Clinical Note dialog box, you are returned to the quick exam.
-
-
Repeat steps 4-6 as needed for each tooth.
Tips:
-
At any time during the quick exam, you can view what you have posted so far today without having to select each tooth individually to see the pinned items and without having to navigate to the progress notes. Click (or tap) the Conditions, Existing Work, Referred, and/or Treatment Plan column header names. A column header name is a link that you can click (or tap) only if a corresponding condition or procedure has been posted today as indicated by the number in parentheses after the column header name.

-
To switch back to viewing a column normally, click (or tap) the column header name or the Back link.
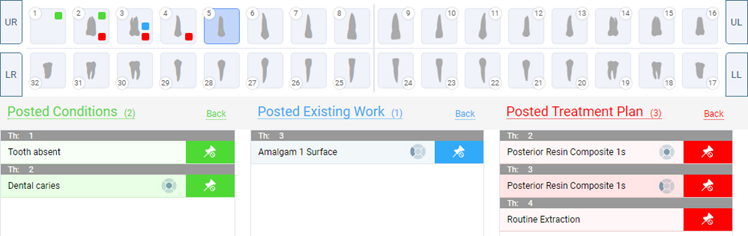
Chart dentition (if not charted during quick exam)
Charting dentition
You can change the graphical tooth chart to show a patient's dentition: primary, permanent, or mixed.
Tip: You can also chart dentition while charting a quick exam.
To chart a patient's dentition
-
If the correct patient is not already selected, use the Patient Search box to access the patient's record.
On the Patient menu, under Clinical, select Chart.
The patient's clinical record opens with the Chart tab selected.
-
Select the teeth whose dentition you want to change in the graphical tooth chart, or leave no teeth selected to change the dentition for the whole mouth (this is the same as selecting all the teeth).
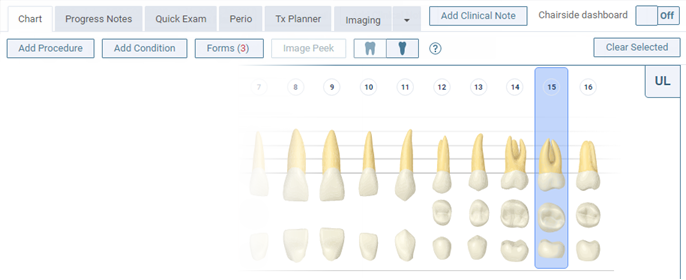
-
Click (or tap) the Permanent Dentition or Primary Dentition button
 .
.All the selected teeth now show in the graphical chart according to the specified dentition. For example, changing the dentition to permanent changes tooth F to 9, or changing the dentition to primary changes tooth 15 to *.
Chart conditions (if not charted during quick exam)
Charting conditions
You can chart dental conditions present at the time of charting in a patient's clinical chart.
Note: A condition charted in the clinical chart appears only on the graphical tooth chart and in the progress notes, not in the financial ledger.
To chart a condition
-
If the correct patient is not already selected, use the Patient Search box to access the patient's record.
On the Patient menu, under Clinical, select Chart.
The patient's clinical record opens with the Chart tab selected.
Select one or more teeth.
-
Click (or tap) Add Condition
The Add Condition dialog box appears.
-
Select the applicable condition, surfaces (if applicable), and provider.
Do the following:
-
Make sure the correct provider is selected for this charting session.

Note: Only providers who have access to the current location and who are flagged as charting providers are available. Also, the provider who is selected by default is determined by the current location's Default procedure provider setting.
-
Click (or tap) a condition.
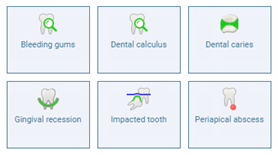
Note: The conditions that appear in the list depend on which teeth or if no teeth are selected. For example, if no teeth are selected (the treatment area is the mouth), a missing tooth condition will not appear in the list of conditions because it can apply only to one or more teeth, but malocclusion options can appear because they apply to the whole mouth.
-
If applicable, do one of the following:
-
If you are posting a condition that requires a surface to be selected, in the Select Surfaces dialog box that appears, select the surfaces on each tooth for the selected condition, and then click (or tap) Done.

Tips:
-
To navigate between teeth, click (or tap) a Th. Alternatively, click (or tap) Back and Next.
-
To not enter surfaces for the selected tooth, set Exclude tooth to On.
-
To set Class 5 to On, at least one of the applicable Surfaces must be selected: mesial, distal, lingual, or facial/buccal.
-
To apply a common combination of surfaces, under Surface combinations, click (or tap) the applicable button.
-
-
If you are posting a condition that requires a direction to be selected, in the Select Direction dialog box that appears, select the direction for each tooth for the selected condition, and then click (or tap) Done.
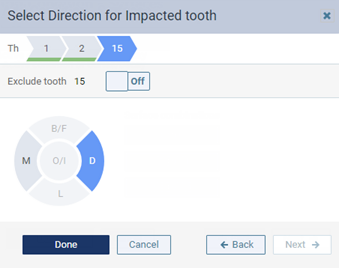
Tips:
-
To navigate between teeth, click (or tap) a Th. Alternatively, click (or tap) Back and Next.
-
To not enter a direction for the selected tooth, set Exclude tooth to On.
-
-
-
Notes:
-
To specify surfaces or add notes for a "watch tooth" condition (SNODENT code 179235D), you can quickly edit the condition while remaining on the Chart tab.
-
To change the surfaces (if applicable) or add notes for any condition, you can edit the condition on the Progress Notes tab.
Chart existing treatment (if not charted during quick exam)
You can chart existing treatment in a patient's clinical chart.
Note: A completed procedure appears in the clinical record and financial ledger; however, a treatment-planned procedure, a referred procedure, an existing procedure, or a condition does not appear in the financial ledger.
To chart treatment
-
If the correct patient is not already selected, use the Patient Search box to access the patient's record.
On the Patient menu, under Clinical, select Chart.
The patient's clinical record opens with the Chart tab selected.
-
Select one or more teeth.
-
Click (or tap) Add Procedure.
The Add Procedure dialog box appears.
-
Select the applicable procedure, surfaces (if applicable), and provider.
Do the following:
-
Click (or tap) Existing (for past services performed at another practice).
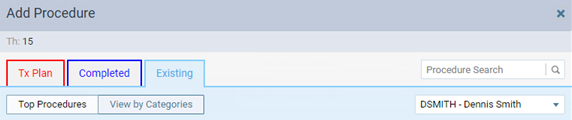
-
Make sure the correct provider is selected for this procedure. Changing the provider may change which options are available in the procedure filter list (which is next to the Available procedure search box) and, consequently, may change which procedures are available on the Tx Plan and Completed tabs.
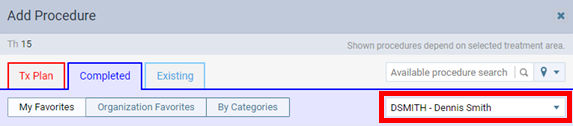
Note: Only providers who have access to the current location and who are flagged as charting providers are available. Also, the provider who is selected by default is determined by the current location's Default procedure provider setting.
-
Search for a procedure using one of the following methods:
-
Click (or tap) in the Available procedure search box (on the Tx Plan or Completed tab) or in the Procedure Search box (on the Existing or Referred tab), and begin typing part of the ADA description (for example, "ama" for Amalgam 1 Surface) or code (for example, "21" for D2140). The procedures that match the criteria entered and that apply to the selected tooth, arch, or quadrant or to the full mouth appear in the list. Continue typing as needed to narrow the results.
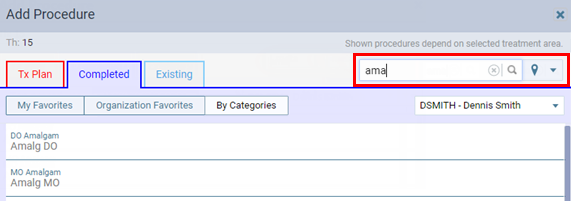
-
Select the My Favorites option (if it is not already selected) to view the procedures that have been marked as your personal favorites and that apply to the selected tooth, arch, or quadrant or to the full mouth.
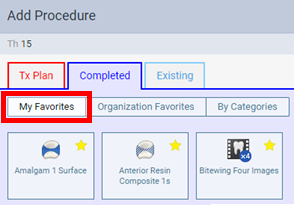
-
Select the Organization Favorites option (if it is not already selected) to view the procedures that have been marked as your organization's favorites and that apply to the selected tooth, arch, or quadrant or to the full mouth.
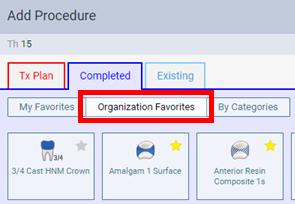
-
Select the By Categories option (if it is not already selected) to view the procedure code categories, and then select a category to view the corresponding procedures that apply to the selected tooth, arch, or quadrant or for the full mouth.
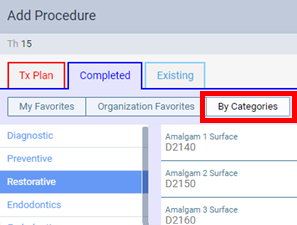
Notes:
-
Procedures appear in the procedure list according to which teeth or if any teeth are selected. For example, if no teeth are selected (the treatment area is the mouth) and you perform a search for "amalgam," no procedures will appear in the list; similarly, if no teeth are selected, an amalgam, procedure will not appear in the lists of personal and organization-wide favorites or within a category (if you are viewing procedures by categories).
-
Dentrix Ascend remembers whether My Favorites or Organization Favorites is selected when you post the procedure, and that option is selected by default the next time someone accesses the Add Procedure dialog box on this computer. If By Categories is selected, Organization Favorites is selected the next time someone accesses the dialog box on this computer.
-
-
Click (or tap) a procedure.
Important: If you chart a multi-code that includes some procedures that are not allowed by the the location or any of the patient's carriers, those procedures will not be posted.
-
If applicable, in the Select Surfaces dialog box that appears, select the surfaces on each tooth for the selected procedure, and then click (or tap) Done.
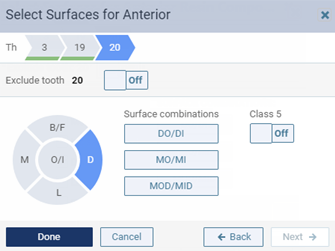
Tips:
-
To navigate between teeth, click (or tap) a Th. Alternatively, click (or tap) Back and Next.
-
To not enter surfaces for the selected tooth, set Exclude tooth to On.
-
To set Class 5 to On, at least one of the appropriate Surfaces must be selected: mesial, distal, lingual, or facial/buccal.
-
To apply a common combination of surfaces, under Surface combinations, click (or tap) the appropriate button.
-
-
You can edit the procedure as needed (such as to enter a supernumerary tooth number or to attach diagnosis codes).
Note: The charge that is used for a charted or scheduled procedure comes from either the provider's fee schedule or, if not applicable, the preferred fee schedule of the location where the procedure was charted or scheduled.
-
Enter a perio exam
Entering perio exams
You can enter a perio exam in a patient's record.
To enter a perio exam
-
If the correct patient is not already selected, use the Patient Search box to access the patient's record.
-
On the Patient menu, under Clinical, select Perio.
The patient's clinical record opens with the Perio tab selected.
-
Click (or tap) New Perio Exam.

The New Perio Exam dialog box appears.
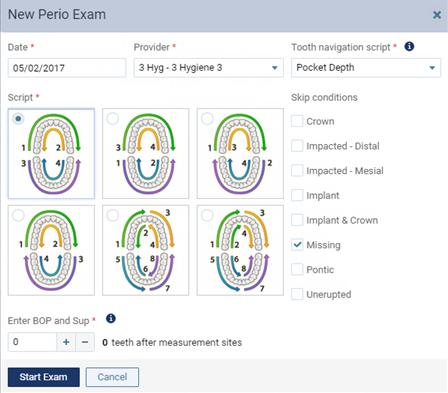
-
Select the desired options, such as the arch and tooth sequence and the teeth to be skipped.
Set up the following options:
-
Date - Verify that the date is correct. If necessary, you can change it.
-
Provider - Verify that the correct provider is associated with the exam. If necessary, select a different provider.
Note: Only providers who have access to the current location and who are flagged as charting providers are available. Also, the provider who is selected by default is determined by the current location's Default procedure provider setting.
-
Tooth navigation script - Select whether you want to enter primarily pocket depths, primarily gingival margins, the pocket depth and then the gingival margin at each measurement site, primarily mucogingival junctions, or the pocket depth and then the mucogingival junction at each measurement site. A selection frame will appear next to the applicable measure (PD, GM, or MGJ) during the exam.
Tip: If you are not using the script that allows you to enter pocket depths and gingival margins at each measurement site, to enter pocket depths first and then gingival margins, select Pocket Depth as the script, start the exam, enter pocket depths, save the exam, restart (edit) the exam, select Gingival Margin as the script, enter gingival margins, and then save the exam. Or, you can enter gingival margins first and then pocket depths by making the script selections in the opposite order than just explained.
-
Skip Hard Palate for MGJ - If the selected Tooth navigation script is Mucogingival Junction or Pocket Depth & Mucogingival Junction, the Skip Hard Palate for MGJ switch is available. By default, the switch is On, so the lingual side of the upper arch will be skipped because MGJ measurements cannot be taken in that area. To include the lingual side of the upper arch in the script, set the switch to Off.
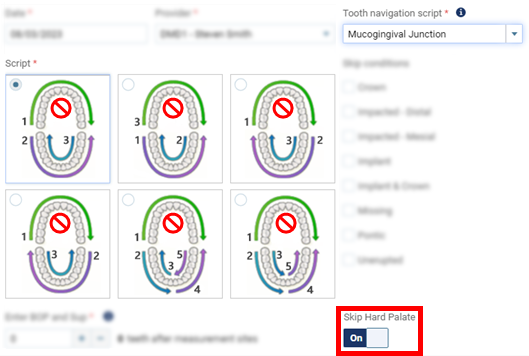
-
Script - Select the sequence of movement between teeth and arches that you want to use to enter perio measurements.
-
Skip conditions - Select the conditions that will cause teeth with those conditions to be skipped automatically. A tooth is considered to have one of the selected conditions if an applicable charting symbol is associated with an existing or a completed procedure that was posted for that tooth. However, if Missing is selected, but Implant or Implant & Crown is not selected, a tooth that was replaced with an implant or with an implant and a crown will not be skipped.
-
Enter BOP and Sup - Specify if you want to delay the marking of bleeding and suppuration:
-
Enter the number of teeth that you must measure before you can start entering bleeding and suppuration (for example, if you enter four, you must enter measurements for Distal, Center, and Mesial on the Facial side of teeth 1-4) unless you click (or tap) a different area of the exam than where the script starts. Also, as you follow the script to continue charting, the BOP/Sup selection frame trails behind the current tooth by the specified number of teeth (as with our example of four, if the current position is tooth 10, the BOP/Sup selection frame is on tooth 6).
-
Zero indicates that you can start entering bleeding and suppuration immediately upon starting the exam.
-
-
Include Plaque and Calculus charting - To record plaque and calculus, set the switch to On.
With the switch on, during the exam, PLQ, SPGC, and SBGC indicators and entry boxes appear.

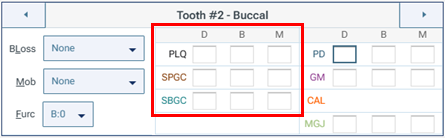
-
-
Click (or tap) Start Exam.
The options for entering a perio exam become available.
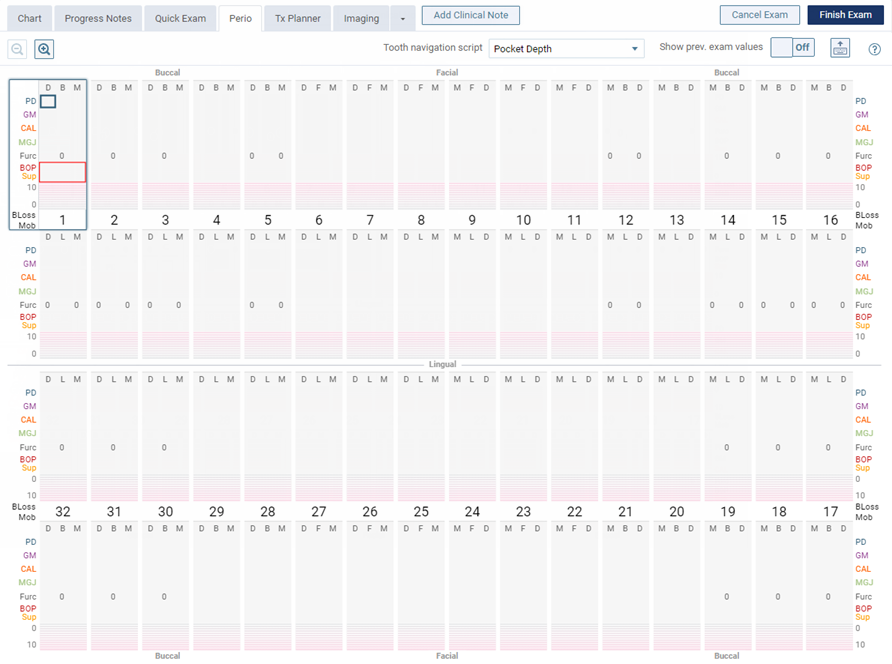
-
By default, if the patient has a previous perio exam entered, the measurements (pocket depth, gingival margin, clinical attachment level, mucogingival junction, furcation grade, bone loss, and mobility) from that exam appear in gray. To switch between showing and hiding the previous exam's measurements, turn the Show prev. exam values switch On and Off.
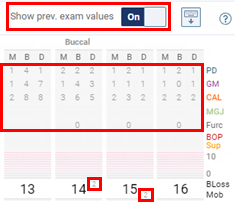
Note: This switch is available only if a perio exam was entered previously.
-
Enter probing depths and/or gingival margins, and chart conditions, such as bleeding and furcation, on each tooth.
As you chart, the positions of the Tooth selection frame, the PD, GM, MGJ, and BOP/Sup selection frames change according to the exam options (from the New Perio Exam dialog box).
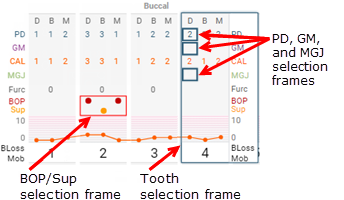
The following examples illustrate where the selection frames are as you chart pocket depths, gingival margins, mucogingival junctions, and bleeding and suppuration according to both the tooth navigation script and the delay for charting bleeding and suppuration:
-
Tooth navigation script = Pocket Depth:
-
Enter BOP and Sup = 0 (no delay):
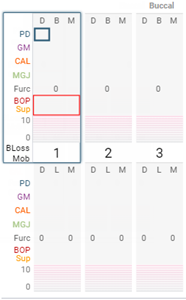
On the current tooth, the PD selection frame is at the first position, and the BOP/Sup selection frame is available.
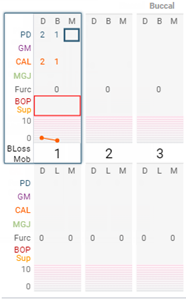
On the current tooth, the PD selection frame is at the third position, and the BOP/Sup selection frame is available.
The PD selection frame and the BOP/Sup selection frame stay inside the Tooth selection frame.
-
Enter BOP and Sup = 1 (one-tooth delay):
On the current tooth, the PD selection frame is at the first position.
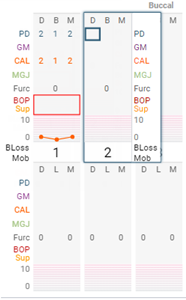
On the previous tooth, the BOP/Sup selection frame is available.
The PD selection frame stays inside the Tooth selection frame. The BOP/Sup selection frame advances with the Tooth selection frame but stays one tooth behind, so you cannot mark bleeding or suppuration while the first tooth is selected.
-
-
Tooth navigation script = Gingival Margin:
-
Enter BOP and Sup = 0 (no delay):
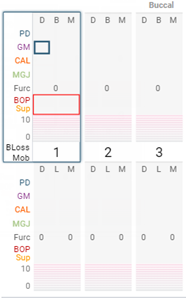
On the current tooth, the GM selection frame is at the first position, and the BOP/Sup selection frame is available.
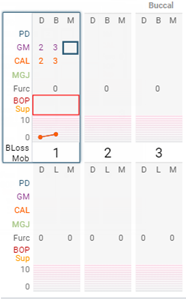
On the current tooth, the GM selection frame is at the third position, and the BOP/Sup selection frame is available.
The GM selection frame and the BOP/Sup selection frame stay inside the Tooth selection frame.
-
Enter BOP and Sup = 1 (one-tooth delay):
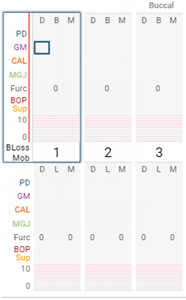
On the current tooth, the GM selection frame is at the first position.
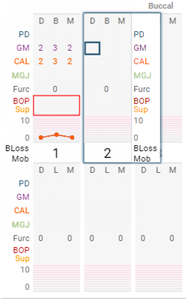
On the previous tooth, the BOP/Sup selection frame is available.
The GM selection frame stays inside the Tooth selection frame. The BOP/Sup selection frame advances with the Tooth selection frame but stays one tooth behind, so you cannot mark bleeding or suppuration while the first tooth is selected.
-
-
Tooth navigation script = Pocket Depth and Gingival Margin:
-
Enter BOP and Sup = 0 (no delay):
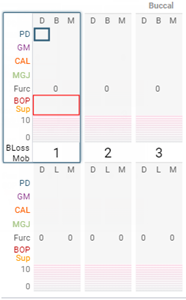
On the current tooth, the PD selection frame is at the first position, and the BOP/Sup selection frame is available.
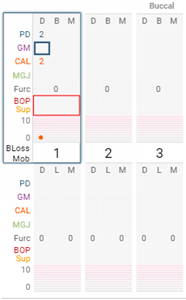
On the current tooth, the GM selection frame is at the first position, and the BOP/Sup selection frame is available.
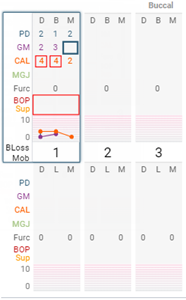
On the current tooth, the GM selection frame is at the third position, and the BOP/Sup selection frame is available.
The PD and GM selection frames, and the BOP/Sup selection frame stay inside the Tooth selection frame.
-
Enter BOP and Sup = 1 (one-tooth delay):
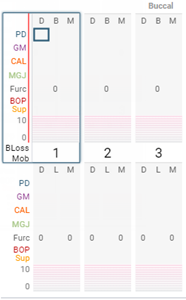
On the current tooth, the PD selection frame is at the first position.
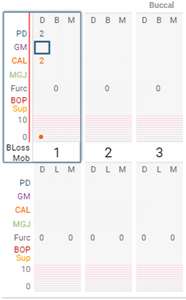
On the current tooth, the GM selection frame is at the first position.
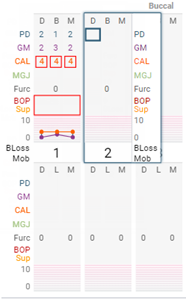
On the previous tooth, the BOP/Sup selection frame is available.
The PD and GM selection frames stay inside the Tooth selection frame. The BOP/Sup selection frame advances with the Tooth selection frame but stays one tooth behind, so you cannot mark bleeding or suppuration while the first tooth is selected.
-
-
Tooth navigation script = Mucogingival Junction:
-
Enter BOP and Sup = 0 (no delay):
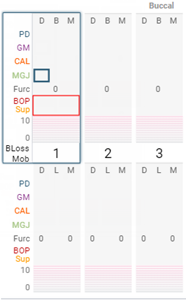
On the current tooth, the MGJ selection frame is at the first position, and the BOP/Sup selection frame is available.
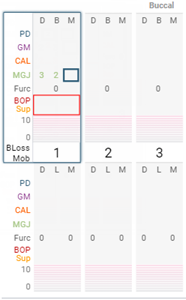
On the current tooth, the MGJ selection frame is at the third position, and the BOP/Sup selection frame is available.
The MGJ selection frame and the BOP/Sup selection frame stay inside the Tooth selection frame.
-
Enter BOP and Sup = 1 (one-tooth delay):
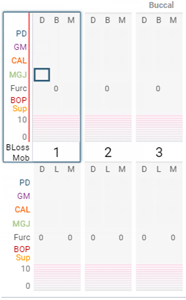
On the current tooth, the MGJ selection frame is at the first position.
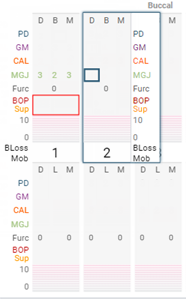
On the previous tooth, the BOP/Sup selection frame is available.
The MGJ selection frame stays inside the Tooth selection frame. The BOP/Sup selection frame advances with the Tooth selection frame but stays one tooth behind, so you cannot mark bleeding or suppuration while the first tooth is selected.
-
Enter any of the following measurements for the mesial, distal, and middle sites on the facial and lingual sides of each tooth (the order depends on the selected script):
-
PD - If you are using the pocket depth charting mode or the pocket depth and gingival margin charting mode, enter the probing depth values (0 to 19). If you are using the gingival margin charting mode, enter the pocket depth values in the M, B (or F or L), and/or D boxes.
Note: For measurements that are four or greater, a red box appears around the number on the chart.
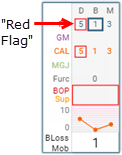
-
GM - If you are using the gingival margin charting mode, enter the gingival margin values (-19 to 19). If you are using the pocket depth and gingival margin charting mode, enter the gingival margin value after entering the pocket depth value at each site. If you are using the pocket depth charting mode, enter the gingival margin values in the M, B (or F or L), and/or D boxes. To enter one value for all three sites at the same time, make sure the Mark all surfaces switch is on before you enter the value.
Note: For measurements that are four or greater, a red box appears around the number on the chart.
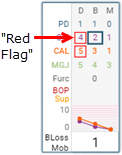
-
MGJ - Enter the mucogingival junction values in the M, B (or F or L), and/or D boxes. To enter one value for all three sites at the same time, make sure the Mark all surfaces switch is on before you enter the value.
Note: For measurements that are critical (where MGJ minus PD is two or less), a red box appears around the number on the chart.
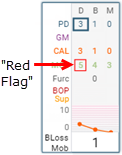
-
BOP - If bleeding is present for any sites, click (or tap) the M, B (or F or L), and/or D circles. To quickly add bleeding to multiple sites at once, click (or tap) the shortcut button or press the B key. Clicking (or tapping) the shortcut button or pressing the B key changes the applied bleeding and toggles between the bleeding options for that button: the empty circle
 removes the bleeding from M, B (or F or L), and D, if any; the two half circles
  adds bleeding to M and D; the filled circle with an A
  adds bleeding to M, B (or F or L), and D.
 -
SUP - If suppuration is present for any sites, click (or tap) the M, B (or F or L), and/or D circles. To quickly add suppuration to multiple sites at once, click (or tap) the shortcut button or press the S key. Clicking (or tapping) the shortcut button or pressing the S key changes the applied suppuration and toggles between the suppuration options for that button: the empty circle
 removes the suppuration from M, B (or F or L), and D, if any; the two half circles
  adds suppuration to M and D; the filled circle with an A
  adds suppuration to M, B (or F or L), and D.
 -
Bloss - Select the amount of bone loss (None to Severe).
-
Mob - Select the level of mobility (None to Class III).
-
Furc - Select the furcation grades (F0 to F4). Furcation is not applicable to all tooth sites, so some teeth and sites do not have this option available.
-
PLQ - Enter the plaque values in the M, B (or F or L), and/or D boxes. To enter one value for all three sites at the same time, make sure the Mark all surfaces switch is on before you enter the value.
Note: These boxes are available only if the Include Plaque and Calculus charting switch in the New Perio Exam dialog box was set to On.
-
SPGC - Enter the supragingival calculus values in the M, B (or F or L), and/or D boxes. To enter one value for all three sites at the same time, make sure the Mark all surfaces switch is on before you enter the value.
Note: These boxes are available only if the Include Plaque and Calculus charting switch in the New Perio Exam dialog box was set to On.
-
SBGC - Enter the subgingival calculus values in the M, B (or F or L), and/or D boxes. To enter one value for all three sites at the same time, make sure the Mark all surfaces switch is on before you enter the value.
Note: These boxes are available only if the Include Plaque and Calculus charting switch in the New Perio Exam dialog box was set to On.
Tips:
-
To switch between hiding and showing the perio exam controls for entering data, click (or tap) the Hide and Show button
 .
. -
For pocket depths, gingival margins, and the other measurements, you can click (or tap) the left and right arrow buttons to rewind and advance the script for the exam. Click (or tap) an area on the graph to go directly to that part of the script for the exam. You can use the left and right arrow keys to move the selection frame for PD, GM , or MGJ left and right between the M, B (or F or L), and D sites. You can use the up and down arrow keys to move the selection frame for PD, GM, or MGJ up and down. With a site selected for PD, GM, or MGJ, to remove the value that you have entered, press the Delete key. After using the keyboard keys to stray from the script, to get back on script, click (or tap) the left or right arrow button.
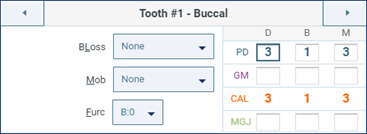
-
You can enter bleeding and suppuration separately from the script for the exam. Click (or tap) the left and right arrow buttons to go backward and forward sequentially between areas in the mouth.
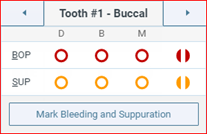
To enter bleeding and suppuration for an entire sextant at once, click (or tap) Mark Bleeding and Suppuration. By default, the tab of the sextant that corresponds to the tooth that is currently selected, but you can enter bleeding and suppuration on any tab as needed. In a sextant, you can quickly specify bleeding and suppuration for all sites, for the same site on all teeth on the buccal or lingual sides, or on a tooth by tooth basis. When you are finished entering bleeding and suppuration, click (or tap) Save.
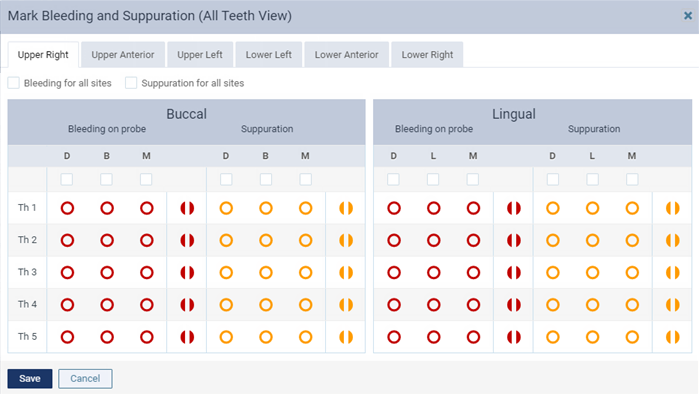
-
You can use the number buttons or keyboard keys to enter probing depths, gingival margins, mucogingival junctions, plaque (if applicable), and calculus (if applicable).
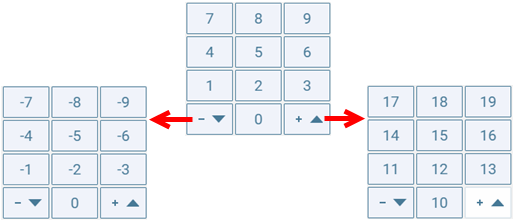
-
You can zoom in and out at any time during the exam either by holding down the Ctrl key and scrolling or by moving the Zoom slider between Full, Quad, and Tooth. The Full option is available only if the resolution of your computer's (or device's) display is high enough.

-
To switch to a different tooth navigation script, select the desired script from the Tooth navigation script list.
-
To view an explanation of all the abbreviations and symbols that are used for perio exams, a list of the available keyboard shortcuts, and an explanation of the possible values for plaque and calculus levels, click (or tap) the Legend button
 .
.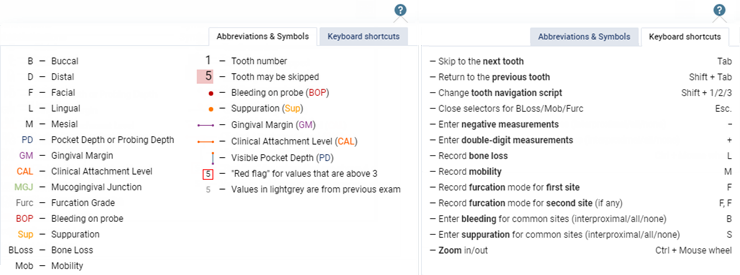
Note: If you navigate elsewhere in Dentrix Ascend before clicking (or tapping) Finish Exam, a warning message appears. You have until 11:59 PM of the next day to resume the exam; otherwise, it will be deleted.
-
-
When you have finished the exam, click (or tap) Finish Exam.
If the patient has a previous exam, the Finish Perio Exam dialog box appears. If not, ignore the next step.
-
Do one of the following:
-
To save the current exam with measurements (if they exist) from the previous exam where you have not entered new measurements, click (or tap) Save Exam with the Previous Values.
-
To save the current exam without any of the measurements from the previous exam, click (or tap) Save Only New Values.
-
Chart treatment performed (if not scheduled for today)
You can chart completed treatment in a patient's clinical chart.
Note: A completed procedure appears in the clinical record and financial ledger; however, a treatment-planned procedure, a referred procedure, an existing procedure, or a condition does not appear in the financial ledger.
To chart treatment
-
If the correct patient is not already selected, use the Patient Search box to access the patient's record.
On the Patient menu, under Clinical, select Chart.
The patient's clinical record opens with the Chart tab selected.
-
Select one or more teeth.
-
Click (or tap) Add Procedure.
The Add Procedure dialog box appears.
-
Select the applicable procedure, surfaces (if applicable), and provider.
Do the following:
-
Click (or tap) Completed (for today's services).
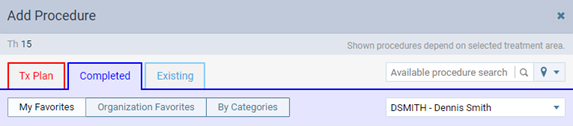
-
Make sure the correct provider is selected for this procedure. Changing the provider may change which options are available in the procedure filter list (which is next to the Available procedure search box) and, consequently, may change which procedures are available on the Tx Plan and Completed tabs.
Note: Only providers who have access to the current location and who are flagged as charting providers are available. Also, the provider who is selected by default is determined by the current location's Default procedure provider setting.
-
On the Completed tab, procedures appear in the list according to the selected filter.
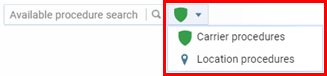
Select one of the following options from the procedure filter list next to the Available procedure search box as needed:
-
Carrier procedures - If the patient has any active insurance plans attached to his or her record, and if the selected Provider is contracted with any of the patient's carriers, Carrier procedures is selected by default. With this option selected, only the carriers' allowed procedures are available.
-
Location procedures - If the patient is not covered by an insurance carrier that the provider is contracted with, Location procedures is selected by default. With this option selected, only the location's allowed procedures are available.
Note: Carrier procedures is available only if the patient has any active insurance plans attached to his or her record, and if the selected Provider is contracted with any of the patient's carriers. Location procedures is available for any patient.
-
-
Search for a procedure using one of the following methods:
-
Click (or tap) in the Available procedure search box (on the Tx Plan or Completed tab) or in the Procedure Search box (on the Existing or Referred tab), and begin typing part of the ADA description (for example, "ama" for Amalgam 1 Surface) or code (for example, "21" for D2140). The procedures that match the criteria entered and that apply to the selected tooth, arch, or quadrant or to the full mouth appear in the list. Continue typing as needed to narrow the results.
-
Select the My Favorites option (if it is not already selected) to view the procedures that have been marked as your personal favorites and that apply to the selected tooth, arch, or quadrant or to the full mouth.
-
Select the Organization Favorites option (if it is not already selected) to view the procedures that have been marked as your organization's favorites and that apply to the selected tooth, arch, or quadrant or to the full mouth.
-
Select the By Categories option (if it is not already selected) to view the procedure code categories, and then select a category to view the corresponding procedures that apply to the selected tooth, arch, or quadrant or for the full mouth.
Notes:
-
Procedures appear in the procedure list according to which teeth or if any teeth are selected. For example, if no teeth are selected (the treatment area is the mouth) and you perform a search for "amalgam," no procedures will appear in the list; similarly, if no teeth are selected, an amalgam, procedure will not appear in the lists of personal and organization-wide favorites or within a category (if you are viewing procedures by categories).
-
Dentrix Ascend remembers whether My Favorites or Organization Favorites is selected when you post the procedure, and that option is selected by default the next time someone accesses the Add Procedure dialog box on this computer. If By Categories is selected, Organization Favorites is selected the next time someone accesses the dialog box on this computer.
-
-
Click (or tap) a procedure.
Important: If you chart a multi-code that includes some procedures that are not allowed by the the location or any of the patient's carriers, those procedures will not be posted.
-
If applicable, in the Select Surfaces dialog box that appears, select the surfaces on each tooth for the selected procedure, and then click (or tap) Done.
Tips:
-
To navigate between teeth, click (or tap) a Th. Alternatively, click (or tap) Back and Next.
-
To not enter surfaces for the selected tooth, set Exclude tooth to On.
-
To set Class 5 to On, at least one of the appropriate Surfaces must be selected: mesial, distal, lingual, or facial/buccal.
-
To apply a common combination of surfaces, under Surface combinations, click (or tap) the appropriate button.
-
-
You can edit the procedure as needed (such as to enter a supernumerary tooth number or to attach diagnosis codes).
Note: The charge that is used for a charted or scheduled procedure comes from either the provider's fee schedule or, if not applicable, the preferred fee schedule of the location where the procedure was charted or scheduled.
-
Chart recommended treatment (if not charted during quick exam)
You can chart planned treatment in a patient's clinical chart.
Note: A completed procedure appears in the clinical record and financial ledger; however, a treatment-planned procedure, a referred procedure, an existing procedure, or a condition does not appear in the financial ledger.
To chart treatment
-
If the correct patient is not already selected, use the Patient Search box to access the patient's record.
On the Patient menu, under Clinical, select Chart.
The patient's clinical record opens with the Chart tab selected.
-
Select one or more teeth.
-
Click (or tap) Add Procedure.
The Add Procedure dialog box appears.
-
Select the applicable procedure, surfaces (if applicable), and provider.
Do the following:
-
Click (or tap) Tx Plan (for potential future services).
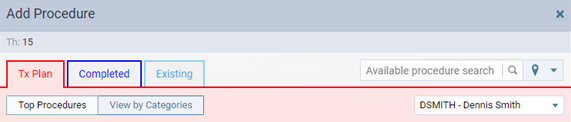
-
Make sure the correct provider is selected for this procedure. Changing the provider may change which options are available in the procedure filter list (which is next to the Available procedure search box) and, consequently, may change which procedures are available on the Tx Plan and Completed tabs.
Note: Only providers who have access to the current location and who are flagged as charting providers are available. Also, the provider who is selected by default is determined by the current location's Default procedure provider setting.
-
On the Tx Plan tab, procedures appear in the list according to the selected filter.
Select one of the following options from the procedure filter list next to the Available procedure search box as needed:
-
Carrier procedures - If the patient has any active insurance plans attached to his or her record, and if the selected Provider is contracted with any of the patient's carriers, Carrier procedures is selected by default. With this option selected, only the carriers' allowed procedures are available.
-
Location procedures - If the patient is not covered by an insurance carrier that the provider is contracted with, Location procedures is selected by default. With this option selected, only the location's allowed procedures are available.
Note: Carrier procedures is available only if the patient has any active insurance plans attached to his or her record, and if the selected Provider is contracted with any of the patient's carriers. Location procedures is available for any patient.
-
-
Search for a procedure using one of the following methods:
-
Click (or tap) in the Available procedure search box (on the Tx Plan or Completed tab) or in the Procedure Search box (on the Existing or Referred tab), and begin typing part of the ADA description (for example, "ama" for Amalgam 1 Surface) or code (for example, "21" for D2140). The procedures that match the criteria entered and that apply to the selected tooth, arch, or quadrant or to the full mouth appear in the list. Continue typing as needed to narrow the results.
-
Select the My Favorites option (if it is not already selected) to view the procedures that have been marked as your personal favorites and that apply to the selected tooth, arch, or quadrant or to the full mouth.
-
Select the Organization Favorites option (if it is not already selected) to view the procedures that have been marked as your organization's favorites and that apply to the selected tooth, arch, or quadrant or to the full mouth.
-
Select the By Categories option (if it is not already selected) to view the procedure code categories, and then select a category to view the corresponding procedures that apply to the selected tooth, arch, or quadrant or for the full mouth.
Notes:
-
Procedures appear in the procedure list according to which teeth or if any teeth are selected. For example, if no teeth are selected (the treatment area is the mouth) and you perform a search for "amalgam," no procedures will appear in the list; similarly, if no teeth are selected, an amalgam, procedure will not appear in the lists of personal and organization-wide favorites or within a category (if you are viewing procedures by categories).
-
Dentrix Ascend remembers whether My Favorites or Organization Favorites is selected when you post the procedure, and that option is selected by default the next time someone accesses the Add Procedure dialog box on this computer. If By Categories is selected, Organization Favorites is selected the next time someone accesses the dialog box on this computer.
-
-
Click (or tap) a procedure.
Important: If you chart a multi-code that includes some procedures that are not allowed by the the location or any of the patient's carriers, those procedures will not be posted.
-
If applicable, in the Select Surfaces dialog box that appears, select the surfaces on each tooth for the selected procedure, and then click (or tap) Done.
Tips:
-
To navigate between teeth, click (or tap) a Th. Alternatively, click (or tap) Back and Next.
-
To not enter surfaces for the selected tooth, set Exclude tooth to On.
-
To set Class 5 to On, at least one of the appropriate Surfaces must be selected: mesial, distal, lingual, or facial/buccal.
-
To apply a common combination of surfaces, under Surface combinations, click (or tap) the appropriate button.
-
-
You can edit the procedure as needed (such as to enter a supernumerary tooth number or to attach diagnosis codes).
Note: The charge that is used for a charted or scheduled procedure comes from either the provider's fee schedule or, if not applicable, the preferred fee schedule of the location where the procedure was charted or scheduled.
-
Entering clinical notes
Entering clinical notes
You can enter clinical notes into a patient's record.
Note: You can also enter and sign clinical notes from the Clinical Note Tasks page.
To enter a clinical note
-
If the correct patient is not already selected, use the Patient Search box to access the patient's record.
-
Do one of the following:
-
To assign tooth numbers to the clinical note that you are going to create, do the following:
On the Patient menu, under Clinical, select Chart or Quick Exam.
The patient's clinical record opens with the Chart or Quick Exam tab selected.
-
Select one or more teeth.
-
On the Chart tab:
-
On the Quick Exam tab:

-
Note: You can change the assigned tooth numbers as needed later.
-
To not assign tooth numbers (initially or ever) to the clinical note that you are going to create, skip this step.
Note: You can assign tooth numbers as needed later.
-
-
If you are not already viewing the Chart, Progress Notes, Quick Exam, Perio, or Tx Planner, or Imaging tab of the patient's clinical record, and you do not want to assign tooth numbers (initially or ever) to the clinical note that you are going to create, do the following:
-
On the Patient menu, under Clinical, select Chart, Progress Notes, Quick Exam, Perio, Tx Planner, or Imaging.
The patient's clinical record opens with the Chart, Progress Notes, Quick Exam, Perio, Tx Planner, or Imaging tab selected.
-
-
Do one of the following:
-
Whether or not the patient has existing clinical notes, click (or tap) Add Clinical Note.

-
If the patient has existing clinical notes, on the Clinical Notes menu, select + Add Clinical Note.

The Add Clinical Note dialog box appears.
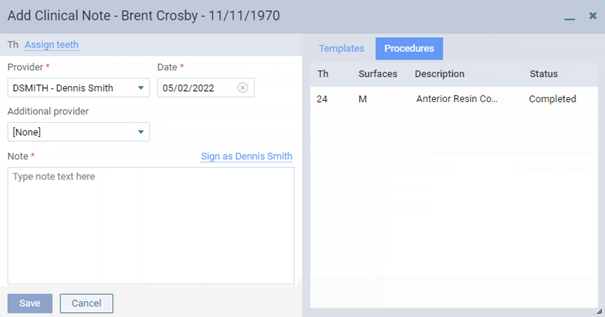
Notes:
-
For your reference, any of the patient's completed and treatment-planned procedures for the selected date appear on the Procedures tab.
-
If Dentrix Ascend detects that there is an unsaved clinical note for the patient due to you being logged out automatically before you could save the note, the clinical note is populated with the information from the unsaved note, and a yellow warning message appears. To save the note, click (or tap) Save in the Add Clinical Note dialog box.
-
-
Set up the following options:
-
Th - By default, if you have selected teeth on the Chart or Quick Exam tab of the patient's clinical record, those tooth numbers are automatically assigned to this clinical note. Do one of the following if needed:
-
If no tooth numbers are assigned to the clinical note, to assign tooth numbers, click (or tap) the Assign teeth link, select the applicable teeth, and then click (or tap) X.
-
If tooth numbers are assigned to the clinical note, to modify the assigned tooth numbers, click (or tap) the link for those tooth numbers (such as 2-4). Select or deselect teeth, and then click (or tap) X.
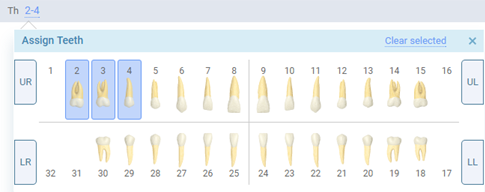
-
-
Provider - The provider to associate with this note.
Notes:
-
Only providers who have access to the current location and who are flagged as charting providers are available. Also, the provider who is selected by default is determined by the current location's Default procedure provider setting.
-
If the patient has a preferred provider, and you select a different provider, the preferred provider is selected automatically in the Additional Provider list.
Recommendation: As the patient's provider of record, the primary provider should enter a clinical note for the work performed even if he or she has already signed a clinical note as the Additional Provider on that day.
-
-
Date - The date of the note. Leave the current date selected, or click (or tap) the box to select a different date.
-
Additional Provider - A secondary provider (such as a hygienist) to associate with this note. To associate an additional provider with the note, select that provider; otherwise, leave [None] selected. Only providers who have access to the current location and who are flagged as charting providers are available.
-
Note - The text of the note. Enter the note text, and/or insert notes from templates.
-
-
If the note is complete, and if you are the selected provider or have permission from the provider, you can sign the note. To sign the note, click (or tap) the Sign as [provider name] link, and then enter the selected provider's or, if you are the provider, your password in the Password box that appears. However, if the note needs to be finished later, or if the provider has to review the note, the note can be signed later.
Note: The Sign as [provider name] link is available only if a digital signature for the selected provider has been set up.
-
Click (or tap) Save.
Entering clinical notes (using templates)
Entering clinical notes from templates
Using the clinical note templates for the current location, you can quickly enter clinical notes into a patient's record.
To enter a clinical note from a template
-
If the correct patient is not already selected, use the Patient Search box to access the patient's record.
-
Do one of the following:
-
To assign tooth numbers to the clinical note that you are going to create, do the following:
On the Patient menu, under Clinical, select Chart or Quick Exam.
The patient's clinical record opens with the Chart or Quick Exam tab selected.
-
Select one or more teeth.
-
On the Chart tab:
-
On the Quick Exam tab:
-
Note: You can change the assigned tooth numbers as needed later.
-
To not assign tooth numbers (initially or ever) to the clinical note that you are going to create, skip this step.
Note: You can assign tooth numbers as needed later.
-
-
If you are not already viewing the Chart, Progress Notes, Quick Exam, Perio, or Tx Planner, or Imaging tab of the patient's clinical record, and you do not want to assign tooth numbers (initially or ever) to the clinical note that you are going to create, do the following:
-
On the Patient menu, under Clinical, select Chart, Progress Notes, Quick Exam, Perio, Tx Planner, or Imaging.
The patient's clinical record opens with the Chart, Progress Notes, Quick Exam, Perio, Tx Planner, or Imaging tab selected.
-
-
Do one of the following:
-
Whether or not the patient has existing clinical notes, click (or tap) Add Clinical Note.
-
If the patient has existing clinical notes, on the Clinical Notes menu, select + Add Clinical Note.
The Add Clinical Note dialog box appears.
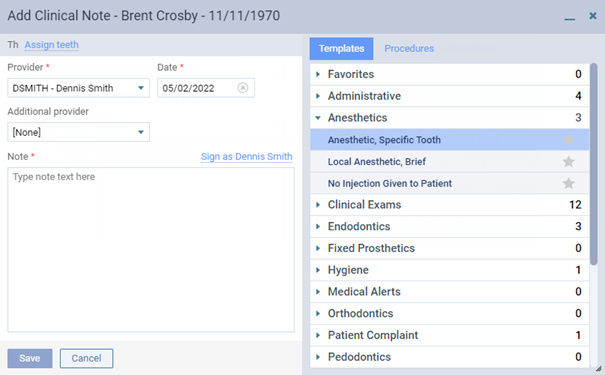
Note: If Dentrix Ascend detects that there is an unsaved clinical note for the patient due to you being logged out automatically before you could save the note, the clinical note is populated with the information from the unsaved note, and a yellow warning message appears. To save the note, click (or tap) Save in the Add Clinical Note dialog box.
-
-
On the Templates tab, select a template.
Note: A location's clinical note templates are available when entering clinical notes only from that location. However, if a user makes a clinical note template a favorite, it will be available for that user from any location.
-
If there are any quick-picks associated with the selected template, respond to all prompts that may appear, clicking (or tapping) Next between each prompt.
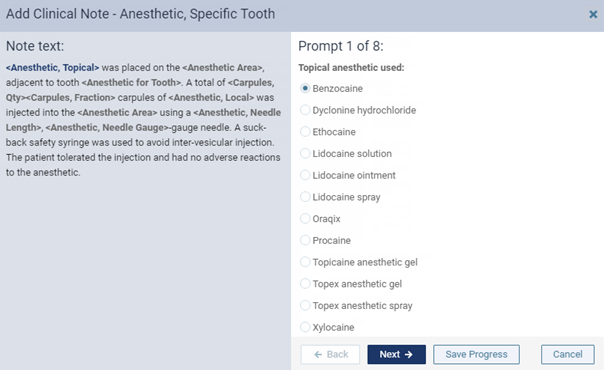
Note: If you need to save your progress and close the clinical note before you are finished responding to all the prompts that are associated with the selected template, click (or tap) Save Progress. The clinical note becomes marked as In Progress. Later, you can resume entering the clinical note from the following areas of Dentrix Ascend:
The Clinical Notes menu. The note that is in progress is indicated by "[In Progress]."
The Progress Notes tab. The note that is in progress is indicated by a red dot on the note symbol.

The Clinical Note Tasks box. The count in the In Progress column accounts for the note that is in progress.
On the last prompt, the Next button changes to a Done button.
-
Click (or tap) Done.
The finished note appears in the Note field.
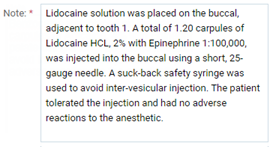
-
Edit and/or add to the note text, and change the other options, such as the provider, as needed.
Set up the following options:
-
Th - By default, if you have selected teeth on the Chart or Quick Exam tab of the patient's clinical record, those tooth numbers are automatically assigned to this clinical note. Do one of the following if needed:
-
If no tooth numbers are assigned to the clinical note, to assign tooth numbers, click (or tap) the Assign teeth link, select the applicable teeth, and then click (or tap) X.
-
If tooth numbers are assigned to the clinical note, to modify the assigned tooth numbers, click (or tap) the link for those tooth numbers (such as 2-4). Select or deselect teeth, and then click (or tap) X.
-
-
Provider - The provider to associate with this note.
Notes:
-
Only providers who have access to the current location and who are flagged as charting providers are available. Also, the provider who is selected by default is determined by the current location's Default procedure provider setting.
-
If the patient has a preferred provider, and you select a different provider, the preferred provider is selected automatically in the Additional Provider list.
Recommendation: As the patient's provider of record, the primary provider should enter a clinical note for the work performed even if he or she has already signed a clinical note as the Additional Provider on that day.
-
-
Date - The date of the note. Leave the current date selected, or click (or tap) the box to select a different date.
-
Additional Provider - A secondary provider (such as a hygienist) to associate with this note. To associate an additional provider with the note, select that provider; otherwise, leave [None] selected. Only providers who have access to the current location and who are flagged as charting providers are available.
-
Note - The text of the note. Edit the note text, and/or insert notes from templates (where the text cursor is located).
-
-
If the note is complete, and if you are the selected provider or have permission from the provider, you can sign the note. To sign the note, click (or tap) the Sign as [provider name] link, and then enter the selected provider's or, if you are the provider, your password in the Password box that appears. However, if the note needs to be finished later, or if the provider has to review the note, the note can be signed later.
Note: The Sign as [provider name] link is available only if a digital signature for the selected provider has been set up.
-
Click (or tap) Save.
Creating treatment plans
Creating treatment plans
Using the procedures that have been treatment-planned or referred, you can create a custom treatment plan for a patient.
To create a treatment plan
-
If the correct patient is not already selected, use the Patient Search box to access the patient's record.
-
Do one of the following:
-
If the patient's Overview page is not already open, on the Patient menu, under General, select Overview. The patient's Overview page opens. Click (or tap) the Treatment Plan box.
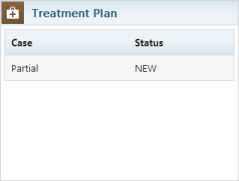
-
On the Patient menu, under Clinical, select Treatment Planner.
The patient's clinical record opens with the Tx Planner tab selected.
-
-
Do one of the following to create a case:
-
Create a case using planned procedures not assigned to a case:
-
On the navigation panel (on the left), under Active, select Unassigned. The procedures that have not been assigned to a case appear on the right.
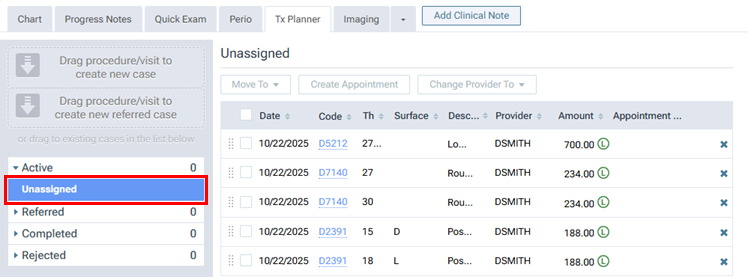
Notes:
-
To view or edit the details of a procedure, click (or tap) the corresponding Code link.
-
To change the provider of multiple procedures at one time, do the following:
-
Select the checkboxes of the procedures that you want to change the provider for.
-
From the Change Provider To menu, select the correct provider.
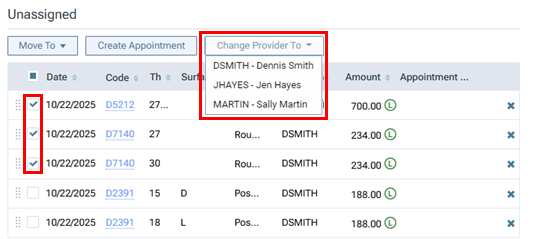
Note: Only providers who have access to the current location and who are flagged as charting providers are available.
The Changing Provider dialog box appears.
-
Do one of the following:
-
If the new provider has an assigned fee schedule, to update the amounts for the procedures based on that provider's fee schedule, select the Update procedure amount(s) based on this fee schedule checkbox. With the checkbox clear, the amounts for the procedures will not change. Then, click (or tap) Change.
-
If the new provider does not have an assigned fee schedule, there is not a checkbox, so click (or tap) Change. The amounts for the procedures will not change.
Note: Changing the provider and amount requires the "Edit patient procedure" and "Edit patient procedure amount" security rights.
-
-
-
-
Do one of the following:
-
To move an individual procedure, drag that procedure (using the handle
 ) to the Drag procedure/visit to create new case box on the navigation panel (on the left).
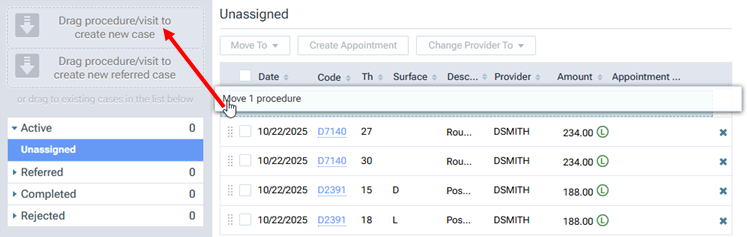
-
To move one or more procedures, select the checkbox of each procedure.
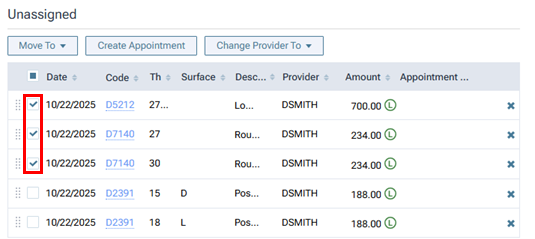
Next, do one of the following:
-
On the Move To menu, select New Case.
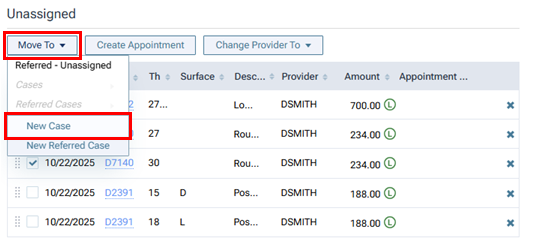
-
Drag those procedures (using the handle
of any of those procedures) to the Drag procedure/visit to create new case box on the navigation panel (on the left).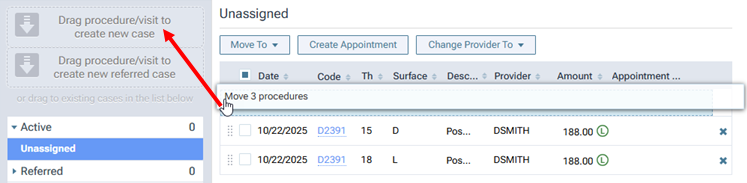
-
-
-
-
Create a case using planned procedures assigned to an existing case:
-
On the navigation panel (on the left), under Active, select a case. The case details appear on the right.
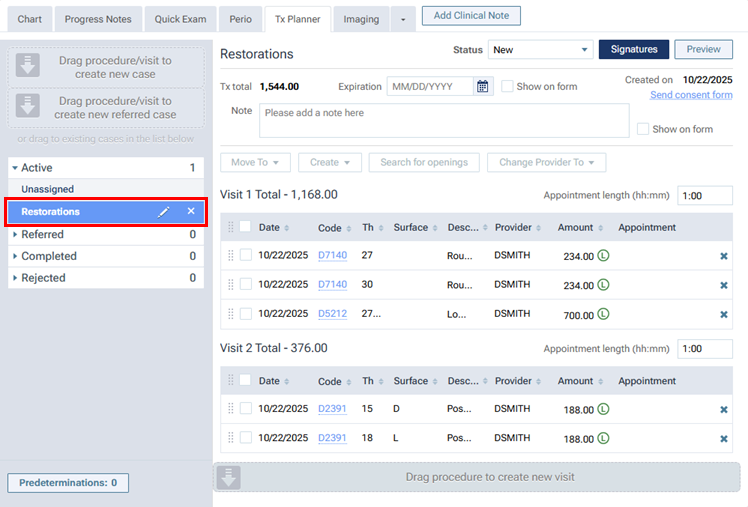
-
Do one of the following:
-
To move an individual procedure, drag that procedure (using the handle
) to the Drag procedure/visit to create new case box on the navigation panel (on the left).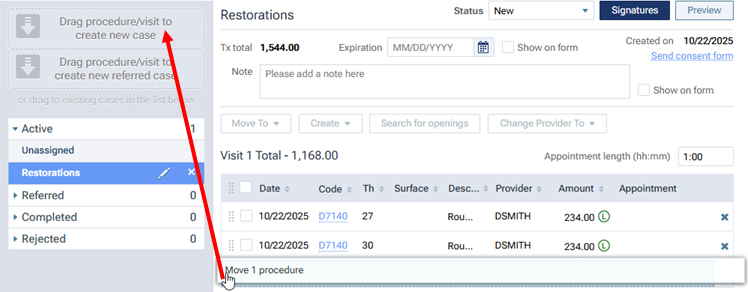
-
To move one or more procedures, select the checkbox of each procedure.
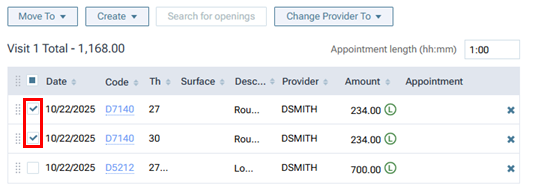
Next, do one of the following:
-
On the Move To menu, select New Case.
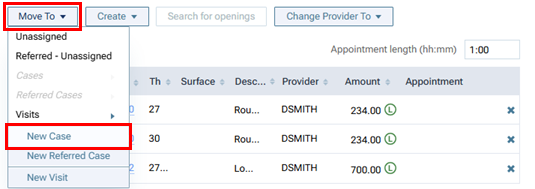
-
Drag those procedures (using the handle
of any of those procedures) to the Drag procedure/visit to create new case box on the navigation panel (on the left).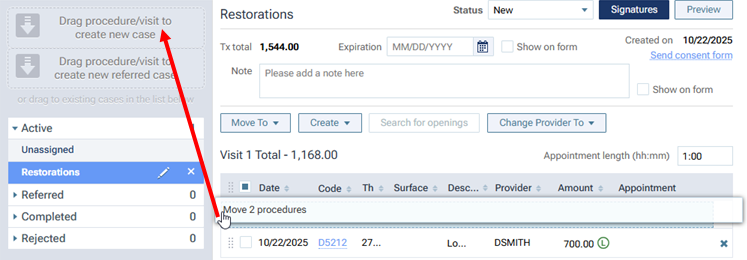
-
-
To move all the procedures in a visit, drag that visit (using the handle
 ) to the Drag procedure/visit to create new case box on the navigation panel (on the left).
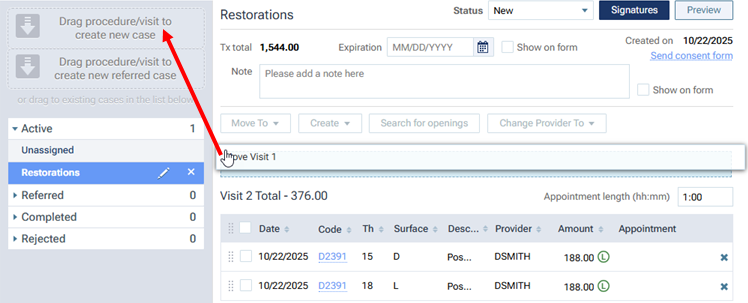
-
-
-
Create a case using referred procedures not assigned to a case:
-
On the navigation panel (on the left), under Referred, select Unassigned. The procedures that have not been assigned to a case appear on the right.

Note: To view or edit the details of a procedure, click (or tap) the corresponding Code link.
-
Do one of the following:
-
To move an individual procedure, drag that procedure (using the handle
) to the Drag procedure/visit to create new case box on the navigation panel (on the left).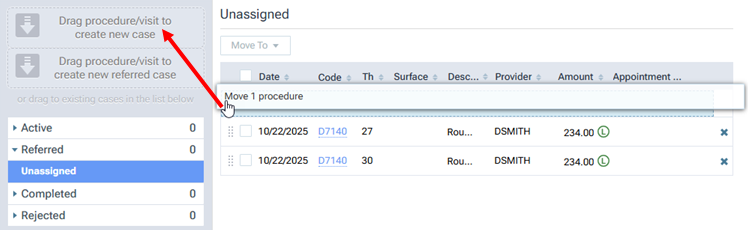
-
To move one or more procedures, select the checkbox of each procedure.
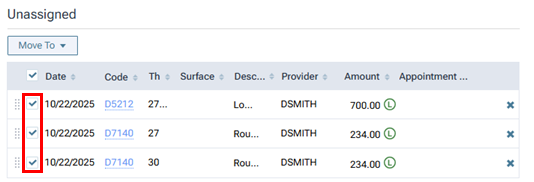
Next, do one of the following:
-
On the Move To menu, select New Case.
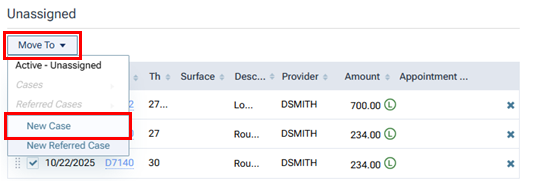
-
Drag those procedures (using the handle
of any of those procedures) to the Drag procedure/visit to create new case box on the navigation panel (on the left).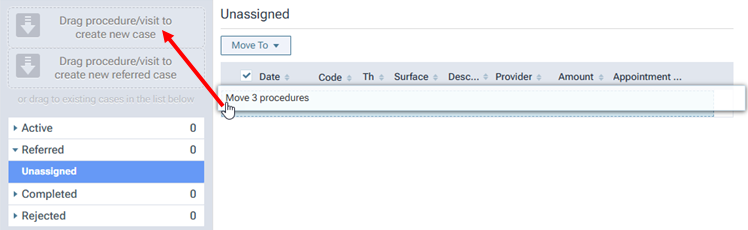
-
-
-
-
Create a case using referred procedures assigned to an existing case:
-
On the navigation panel (on the left), under Referred, select a case. The case details appear on the right.
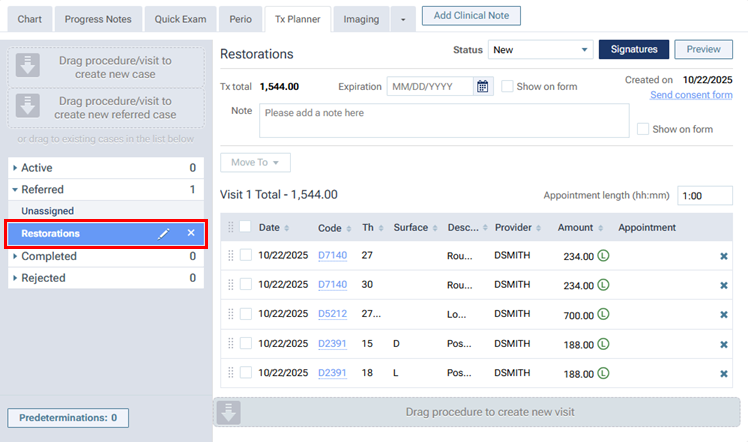
-
Do one of the following:
-
To move an individual procedure, drag that procedure (using the handle
) to the Drag procedure/visit to create new case box on the navigation panel (on the left).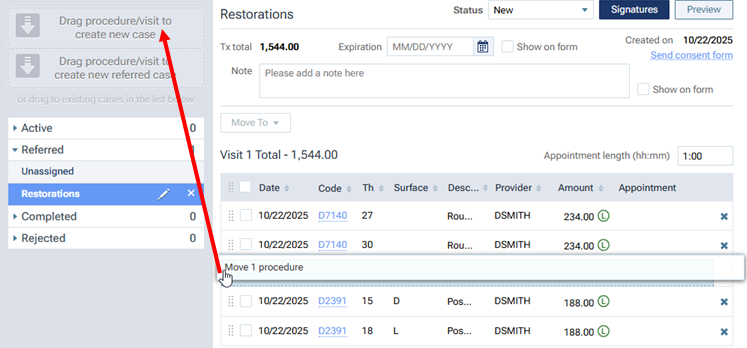
-
To move one or more procedures, select the checkbox of each procedure.
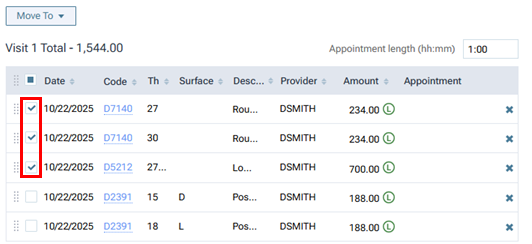
Next, do one of the following:
-
On the Move To menu, select New Case.
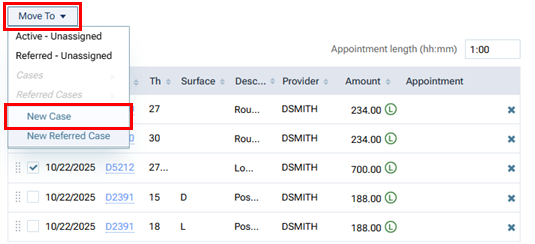
-
Drag those procedures (using the handle
of any of those procedures) to the Drag procedure/visit to create new case box on the navigation panel (on the left).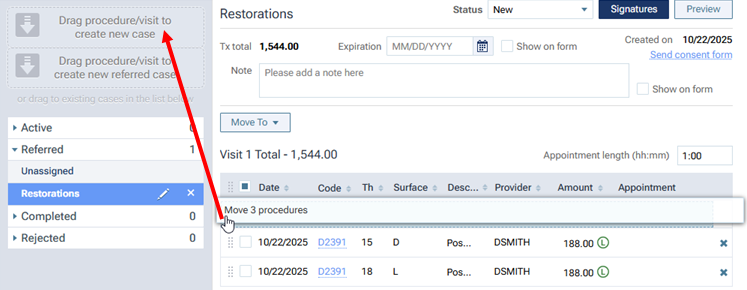
-
-
To move all the procedures in a visit, drag that visit (using the handle
) to the Drag procedure/visit to create new case box on the navigation panel (on the left).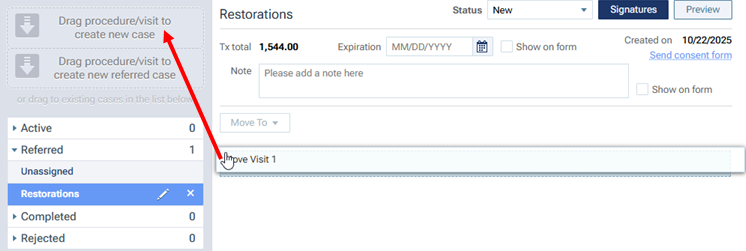
-
-
-
-
If you move procedures that are already scheduled, they are removed from the corresponding appointment. However, if removing those procedures leaves the appointment empty, the Moving message box appears and displays the date and time of the affected appointment. To confirm the removal of the procedures and allow the existence of the empty appointment, click (or tap) Move. Later, you can go to the schedule and delete the empty appointment.
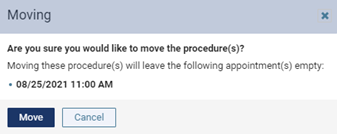
A new case is created, and the procedures are moved to it.
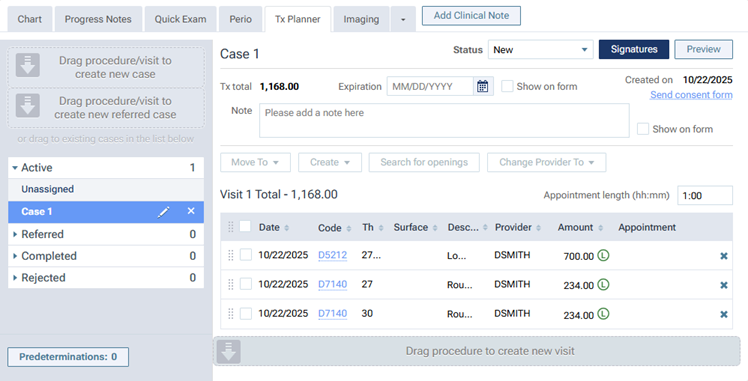
-
To rename the newly created case, do the following:
-
With the case selected under Active on the navigation panel (on the left), click (or tap) the corresponding Edit button
 .
.The Rename dialog box appears.
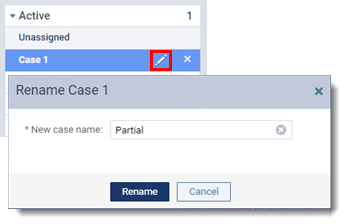
-
Change the name in the New case name box.
-
Click (or tap) Rename.
The name change is applied to the case.

Notes:
-
The fees on treatment plans come from either the procedure provider's fee schedule or, if there is not a fee schedule for the provider, the preferred fee schedule of the location where the procedures were treatment planned. The fees do not take into account an insurance plan's fee schedule and coverage table or a patient's estimated portion. An icon next to a procedure's Amount indicates where the fee comes from:
-
P - If the procedure's provider has a fee schedule assigned to his or her user account, the amount comes from the fee schedule assigned to that provider.
-
L - If the procedure's provider does not have a fee schedule assigned to his or her user account, the amount comes from the fee schedule assigned to the location that you were logged in to when you charted the procedure or updated its amount.
-
! - The amount is different from the fee in the provider's or location's fee schedule, depending on which fee schedule applies.
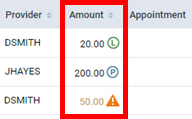
-
-
If a procedure has a coverage exception, an orange warning icon
 appears next to the procedure's description. You can click (or tap) the icon to view the applicable coverage exception.
-
-
Do any of the following:
-
Create a new visit for procedures.
-
Do any of the following:
-
To create a new visit for an individual procedure, drag that procedure (using the handle
) to the Drag procedure to create new visit box (below the visits).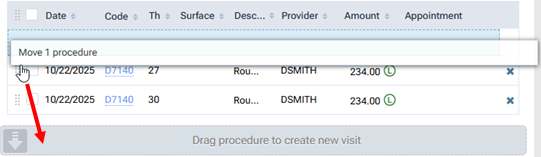
-
To create a new visit for one or more procedures, select the checkbox of each procedure.

Next, do one of the following:
-
On the Move To menu, click (or tap) New Visit.
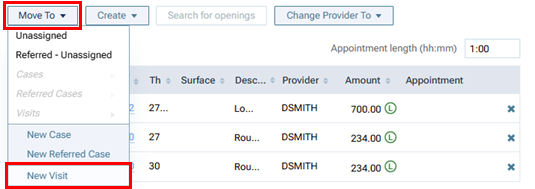
-
Drag those procedures (using the handle
of any of those procedures) to the Drag procedure to create new visit box (below the visits).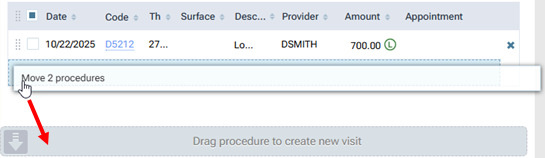
-
-
-
If you move procedures that are already scheduled, they are removed from the corresponding appointment. However, if removing those procedures leaves the appointment empty, the Moving message box appears and displays the date and time of the affected appointment. To confirm the removal of the procedures and allow the existence of the empty appointment, click (or tap) Move. Later, you can go to the schedule and delete the empty appointment.
The new visit is created, and the procedures are moved to it.
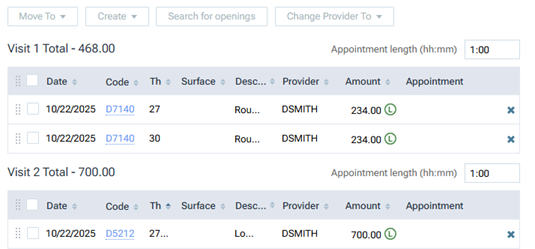
-
-
Move procedures to an existing visit.
-
Do any of the following:
-
To move an individual procedure to an existing visit, drag that procedure (using the handle
) to a visit.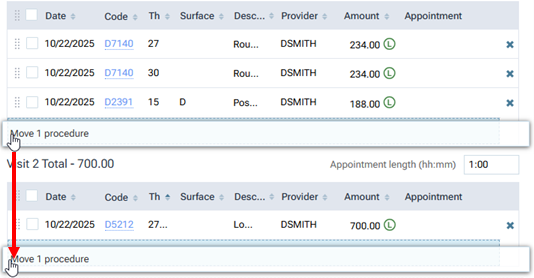
-
To move multiple procedures to an existing visit, select the checkboxes of those procedures.
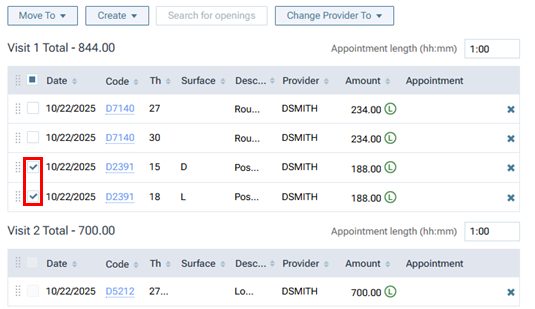
Next, do one of the following:
-
On the Move To menu, point to (or tap) Visits, and then select the name of a visit.
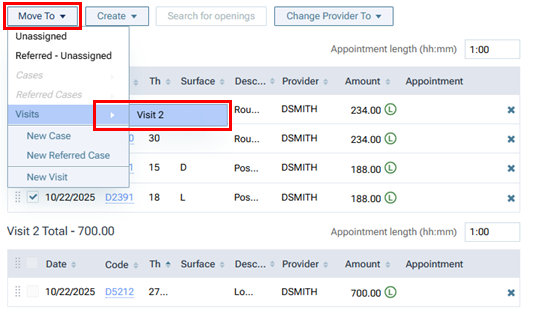
-
Drag those procedures (using the handle
of any of those procedures) to a visit.
-
-
-
If you move procedures that are already scheduled, they are removed from the corresponding appointment. However, if removing those procedures leaves the appointment empty, the Moving message box appears and displays the date and time of the affected appointment. To confirm the removal of the procedures and allow the existence of the empty appointment, click (or tap) Move. Later, you can go to the schedule and delete the empty appointment.
The procedures are moved to the other visit.
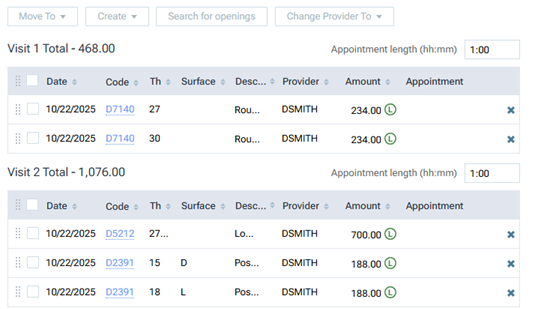
-
-
Adjust the order of procedures in a visit.
Do any of the following:
-
To move an individual procedure, drag that procedure (using the handle
) to a location above or below another procedure in that visit.
-
To move one or more procedures, select the checkbox of each procedure.
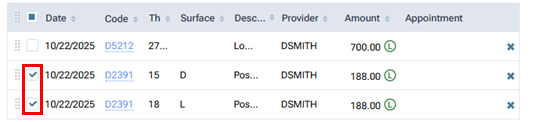
Next, drag those procedures (using the handle
of any of those procedures) to a location above or below another procedure in that visit.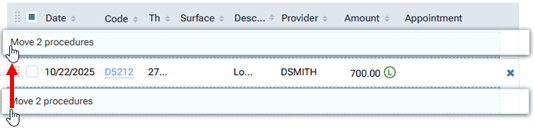
The procedures in the visit are now reordered.
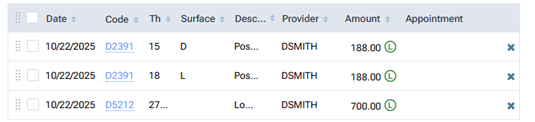
-
-
To edit a procedure, click (or tap) the corresponding Code link.
-
If needed, change the provider of multiple procedures at one time.
-
Select the checkboxes of the procedures that you want to change the provider for.
-
From the Change Provider To menu, select the correct provider.
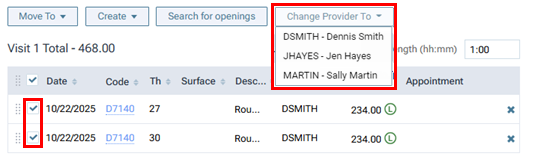
Note: Only providers who have access to the current location and who are flagged as charting providers are available.
The Changing Provider dialog box appears.
-
Do one of the following:
-
If the new provider has an assigned fee schedule, to update the amounts for the procedures based on that provider's fee schedule, select the Update procedure amount(s) based on this fee schedule checkbox. With the checkbox clear, the amounts for the procedures will not change. Then, click (or tap) Change.
-
If the new provider does not have an assigned fee schedule, there is not a checkbox, so click (or tap) Change. The amounts for the procedures will not change.
Note: Changing the provider and amount requires the "Edit patient procedure" and "Edit patient procedure amount" security rights.
-
-
-
Modify the details of the case, such as the expiration date and status, as needed.
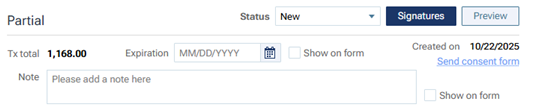
Do any of the following:
-
Specify the Expiration date of the case. You can choose a specific date, insert the last day of the current year, or insert a date that is three months in the future. To show the expiration date when presenting the case, on the printed copy of the case, and on a consent form, select the Show on form checkbox.
-
Enter a Note regarding the case. The note can be up to 250 characters long. To show the note when presenting the case, on the printed copy of the case, and on a consent form, select the Show on form checkbox.
-
To change the duration of any visit, enter a different appointment length in the corresponding Appointment length box. (Also, you can select a length from the list that appears when you click in, or tap, the box.)
Note: Changing the duration of a visit requires the "Manage Appointments" security right.
-
By default, a new case has a "New" status initially, but you can select a different Status for the case. Select one of the following options.
-
New - If this is a newly created case that you have not presented to the patient yet.
-
Presented - If you have presented the case to the patient.
-
Accepted - If the patient accepts the entire case.
-
Rejected - If the patient rejects any part of the case.
-
-
-
-
If any of the procedures in the case that are being billed to insurance require a predetermination (pre-authorization), according to the patient's primary insurance plan settings, a yellow warning message appears, and a Predetermination Required symbol
 appears next to those procedures and next to the case name. However, for any procedure that requires a predetermination but is not flagged as being billed to insurance, the procedure's Predetermination Required symbol is gray
  , but you can edit the procedure to flag it as being billed to insurance if you want to include the procedure on a predetermination. Create a predetermination.
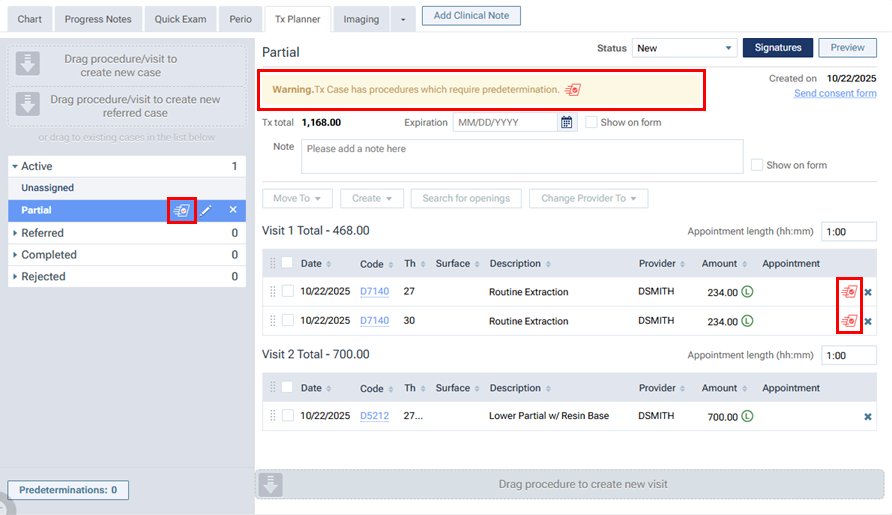
Posting procedures (scheduled for today and treatment planned)
Completing treatment
From a patient's clinical chart or the routing panel, you can complete the following types of procedures:
Notes:
-
A typical method of posting a patient's scheduled procedures is to complete the corresponding appointment.
-
Completed procedures appear in the clinical record and financial record. Posting or editing a completed procedure in either of these areas affects the other area.
To complete treatment
Do any of the following as needed:
-
For a procedure scheduled for today (Other status):
-
Do one of the following:
-
On the Progress Notes tab of a patient's clinical record, with the Today's work option and the All checkbox selected, click (or tap) Post.
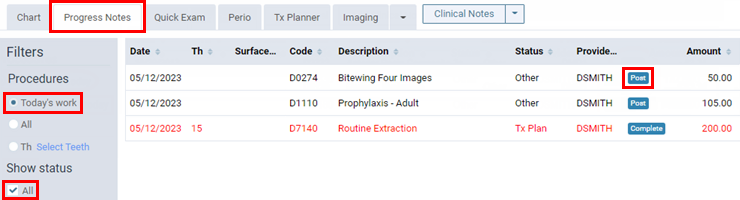
-
On a patient's appointment card in the Chair, Checkout, or Complete section of the routing panel, do one of the following:
-
If the rendering provider is different from the provider who is attached to the appointment, change the Provider, and then click (or tap) Change & Complete.
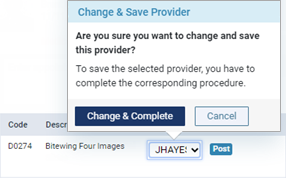
-
Click (or tap) Post.
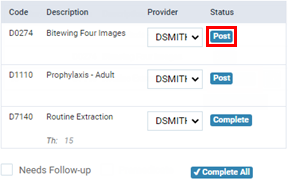
-
-
-
If the procedure is an orthodontic procedure (D8001-D8999) that requires treatment information, the Orthodontic Treatment pop-up message appears. In the Placement box, enter the date that the appliance was placed. In the Months remaining box, enter the number of months that remain until the treatment is complete. Then, click (or tap) Save (if you attempted to change the provider) or Post (if you attempted to post the procedure without changing the provider).

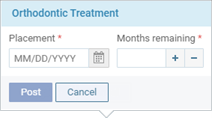
-
If the procedure requires additional treatment information (such as a tooth number and surfaces), the Enter Procedure dialog box appears. Enter the required details, and then click (or tap) Save.
-
If a procedure with the same code and treatment areas (such as the tooth number and surfaces) has already been posted complete today, the Duplicate Procedure popup appears. Do one of the following:
-
Click (or tap) Save & Complete.
-
Click (or tap) Cancel. Then, cancel completing the appointment to modify or delete the applicable procedures so that there are not duplicates.
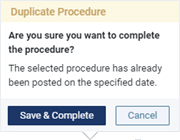
-
-
-
For a procedure scheduled for today (Tx Plan status):
-
Do one of the following:
-
On the Progress Notes tab of a patient's clinical record, with the Today's work option and the Tx Plan checkbox selected, click (or tap) Complete.
-
On a patient's appointment card in the Chair, Checkout, or Complete section of the routing panel, do one of the following:
-
If the rendering provider is different from the provider who is attached to the appointment, change the Provider, and then click (or tap) Complete.
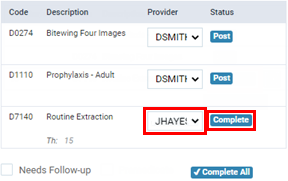
-
Click (or tap) Complete.
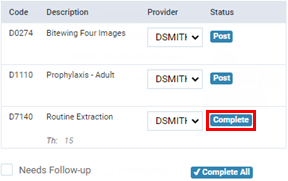
-
-
-
If the procedure is an orthodontic procedure (D8001-D8999) that requires treatment information, the Orthodontic Treatment pop-up message appears. In the Placement box, enter the date that the appliance was placed. In the Months remaining box, enter the number of months that remain until the treatment is complete. Then, click (or tap) Complete.
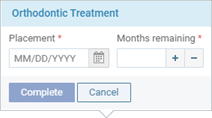
-
If a procedure with the same code and treatment areas (such as the tooth number and surfaces) has already been posted complete today, the Duplicate Procedure popup appears. Do one of the following:
-
Click (or tap) Save & Complete.
-
Click (or tap) Cancel. Then, cancel completing the appointment to modify or delete the applicable procedures so that there are not duplicates.
-
-
If you completed the procedure from the progress notes, and it has linked conditions (diagnoses),the Treat Condition dialog box appears. Select which, if any, of those conditions you want to mark as Treated.
Note: Whether you completed the procedure from the routing panel or the progress notes, you can mark the associated conditions as Treated now or at a later time.
-
-
For an unscheduled procedure (Tx Plan status):
-
On the Progress Notes tab of a patient's clinical record, with the All or Th option and the Tx Plan checkbox selected, click (or tap) Complete.
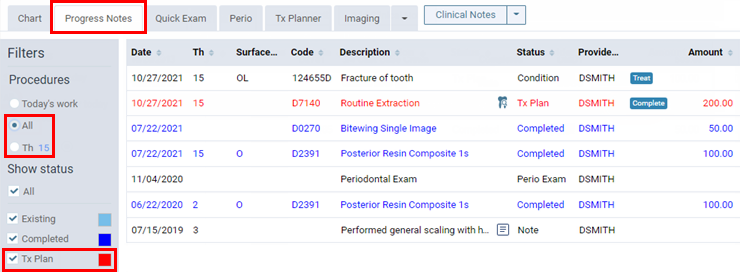
-
If the procedure is an orthodontic procedure (D8001-D8999) that requires treatment information, the Orthodontic Treatment pop-up message appears. In the Placement box, enter the date that the appliance was placed. In the Months remaining box, enter the number of months that remain until the treatment is complete. Then, click (or tap) Complete.
-
If a procedure with the same code and treatment areas (such as the tooth number and surfaces) has already been posted complete today, the Duplicate Procedure popup appears. Do one of the following:
-
Click (or tap) Save & Complete.
-
Click (or tap) Cancel. Then, cancel completing the appointment to modify or delete the applicable procedures so that there are not duplicates.
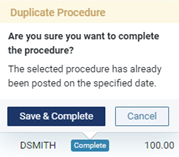
-
-
If the procedure has linked conditions (diagnoses),the Treat Condition dialog box appears. Select which, if any, of those conditions you want to mark as Treated.
Note: You can mark the associated conditions as Treated now or at a later time.
-
-
For all procedures scheduled for today (Other and/or Tx Plan status):
-
On a patient's appointment card in the Chair, Checkout, or Complete section of the routing panel, click (or tap) Complete All.
-
Do the following as needed:
-
If any of the procedures need to have treatment areas (such as teeth and surfaces) specified or need to have orthodontic treatment information entered before they can be posted, the Bulk Edit Procedure dialog box appears. Enter the missing, required information for each procedure.
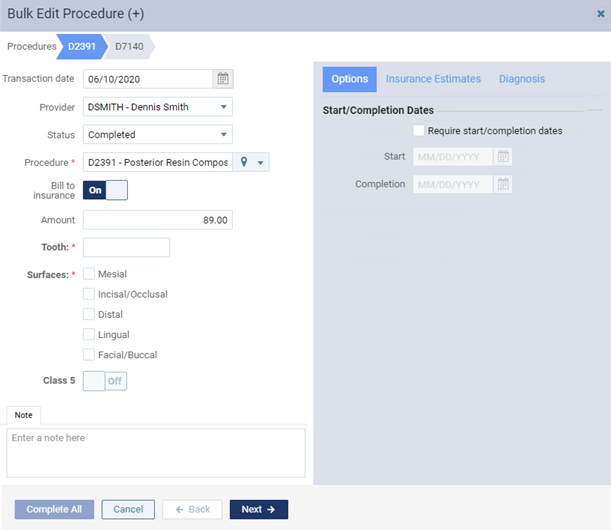
Do the following:
-
Specify the missing, required information for the procedure, and change other options as needed.
If the procedure is an orthodontic procedure (D8001-D8999) that requires treatment information, the Orthodontic treatment checkbox is selected, and a warning symbol appears. In the Placement box, enter the date that the appliance was placed. In the Months remaining box, enter the number of months that remain until the treatment is complete.
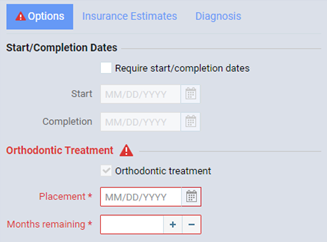
-
Click (or tap) Next to proceed to the next tab.
The options to edit the next procedure become available.
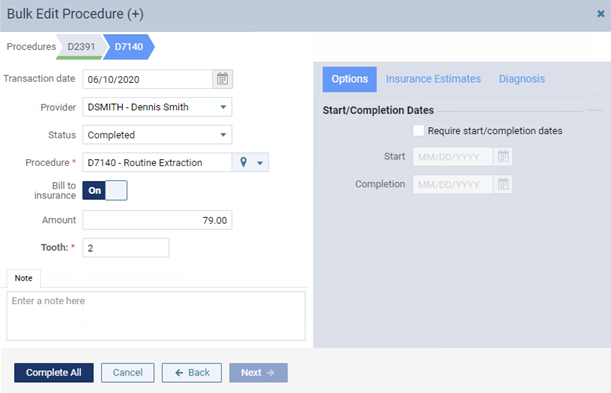
Note: The tab of the previous procedure has a green stripe to indicate that all the required information has been specified.
-
Do one of the following:
-
If the last tab is not selected, repeat steps a-b for the procedure.
-
If the last tab is selected, repeat step a for the procedure, and then click (or tap) Complete All (the button is available only if all the procedures have all the required information).
-
-
If a procedure with the same code and treatment areas (such as the tooth number and surfaces) as one of the procedures being completed has already been posted complete today, the Duplicate Procedure popup appears. Do one of the following:
-
Click (or tap) Save & Complete.
-
Click (or tap) Cancel. Then, cancel completing the appointment to modify or delete the applicable procedures so that there are not duplicates.
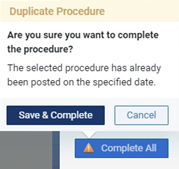
-
-
-
If the procedures all have the required information, and if a procedure with the same code and treatment areas (such as the tooth number and surfaces) as one of the procedures being completed has already been posted complete today, the Duplicate Procedure popup appears. Do one of the following:
-
Click (or tap) Save & Complete.
-
Click (or tap) Cancel. Then, cancel completing the appointment to modify or delete the applicable procedures so that there are not duplicates.

-
-
-
Scheduling the next recare appointment
You can schedule a patient's next recare appointment from the routing panel before you complete the current appointment. Alternatively, you can wait to schedule the next recare appointment until after you complete the current appointment.
To schedule a patient's next recare appointment
-
To schedule the next recare appointment, in the Chair section of the routing panel, expand the Schedule Recare task, and then click (or tap) the Unscheduled link next to the correct recare type.

The Appointment Information panel opens.
-
Set up the options for the appointment as needed.
Set up the following options:
-
Status - By default, all new appointments have Unconfirmed selected, but you can select a different status if necessary. The corresponding status icon appears on the appointment (for example, Unconfirmed is a question mark
). -
ASAP - Select this check box if the patient wants to be contacted if an earlier date and/or time becomes available. With this option selected, the patient will show on the ASAP List. With this option selected, the patient will show on the ASAP List, and an ASAP icon
appears on the appointment. -
Needs Follow-up - Select this check box if any of the procedures for this appointment require you to follow up with the patient after his or her visit. The patient will show up on the Patient Follow-up list after his or her appointment.
-
Premedicate - Select this check box if the patient prefers to be medicated before any of the procedures are performed or if any of the procedures require premedication.
Note: This checkbox is selected by default if the patient has an active medical alert that has the SNOMED code 398193008 assigned to it (such as "Pre-medicate need") in his or her record. You can clear the checkbox if premedication is not needed for this appointment.
-
Procedure(s) - The applicable recare procedures are attached to the appointment automatically.
On the Appointment Information panel, a recare procedure that is attached to an appointment has a green stripe. A non-recare procedure does not have a colored stripe.
-
Operatory - Select an operatory from the list. If you selected a time slot in step 3 while viewing by operatory, an operatory is already selected, but you can select a different one. Alternatively, to quickly change the operatory, click (or tap) and hold and then click (or tap) an open time slot in a different operatory.
Note: The provider's default operatory (if one has been set up) will be selected automatically if you are viewing the schedule by provider.
-
Appointment Provider - Select an appointment provider from the list. If you selected a time slot in step 3 while viewing the schedule by provider, a provider is already selected, but you can select a different one. Alternatively, if you are viewing the schedule by provider, to quickly change the provider, click (or tap) and hold and then click (or tap) the column of a different provider. Only providers who have access to the current location are available. The exception to this is when a provider is associated with the appointment and no longer has access to the current location; that provider is available in the list unless you select a different provider and then save the change.
-
Other Provider - Select a secondary provider, such as a hygienist, for the appointment from the list. A colored box
(determined by the provider color assigned to this provider) appears on the appointment. Only providers who have access to the current location are available. The exception to this is when a provider is associated with the appointment and no longer has access to the current location; that provider is available in the list unless you select a different provider and then save the change. -
Date - The date being viewed on the schedule is already selected by default, but you can change it. Click (or tap) in the box to select a different date. Alternatively, if you are viewing the schedule by week, to quickly change the date, click (or tap) and hold and then click (or tap) an open time slot on a different date.
-
Time - Click (or tap) in the box, and then enter a time. If you selected a time slot in step 3, the time is already entered, but you can change it. Alternatively, to quickly change the time, click (or tap) and hold and then click (or tap) a different open time slot.
Tip: You can enter a time using various formats. For example, you can type 08:30, 8:30a, or 8:30 AM; 8a or 8am; 13:30, 1:30p, or 1:30 PM; or 1p or 1pm.
-
Length - By default, the length of the appointment is determined by the location's default appointment length, but you can change the length as needed. The end time of the appointment changes accordingly.
-
Note - Enter a note regarding the appointment. To insert the current date where the text cursor is positioned in the box, click (or tap) Insert Date. If there is an appointment note, a note icon
appears on the appointment. -
Lab Case - On the Lab Case tab, you can attach a lab case to the patient's appointment.
-
-
Click (or tap) Save.
-
Do one of the following if applicable:
-
If you have attached treatment-planned procedures that are already scheduled, the Attach Treatment Plan message box appears so you can confirm that you want to remove the procedures from the other appointment. The message displays the date and time of the affected appointment and a note that it will be updated. However, if removing those procedures leaves another appointment empty, the message displays the date and time of the affected appointment and a note that it will remain scheduled on the calendar but be empty. To confirm that you want to move the procedures, click (or tap) Attach to This Appointment.
-
If you have attached recare procedures that are already attached to another appointment for this patient, and the other appointment's status is not Complete, the Attach Recare message box appears so you can confirm that you want the recare procedures to be attached to multiple appointments. The message displays the date and time of the other appointment. To confirm that you want to attach the recare procedures to mutliple appointments, click (or tap) Verify.
-
If you have attached treatment-planned procedures that are already scheduled, and if you have attached recare procedures that are already attached to another appointment for this patient, the Attach Treatment Plan & Recare message box appears so you can confirm that you want to remove the treatment-planned procedures from the other appointment and that you want the recare procedures to be attached to multiple appointments. The message displays the date and time of the affected treatment-planned appointment and a note that it will be updated; however, if removing those procedures leaves another appointment empty, the message displays the date and time of the affected appointment and a note that it will remain scheduled on the calendar but be empty. Also, the message displays the date and time of the other recare appointment. To confirm that you want to move the planned procedures and attach the recare procedures to multiple appointments, click (or tap) Verify.
-
Get the patient to the front office
-
After work is completed on the patient, the hygienist opens the routing panel (if it is not already open) and then clicks (or taps) the Checkout status button. The patient starts walking to the front desk to check out.
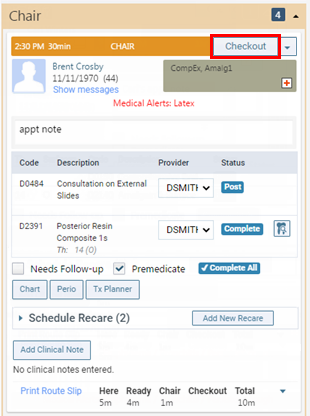
The appointment's status changes to Checkout. The receptionist at the front desk, at his or her computer, sees the notification of the status change, and the appointment appears on the routing panel under Checkout.
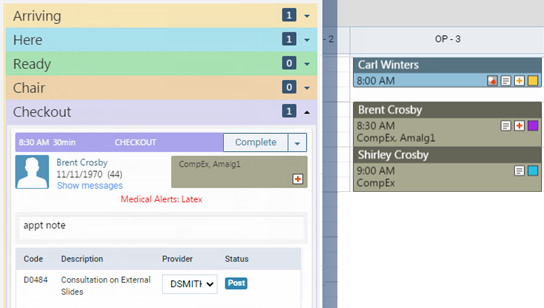
-
The receptionist clicks (or taps) the notification.
The corresponding patient becomes available (if not already visible) on the routing panel.
4. Patient checkout
Present treatment plan estimates
After treatment-planned procedures have been added to a case, you can present the treatment plan to the patient.
To present a treatment plan
-
The receptionist opens the routing panel (if it is not already open) and clicks (or taps) the name of the patient under Checkout.
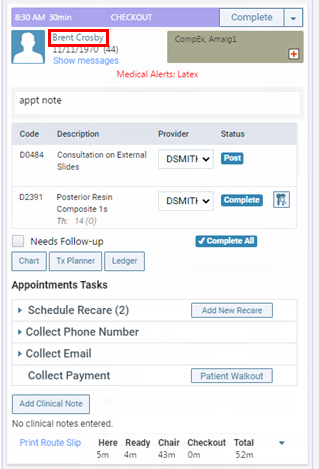
The patient is now selected in the Patient Search box.
-
Do one of the following:
-
If the patient's Overview page is not already open, on the Patient menu, under General, select Overview. The patient's Overview page opens. Click (or tap) the Treatment Plan box.
-
On the Patient menu, under Clinical, select Treatment Planner.
The patient's clinical record opens with the Tx Planner tab selected.
-
-
Under Active, select a case.
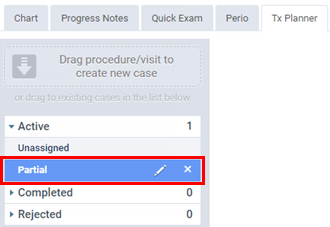
The recommended treatment for the selected case appears.
-
Click (or tap) Preview.

The treatment plan appears.
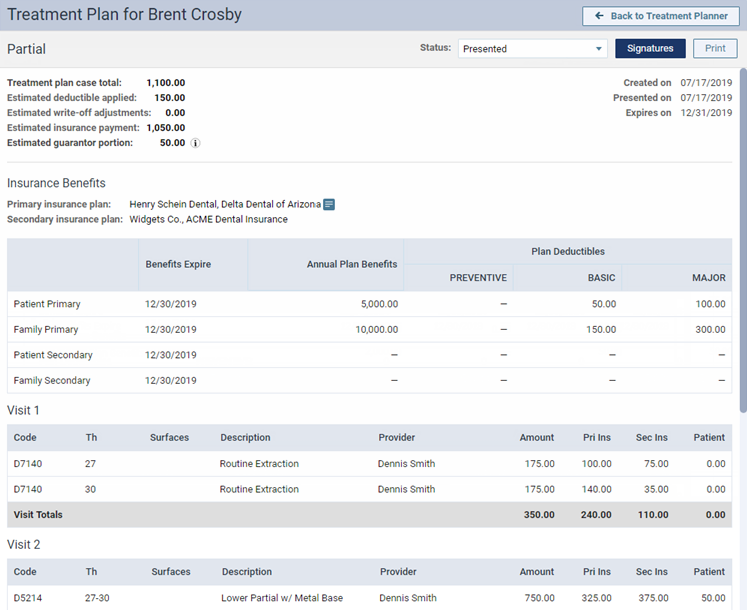
Notes:
-
The standard presentation format is used if the New Preview switch on the Preview Options menu is set to No.
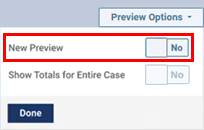
-
If one or more procedures in the treatment plan being presented have coverage exceptions, an orange warning icon
appears next to Estimated insurance payment. You can click (or tap) the icon to view a message that explains this.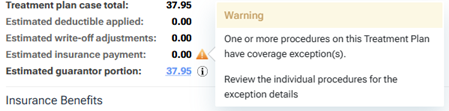
-
For a procedure with a coverage exception, an orange warning icon
appears next to the insurance amount (in the Pri Ins or Sec Ins column). You can click (or tap) the icon to view the applicable coverage exception.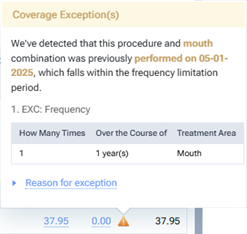
-
If an eligibility document (for the patient's primary insurance coverage only) exists for the patient, an Eligibility Verification line appears. The "E" icon indicates the status (eligible, ineligible, or unable to verify). The status and date of the verification is a link that you can click to view the corresponding eligibility document on a new browser tab.

-
-
By default, a presented case has a "Presented" status, but you can select a different Status as needed.
Select one of the following options:
-
New - This is a newly created case that you have not presented to the patient yet.
-
Presented - This is a case that you have presented to the patient.
-
Accepted - The entire case has been accepted by the patient.
-
Rejected - Any part of the case has been rejected by the patient.
-
-
If there is a blue insurance plan icon
 next to the name of any of the patient's insurance plans, there is a note for that insurance plan. To view the note as a tooltip (only if you are using a mouse), position the pointer over the icon; otherwise, click (or tap) the icon.
 -
To view the details of the treatment plan's estimated guarantor portion, click (or tap) the amount next to Estimated guarantor portion.
-
To print a copy of the treatment plan for the patient to take, click (or tap) Print.
To use the enhanced view to present the treatment plan to the patient, on the Try New Preview menu, set the New Preview switch to On.
-
To return to the Treatment Planner page, click (or tap) Back to Treatment Planner.
Schedule an appointment from the treatment plan
Scheduling appointments from treatment plans
You can quickly schedule appointments for the procedures in a patient's treatment plan.
To schedule a treatment plan
-
If the correct patient is not already selected, use the Patient Search box to access the patient's record.
-
Do one of the following:
-
If the patient's Overview page is not already open, on the Patient menu, under General, select Overview. The patient's Overview page opens. Click (or tap) the Treatment Plan box.
-
On the Patient menu, under Clinical, select Treatment Planner.
The patient's clinical record opens with the Tx Planner tab selected.
-
-
Under Active, select a treatment plan.
The procedures (arranged by visit) that are associated with the selected treatment plan appear.
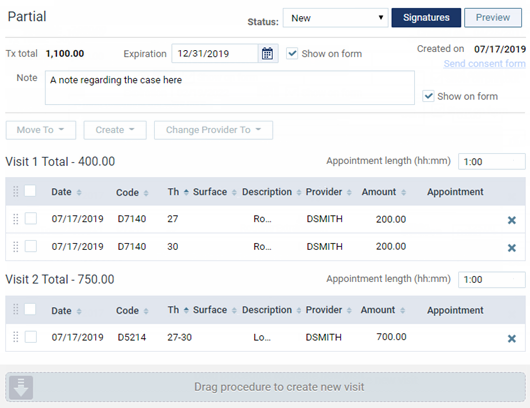
-
Select the checkboxes of all the procedures in the visit that you want to schedule an appointment for, or select the checkbox at the top of that visit to select all the corresponding procedures.
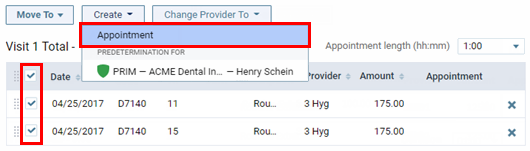
-
From the Create menu, select Appointment. This option is available only if all the procedures in the visit are selected.
If any of the procedures in the visit that are being billed to insurance require a predetermination, according to the patient's primary insurance plan settings, but a predetermination has not been created for the visit's procedures, the Create Appointment dialog box appears; otherwise, skip to step 5.
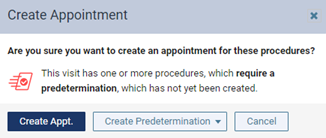
-
Do one of the following:
-
To create the appointment without creating a predetermination, click (or tap) Create Appt.
-
To create a predetermination before creating the appointment, do the following:
-
From the Create Predetermination menu, select the insurance plan that you want to create a predetermination for.
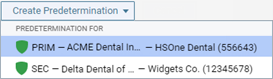
The Predetermination Detail dialog box appears.
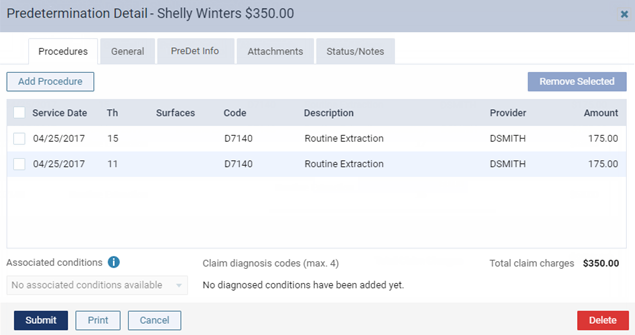
-
Change the details of the predetermination as needed.
-
Click (or tap) Submit.
-
-
Post procedures (those not charted)
Posting procedures (Ledger)
You can post a procedure or a charge for a product to a patient's ledger.
Important: The recommended method for posting procedures is to attach procedures to an appointment and then complete or post those procedures from the progress notes of the clinical chart.
Note: Completed procedures appear in the clinical record and financial record. Posting or editing a completed procedure in either of these areas affects the other area.
To post a procedure
-
If the correct patient is not already selected, use the Patient Search box to access the patient's record.
-
Do one of the following:
-
If the patient's Overview page is not already open, on the Patient menu, under General, select Overview. The patient's Overview page opens. Click (or tap) the Ledger box.
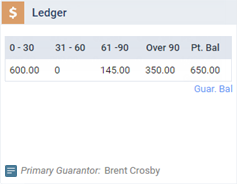
-
On the Patient menu, under Financial, select Ledger.
The patient's Ledger page opens.
-
-
Click (or tap) Procedure.
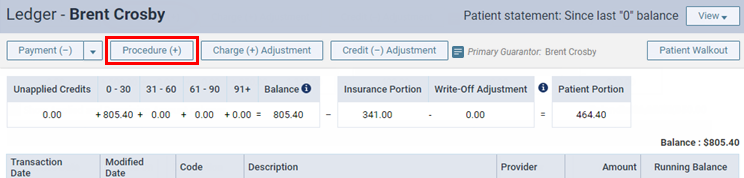
The Enter Procedure dialog box appears.
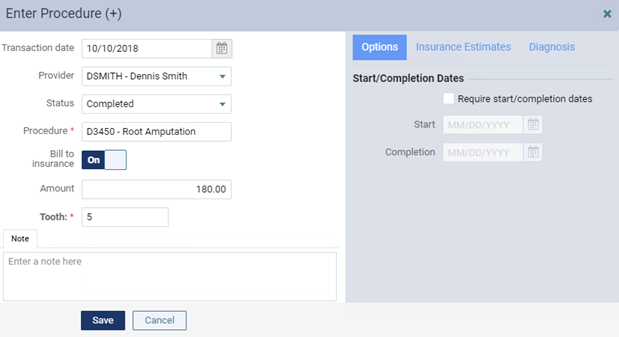
-
Enter the procedure details, such as the rendering provider, ADA Procedure Code, and amount.
Set up the following options:
-
Transaction date - The date of service. Leave the current date entered, or click (or tap) in the box to select the correct date.
If you attempt to backdate the procedure to a date that would cause it to become locked (based on your organization's transaction lock setting), the Locked Time Period pop-up box appears. In the Authorized user and Password boxes, enter your credentials if you have permission to backdate transactions into locked time periods, or have someone with permission enter his or her credentials. Then, click Unlock.
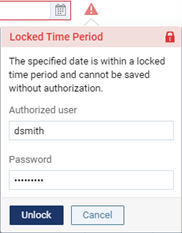
Note: Backdating transactions into locked time periods requires the "Override Locked Transaction" security right.
-
Provider - The provider who performed the procedures (rendering provider). Only providers who have access to the current location are available.
-
Status - A completed, treatment-planned, or existing procedure.
-
Procedure - The procedure performed or product sold. Click (or tap) in the box, begin typing the code or description of a procedure, continue typing as needed to narrow the results list, and then select the procedure to post.
When you are searching for a procedure, procedures appear in the results list not only according to your search criteria but according to the selected filter.

Select one of the following procedure filters as needed:
-
Carrier procedures - If the patient has any active insurance plans attached to his or her record, and if the selected Provider is contracted with any of the patient's carriers, Carrier procedures is selected by default. Selecting this option (if another option is already selected) may change the Amount and if the Procedure box contains a procedure that is not allowed by any of the patient's carriers, removes the procedure from the Procedure box.
Note: Only the carriers' allowed procedures are available.
-
Location procedures - If the patient is not covered by an insurance carrier that the provider is contracted with, Location procedures is selected by default. Selecting this option (if another option is already selected) may change the Amount and if the Procedure box contains a procedure that is not allowed at the current location, removes the procedure from the Procedure box.
Note: Only the location's allowed procedures are available.
Note: Carrier procedures is available only if the patient has any active insurance plans attached to his or her record, and if the selected Provider is contracted with any of the patient's carriers. Location procedures is available for any patient.
Important: If you post a multi-code that includes some procedures that are not allowed by the the location or any of the patient's carriers, those procedures will not be posted.
-
-
Bill to insurance - Whether the selected procedure should be billed to insurance. If the switch is On, the procedure can appear on a claim. If the switch is Off, the procedure cannot be added to a claim and will not be included in estimated insurance portion calculations. The default state of this switch is determined by the setup of the procedure code. Use caution when turning on this option for an alias procedure code or a non-standard code because some carriers may reject this procedure on a claim or may reject the entire claim due to the presence of an unrecognized procedure code. However, being able to bill a non-standard code, such as a rate code, to an insurance carrier is helpful for Federally Qualified Health Centers (FQHCs) when a rate code is needed for a wrap claim.
-
Amount - The charge for the selected procedure. The amount appears automatically, but you can change it as needed. By default, this amount comes from the selected procedure on the selected provider's fee schedule; however, if the selected procedure does not exist on that fee schedule, or the selected provider does not have a fee schedule, the amount comes from the selected procedure on the location's procedure code list. Also, be aware of the following:
-
If the patient has insurance coverage, if the patient's insurance plan has a contracted fee schedule attached to it, and if the selected provider (or the billing entity/location that is used for claims) is contracted with that carrier, the amount from the contracted fee schedule is used for calculating insurance estimates and write-offs.
-
If the patient does not have insurance coverage but has a discount plan, a credit adjustment will be entered automatically in the Ledger for the difference between the charged amount and the amount for the selected procedure on the patient's discount fee schedule if the selected procedure exists on that fee schedule and if the amounts are different.
Notes:
-
Changing the amount requires the "Edit patient procedure amount" security right, or if that right has not been granted and if the posted amount is currently $0, it requires the "Edit patient procedure zero amount" security right. If you need to change the amount, but your user account has not been granted the applicable security right, after receiving approval from someone who has been granted the "Edit patient procedure amount" security right, have that authorized user, click (or tap) the padlock icon next to the Amount box, enter his or her credentials, and then click (or tap) Unlock to temporarily unlock the amount. The Amount box will remain editable until you click (or tap) Save.
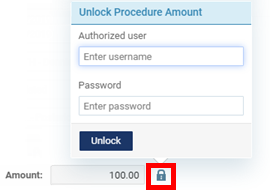
-
If the Amount does not match the charge for this procedure in the applicable fee schedule, an orange warning icon
 appears next to the Amount. You can click (or tap) the Update to: [amount] link to insert the indicated amount into the Amount box. Updating the procedure amount by clicking (or tapping) this link, requires the "Edit patient procedure amount" security right, or if that right has not been granted, it requires either the "Update patient procedure amount" security right (if the posted amount is currently greater than $0) or the "Edit patient procedure zero amount" security right (if the posted amount is currently $0).
-
-
Teeth, Surfaces, and so forth - If applicable for the selected procedure, specify the supporting treatment information, such as a Tooth number and Surfaces.
Note: To change the tooth number to a supernumerary tooth number, do the following: for a permanent tooth, add 50 (for example, 16 + 50 = 66); for a primary tooth, add a letter "s" (for example, CS).
-
Note - Any notes regarding the procedure. The maximum length allowed for the note is 255 characters.
-
Options - If the procedure has a Completed or Tx Plan status, you can set up the following options on this tab as needed:
-
Start/Completion Dates - If the procedure requires a start date and a completion date, select the Require start/completion dates checkbox. The Start and Completion boxes are populated with today's date automatically, but you can change the dates as needed.
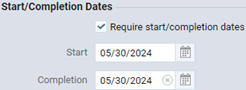
-
To change the start date, click (or tap) in the Start box, and then select a different date on the calendar that appears.
-
To remove the completion date, click (or tap) the Clear icon in the Completion box.

-
To change the completion date, click (or tap) in the Completion box, and then select a different date on the calendar that appears.
-
-
Orthodontic Treatment - If the procedure is for orthodontic treatment (D8010-D8999), select the Orthodontic treatment checkbox.
Then, set up the following options:
-
Placement - Click (or tap) in the box to display a calendar, and then select the date that the orthodontic device was placed.
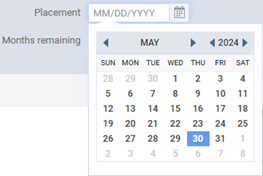
-
Months remaining - In the box, enter the number of months that remain until the treatment is complete.

Notes:
-
If orthodontic treatment information is required for the procedure, the Orthodontic treatment checkbox is selected automatically, and a warning symbol appears. You cannot save the procedure until you have entered the placement date and remaining number of months.
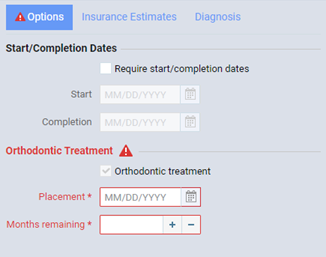
-
When you create a claim for the procedure, the total number of months will be calculated (based on the placement date and remaining months) and entered on the claim automatically.
-
-
Prosthesis - If the procedure allows for prosthesis information (D2710-D2799, D5810-5999, D6010-D6999, or D7993-D79994), select an option from the Prosthesis list:
-
Not Applicable - Prosthesis information is not applicable for this procedure.
-
Initial Placement - This procedure is for the initial placement of a prosthetic device. With this option selected, click (or tap) in the Date ordered box to display a calendar, and then select the prosthetic device was ordered.
-
Replacement - This procedure is for a replacement prosthetic device.
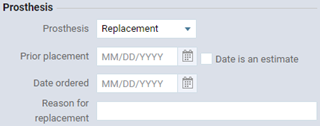
With this option selected, set up the following options:
-
Prior placement - Click (or tap) in the box to display a calendar, and then select the date that the prosthetic device was placed previously. If the specified date is an estimate, select the Date is an estimate checkbox.

-
Date ordered - Click (or tap) in the box to display a calendar, and then select the date that the prosthetic device was ordered.
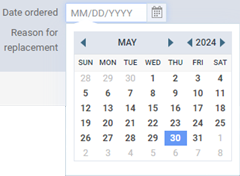
-
Reason for replacement - In the box, enter the reason that the prosthetic device is being replaced.
-
-
-
-
Insurance Estimates - On this tab, you can edit outstanding insurance estimates or enter insurance estimate overrides.
-
Diagnosis - On this tab, you can link conditions to the procedure.
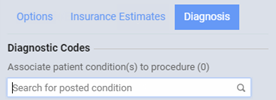
Note: Conditions (diagnoses) can be associated automatically with a procedure when charting a quick exam. Chart one or more conditions; and then, with the same tooth (or teeth) selected, treatment plan a procedure to treat those conditions.
-
Update procedure code/amount to the recommended value above? - Do any of the following:
-
If the selected Procedure is not valid for the specified tooth number and/or treatment areas (such as surfaces), the recommended ADA Procedure Code appears next to the box. To use the recommended procedure, either click (or tap) the recommendation to insert that value into the Procedure box, or select the Update procedure code/amount to the recommended value above? checkbox to use the recommended value automatically when you save the procedure. To not use the recommended procedure, clear the Update procedure code/amount to the recommended value above? checkbox.
-
If the Amount entered is different than the fee for the selected procedure in the patient's discount fee schedule (if applicable) or the provider's fee schedule (or if not applicable, the default fee for the procedure code), the recommended amount appears next to the box. To use the recommended amount, either click (or tap) the recommendation to insert that value into the Amount box, or select the Update procedure code/amount to the recommended value above? checkbox to use the recommended value automatically when you save the procedure. To not use the recommended amount, clear the Update procedure code/amount to the recommended value above? checkbox.
-
If there are recommendations for both the Procedure and the Amount, but you want to use only one of those recommendations, click (or tap) the recommendation that you want to use, and then clear the Update procedure code/amount to the recommended value above? checkbox before saving the procedure.
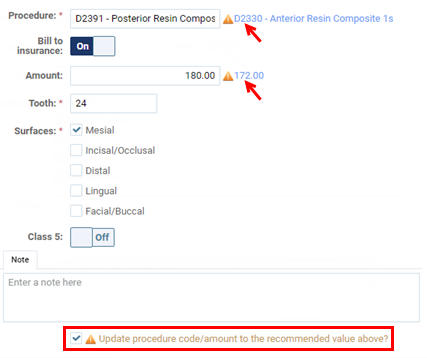
-
-
-
Click (or tap) Save.
If a procedure with the same code and treatment areas (such as the tooth number and surfaces) has already been posted complete for the specified date, the Duplicate Procedure popup appears.
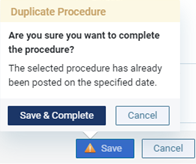
-
Do one of the following:
-
Click (or tap) Save & Complete.
-
Click (or tap) Cancel. Then, either cancel posting the procedure, or modify the procedure information so that it is not a duplicate.
-
Checking out the patient (walkout procedure)
Checking out patients
You can enter a payment, generate a walkout statement, and create claims at the same time for a patient when that patient is ready to check out after a visit.
To check out a patient
-
Do one of the following:
-
In the Checkout section of the routing panel, on a patient's appointment card, click (or tap) Patient Walkout.
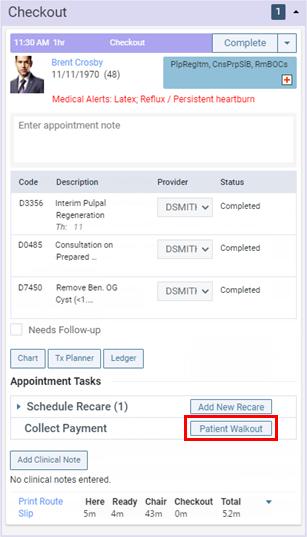
-
On a patient's Ledger page, click (or tap) Patient Walkout.
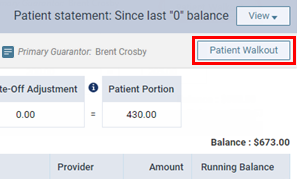
The Patient Walkout dialog box appears.
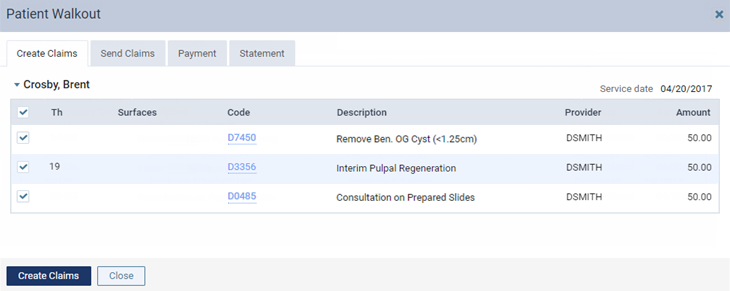
-
-
Perform the necessary tasks on the following tabs for checking the patient out after his or her visit:
-
Discount
Discount tab
The Discount tab is available only if the patient does not have insurance coverage, has a sliding fee assigned to his or her patient record, and has a poverty level with a per visit charge.
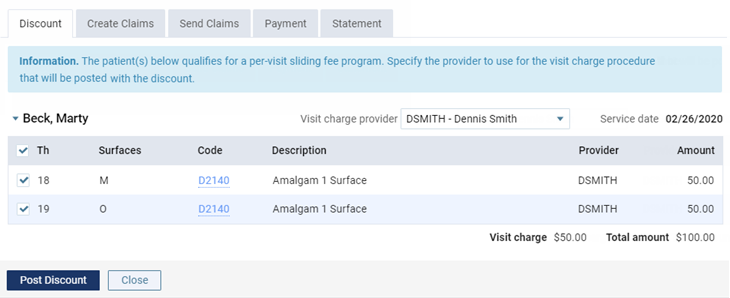
-
For each patient, do the following:
-
From the Visit charge provider list, select the provider who you want to associate with the visit charge.
-
Select the checkboxes of the procedures that are part of the visit.
-
-
Click (or tap) Post Discount.
Note: For each patient's visit, Dentrix Ascend posts a discount (credit adjustment) that is equal to the sum of the selected procedures and applies that credit to those procedures. Then, for each patient, Dentrix Ascend posts the procedure that has been assigned as a visit charge.

-
-
Create Claims
Create Claims tab
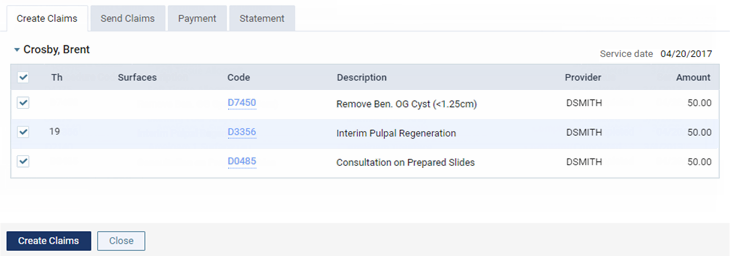
-
Select the checkboxes of any completed procedures posted to the patient's ledger that are not attached to claims.
Note: For an orthodontic procedure (D8001-D8999), if the treatment information is missing, a warning message appears at the top of the dialog box, and a warning symbol appears next to the corresponding patient's name and next to the applicable procedure. To include the procedure on a claim, you must first enter the treatment information.
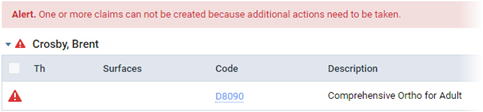
-
For the selected procedures, the associated diagnoses appear. You can have up to four ICD-10 codes per claim. If you have more than four, either remove ICD-10 codes from the claim (by clicking, or tapping,
 on the corresponding codes), or split the procedures between separate claims (clear the checkboxes of the procedures that you do not want on this claim, so you can create one or more additional claims for those procedures).
Note: Removing ICD-10 codes from a claim does not affect the corresponding procedures. All diagnoses remain attached to their corresponding procedures as currently posted in the patient's ledger and progress notes.
If there are two, three, or four ICD-10 codes, select the one that you want to be the primary diagnosis.

-
Click (or tap) Create Claims.
Procedures are grouped by Service Date, so you can create separate claims for each unique date of service.
-
-
Send Claims
Send Claims tab
Note: To reduce delays or non-payments from insurance carriers, Dentrix Ascend alerts you when, according to NEA guidelines, supporting documentation is recommended for any procedures on a claim. For a secondary (or tertiary or quaternary) insurance claim, a warning message includes a recommendation to attach the EOBs from the corresponding primary (and/or secondary and/or tertiary) claims before submitting the secondary (or tertiary or quaternary) claim.
An orange warning icon appears in a claim's Att. column when claim attachments are recommended. To see the applicable procedures and recommended attachment types, click the warning icon. In the pop-up message that appears, you can click Add Attachment(s) to open the claim so you can add attachments.
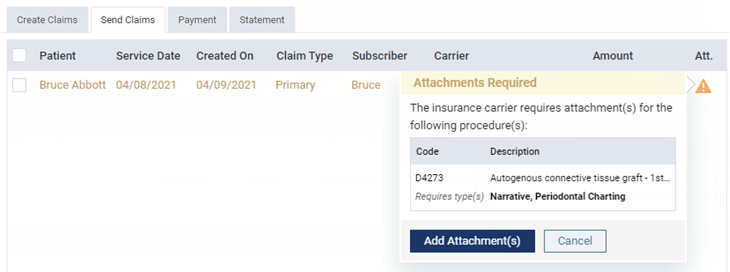
You can ignore a warning and submit the claim without the recommended attachments.
Important: Ignore an attachment recommendation only if you are certain that the payer does not require supporting documentation for the procedure.
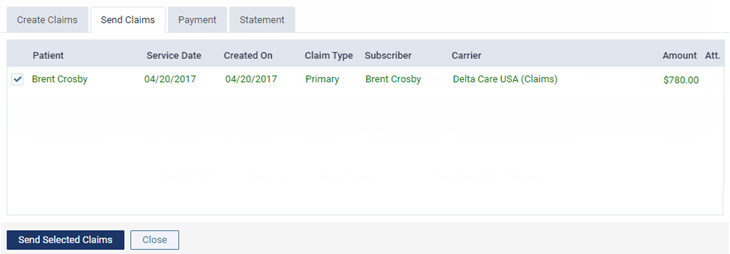
-
Select the checkboxes of the claims that you want to send.
-
Click (or tap) Send Selected Claims.
-
-
Payment
Payment tab
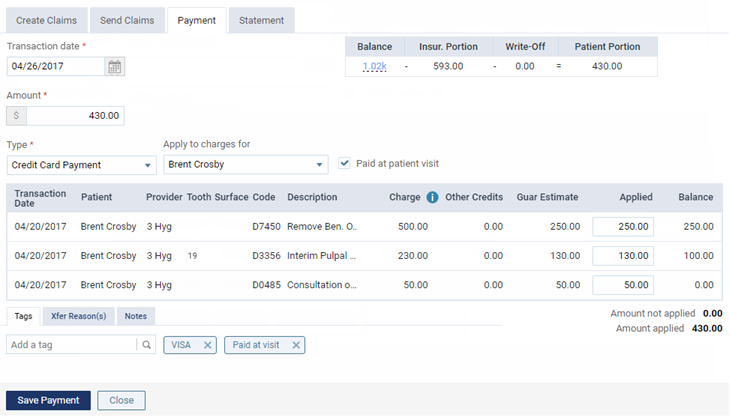
-
Type the Amount of the payment.
-
Select a payment Type.
The other payment options become available.
-
Set up the payment details as needed.
-
Click (or tap) Save Payment.
-
Repeat steps a-d for any other payments that you need to post.
-
-
Statement
Statement tab
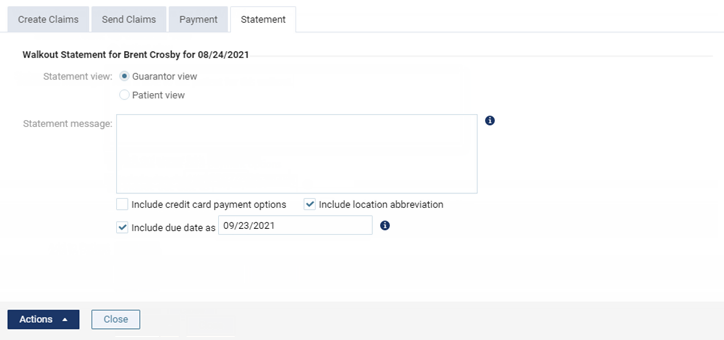
Notes:
-
For a printed statement, a guarantor must have a street address, city, state, and ZIP Code entered in his or her record. If this information is missing, Dentrix Ascend will warn you so you know to update the guarantor's information before generating the statement.
-
For an electronic statement, a guarantor must have mobile phone number or email address entered in his or her record. If this information is missing, Dentrix Ascend will warn you so you know to update the guarantor's information before generating the statement.
-
Set up the following walkout statement options as needed:
-
Statement View
-
Guarantor View - Select this option to include transactions for the current patient, all patients who have the same guarantor as the current patient, and the guarantor (if not the current patient).
-
Patient View - Select this option to include transactions for the current patient. This option is not available if the patient is the guarantor for only himself or herself (the Guarantor View option will be used).
-
-
Statement Message - Type a message that you want to have appear at the bottom of the walkout. This message will be saved for the current patient (and appear on this patient's individual statements and walkouts from now on) when you click (or tap) Print Walkout Statement. In addition to this patient-specific message, a general message may also appear below at the bottom of the walkout (if a default message exists for batch statements).
Note: Only the first 450 characters of the statement message can be transmitted with an electronic statement.
-
Include credit card payment options - Select this checkbox to have credit card payment options appear on the walkout.
-
Include location abbreviation - With this checkbox selected, the location abbreviation of the applicable rendering location (if an abbreviation has been set up for that location) appears next to each procedure on the statement.

-
Include due date as - Select this checkbox to have the specified date entered as the due date on the walkout.
Note: You can choose a date that is 1 to 180 days in the future. However, industry consultants recommend that the due date be 30 days, which is the default.
-
-
Do one of the following:
-
Print a statement for the patient, and optionally send an electronic statement (e-statement) to the patient:
-
From the Actions button menu, point to (or tap) Print.
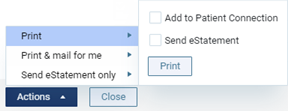
-
To record a summary of the statement in the patient's connections history and save a copy of the statement in the patient's Document Manager, select the Add to Patient Connection checkbox. To not record the statement as a patient connection or save a copy of the statement, leave the checkbox clear.
-
To send an electronic statement (e-statement) to the patient, in addition to printing the statement, select the Send eStatement checkbox. To not send an e-statement, leave the checkbox clear.
-
Click (or tap) Print.
-
-
Use Dentrix Ascend's print-and-mail statement fulfillment service to print and mail a statement for the patient (terms, conditions, and fees apply), and optionally send an electronic statement (e-statement) to the patient:
-
From the Actions button menu, point to (or tap) Print & mail for me.
Note: This option is available only if your assigned user role has the "Send single Print & mail for me statement" right.
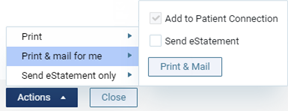
Note: The Add to Patient Connection checkbox is always selected. A summary of the statement will be recorded in the patient's connections history and a copy of the statement will be saved in the patient's Document Manager.
-
To send an electronic statement (e-statement) to the patient, in addition to having the statement printed and mailed for you, select the Send eStatement checkbox. To not send an e-statement, leave the checkbox clear.
-
Click (or tap) Print & Mail.
If you have not accepted the terms and conditions while logged in to the current location, the Pricing Details - Print & Mail for Me Option dialog box appears.
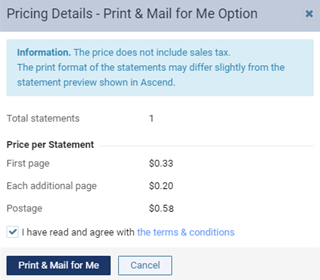
Note: You do not have to accept the terms and conditions again for this location unless the terms and conditions change, such as if the pricing changes.
-
To read the terms and conditions, click (or tap) the the terms & conditions link. The document opens on a new browser tab.
-
To accept the terms and conditions, select the I have read and agree with the terms & conditions checkbox.
-
Click (or tap) Print & Mail for Me.
-
-
Send an electronic statement (e-statement) to the patient:
-
From the Actions button menu, point to (or tap) Send eStatement only.
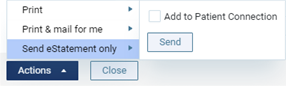
-
To record a summary of the statement in the patient's connections history and save a copy of the statement in the patient's Document Manager, select the Add to Patient Connection checkbox. To not record the statement as a patient connection or save a copy of the statement, leave the checkbox clear.
-
Click (or tap) Send.
-
If you chose to print the statement, a .pdf file of the walkout appears on a new browser tab so you can print it.
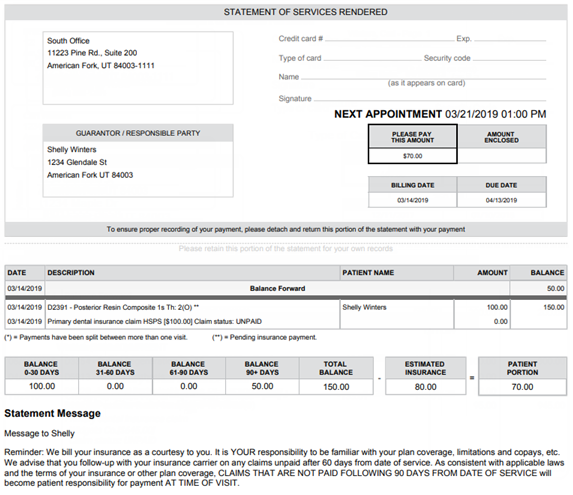
Notes:
-
A balance forward amount will appear on the walkout for the account's balance up to today's date.
-
If the Add to Patient Connection checkbox was selected, the patient's "last billed date" is updated, which affects which statements get generated if you generate a batch of statements in the future using the Only generate statement if not billed since option.
-
If the Add to Patient Connection checkbox was selected, and if the Guarantor View option was selected, a patient connection is added to, a copy of the statement is copied to, and the "last billed date" is updated for not only the current patient but the patient's guarantor (if not the same) and all patients who have that guarantor.
-
-
-
Complete the appointment
Completing appointments
Completing appointments is a good way to make sure that all the necessary tasks have been done for that appointment, such as posting procedures, scheduling the next recare appointment, gathering contact information, and collecting a payment. On the calendar, you can see at a glance which appointments have been completed because those appointment tiles will be a gray color.
Also, to help you complete all the necessary appointment tasks, you can turn on the workflow compliance feature for any location.
To complete an appointment
-
Do one of the following:
-
On the routing panel, click (or tap) the Complete status button.
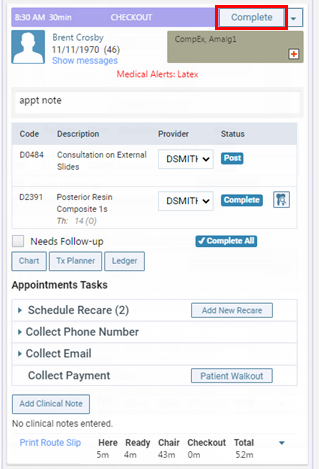
-
On the Calendar page, click (or tap) an appointment, and then change the appointment's Status to Complete.
Do the following:
-
Do one of the following:
-
Click (or tap) the Schedule menu.
-
On the Schedule menu, select Calendar.
The Calendar page opens.
-
-
Click (or tap) an appointment.
The Appointment Information panel appears.
-
From the Status list, select Complete.

-
Click (or tap) Save.
-
If any of the appointment's procedures have not been posted (either from the routing panel or from the progress notes), the Post Procedures Complete dialog box appears. Otherwise, skip to step 6.
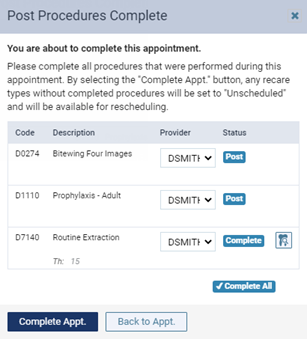
Note: Changing the status of an appointment for a new patient to "Complete" causes the status of the patient to change from New to Active.
-
-
Do any of the following as needed:
-
Complete each scheduled procedure with a Tx Plan status:
-
Do one of the following:
-
If the rendering provider is different from the provider who is attached to the appointment, change the Provider, and then click (or tap) Complete.
-
Click (or tap) Complete.
-
-
If the procedure is an orthodontic procedure (D8001-D8999) that requires treatment information, the Orthodontic Treatment pop-up message appears. In the Placement box, enter the date that the appliance was placed. In the Months remaining box, enter the number of months that remain until the treatment is complete. Then, click (or tap) Complete.
-
If a procedure with the same code and treatment areas (such as the tooth number and surfaces) has already been posted complete today, the Duplicate Procedure popup appears. Do one of the following:
-
Click (or tap) Save & Complete.
-
Click (or tap) Cancel. Then, cancel completing the appointment to modify or delete the applicable procedures so that there are not duplicates.
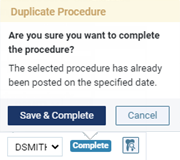
-
Note: You can mark any associated conditions as Treated before you finish completing this appointment, or someone can do it at a later time.
-
-
Complete each scheduled procedure with an Other status:
-
Do one of the following:
-
If the rendering provider is different from the provider who is attached to the appointment, change the Provider, and then click (or tap) Change & Complete.
-
Click (or tap) Post.
-
-
If the procedure is an orthodontic procedure (D8001-D8999) that requires treatment information, the Orthodontic Treatment pop-up message appears. In the Placement box, enter the date that the appliance was placed. In the Months remaining box, enter the number of months that remain until the treatment is complete. Then, click (or tap) Save (if you attempted to change the provider) or Post (if you attempted to post the procedure without changing the provider).
-
If the procedure requires additional treatment information (such as a tooth number and surfaces), the Enter Procedure dialog box appears. Enter the required details, and then click (or tap) Save.
-
If a procedure with the same code and treatment areas (such as the tooth number and surfaces) has already been posted complete today, the Duplicate Procedure popup appears. Do one of the following:
-
Click (or tap) Save & Complete.
-
Click (or tap) Cancel. Then, cancel completing the appointment to modify or delete the applicable procedures so that there are not duplicates.
-
-
-
Complete all scheduled procedures at once:
-
Click (or tap) Complete All.
-
Do the following as needed:
-
If any of the procedures need to have treatment areas (such as teeth and surfaces) specified or need to have orthodontic treatment information entered before they can be posted, the Bulk Edit Procedure dialog box appears. Enter the missing, required information for each procedure.
Do the following:
-
Specify the missing, required information for the procedure, and change other options as needed.
If the procedure is an orthodontic procedure (D8001-D8999) that requires treatment information, the Orthodontic treatment checkbox is selected, and a warning symbol appears. In the Placement box, enter the date that the appliance was placed. In the Months remaining box, enter the number of months that remain until the treatment is complete.
-
Click (or tap) Next to proceed to the next tab.
The options to edit the next procedure become available.
Note: The tab of the previous procedure has a green stripe to indicate that all the required information has been specified.
-
Do one of the following:
-
If the last tab is not selected, repeat steps a-b for the procedure.
-
If the last tab is selected, repeat step a for the procedure, and then click (or tap) Complete All (the button is available only if all the procedures have all the required information).
-
-
If a procedure with the same code and treatment areas (such as the tooth number and surfaces) as one of the procedures being completed has already been posted complete today, the Duplicate Procedure popup appears. Do one of the following:
-
Click (or tap) Save & Complete.
-
Click (or tap) Cancel. Then, cancel completing the appointment to modify or delete the applicable procedures so that there are not duplicates.
-
-
-
If the procedures all have the required information, and if a procedure with the same code and treatment areas (such as the tooth number and surfaces) as one of the procedures being completed has already been posted complete today, the Duplicate Procedure popup appears. Do one of the following:
-
Click (or tap) Save & Complete.
-
Click (or tap) Cancel. Then, cancel completing the appointment to modify or delete the applicable procedures so that there are not duplicates.
-
-
Treat conditions that are associated with completed treatment-planned procedures as needed by clicking (or tapping) the corresponding Condition buttons
 . If you have not already completed the treatment-planned procedures that were performed to treat those conditions, you can do so before you finish completing this appointment, or someone can do it at a later time.
-
-
-
-
Click (or tap) Complete Appt.
-
According to whether your location uses or does not use the workflow compliance feature for appointment tasks, do one of the following:
-
With workflow compliance: If there are incomplete tasks on the routing panel, a warning message appears, and the incomplete appointment tasks on the routing panel have a yellow background.
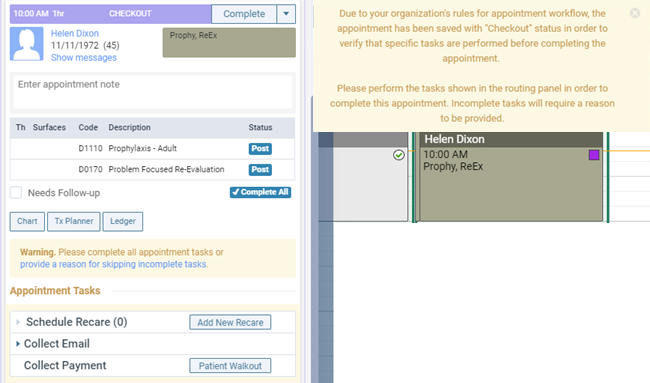
Note: The appointment status will remain as "Checkout" until you complete all the appointment tasks or until you specify a reason for not completing all the tasks.
Do the following:
-
Complete all the appointment tasks, or at least those that can be.
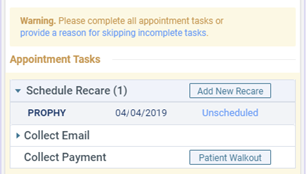
Under Appointment Tasks, do any of the following as required:
-
Collect a phone number - If there is not a phone number on record for the patient (if the patient is the primary contact for himself or herself) or the patient's primary contact person (if the primary contact is someone other than the patient), Collect Phone Number is available. To enter a phone number, expand the section.
-
Collect an email address - If there is not an email address on record for the patient (if the patient is the primary contact for himself or herself) or the patient's primary contact person (if the primary contact is someone other than the patient), Collect Email is available. To enter an email address, expand the section.
-
Add or schedule recare - If no primary recare types are attached to the patient's record, or if a primary recare type that is attached to the patient's record is not associated with a future appointment, Schedule Recare is available. To add a recare type to a patient's record, click (or tap) Add New Recare. If a recare type is attached to the patient's record but is unscheduled, to schedule a recare appointment for the patient, expand the section, and then click (or tap) the applicable Unscheduled link.
Note: Only primary recare types are required.
-
Collect a payment - If there is a guarantor balance for the patient, Collect Payment is available. A guarantor balance can consist of a balance for any of the following: the patient (whether or not the patient is the guarantor for himself or herself), the guarantor (if the guarantor is someone other than the patient), or any other patients who share that guarantor. To enter a payment and perform other actions (such as creating and sending a claim), click (or tap) Patient Walkout.
-
-
Do one of the following:
-
If all appointment tasks are now complete (the yellow background disappears, and the tasks have green check mark symbols next to them), complete the appointment from the routing panel or the appointment information panel. Ignore the steps that follow.
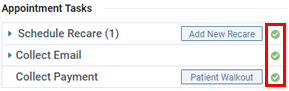
-
If all appointment tasks are still not complete, click (or tap) the provide a reason for skipping incomplete tasks link. Proceed to the next step.
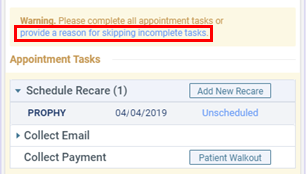
The Reason to Skip Completing All Tasks dialog box appears.
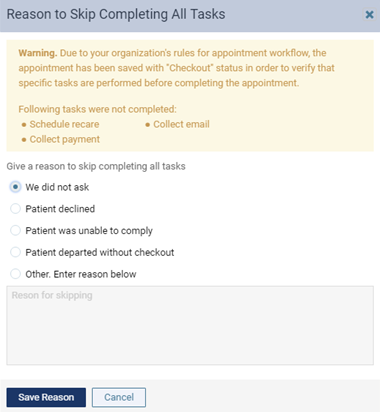
-
-
Select a reason why tasks were not completed. If you select Other, enter an explanation (such as "Applied pre-payment to balance"), in the box provided.
-
Click (or tap) Save Reason to complete the appointment.
-
-
Without workflow compliance: The appointment is marked as completed. According to whether you posted or did not post the recare, do one of the following:
-
If you did post the recare, the Schedule Appointment message appears.
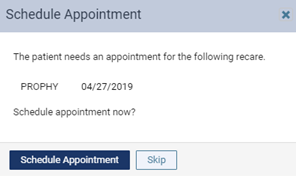
Click (or tap) Schedule Appointment to schedule the patient's next recare appointment.
-
If you did not post the recare, the Update Patient Recare message appears.
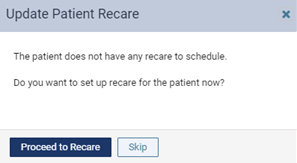
Click (or tap) Proceed to Recare to attach the correct recare to the patient's record. Next, you will need to schedule the next appointment for the newly-attached recare type (using the Unscheduled link).
-
Note: If you complete the appointment without posting the recare procedure and without scheduling the next recare appointment, the due date of the corresponding recare type attached to the patient does not get updated, and that recare type becomes unscheduled for that patient.
The patient's appointment card now appears under Complete on the routing panel.
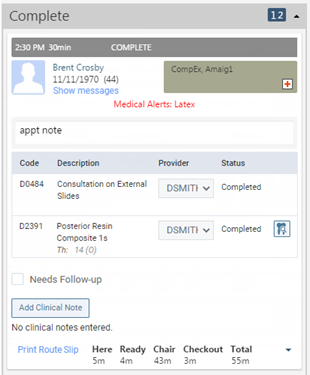
-
-
If you have not already done so, treat conditions associated with completed treatment-planned procedures as needed by clicking (or tapping) the corresponding Condition buttons
.
Post a patient payment (if not done during the walkout procedure)
Posting patient payments
You can post a payment from a patient to that patient's ledger.
To post a patient payment
-
If the correct patient is not already selected, use the Patient Search box to access the patient's record.
-
Do one of the following:
-
If the patient's Overview page is not already open, on the Patient menu, under General, select Overview. The patient's Overview page opens. Click (or tap) the Ledger box.
-
On the Patient menu, under Financial, select Ledger.
The patient's Ledger page opens.
-
-
Click (or tap) Payment.
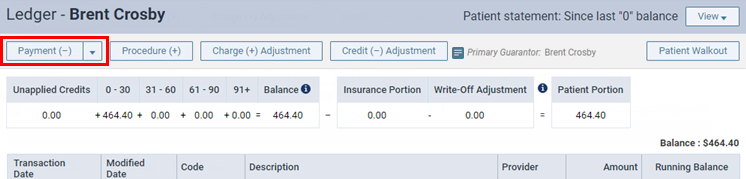
The Enter Payment dialog box appears.
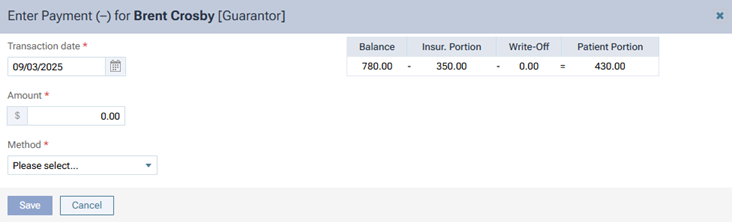
-
Leave the current date entered in the Transaction date box, or click (or tap) in the box to select the correct date.
If you attempt to backdate the payment to a date that would cause it to become locked (based on your organization's transaction lock setting), the Locked Time Period pop-up box appears. In the Authorized user and Password boxes, enter your credentials if you have permission to backdate transactions into locked time periods, or have someone with permission enter his or her credentials. Then, click Unlock.
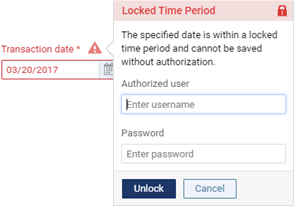
Note: Backdating transactions into locked time periods requires the "Override Locked Transaction" security right.
-
Enter the Amount of the payment.
-
Select the Method of payment received from the patient (such as a check, cash, or credit card).
Note: If your location uses Dentrix Ascend Pay, and you select Credit Card Payment as the payment type, options for processing the credit card become available.
Additional options appear in the dialog box.
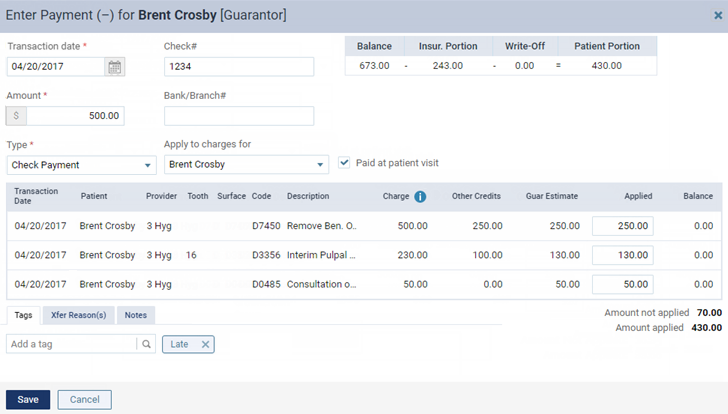
-
Enter the payment details, such as the check number and amount.
Set up the following options:
-
Check # - The check number. This option is available only if the payment type is Check Payment.
-
Reference # - The reference number of the transaction or electronic funds transfer (EFT). This option is available only if the payment method is Patient Financing Payment or Electronic Transfer Payment.
-
Bank/Branch # - The bank account number on the check. This option is available only if the payment type is Check Payment.
-
Apply to charges for - The payment goes towards charges for the patient whose record you are viewing or another member of his or her household. If you select [Guarantor], you can apply the payment to charges for any household members.
-
Paid at patient visit - The payment was made at the office when services were rendered. Statistics regarding payments collected during visits appear on the Payment Analysis Report.
-
-
The payment amount is applied automatically to the procedure with the oldest date of service and then to subsequent procedures based on the date until the payment amount is used up. However, you can change the Applied amount for any procedure in the procedure list as needed.
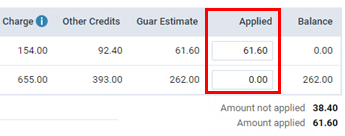
For your reference, the following amounts appear:
-
The Amount not applied is the payment Amount minus the sum of the amounts in the Applied column. This amount will appear as a credit on the account of the patient whose record you are viewing, another household member, or the guarantor, according to the selection that you made from the Apply to charges for list.
-
The Amount applied is the sum of the amounts in the Applied column.
Notes:
-
If you are entering a payment for procedures on the same date as the date of service or for procedures prior to the current date that are attached to a claim, Dentrix Ascend automatically calculates the estimated guarantor portion of the charges (if the patient has insurance coverage). However, if you are entering a payment for procedures prior to the current date that are not attached to a claim, Dentrix Ascend automatically calculates the estimated guarantor portion to be 100 percent of the charges.
-
If the patient has insurance coverage, and the estimated insurance portion for a given procedure is 100 percent, that procedure does not appear in the Enter Payment dialog box.
-
-
On the Tags tab, add tags to the payment as needed.
-
If applicable, on the Xfer Reason(s) tab, select or create reasons for a transfer of responsibility as needed.

To select or create a reason, do the following:
-
In the Add a tag search box, begin typing the name of a reason. Once you have entered at least two characters, the results list appears with any matches (not case-sensitive). Continue typing as needed to narrow the results list.
-
Do one of the following:
-
If the correct reason is listed, select that reason to attach it.
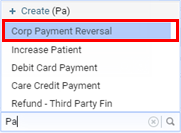
-
If the correct reason does not exist, finish typing the name of the reason (spaces are allowed). Make sure that the name is capitalized as desired. Then, select + Create [reason name] to create the reason and attach it.
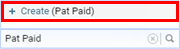
Note: The reason that you have created is now available to all Dentrix Ascend users in your organization.
-
Note: To save the payment after you add reasons for a transfer of responsibility, your user account must have the security right "Edit responsibility transfer reason" enabled.
-
-
On the Notes tab, enter any notes regarding the payment.
-
Click (or tap) Save.
Generate a billing statement (if not done during the walkout procedure)
Generating a patient's billing statement
You can generate a billing statement for a specific patient or account. You can then send it electronically, print it in-office to mail it, or use Dentrix Ascend's print-and-mail statement fulfillment service to have it printed and mailed to the patient or guarantor.
Notes:
-
For a printed statement, a guarantor must have a street address, city, state, and ZIP Code entered in his or her record. If this information is missing, Dentrix Ascend will warn you so you know to update the guarantor's information before generating the statement.
-
For an electronic statement, a guarantor must have mobile phone number or email address entered in his or her record. If this information is missing, Dentrix Ascend will warn you so you know to update the guarantor's information before generating the statement.
To generate a billing statement
-
If the correct patient is not already selected, use the Patient Search box to access the patient's record.
-
On the Patient menu, under Financial, select Billing Statement.
The Billing Statement dialog box appears.
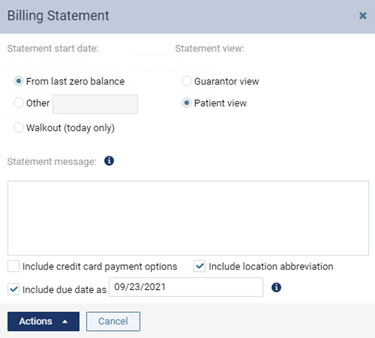
-
Set up the following options:
-
Statement Start Date
-
From Last Zero Balance - Select this option to include an account's transactions with service dates (transaction dates) since the account last had a zero balance.
-
Other - Select this option to include an account's transactions with service dates (transaction dates) since the date you enter. The current date is entered by default, but you can change the date.
-
Walkout (Today Only) - Select this option to include an account's transactions with service dates (transaction dates) on the current date.
Notes:
-
The statement will include only the current version of transactions. The statement will not include transaction history or cancellations.
-
On the statement, a balance forward amount will appear for the account's balance up to the specified date.
-
-
Statement View
-
Guarantor View - Select this option to include transactions for the current patient, all patients who have the same guarantor as the current patient, and the guarantor (if not the current patient).
-
Patient View - Select this option to include transactions for the current patient. This option is not available if the patient is the guarantor for only himself or herself (the Guarantor View option will be used).
-
-
Statement Message - Type a message that you want to have appear at the bottom of the statement. This message will be saved for the current patient (and appear on this patient's individual statements and walkouts from now on) when you click (or tap) Print. In addition to this patient-specific message, a general message may also appear at the bottom of the statement (if a default message exists for batch statements).
Note: Only the first 450 characters of the statement message can be transmitted with an electronic statement.
-
Include credit card payment options - Select this checkbox to have credit card payment options appear on the statement.
-
Include location abbreviation - With this checkbox selected, the location abbreviation of the applicable rendering location (if an abbreviation has been set up for that location) appears next to each procedure on the statement.
-
Include due date as - Select this checkbox to have the specified date entered as the due date on the statement.
Note: You can choose a date that is 1 to 180 days in the future. However, industry consultants recommend that the due date be 30 days, which is the default.
-
-
Do one of the following:
-
Print a statement for the patient, and optionally send an electronic statement (e-statement) to the patient:
-
From the Actions button menu, point to (or tap) Print.
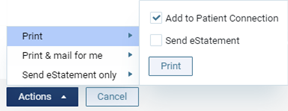
-
To record a summary of the statement in the patient's connections history and save a copy of the statement in the patient's Document Manager, leave the Add to Patient Connection checkbox selected. To not record the statement as a patient connection or save a copy of the statement, clear the checkbox.
-
To send an electronic statement (e-statement) to the patient, in addition to printing the statement, select the Send eStatement checkbox. To not send an e-statement, leave the checkbox clear.
-
Click (or tap) Print.
-
-
Use Dentrix Ascend's print-and-mail statement fulfillment service to print and mail a statement for the patient (terms, conditions, and fees apply), and optionally send an electronic statement (e-statement) to the patient:
-
From the Actions button menu, point to (or tap) Print & mail for me.
Note: This option is available only if your assigned user role has the "Send single Print & mail for me statement" right.
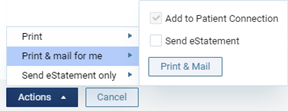
Note: The Add to Patient Connection checkbox is always selected. A summary of the statement will be recorded in the patient's connections history and a copy of the statement will be saved in the patient's Document Manager.
-
To send an electronic statement (e-statement) to the patient, in addition to having the statement printed and mailed for you, select the Send eStatement checkbox. To not send an e-statement, leave the checkbox clear.
-
Click (or tap) Print & Mail.
If you have not accepted the terms and conditions while logged in to the current location, the Pricing Details - Print & Mail for Me Option dialog box appears.
Note: You do not have to accept the terms and conditions again for this location unless the terms and conditions change, such as if the pricing changes.
-
To read the terms and conditions, click (or tap) the the terms & conditions link. The document opens on a new browser tab.
-
To accept the terms and conditions, select the I have read and agree with the terms & conditions checkbox.
-
Click (or tap) Print & Mail for Me.
-
-
Send an electronic statement (e-statement) to the patient:
-
From the Actions button menu, point to (or tap) Send eStatement only.

-
To record a summary of the statement in the patient's connections history and save a copy of the statement in the patient's Document Manager, leave the Add to Patient Connection checkbox selected. To not record the statement as a patient connection or save a copy of the statement, clear the checkbox.
-
Click (or tap) Send.
-
If you chose to print the statement, a .pdf file of the statement appears on a new browser tab so you can print it.
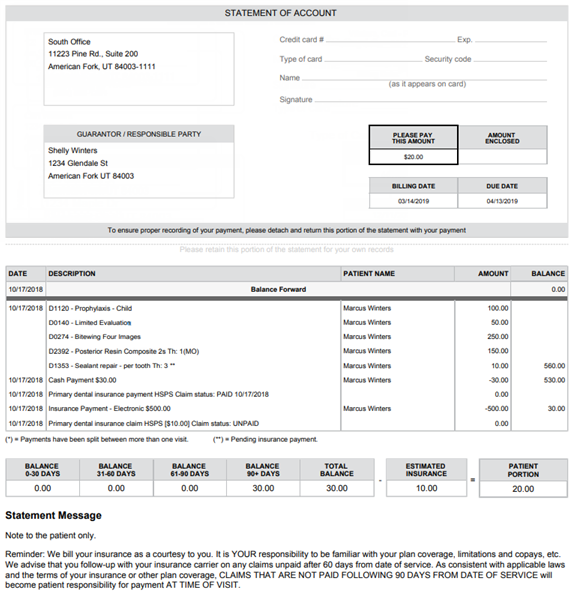
Notes:
-
Printed statements fit in #9 single- and dual-window envelopes and #10 single-window envelopes.
-
If the Add to Patient Connection checkbox was selected, the patient's "last billed date" is updated, which affects which statements get generated if you generate a batch of statements in the future using the Only generate statement if not billed since option.
-
If the Add to Patient Connection checkbox was selected, and if the Guarantor View option was selected, a patient connection is added to, a copy of the statement is copied to, and the "last billed date" is updated for not only the current patient but the patient's guarantor (if not the same) and all patients who have that guarantor.
-
Create a claim (if not done during the walkout procedure)
Creating claims
You can quickly create claims for procedures that are not attached to insurance claims. Also, you can edit any unattached procedure before you create a claim for that procedure.
Tip: You can create a claim for a patient's procedures while performing a patient checkout.
Note: Creating claims requires the "Create Insurance Claims" security right.
To create claims
-
If you are not already viewing the correct location, select it on the Location menu.
-
On the Home menu, under Insurance, select Create Claims.
The Create Claims page opens.
-
Do one of the following:
-
To create claims for all procedures for all patients listed, leave the All checkbox at the top of the page selected.
-
To create claims for specific procedures for a specific patient, clear the All checkbox at the top of the page, and then, under the appropriate patient's name, select the checkboxes of the procedures to include or the All checkbox to include all procedures.
Notes:
-
For an unattached procedure to appear on the Create Claims page, the service date of that procedure must fall within the coverage dates of a patient's insurance plan, and that procedure must be marked as billable to insurance.
-
For an orthodontic procedure (D8001-D8999), if the treatment information is missing, a warning message appears at the top of the page, and a warning symbol appears next to the corresponding patient's name and next to the applicable procedure. To include the procedure on a claim, you must first enter the treatment information.
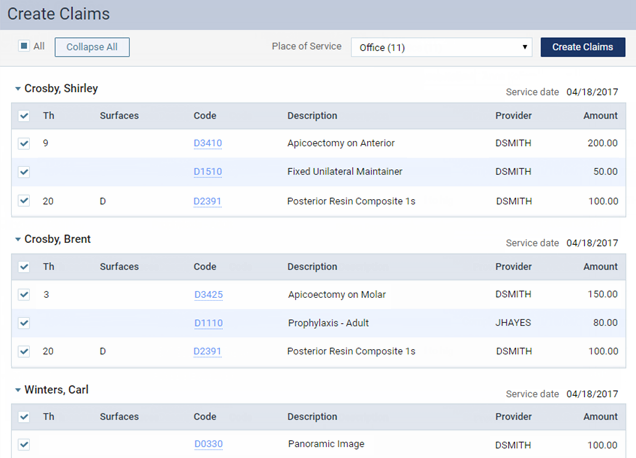
Tips:
-
To edit a procedure before creating a claim for it, click (or tap) the procedure code link, make the necessary changes, and then click (or tap) Save.
-
To hide the procedures and show only the patient names, click (or tap) Collapse All.
-
To hide or show the procedures for a specific patient, click (or tap) the header with that patient's name.
-
-
For the selected procedures, the associated diagnoses appear. You can have up to four ICD-10 codes per claim. If you have more than four, either remove ICD-10 codes from the claim (by clicking, or tapping,
on the coresponding codes), or split the procedures between separate claims (clear the checkboxes of the procedures that you do not want on this claim, so you can create one or more additional claims for those procedures).Note: Removing ICD-10 codes from a claim does not affect the corresponding procedures. All diagnoses remain attached to their corresponding procedures as currently posted in the patient's ledger and progress notes.
If there are two, three, or four ICD-10 codes, select the one that you want to be the primary diagnosis.
-
Select the Place of Service for the claims that will be created for the selected procedures.
Note: You can change the place of service for a claim later if needed.
-
Click (or tap) Create Claims.
For each patient with procedures selected, separate claims are created for the service dates of the selected procedures.
For example, Billy has six unattached procedures selected with varying service dates:
-
Procedure 1 - 10/10/2013
-
Procedure 2 - 10/10/2013
-
Procedure 3 - 11/11/2013
-
Procedure 4 - 11/11/2013
-
Procedure 5 - 11/11/2013
-
Procedure 6 - 12/12/2013
Three claims will be created (one for procedures 1 - 2, one for procedures 3 - 5, and one for procedure 6).
-
Posting credit adjustments
Posting credit adjustments
You can post a credit adjustment, which decreases an account balance, to a patient's ledger.
To post a credit adjustment
-
If the correct patient is not already selected, use the Patient Search box to access the patient's record.
-
Do one of the following:
-
If the patient's Overview page is not already open, on the Patient menu, under General, select Overview. The patient's Overview page opens. Click (or tap) the Ledger box.
-
On the Patient menu, under Financial, select Ledger.
The patient's Ledger page opens.
-
-
Click (or tap) Credit Adjustment.
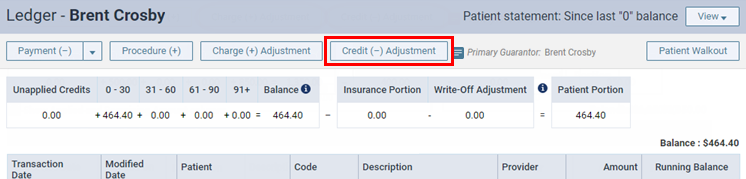
The Enter Credit (-) Adjustment dialog box appears.

-
Enter the adjustment details, such as the type and amount.
Set up the following options:
-
Transaction date - The date of the adjustment. Leave the current date entered, or click (or tap) in the box to select the correct date.
If you attempt to backdate the adjustment to a date that would cause it to become locked (based on your organization's transaction lock setting), the Locked Time Period pop-up box appears. In the Authorized user and Password boxes, enter your credentials if you have permission to backdate transactions into locked time periods, or have someone with permission enter his or her credentials. Then, click Unlock.
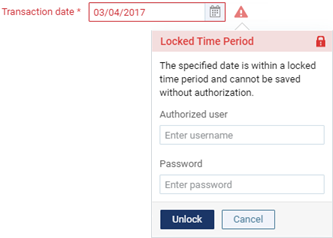
Note: Backdating transactions into locked time periods requires the "Override Locked Transaction" security right.
-
Type - The adjustment type, such as Credit Adjustment or Professional Courtesy.
-
Amount - The amount of the adjustment.
-
Apply to charges for - The adjustment is to be applied toward charges on the current patient's account or the account of another member of his or her household. If you select [Guarantor], you can apply the adjustment to charges for any or all household members.
-
-
The adjustment amount is applied automatically to the procedure with the oldest date of service and then to subsequent procedures based on the date until the adjustment amount is used up. However, you can change the Applied amount for any procedure in the procedure list as needed.
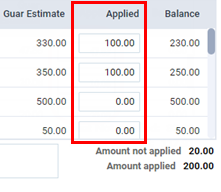
Note: If there is an amount greater than zero for Amount not applied when you save the adjustment, you can use that unapplied credit later.
-
On the Tags tab, add tags to the adjustment as needed.
-
If applicable, on the Xfer Reason(s) tab, select or create reasons for a transfer of responsibility as needed.

To select or create a reason, do the following:
-
In the Add a tag search box, begin typing the name of a reason. Once you have entered at least two characters, the results list appears with any matches (not case-sensitive). Continue typing as needed to narrow the results list.
-
Do one of the following:
-
If the correct reason is listed, select that reason to attach it.
-
If the correct reason does not exist, finish typing the name of the reason (spaces are allowed). Make sure that the name is capitalized as desired. Then, select + Create [reason name] to create the reason and attach it.
Note: The reason that you have created is now available to all Dentrix Ascend users in your organization.
-
Note: To save the adjustment after you add reasons for a transfer of responsibility, your user account must have the security right "Edit responsibility transfer reason" enabled.
-
-
On the Notes tab, enter any relevant notes regarding the adjustment.
-
Click (or tap) Save.
Posting charge adjustments
Posting charge adjustments
You can post a charge adjustment, which increases an account balance, to a patient's ledger.
To post a charge adjustment
-
If the correct patient is not already selected, use the Patient Search box to access the patient's record.
-
Do one of the following:
-
If the patient's Overview page is not already open, on the Patient menu, under General, select Overview. The patient's Overview page opens. Click (or tap) the Ledger box.
-
On the Patient menu, under Financial, select Ledger.
The patient's Ledger page opens.
-
-
Click (or tap) Charge Adjustment.
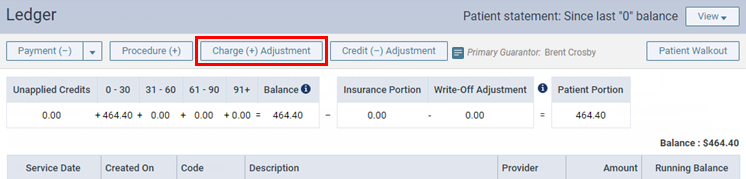
The Enter Charge (+) Adjustment dialog box appears.
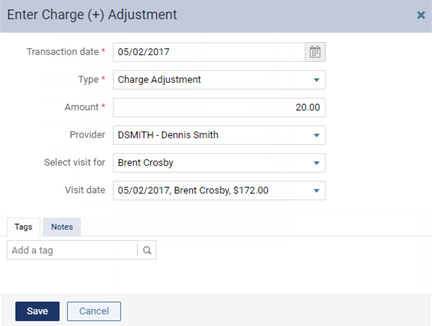
-
Enter the adjustment details, such as the type, provider, and amount.
Set up the following options:
-
Transaction date - The date of the adjustment. Leave the current date entered, or click (or tap) in the box to select the correct date.
If you attempt to backdate the adjustment to a date that would cause it to become locked (based on your organization's transaction lock setting), the Locked Time Period pop-up box appears. In the Authorized user and Password boxes, enter your credentials if you have permission to backdate transactions into locked time periods, or have someone with permission enter his or her credentials. Then, click Unlock.
Note: Backdating transactions into locked time periods requires the "Override Locked Transaction" security right.
-
Type - The adjustment type, such as Charge Adjustment or Patient Refund.
-
Amount - The amount of the adjustment.
-
Provider - The provider to associate with this adjustment. Only providers who have access to the current location are available.
-
Select Visit for - The adjustment is to be associated with a visit from the current patient or another member of his or her household. If you select [Guarantor], you can apply the adjustment to a visit from any member of the household. The selection cannot be changed after you save the adjustment.
-
Visit date - The date of service (for the patient or guarantor selected from the Select Visit for list) to associate the adjustment with. Select [None] if the adjustment is not to be associated with a visit date. This option is available only if the current patient's name or [Guarantor] is selected from the Select Visit for list. The selection cannot be changed after you save the adjustment.
-
-
On the Tags tab, add tags to the adjustment as needed.
-
On the Notes tab, enter any notes regarding the adjustment.
-
Click (or tap) Save.