Entering clinical notes
You can enter clinical notes into a patient's record.
Note: You can also enter and sign clinical notes from the Clinical Note Tasks page.
To enter a clinical note
-
If the correct patient is not already selected, use the Patient Search box to access the patient's record.

-
Do one of the following:
-
To assign tooth numbers to the clinical note that you are going to create, do the following:
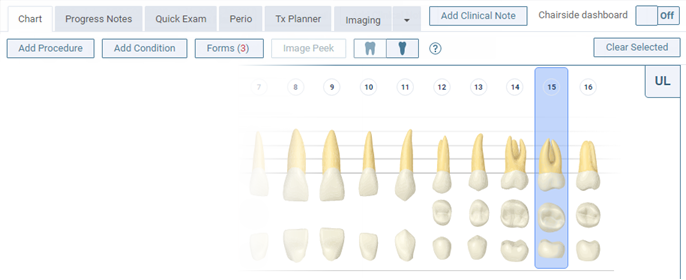
On the Patient menu, under Clinical, select Chart or Quick Exam.
The patient's clinical record opens with the Chart or Quick Exam tab selected.
-
Select one or more teeth.
-
On the Chart tab:
-
On the Quick Exam tab:

-
Note: You can change the assigned tooth numbers as needed later.
-
To not assign tooth numbers (initially or ever) to the clinical note that you are going to create, skip this step.
Note: You can assign tooth numbers as needed later.
-
-
If you are not already viewing the Chart, Progress Notes, Quick Exam, Perio, or Tx Planner, or Imaging tab of the patient's clinical record, and you do not want to assign tooth numbers (initially or ever) to the clinical note that you are going to create, do the following:
-
On the Patient menu, under Clinical, select Chart, Progress Notes, Quick Exam, Perio, Tx Planner, or Imaging.
The patient's clinical record opens with the Chart, Progress Notes, Quick Exam, Perio, Tx Planner, or Imaging tab selected.
-
-
Do one of the following:
-
Whether or not the patient has existing clinical notes, click (or tap) Add Clinical Note.

-
If the patient has existing clinical notes, on the Clinical Notes menu, select + Add Clinical Note.

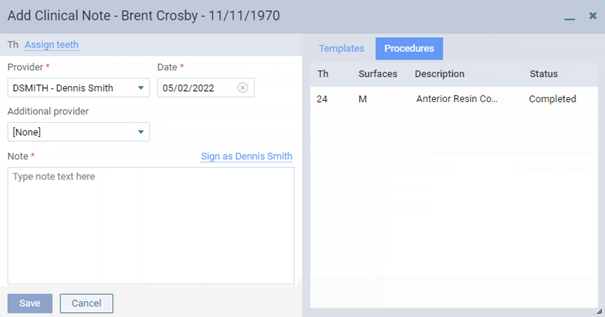
The Add Clinical Note dialog box appears.
Notes:
-
For your reference, any of the patient's completed and treatment-planned procedures for the selected date appear on the Procedures tab.
-
If Dentrix Ascend detects that there is an unsaved clinical note for the patient due to you being logged out automatically before you could save the note, the clinical note is populated with the information from the unsaved note, and a yellow warning message appears. To save the note, click (or tap) Save in the Add Clinical Note dialog box.
-
-
Set up the following options:
-
Th - By default, if you have selected teeth on the Chart or Quick Exam tab of the patient's clinical record, those tooth numbers are automatically assigned to this clinical note. Do one of the following if needed:
-
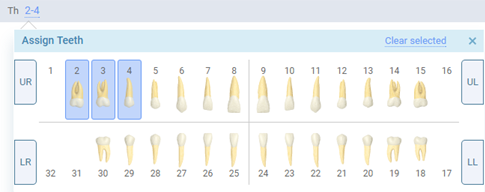
If no tooth numbers are assigned to the clinical note, to assign tooth numbers, click (or tap) the Assign teeth link, select the applicable teeth, and then click (or tap) X.
-
If tooth numbers are assigned to the clinical note, to modify the assigned tooth numbers, click (or tap) the link for those tooth numbers (such as 2-4). Select or deselect teeth, and then click (or tap) X.
-
-
Provider - The provider to associate with this note.
Notes:
-
Only providers who have access to the current location and who are flagged as charting providers are available. Also, the provider who is selected by default is determined by the current location's Default procedure provider setting.
-
If the patient has a preferred provider, and you select a different provider, the preferred provider is selected automatically in the Additional Provider list.
Recommendation: As the patient's provider of record, the primary provider should enter a clinical note for the work performed even if he or she has already signed a clinical note as the Additional Provider on that day.
-
-
Date - The date of the note. Leave the current date selected, or click (or tap) the box to select a different date.
-
Additional Provider - A secondary provider (such as a hygienist) to associate with this note. To associate an additional provider with the note, select that provider; otherwise, leave [None] selected. Only providers who have access to the current location and who are flagged as charting providers are available.
-
Note - The text of the note. Enter the note text, and/or insert notes from templates.
-
-
If the note is complete, and if you are the selected provider or have permission from the provider, you can sign the note. To sign the note, click (or tap) the Sign as [provider name] link, and then enter the selected provider's or, if you are the provider, your password in the Password box that appears. However, if the note needs to be finished later, or if the provider has to review the note, the note can be signed later.
Note: The Sign as [provider name] link is available only if a digital signature for the selected provider has been set up.
-
Click (or tap) Save.