Working with Claims and Ledgers
This document provides instructions for working with insurance carriers, claims, and ledger transactions in Dentrix Ascend on a daily basis.
1. Insurance Maintenance
Adding insurance carriers
Adding insurance carriers
From Dentrix Ascend, you have access to a large database of supported payers. You can add any of these supported insurance carriers to your organization's database. You can also add an insurance carrier that does not appear in the database of supported insurance carriers to your organization's database.
Tip: You can also add an insurance carrier when you are attaching insurance to a patient.
Note: Adding insurance carriers requires the "Create Carriers" security right.
To add an insurance carrier
On the Home menu, under Insurance, select Carriers.
The Insurance Carriers page opens.
-
Click (or tap) Add Carrier.
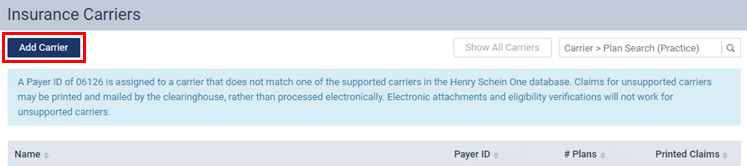
The Select carrier box becomes available.
-
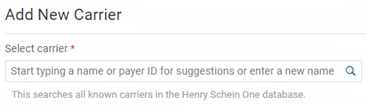
In the Select carrier box, begin typing the insurance carrier's name or payer ID. A list of supported insurance carriers appears. Continue typing as needed to narrow the search results.
Important: Henry Schein One maintains a database of supported payers. The database is updated regularly, and a list of carriers and each carrier's details is sent to Dentrix Ascend. Selecting a carrier from the list of supported payers ensures that your practice has up-to-date information for that carrier. Also, using a supported payer allows you to add attachments to claims (however, the payer might not accept electronic attachments; in which case, you can mail the attachments separately from the claims or print and mail the claim and attachments together).
-
Do one of the following:
-
If the correct insurance carrier is listed, click (or tap) it to populate the boxes with that carrier's information.
-
If the correct insurance carrier name is not listed, finish typing the full name. The name must start with a number or letter, not a special character).
Then, press the Tab key, or click (or tap) outside the box. A message about adding unsupported payers appears.
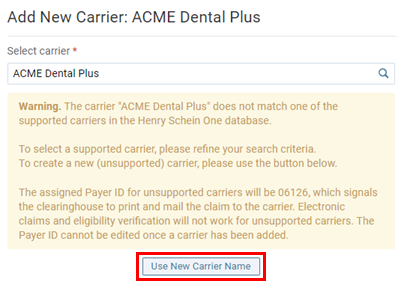
Click (or tap) Use New Carrier Name. The options for adding a new insurance carrier become available.
-
-
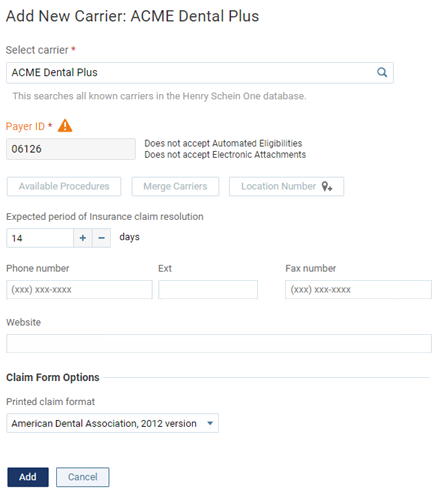
Set up the other options as needed:
-
Expected period of insurance claim resolution - The number of days after which you want to consider claims that are sent to the insurance carrier as being overdue. By default, the turnaround time is set to 14 days, but you can specify a different number of days to reflect the time frame that the carrier usually requires to process claims.
-
Phone number - The insurance carrier's main contact phone number and extension (if applicable).
-
Fax number - A fax number for the insurance carrier.
-
Website - The insurance carrier's website address. Do not include "http://" or "https://" at the beginning of the website address.
-
Printed claim format - For printed claims, select the claim format that this carrier accepts: ADA 2012, ADA 2019, ADA 2024, or Denti-Cal DC-217 (this option is available only if the carrier is "Denti-Cal" or "Medicaid of California (Denti-Cal)").
Notes:
-
You cannot change the Carrier Name after you click (or tap) Add.
-
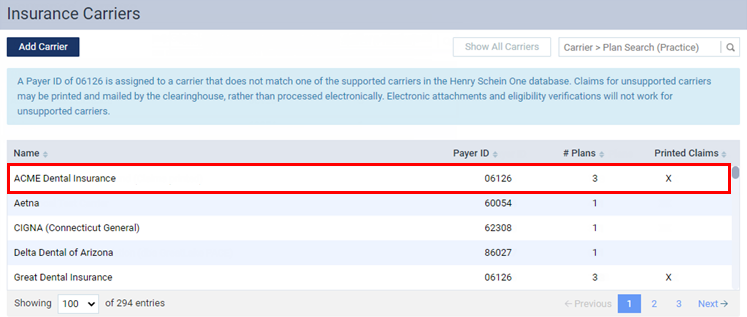
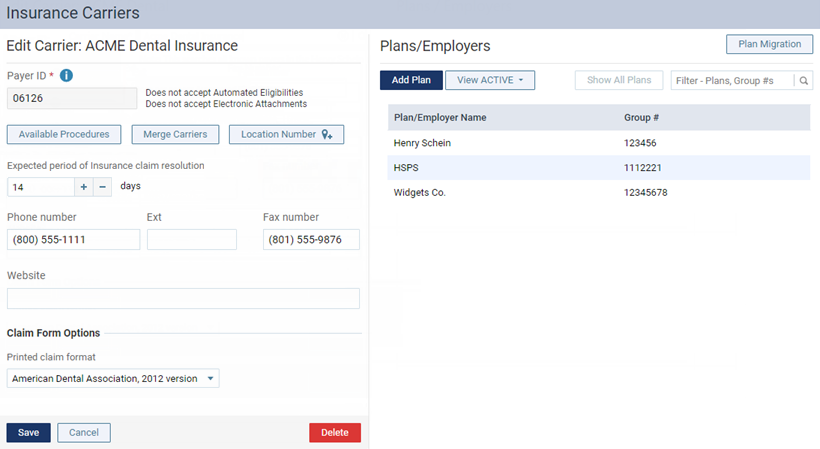
You cannot change the insurance carrier's Payer ID. The ID comes from a database (maintained by Henry Schein One) of payers that accept electronic claims, or if the payer is not supported, the ID is 06126.
-
If the Payer ID is 06126, when you submit a claim, the clearinghouse attempts to match a few data points from the claim, namely the payer name and address, with a supported payer ID. If a payer ID that supports electronic claims is found, the clearinghouse sends the claim electronically to that payer; otherwise, the clearinghouse prints and mails the claim to the payer address found on the claim.
-
The Denti-Cal TAR/Claim form DC-217 option for Printed claim format allows you to print a Denti-Cal claim on a pre-printed claim form (a sheet of paper with boxes, lines, and labels pre-printed on the page). You can obtain pre-printed claim forms from Denti-Cal.
-
You must save the insurance carrier's information to make the Available Procedures button available, so you can specify which procedures are available for posting to the records of patients who are covered by this carrier (when the "Carrier procedures" procedure filter is selected during posting).
-
You must save the insurance carrier's information to make the Location Number button available, so you can to specify the location IDs that this payer has assigned to each location in your organization for electronic claims.
-
-
Click (or tap) Add.
Important: Each time you add an insurance carrier to your organization's database, for each provider (and location serving as a provider) that is contracted with that carrier, you must go to the Contracted With section of that provider's user account (or location's information) and select the checkbox next to the carrier's name.
Adding insurance plans
Adding insurance plans
After you have added an insurance carrier to your organization's database, you can attach plans to it.
Tip: You can also add a plan when you are attaching insurance to a patient.
Note: Adding plans to insurance carriers requires the "Create Insurance Plans" security right.
To add a plan to an insurance carrier
On the Home menu, under Insurance, select Carriers.
The Insurance Carriers page opens.
-
Select an insurance carrier.
Tip: To help you locate an insurance carrier quickly, in the Filter box, enter part or all of a carrier's name, plan/employer, or group number to filter the carrier list so that it displays only those carriers that match what you enter.
The options to edit the insurance carrier become available.
-
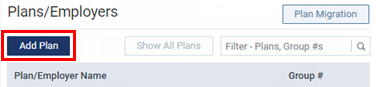
Under Plans/Employers, click (or tap) Add Plan.
The options for adding the insurance plan become available.
-
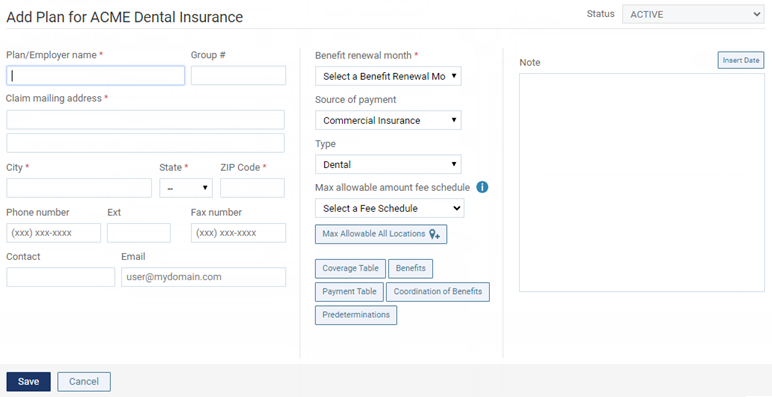
Enter the plan or employer name, and set up the other options as needed.
Set up the following options:
-
Plan/Employer Name - The name of the employer or insurance plan.
-
Group # - The group plan number.
-
Claim mailing address - The address where claims for the insurance plan are sent.
Notes:
-
When you click in the first box, start typing a street address, city, state abbreviation, or ZIP Code. A list of matching addresses appears. Continue typing as needed to narrow down the results.
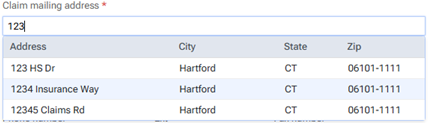
The list of matching addresses comes from the claim mailing addresses that have been entered across all the existing insurance plans in your organization's database.
-
Selecting an address updates the street address, city, state abbreviation, and ZIP Code for this plan accordingly.
-
If the correct address is not found, finish typing the street, and then specify the remaining parts of the address manually.
-
If you select an address, you can edit any part of the address as needed for this plan. Any changes that you make do not affect the addresses of any other plans.
-
-
ZIP Codes must be nine digits.
-
-
Phone - The insurance plan administrator's contact phone number and extension (if applicable).
-
Fax Number - The fax number of the insurance plan administrator.
-
Contact - The name of the insurance plan administrator.
-
Email - The insurance plan administrator's email address.
-
Benefit Renewal Month - The month that the insurance plan's benefits reset. By default, January is selected, but you can select a different month if applicable.
-
Source of Payment - The type of insurance company that will remit payment: CHAMPUS, Blue Cross/Blue Shield, Commercial Insurance, Commercial Insurance (PPO), Commercial Insurance (DHMO), Medicare Part B, or Medicaid.
-
Type - The plan covers dental or medical procedures.
-
Missing tooth clause? - Indicates if a missing tooth clause applies to the plan. Select one of the following options: Not Specified, Yes, or No.
Note: Currently, this option is for reference only.
-
Eligibility coverage level - Indicates the type of coverage that applies to the plan. Select one of the following options: Not Specified, Individual, Family, Employee Only, Employee and Spouse, Employee and Children, Spouse Only, Spouse and Children, Children Only, or Dependents Only.
Note: Currently, this option is for reference only.
-
Crowns/Bridges paid on - Indicates if the plan guidelines base payment on the preparation or seat date for procedures such as crowns and bridges. Select one of the following options: Not Specified, Prep Date, or Seat Date.
Note: Currently, this option is for reference only.
-
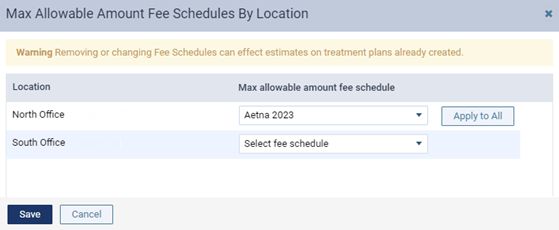
Max allowable amount fee schedule - The schedule of allowed charges for the insurance plan (PPO or DHMO plan only). The selected fee schedule will be used to determine a patient's portion and the recommended write-off.
Important: For each provider (and each location that is set up as a billing provider for claims) who participates with this insurance plan, in that provider's user account (or that location's settings), you must select this carrier in the Contracted With section.
Note: When you expand the list, you can use the search box at the top to quickly locate a fee schedule. Begin typing part of a fee schedule name in the box to see the matching fee schedules in the list. Continue typing as needed to narrow down the results. Select the correct fee schedule.

You can also click (or tap) Max Allowable All Locations to open the Max Allowable Amount Fee Schedules By Location dialog box and set the max allowable fee schedule for the insurance plan by location. Access to this dialog box is available only if the Plan/Employer Name, Claim mailing address, City, State, ZIP Code, and Benefit renewal month have been entered.
-
Coverage Table - The coverage table for the plan. Click (or tap) Coverage Table to open the Coverage Table for dialog box. Access to this dialog box is available only if the Plan/Employer Name, Claim mailing address, City, State, ZIP Code, and Benefit renewal month have been entered.
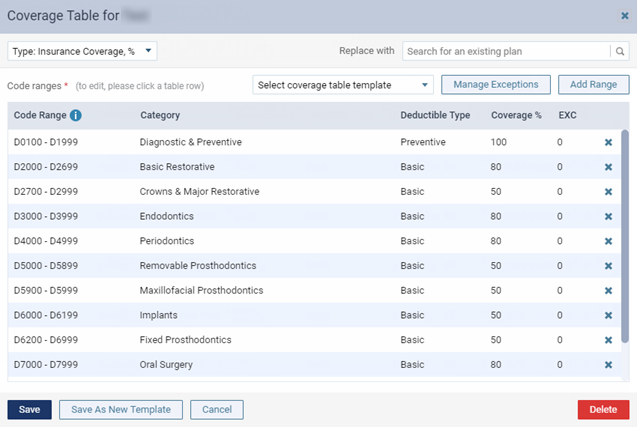
For a coverage table that is based on insurance coverage percentages, change the default deductible type and/or coverage percentage for each procedure code range. For a coverage table that is based on fixed, patient copayments, change the default deductible type and/or copayment amount.
Note: You can also add exceptions, which are used by Dentrix Ascend to automatically calculate insurance estimates.
-
Payment Table - The payment table for the plan. Click (or tap) Payment Table to open the Payment Table dialog box. Access to this dialog box is available only if the Plan/Employer Name, Claim mailing address, City, State, ZIP Code, and Benefit renewal month have been entered.
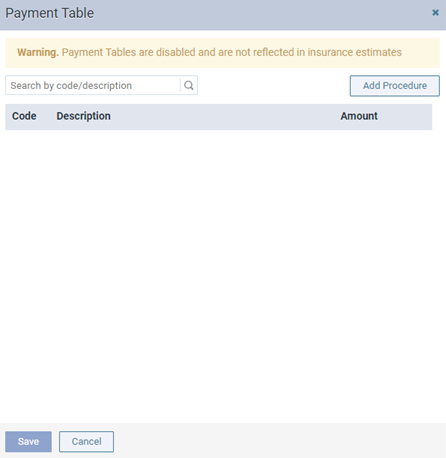
Manually add procedures in the plan's payment table as needed.
-
Predeterminations - The procedures that require a predetermination (pre-authorization) under this plan. Click (or tap) Predeterminations to open the Manage Predeterminations dialog box. Access to this dialog box is available only if the Plan/Employer Name, Claim mailing address, City, State, ZIP Code, and Benefit renewal month have been entered.
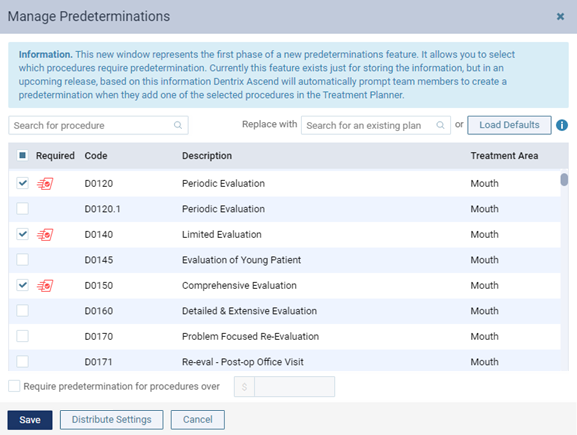
Do any of the following:
-
Select checkboxes:
-
To select the checkboxes of the listed procedures that commonly require a predetermination, click (or tap) Load Defaults. Be aware that doing this replaces the current selections.
-
To select the checkboxes of the listed procedures according to the selections from another insurance plan, enter your search criteria (part of a carrier name, plan/employer name, or group number) in the Replace with box, continue typing as needed to narrow the results, and then select the correct plan. Be aware that doing this replaces the current selections.
-
Manually select or clear the checkboxes of procedures in the list as needed.
Note: To quickly locate a procedure, begin entering part of its code, description, or treatment area in the Search for procedure box. The procedures that match your search criteria are listed. Continue typing as needed to narrow the results.
-
-
Set a charge threshold - To require a predetermination for any procedure that is not selected in the list but whose charge equals or exceeds a certain amount, select the Require predetermination for procedures over checkbox, and then enter an amount in the box provided.
-
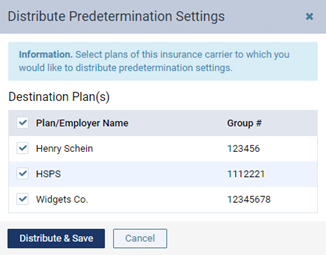
Copy selections to other plans - To copy this plan's selections to other plans that are associated with this plan's carrier, click (or tap) Distribute Settings. In the Distribute Predetermination Settings dialog box, select the checkboxes of the correct plans, and then click (or tap) Distribute & Save. Be aware that doing this replaces the current selections for the destination plans.
-
-
Note - A note that is specific to this insurance plan. You can enter text, such as information from an EOB or other document from the insurance carrier. Also, you can insert a date if needed. The note is accessible from all patient records that have this insurance plan attached.
-
-
Click (or tap) Save.
-
To enter the required deductibles and maximum benefits for the plan, click (or tap) Benefits to open the Deductible and Benefits dialog box. Access to this dialog box is available only after you save the plan.

Enter the required deductible amounts for each deductible type, enter the maximum benefits allowed, and then click (or tap) Save.
Note: Adding required deductibles and maximum benefits to insurance plans requires the "Edit Benefits" security right.
-
To specify the methods for handling the Coordination of Benefits (COB) between primary and secondary insurance claims for a patient with this insurance plan as his or her secondary plan, click (or tap) Coordination of Benefits to open the Coordination of Benefits for [Carrier - Plan] dialog box. Access to this dialog box is available only after you save the plan.
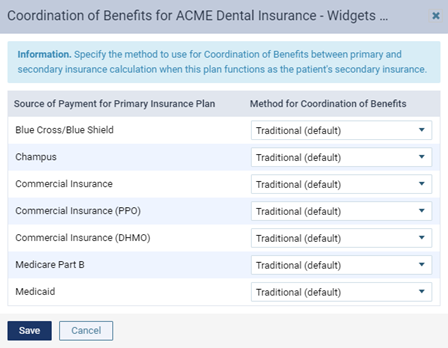
For each Source of Payment for Primary Insurance Plan, select a Method for Coordination of Benefits, and then click (or tap) Save.
Notes:
-
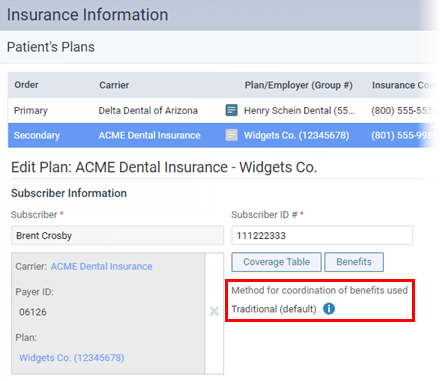
If this insurance plan is attached to a patient's record as a secondary plan, the method being used for coordinating benefits appears on the patient's Insurance Information page when the options for the secondary plan are being displayed.
-
For more information about the coordination of benefits, refer to the topic about Coordination of benefits.
-
Changing the coordination of benefits for insurance plans requires the "Edit Insurance Plans" security right.
-
-
Click (or tap) Save.
2. Claims
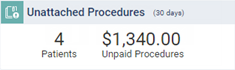
Creating claims for unattached procedures
Processing unattached procedures
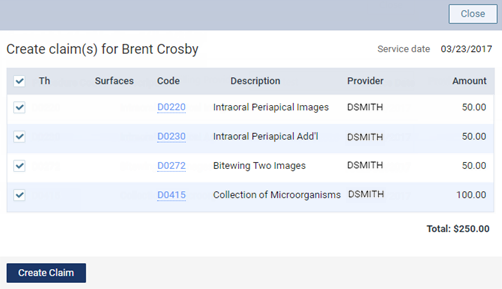
On your location's Overview page, you can view the procedures that are not attached to claims but for which the corresponding patients have insurance coverage, and then you can create claims for selected procedures as needed.
To create a claim
-
If you are not already viewing the correct location, select it on the Location menu.
-
On the location's Overview page, click (or tap) the Unattached Procedures box.
Notes:
-
This box displays the number of unsent insurance claims and a total of the charges for those claims.
-
This box is available only if your user role has the "Review Insurance" security right enabled.
The Unattached Procedures page opens.
-
-
On the list of patients, leave the first patient selected, or click (or tap) a different patient.
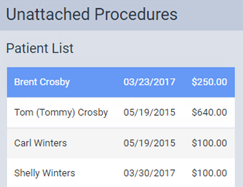
The procedure options become available.
Note: For a procedure to appear, the service date of that procedure must fall within the coverage dates of a patient's insurance plan, and that procedure must be marked as billable to insurance.
-
Select the checkbox of each procedure that you want to include on the claim.
-
Click (or tap) Create Claim.
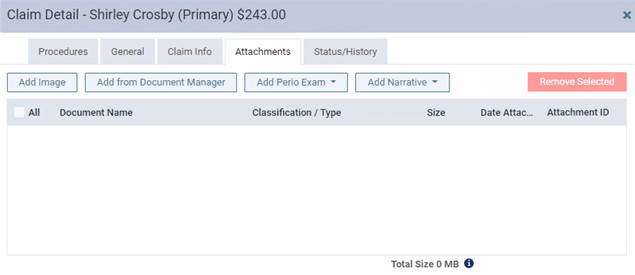
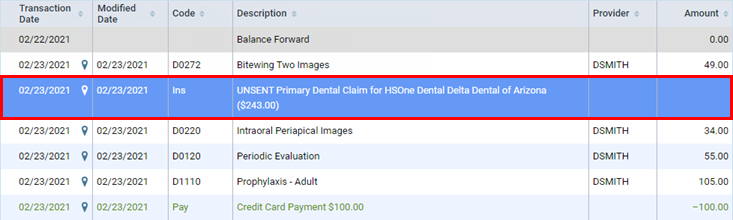
Adding attachments to claims
Adding attachments to claims
You can attach the following to an unpaid claim: a patient's images from Dentrix Ascend Imaging, images from a patient's document manager, a patient's perio exam, and a patient's clinical notes.
Notes:
-
For information about adding attachments to rejected claims, see the topic about resubmitting rejected claims.
-
You can attach images from a patient's document manager only if those images are .jpg/.jpeg files. You can attach only one perio exam to any given claim, but you can attach a perio exam to multiple claims. If you attach a clinical note as a narrative, Dentrix Ascend automatically converts it to a .jpg file.
-
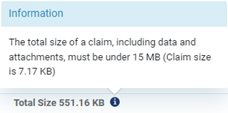
You can have up to a total of 10 attachments per claim, but the total claim size (claim data and attached files) must be smaller than 15 MB.
Important: Henry Schein One maintains a database of supported payers. You can add attachments to claims only for insurance plans that are associated with supported carriers. However, if a payer does not accept electronic attachments, when you send a claim with attachments to that payer, the attachments will not be included, and the claim will have a status message that states that the attachments were rejected. If this is the case, you can mail the attachments to the payer separately from the claim. Alternatively, for payers that don't accept electronic attachments, you can print and mail the claim and attachments together.
To add an attachment to a claim
-
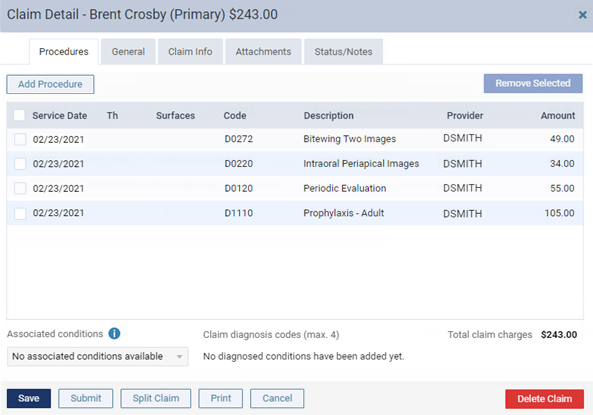
Click (or tap) a claim on one of the following pages:
The Claim Detail dialog box appears (the appearance varies depending on the claim's status).
-
Unsent Claim:
-
Queued, Sent, or Printed Claim:

-
-
Click (or tap) the Attachments tab.
The options for adding attachments become available.
Note: To reduce delays or non-payments from insurance carriers, Dentrix Ascend alerts you when, according to NEA guidelines, supporting documentation is recommended for any procedures on a claim. An orange warning icon and a message with the applicable procedures and recommended attachment types appear when claim attachments are recommended. For a secondary (or tertiary or quaternary) insurance claim, a warning message includes a recommendation to attach the EOBs from the corresponding primary (and/or secondary and/or tertiary) claims before submitting the secondary (or tertiary or quaternary) claim.

You can ignore a warning and submit the claim without the recommended attachments.
Important: Ignore an attachment recommendation only if you are certain that the payer does not require supporting documentation for the procedure.
-
Do any of the following:
-
Add the patient's images from Dentrix Ascend Imaging.
Do the following:
-
Click (or tap) Add Image. This button is available only if the payer for this claim is a supported carrier (a carrier that was added to your practice database from the list of supported carriers that Henry Schein maintains; the payer ID of an unsupported carrier is 06126).
The Add from Imaging dialog box appears.
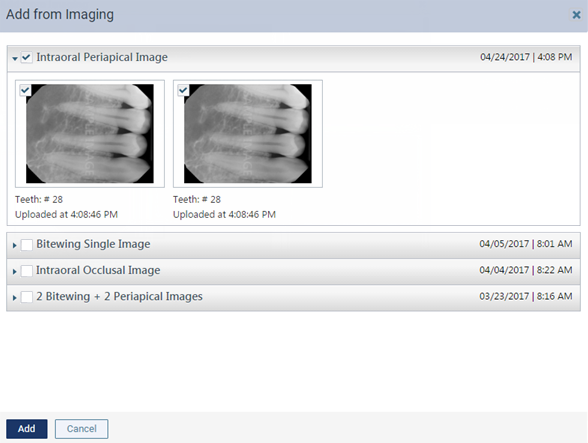
-
Click (or tap) a procedure with the correct date of service to view the corresponding images. Select the checkbox next to the procedure name to attach all the images in that section to the claim, or individually select the checkboxes of images that you want to attach to the claim. Repeat this process as needed.
Notes:
-
If all the images for a given procedure (such as a full mouth series) are selected, they are attached to the claim as a single image with a resolution of 1920 x 1080.
-
The applicable tooth numbers and date of each selected image are included.
-
-
Click (or tap) Add.
-
-
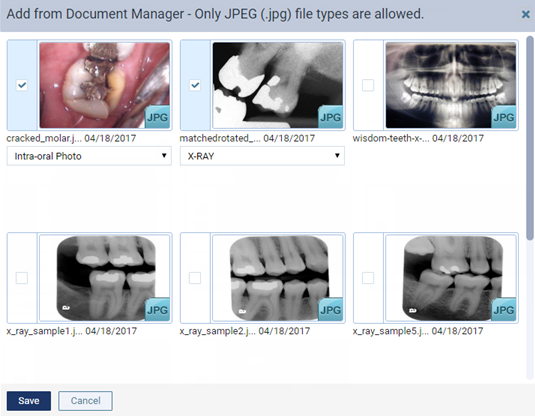
Add images and/or .pdf files from the patient's document manager.
Do the following:
-
Click (or tap) Add From Document Manager. This button is available only if the payer for this claim is a supported carrier (a carrier that was added to your practice database from the list of supported carriers that Henry Schein maintains; the payer ID of an unsupported carrier is 06126).
The Add From Document Manager dialog box appears.
-
Select the checkboxes of the images and/or .pdf files that you want to attach to the claim.
Note: Each page of a .pdf file counts as one attachment. In the example below, there are six attachments (one for the .jpg file, and five for the .pdf file).

-
Select a classification/type for each selected image.
Tip: If necessary, you can change the classification/type later by selecting a different option from the Classification/Type list on the Attachments tab.
-
Click (or tap) Save.
-
-
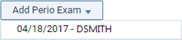
Add the patient's perio exam.
Do the following:
-
Click (or tap) Add Perio Exam to view a menu that lists the dates of the patient's perio exams. This button is available only if the patient has perio exams entered in his or her record and if the payer for this claim is a supported carrier (a carrier that was added to your practice database from the list of supported carriers that Henry Schein maintains; the payer ID of an unsupported carrier is 06126).
-
Click (or tap) the date of the perio exam that you want to attach to the claim.
-
-
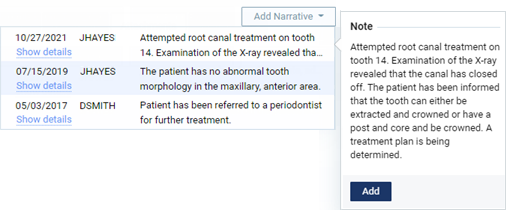
Add narratives from the patient's clinical notes.
Do the following:
-
Click (or tap) Add Narrative to view a menu that lists the patient's clinical notes. This button is available only if the patient has clinical notes entered in his or her record and if the payer for this claim is a supported carrier (a carrier that was added to your practice database from the list of supported carriers that Henry Schein maintains; the payer ID of an unsupported carrier is 06126).
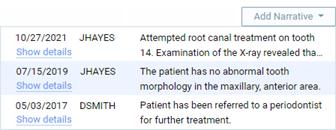
Note: You can click a clinical note's Show details link to view the entire note.
-
Click (or tap) the clinical note that you want to attach as a narrative to the claim.
Note: Alternatively, if you are viewing the details of a note that you want to attach, in the Note pop-up box, click Add to attach that narrative.
-
After attaching the narrative, to see it exactly as the insurance carrier will see it, click (or tap) that narrative's Document Name, which is a link. The image opens in a new browser tab.

-
Note: The total claim size (claim data and attached files) must be smaller than 15 MB. You cannot submit the claim if the size is 15 MB or larger. For your reference, the Total Size appears below the list of attachments on the Attachments tab.
To view the size of the claim itself, click the "i" icon.
-
-
Do one of the following:
-
To save and close the dialog box, click (or tap) Save and then Cancel.
-
To save the changes and submit the claim, click (or tap) Submit.
-
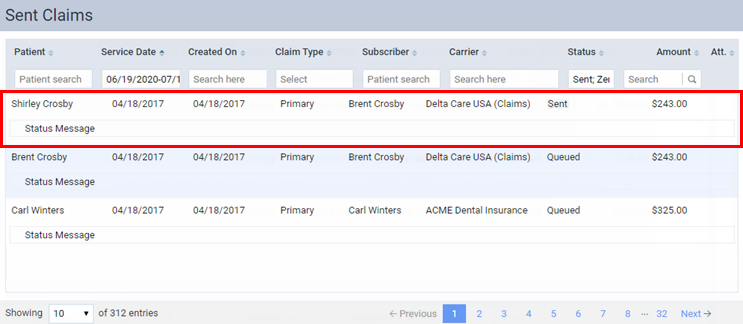
Sending claims
Sending claims
You can send claims that were created previously but not submitted to insurance carriers.
Notes:
-
The clearinghouse processes claims every four hours, from 5:00 AM to 5:00 PM (Mountain time), Monday through Friday.
-
Sending claims requires the "Send Insurance Claims" security right.
To send claims
Do one of the following:
-
For one or more patients
-
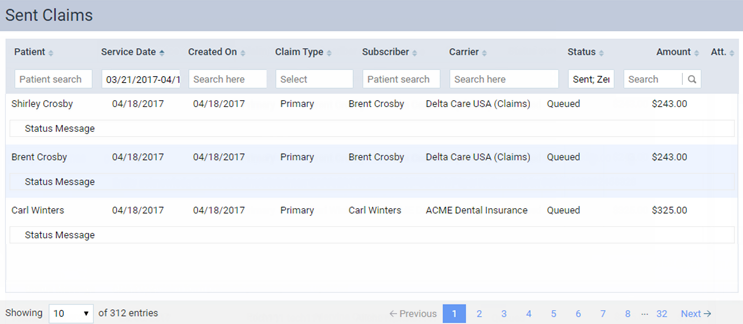
On the Unsent Claims page, select the checkbox of the claims that are ready to be sent. Claims displayed in the color green have a Ready status (all required information is present on the claim).
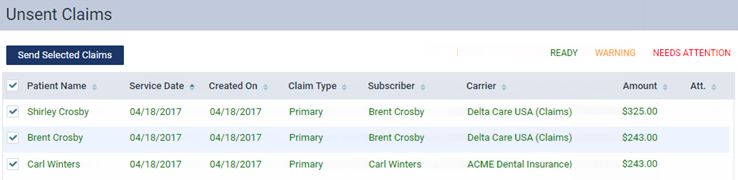
Notes:
-
By default, the claims are sorted by service date (oldest to newest), by patient last name (alphabetically), and then by amount (largest to smallest). You can click (or tap) any column header to sort the list by that column in ascending order and then click (or tap) the same column header again to sort the list by that column in descending order.
-
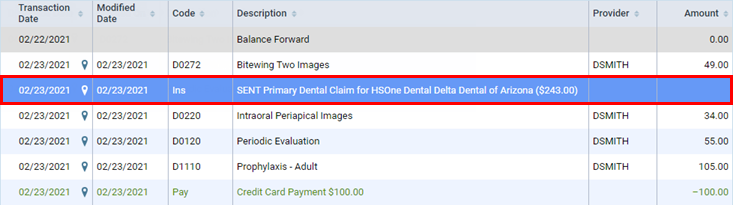
You can click (or tap) the Go to Ledger link under a patient's name to open that patient's Ledger page on a new browser tab.
Important: Fix the problems for claims with a yellow Warning status (information is missing from the claim but might not be required) and/or a red Needs Attention status (required information is missing from the claim) before attempting to submit the corresponding claims. To view and edit claim details, click (or tap) a claim.
Note: To reduce delays or non-payments from insurance carriers, Dentrix Ascend alerts you when, according to NEA guidelines, supporting documentation is recommended for any procedures on a claim. For a secondary (or tertiary or quaternary) insurance claim, a warning message includes a recommendation to attach the EOBs from the corresponding primary (and/or secondary and/or tertiary) claims before submitting the secondary (or tertiary or quaternary) claim.
An orange warning icon appears in a claim's Att. column when claim attachments are recommended. To see the applicable procedures and recommended attachment types, click the warning icon. In the pop-up message that appears, you can click Add Attachment(s) to open the claim so you can add attachments.
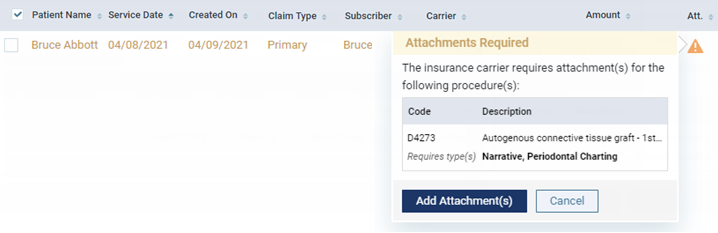
You can ignore a warning and submit the claim without the recommended attachments.
Important: Ignore an attachment recommendation only if you are certain that the payer does not require supporting documentation for the procedure.
-
-
Click (or tap) Send Selected Claims.
-
-
For a specific patient
-
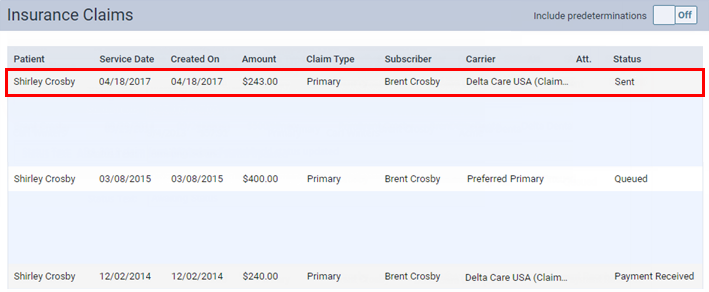
On one of the following pages, click (or tap) a claim with a status of Unsent:
The Claim Detail dialog box appears.
Note: For an electronic claim submission, Dentrix Ascend transmits separate service lines for identical procedures on the same claim. For the known carriers, such as Medicaid and Blue Cross/Blue Shield, that require a single line with a quantity value for identical procedures on the the same claim, claims are processed accordingly through the clearinghouse. If you receive a notice from a payer, stating that a quantity value is required for identical procedures, contact Dentrix Ascend Customer Support with that information so the needed functionality can be provided.
-
Click (or tap) Submit.
Note: This button is available only if the current location has an eTrans user ID, which is required for sending electronic claims.
-
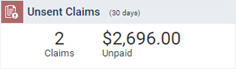
Processing unsent claims
Processing unsent claims
On your location's Overview page, you can review claims for errors before you submit those claims. Options for editing, deleting, and sending each claim are provided. A claim that has not yet been submitted to an insurance carrier also appears on the Unsent Claims List.
To process an unsent claim
-
If you are not already viewing the correct location, select it on the Location menu.
-
On the location's Overview page, click (or tap) the Unsent Claims box.
Notes:
-
This box displays the number of unsent insurance claims and a total of the charges for those claims.
-
This box is available only if your user role has the "Review Insurance" security right enabled.
The Unsent Claims page opens.
-
-
On the list of unsent claims, leave the first claim selected, or click (or tap) a different claim.
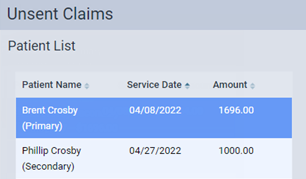
Note: By default, the claims are sorted chronologically by service date. You can sort the list chronologically or reverse chronologically by the service dates of claims, alphabetically or reverse alphabetically by the first names of patients on claims, or numerically or reverse numerically by the billed amount for claims.
The claim options become available.
Note: To reduce delays or non-payments from insurance carriers, Dentrix Ascend alerts you when, according to NEA guidelines, supporting documentation is recommended for any procedures on a claim. For a secondary (or tertiary or quaternary) insurance claim, a warning message includes a recommendation to attach the EOBs from the corresponding primary (and/or secondary and/or tertiary) claims before submitting the secondary (or tertiary or quaternary) claim.
An orange warning icon appears for a claim in the Patient List column when claim attachments are recommended.
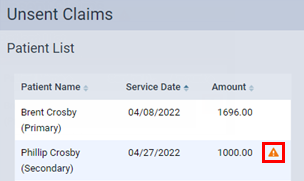
While viewing the options for a claim with an attachment warning, to see the applicable procedures and recommended attachment types, click the Show details link. In the pop-up message that appears, you can click Add Attachment(s) to open the claim so you can add attachments.

You can ignore a warning and submit the claim without the recommended attachments.
Important: Ignore an attachment recommendation only if you are certain that the payer does not require supporting documentation for the procedure.
Note: For an electronic claim submission, Dentrix Ascend transmits separate service lines for identical procedures on the same claim. For the known carriers, such as Medicaid and Blue Cross/Blue Shield, that require a single line with a quantity value for identical procedures on the the same claim, claims are processed accordingly through the clearinghouse. If you receive a notice from a payer, stating that a quantity value is required for identical procedures, contact Dentrix Ascend Customer Support with that information so the needed functionality can be provided.
-
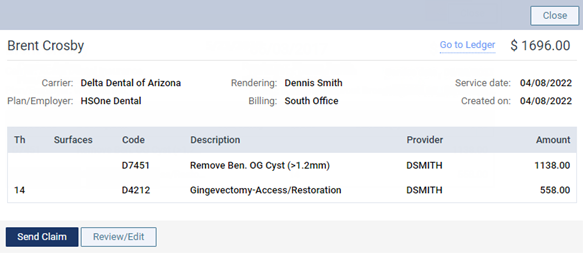
Click (or tap) Review/Edit to view the claim. In the Claim Detail dialog box, make any necessary changes, and then click (or tap) Save.
-
Click (or tap) Send Claim.
Processing unresolved claims
Processing unresolved claims
Dentrix Ascend provides an interactive tool to help you manage unresolved claims.
Notes: A claim is considered to be unresolved if any of the following criteria are met:
-
Overdue - The claim is considered to be overdue if both of the following apply to it:
-
The claim was submitted longer ago than the cut-off date (1-360 days) that has been specified for the corresponding carrier. The number of days before a claim becomes unresolved is controlled by the insurance carrier's Expected period of insurance claim resolution setting. For more information, see the topic about updating insurance carrier information.
-
The claim has one of the following statuses: Sent, Paid (the payment was sent by the carrier but not received by your office), Accepted, Pending, Queued, Printed, Resubmitted, Settled, or Attachment Hold.
-
-
Rejected - The claim is considered to have been rejected (by the payer or clearinghouse) if it has one of the following statuses: Zero Payment, Rejected by eServices, Rejected by Payer, Unprocessable Claim, Additional Information Requested, or Attachment Error.
-
Requires additional follow-up - The claim is considered to be unresolved if it was previously unresolved, a follow-up reminder was applied to the claim, and the specified number of days for that reminder has elapsed.
To process an unresolved claim
-
If you are not already viewing the correct location, select it on the Location menu.
-
Do one of the following:
On the location's Overview page, do one of the following:
Click (or tap) anywhere in the Unresolved Claims box, or click (or tap) the Rejected counter in the box to focus on rejected claims.
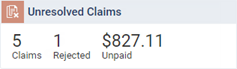
Notes:
This box displays the number of unresolved insurance claims, the number of unresolved claims that have been rejected, and a total of the charges for those claims.
This box is available only if your user role has the "Review Insurance" security right enabled.
In the Insurance A/R Problematic Payers box, click (or tap) any of the bars on the graph.

Notes:
This box displays a graph that represents by carrier the percentage of unresolved claims that were created over 30 days ago.
This box is available only if your user role has the "Review Insurance" security right enabled.
On the Home menu, under Insurance, select Unresolved Claims.
The Unresolved Claims page opens with the Unresolved Claims tab selected by default.
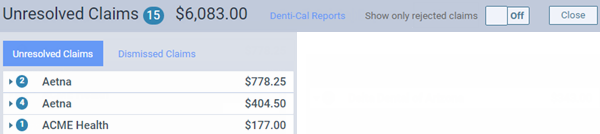
Notes:
-
The claims are grouped by insurance plans, which appear as expandable and collapsible sections. Expand a plan to view the corresponding claims.
-
To list only rejected claims, set the Show only rejected claims switch to On. If you clicked (or tapped) the Rejected count on the Unresolved Claims box, this switch is automatically set to On.

-
To quickly navigate to the Denti-Cal Reports tab of your location's inbox, click (or tap) the Denti-Cal Reports link.

-
Select a claim.

The claim options become available.
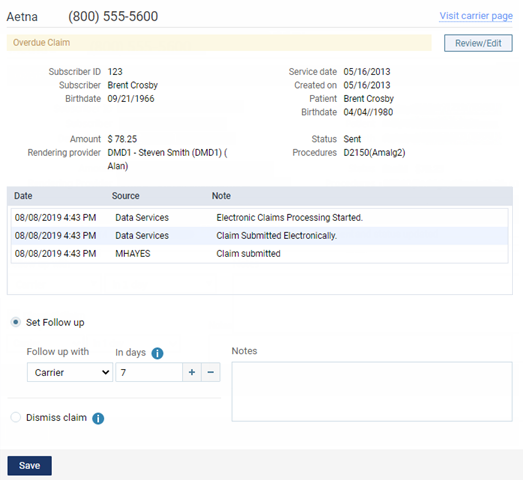
-
Do any of the following as needed:
-
Click (or tap) the Go to Ledger link to open the patient's Ledger page on a new browser tab.
-
Click (or tap) the Visit carrier page link to view or update the insurance carrier's information.
-
Click (or tap) Review/Edit to view the claim. In the Claim Detail dialog box, make any necessary changes, and then click (or tap) Save.
-
Contact the insurance carrier and/or patient.
-
Enter any relevant Notes.
-
Select one of the following options:
-
Set Follow up - To specify that the claim needs additional follow-up, select this option. Specify who to Follow up with (carrier or patient) and when you want to be reminded to follow up. The claim will not appear on the Unresolved Claims tab until the specified number of days in the In days box has elapsed.
Tip: If you enter zero (0) in the In days box, the claim will reappear on the Unresolved Claims tab after one hour.
-
Dismiss claim - To move the claim from the Unresolved Claims tab to the Dismissed Claims tab, select this option. You can move the claim back when necessary.
Note: Dentrix Ascend excludes dismissed claims from the total number of overdue insurance claims and the total amount of the charges for those claims.
-
Note: For an electronic claim submission, Dentrix Ascend transmits separate service lines for identical procedures on the same claim. For the known carriers, such as Medicaid and Blue Cross/Blue Shield, that require a single line with a quantity value for identical procedures on the the same claim, claims are processed accordingly through the clearinghouse. If you receive a notice from a payer, stating that a quantity value is required for identical procedures, contact Dentrix Ascend Customer Support with that information so the needed functionality can be provided.
-
-
Click (or tap) Save.
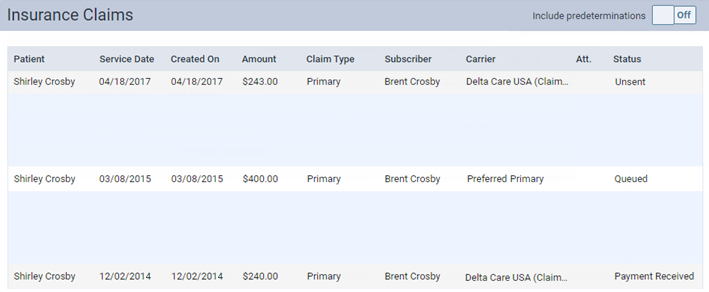
Resubmitting rejected claims
Resubmitting rejected claims
You can resubmit a claim that has been rejected (by the payer or clearinghouse) due to incorrect or missing required attachments and/or due to missing or insufficient data.
Tip: You can access rejected claims from the Unresolved Claims box on the location's Overview page (dashboard).
Notes:
-
For information about resubmitting a claim after a partial or zero-dollar payment was posted for that claim, see the topic about resubmitting a claim after posting a partial insurance payment.
-
Editing and resubmitting claims requires the "Edit Insurance Claims" and "Send Insurance Claims" security rights.
To resubmit a rejected claim
-
Click (or tap) a rejected claim on one of the following pages:
-
Note: Claims are sorted by their dates of service (oldest to most recent).
-
A patient's Insurance Claims page.
-
Note: A rejected claim can have one of the following statuses: Zero Payment, Rejected by eServices, Rejected by Payer, Unprocessable Claim, Additional Information Requested, or Attachment Error.
The Claim Detail dialog box appears.
-
-
Do one of the following:
-
If the claim has missing or insufficient data only (the attachments are fine), change the claim information, enter the predetermination (pre-authorization) reference number, and then resubmit the claim.
Do the following:
-
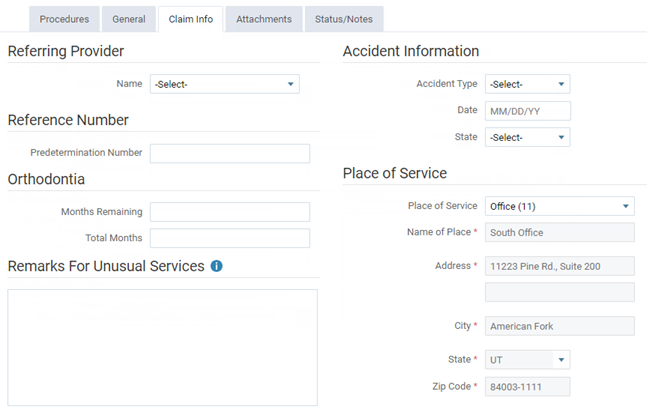
On the Claim Info tab, make any necessary changes.
-
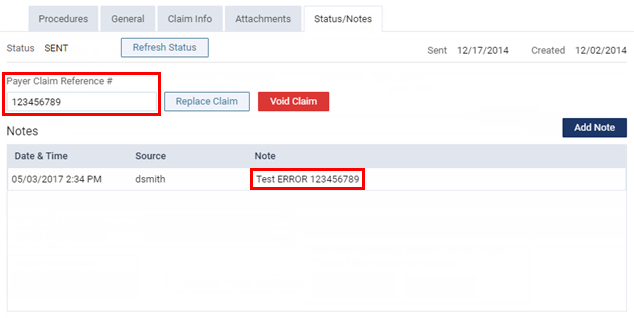
On the Status/Notes tab, locate the reason that the claim was rejected (it may be identified by Document Control Number, DCN, or Claim Reference Number) within the note text of an entry under Notes or from an EOB or other document.
-
Copy and paste or enter the reference number (from step b) into the Payer Claim Reference # box.
-
Click (or tap) Resubmit.
-
-
If the claim has missing or insufficient data and has incorrect or missing required attachments, change the claim information, enter the predetermination (pre-authorization) reference number, enter the attachment reference number, update the attachments, and then resubmit the claim.
Do the following:
-
On the Claim Info tab, make any necessary changes.
-
On the Status/Notes tab, locate the reason that the claim was rejected (it may be identified by Document Control Number, DCN, or Claim Reference Number) within the note text of an entry under Notes or from an EOB or other document.
-
Copy and paste or enter the reference number (from step b) into the Payer Claim Reference # box.
-
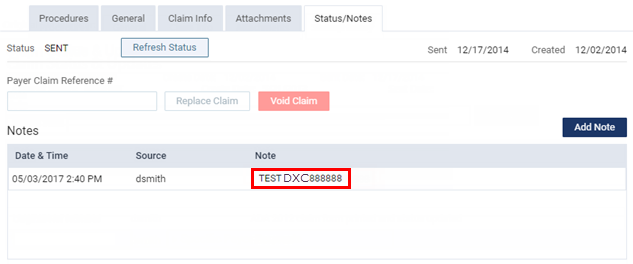
Also, on the Status/Notes tab, locate and copy the attachment reference number (it may be identified by DXC) within the note text of an entry under Notes or from an EOB or other document.
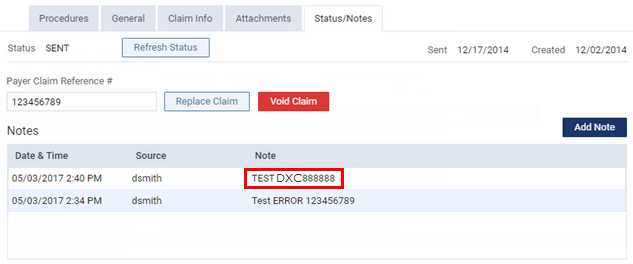
-
On the Attachments tab, enter or paste the attachment reference number (from step d) into the Attachment Ref # box, and add or correct the attachments.
-
Click (or tap) Resubmit.
-
-
If the claim has incorrect or missing required attachments only (the other data is fine), to resubmit the entire claim with all required attachments, enter the original reference number, enter the attachment reference number, update the attachments, and then resubmit the claim.
Do the following:
-
On the Status/Notes tab, locate the reference number of the claim (it may be identified by Document Control Number, DCN, or Claim Reference Number) within the note text of an entry under Notes or from an EOB or other document.
-
Copy and paste or enter the reference number (from step a) into the Payer Claim Reference # box.
-
Also, on the Status/Notes tab, locate and copy the attachment reference number (it may be identified by DCN) within the note text of an entry under Notes or from an EOB or other document.
-
On the Attachments tab, enter or paste the attachment reference number (from step c) into the Attachment Ref # box, and add or correct the attachments.
-
Click (or tap) Resubmit.
-
-
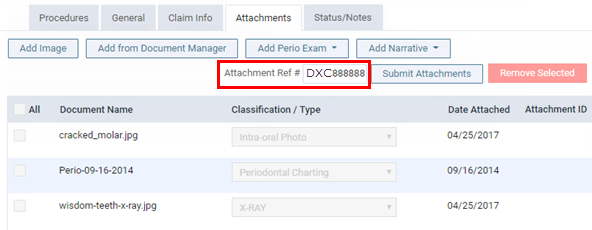
If the claim has incorrect or missing required attachments only (the other data is fine), to send or resend the correct attachments without resubmitting the entire claim, enter the attachment reference number, update the attachments, and then resubmit the attachments.
Do the following:
-
On the Status/Notes tab, locate and copy the attachment reference number (it may be identified by DXC) within the note text of an entry under Notes or from an EOB or other document.
-
On the Attachments tab, enter or paste the attachment reference number (from step a) into the Attachment Ref # box, and add or correct the attachments.
-
Click (or tap) Submit Attachments.
-
-
If the payer has requested a replacement claim, to resubmit the claim as a replacement for the original (the claim is routed differently than with a normal resubmission), enter the original reference number, and then replace the claim.
Do the following:
-
On the Status/Notes tab, locate the original reference number (it may be identified by DCN) within the note text of an entry under Notes.
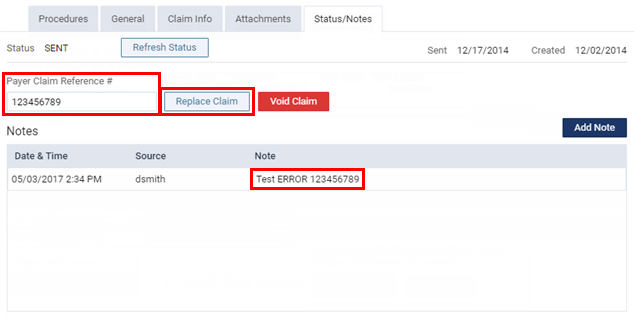
-
Copy and paste or enter the reference number (from step a) into the Payer Claim Reference # box.
-
Click (or tap) Replace Claim.
-
-
3. Transactions (Ledger)
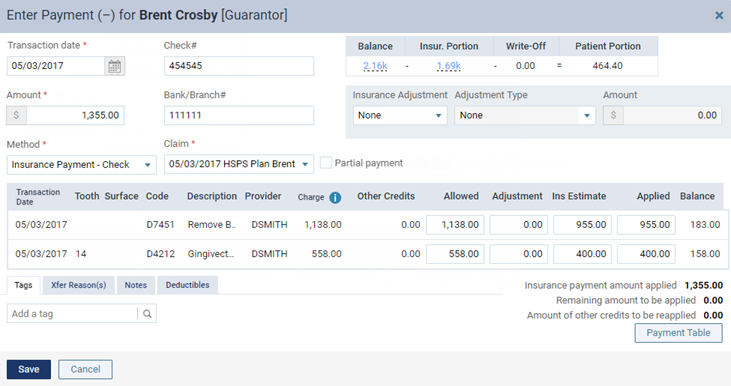
Posting insurance payments
Posting insurance payments
You can post an insurance payment to a patient's ledger.
To post an insurance payment
-
If the correct patient is not already selected, use the Patient Search box to access the patient's record.

-
Do one of the following:
-
If the patient's Overview page is not already open, on the Patient menu, under General, select Overview. The patient's Overview page opens. Click (or tap) the Ledger box.
-
On the Patient menu, under Financial, select Ledger.
The patient's Ledger page opens.
-
-
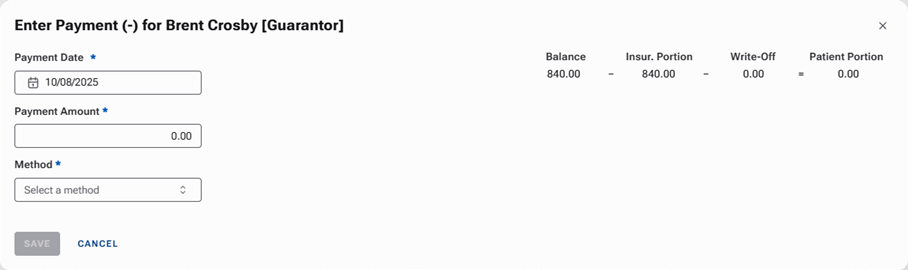
Click (or tap) Insurance Payment.
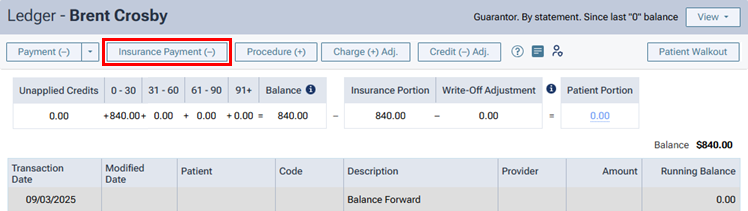
The Enter Payment dialog box appears.
-
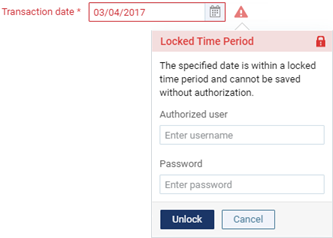
Leave the current date entered in the Payment Date box, or click (or tap) in the box to select the correct date.
If you attempt to backdate the payment to a date that would cause it to become locked (based on your organization's transaction lock setting), the Locked Time Period pop-up box appears. In the Authorized user and Password boxes, enter your credentials if you have permission to backdate transactions into locked time periods, or have someone with permission enter his or her credentials. Then, click Unlock.
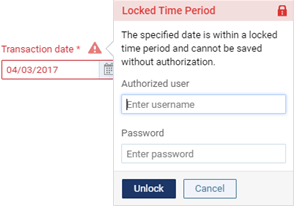
Note: Backdating transactions into locked time periods requires the "Override Locked Transaction" security right.
-
Enter the Payment Amount.
-
Select the Method of payment received from the insurance carrier: an electronic insurance payment, an insurance payment by check, or an insurance payment by credit card.
Additional options appear in the dialog box.
-
Enter the payment details, such as the check number, and select the applicable claim.
Set up the following options:
-
Check # - The check number. This option is available only if the payment method is Insurance Payment - Check.
-
Reference # - The reference number of the transaction or electronic funds transfer (EFT). This option is available only if the payment method is Insurance Payment - Electronic.
-
Transaction ID - The credit card transaction ID. This option is available only if the payment method is Insurance Payment - Credit Card. (Refer to the topic about posting insurance credit card payments.)
-
Bank/Branch # - The bank account number on the check. This option is available only if the payment method is Insurance Payment - Check.
-
Additional payment(s) expected later from insurance - The check or electronic payment amount is less than the allowed amount or the amount billed to the insurance carrier.
Note: This checkbox is selected by default if the selected Claim contains any orthodontic procedures.
-
Claim - The claim that the payment applies to. The selection cannot be changed after you save the payment.
-
-
To post an adjustment for the claim along with the payment, do one of the following:
-
To post a write-off (credit adjustment) for each procedure that the adjustment applies to, do the following:
-
Expand each applicable procedure by clicking (or tapping) each corresponding downward-pointing chevron.
Note: You can expand all the procedures at once by clicking (or tapping) the downward-pointing double chevron.
-
For each applicable procedure, from the Insurance Adjustment list, select Write-off (-).
-
For each applicable procedure, select an Adjustment Type.
-
For each applicable procedure, type an amount in the Adjustment column. By default, a procedure's Adjustment amount is the Charge minus the Allowed amount (the insurance plan's UCR fee).

-
-
To post an offsetting adjustment (charge adjustment) for each procedure that the adjustment applies to, do the following:
-
Expand each applicable procedure by clicking (or tapping) each corresponding downward-pointing chevron.
Note: You can expand all the procedures at once by clicking (or tapping) the downward-pointing double chevron.
-
For each applicable procedure, from the Insurance Adjustment list, select Offsetting (+).
-
For each applicable procedure, select an Adjustment Type.
-
For each applicable procedure, change the amount in the Applied column as needed. If the Insurance payment amount applied is less than the payment Payment Amount, a charge adjustment will be posted for the difference of those two amounts. Also, any amount that you enter for a procedure's Adjustment amount will not be posted as part of a write-off adjustment.
Note: If a write-off for the claim has been posted to the patient's ledger automatically, using an offsetting adjustment will delete the write-off. If a write-off has been calculated for the claim but is not posted in the patient's ledger, using an offsetting adjustment will cause the write-off to not be posted.
-
-
-
Change any of the following amounts for each procedure as needed (for example, if the amounts differ from what is on the EOB that you receive from the insurance carrier):
-
Allowed - By default, this is the fee from the insurance plan's Max allowable amount fee schedule.
-
Insurance estimate - By default, this is calculated from the coverage table, remaining deductible, and remaining benefit of the patient's insurance plan.
-
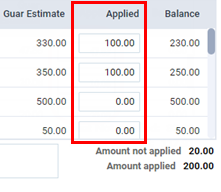
Applied - By default, this is the amount of the payment that is being applied to the procedure up to the Allowed amount. The payment amount is applied automatically to the first procedure listed and then to subsequent procedures until the payment amount is used up.
For each procedure, the Balance appears for your reference. This is the Charge minus the sum of the Other Credits, Adjustment, and Applied amounts.
Also for your reference, the following amounts appear:
-
The Insurance payment amount applied is the sum of the amounts in the Applied column. The text turns red if the amount is less than or greater than the payment Payment Amount. To post the payment, this amount must equal the Payment Amount.
-
The Remaining amount to be applied is the payment Payment Amount minus the Insurance payment amount applied. The text turns red if the amount is greater than zero. To post the payment, this amount must be less than or equal to zero.
-
The Amount of other credits to be reapplied is the sum of all credits in the Balance column. A credit (negative amount) appears in the Balance column for a procedure if the sum of the Applied and Adjustment amounts is more than the sum of the Charge and Other Credits amounts.
-
-
Record denial codes for each procedure as needed.
-
Click (or tap) Payment Tables to update the insurance plan's payment table as needed.
-
On the Tags tab, add tags to the payment as needed.
-
If applicable, on the Xfer Reason(s) tab, select or create reasons for a transfer of responsibility as needed.

To select or create a reason, do the following:
-
In the Enter xfer reason(s) search box, begin typing the name of a reason. Once you have entered at least two characters, the results list appears with any matches (not case-sensitive). Continue typing as needed to narrow the results list.
-
Do one of the following:
-
If the correct reason is listed, select that reason to attach it.
-
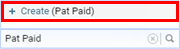
If the correct reason does not exist, finish typing the name of the reason (spaces are allowed). Make sure that the name is capitalized as desired. Then, select + Create ([reason name]) to create the reason and attach it.

Note: The reason that you have created is now available to all Dentrix Ascend users in your organization.
-
Note: To save the payment after you add reasons for a transfer of responsibility, your user account must have the security right "Edit responsibility transfer reason" enabled.
-
-
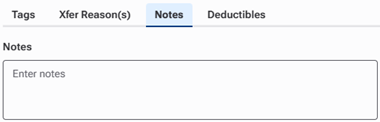
On the Notes tab, enter any notes regarding the payment.
-
In the Deductibles section (in the upper-right corner of the dialog box), change the amounts of the payment that are being applied toward any deductibles for Major, Preventive, Basic, and/or Ortho procedures as needed (for example, if the amounts differ from what is on the EOB that you receive from the insurance carrier).

-
Click (or tap) Save.
-
If you are posting a payment to a primary claim, a secondary claim is created for you automatically, and the Claim Created message appears and informs you of that. To view the secondary claim immediately, click (or tap) Open Secondary Claim; otherwise, click (or tap) OK.
Notes:
-
The following details of the insurance payment for the primary claim will appear on a printed secondary claim:
-
Box 30 - The text "Primary Insurance Payment"
-
Box 24 - The transaction date of the payment(s)
-
Box 31 - The amount of the payment (including a zero dollar payment), or the total amount of payments made on the same transaction date
-
Box 26 - The text "JP"
-
-
If Additional payment(s) expected later from insurance was selected, the original primary insurance payment and subsequent primary insurance payments entered on separate days will appear as separate line items on a printed secondary insurance claim that is created after those payments are entered.
-
Posting credit adjustments
Posting credit adjustments
You can post a credit adjustment, which decreases an account balance, to a patient's ledger.
To post a credit adjustment
-
If the correct patient is not already selected, use the Patient Search box to access the patient's record.
-
Do one of the following:
-
If the patient's Overview page is not already open, on the Patient menu, under General, select Overview. The patient's Overview page opens. Click (or tap) the Ledger box.
-
On the Patient menu, under Financial, select Ledger.
The patient's Ledger page opens.
-
-
Click (or tap) Credit Adjustment.
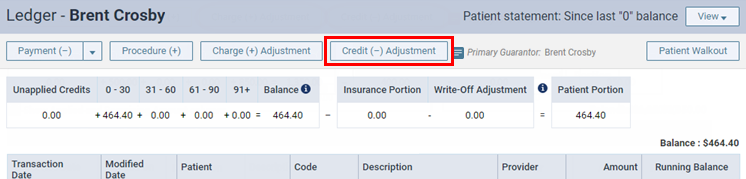
The Enter Credit (-) Adjustment dialog box appears.

-
Enter the adjustment details, such as the type and amount.
Set up the following options:
-
Transaction date - The date of the adjustment. Leave the current date entered, or click (or tap) in the box to select the correct date.
If you attempt to backdate the adjustment to a date that would cause it to become locked (based on your organization's transaction lock setting), the Locked Time Period pop-up box appears. In the Authorized user and Password boxes, enter your credentials if you have permission to backdate transactions into locked time periods, or have someone with permission enter his or her credentials. Then, click Unlock.
Note: Backdating transactions into locked time periods requires the "Override Locked Transaction" security right.
-
Type - The adjustment type, such as Credit Adjustment or Professional Courtesy.
-
Amount - The amount of the adjustment.
-
Apply to charges for - The adjustment is to be applied toward charges on the current patient's account or the account of another member of his or her household. If you select [Guarantor], you can apply the adjustment to charges for any or all household members.
-
-
The adjustment amount is applied automatically to the procedure with the oldest date of service and then to subsequent procedures based on the date until the adjustment amount is used up. However, you can change the Applied amount for any procedure in the procedure list as needed.
Note: If there is an amount greater than zero for Amount not applied when you save the adjustment, you can use that unapplied credit later.
-
On the Tags tab, add tags to the adjustment as needed.
-
If applicable, on the Xfer Reason(s) tab, select or create reasons for a transfer of responsibility as needed.

To select or create a reason, do the following:
-
In the Add a tag search box, begin typing the name of a reason. Once you have entered at least two characters, the results list appears with any matches (not case-sensitive). Continue typing as needed to narrow the results list.
-
Do one of the following:
-
If the correct reason is listed, select that reason to attach it.
-
If the correct reason does not exist, finish typing the name of the reason (spaces are allowed). Make sure that the name is capitalized as desired. Then, select + Create [reason name] to create the reason and attach it.
Note: The reason that you have created is now available to all Dentrix Ascend users in your organization.
-
Note: To save the adjustment after you add reasons for a transfer of responsibility, your user account must have the security right "Edit responsibility transfer reason" enabled.
-
-
On the Notes tab, enter any relevant notes regarding the adjustment.
-
Click (or tap) Save.
Posting charge adjustments
Posting charge adjustments
You can post a charge adjustment, which increases an account balance, to a patient's ledger.
To post a charge adjustment
-
If the correct patient is not already selected, use the Patient Search box to access the patient's record.
-
Do one of the following:
-
If the patient's Overview page is not already open, on the Patient menu, under General, select Overview. The patient's Overview page opens. Click (or tap) the Ledger box.
-
On the Patient menu, under Financial, select Ledger.
The patient's Ledger page opens.
-
-
Click (or tap) Charge Adjustment.
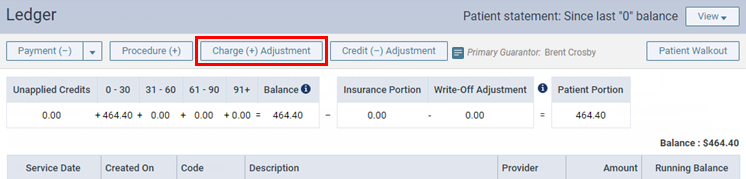
The Enter Charge (+) Adjustment dialog box appears.
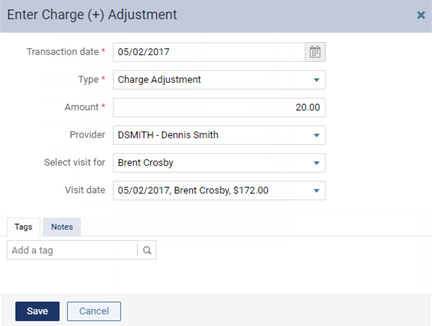
-
Enter the adjustment details, such as the type, provider, and amount.
Set up the following options:
-
Transaction date - The date of the adjustment. Leave the current date entered, or click (or tap) in the box to select the correct date.
If you attempt to backdate the adjustment to a date that would cause it to become locked (based on your organization's transaction lock setting), the Locked Time Period pop-up box appears. In the Authorized user and Password boxes, enter your credentials if you have permission to backdate transactions into locked time periods, or have someone with permission enter his or her credentials. Then, click Unlock.
Note: Backdating transactions into locked time periods requires the "Override Locked Transaction" security right.
-
Type - The adjustment type, such as Charge Adjustment or Patient Refund.
-
Amount - The amount of the adjustment.
-
Provider - The provider to associate with this adjustment. Only providers who have access to the current location are available.
-
Select Visit for - The adjustment is to be associated with a visit from the current patient or another member of his or her household. If you select [Guarantor], you can apply the adjustment to a visit from any member of the household. The selection cannot be changed after you save the adjustment.
-
Visit date - The date of service (for the patient or guarantor selected from the Select Visit for list) to associate the adjustment with. Select [None] if the adjustment is not to be associated with a visit date. This option is available only if the current patient's name or [Guarantor] is selected from the Select Visit for list. The selection cannot be changed after you save the adjustment.
-
-
On the Tags tab, add tags to the adjustment as needed.
-
On the Notes tab, enter any notes regarding the adjustment.
-
Click (or tap) Save.
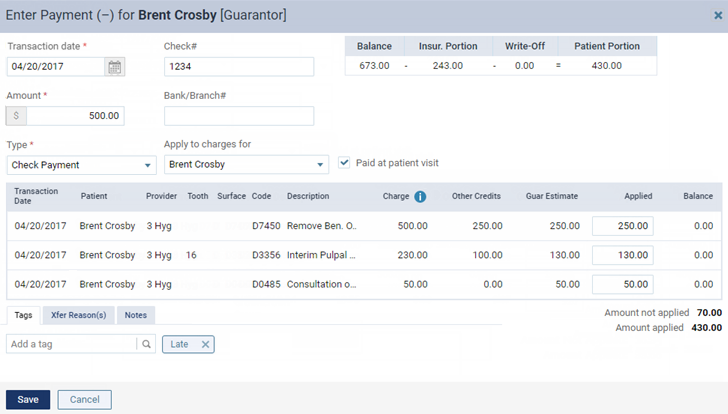
Posting patient payments
Posting patient payments
You can post a payment from a patient to that patient's ledger.
To post a patient payment
-
If the correct patient is not already selected, use the Patient Search box to access the patient's record.
-
Do one of the following:
-
If the patient's Overview page is not already open, on the Patient menu, under General, select Overview. The patient's Overview page opens. Click (or tap) the Ledger box.
-
On the Patient menu, under Financial, select Ledger.
The patient's Ledger page opens.
-
-
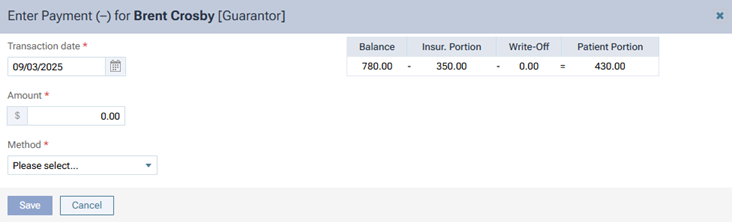
Click (or tap) Payment.
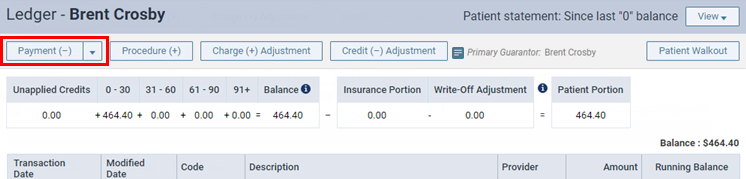
The Enter Payment dialog box appears.
-
Leave the current date entered in the Transaction date box, or click (or tap) in the box to select the correct date.
If you attempt to backdate the payment to a date that would cause it to become locked (based on your organization's transaction lock setting), the Locked Time Period pop-up box appears. In the Authorized user and Password boxes, enter your credentials if you have permission to backdate transactions into locked time periods, or have someone with permission enter his or her credentials. Then, click Unlock.

Note: Backdating transactions into locked time periods requires the "Override Locked Transaction" security right.
-
Enter the Amount of the payment.
-
Select the Method of payment received from the patient (such as a check, cash, or credit card).
Note: If your location uses Dentrix Ascend Pay, and you select Credit Card Payment as the payment type, options for processing the credit card become available.
Additional options appear in the dialog box.
-
Enter the payment details, such as the check number and amount.
Set up the following options:
-
Check # - The check number. This option is available only if the payment type is Check Payment.
-
Reference # - The reference number of the transaction or electronic funds transfer (EFT). This option is available only if the payment method is Patient Financing Payment or Electronic Transfer Payment.
-
Bank/Branch # - The bank account number on the check. This option is available only if the payment type is Check Payment.
-
Apply to charges for - The payment goes towards charges for the patient whose record you are viewing or another member of his or her household. If you select [Guarantor], you can apply the payment to charges for any household members.
-
Paid at patient visit - The payment was made at the office when services were rendered. Statistics regarding payments collected during visits appear on the Payment Analysis Report.
-
-
The payment amount is applied automatically to the procedure with the oldest date of service and then to subsequent procedures based on the date until the payment amount is used up. However, you can change the Applied amount for any procedure in the procedure list as needed.
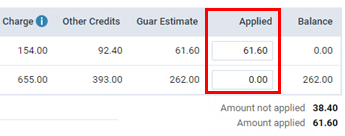
For your reference, the following amounts appear:
-
The Amount not applied is the payment Amount minus the sum of the amounts in the Applied column. This amount will appear as a credit on the account of the patient whose record you are viewing, another household member, or the guarantor, according to the selection that you made from the Apply to charges for list.
-
The Amount applied is the sum of the amounts in the Applied column.
Notes:
-
If you are entering a payment for procedures on the same date as the date of service or for procedures prior to the current date that are attached to a claim, Dentrix Ascend automatically calculates the estimated guarantor portion of the charges (if the patient has insurance coverage). However, if you are entering a payment for procedures prior to the current date that are not attached to a claim, Dentrix Ascend automatically calculates the estimated guarantor portion to be 100 percent of the charges.
-
If the patient has insurance coverage, and the estimated insurance portion for a given procedure is 100 percent, that procedure does not appear in the Enter Payment dialog box.
-
-
On the Tags tab, add tags to the payment as needed.
-
If applicable, on the Xfer Reason(s) tab, select or create reasons for a transfer of responsibility as needed.

To select or create a reason, do the following:
-
In the Add a tag search box, begin typing the name of a reason. Once you have entered at least two characters, the results list appears with any matches (not case-sensitive). Continue typing as needed to narrow the results list.
-
Do one of the following:
-
If the correct reason is listed, select that reason to attach it.
-
If the correct reason does not exist, finish typing the name of the reason (spaces are allowed). Make sure that the name is capitalized as desired. Then, select + Create [reason name] to create the reason and attach it.
Note: The reason that you have created is now available to all Dentrix Ascend users in your organization.
-
Note: To save the payment after you add reasons for a transfer of responsibility, your user account must have the security right "Edit responsibility transfer reason" enabled.
-
-
On the Notes tab, enter any notes regarding the payment.
-
Click (or tap) Save.