Adding attachments to claims
You can attach the following to an unpaid claim: a patient's images from Dentrix Ascend Imaging, images from a patient's document manager, a patient's perio exam, and a patient's clinical notes.
Notes:
-
For information about adding attachments to rejected claims, see the topic about resubmitting rejected claims.
-
You can attach images from a patient's document manager only if those images are .jpg/.jpeg files. You can attach only one perio exam to any given claim, but you can attach a perio exam to multiple claims. If you attach a clinical note as a narrative, Dentrix Ascend automatically converts it to a .jpg file.
-
You can have up to a total of 10 attachments per claim, but the total claim size (claim data and attached files) must be smaller than 15 MB.
Important: Henry Schein One maintains a database of supported payers. You can add attachments to claims only for insurance plans that are associated with supported carriers. However, if a payer does not accept electronic attachments, when you send a claim with attachments to that payer, the attachments will not be included, and the claim will have a status message that states that the attachments were rejected. If this is the case, you can mail the attachments to the payer separately from the claim. Alternatively, for payers that don't accept electronic attachments, you can print and mail the claim and attachments together.
To add an attachment to a claim
-
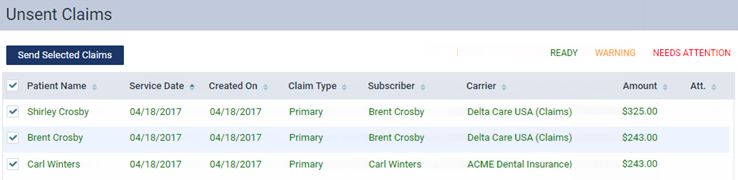
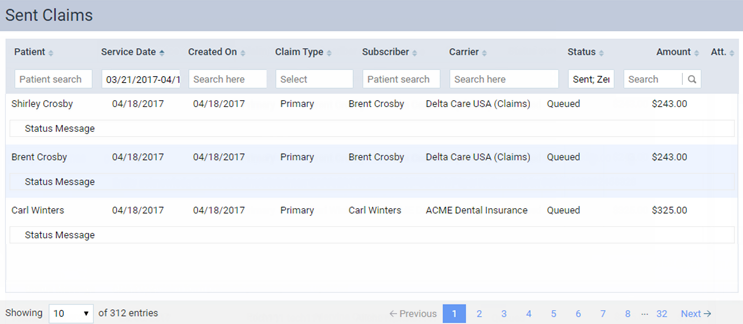
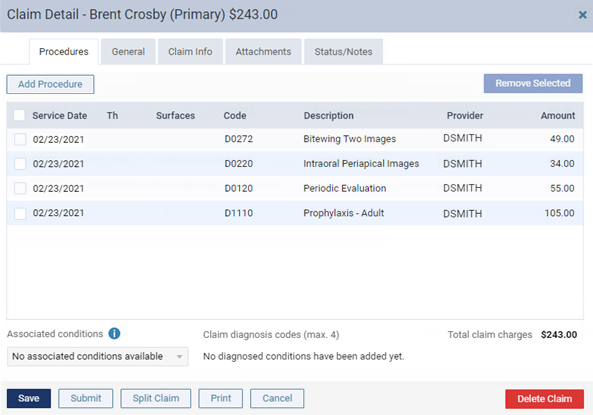
Click (or tap) a claim on one of the following pages:
The Claim Detail dialog box appears (the appearance varies depending on the claim's status).
-
Unsent Claim:
-
Queued, Sent, or Printed Claim:

-
-
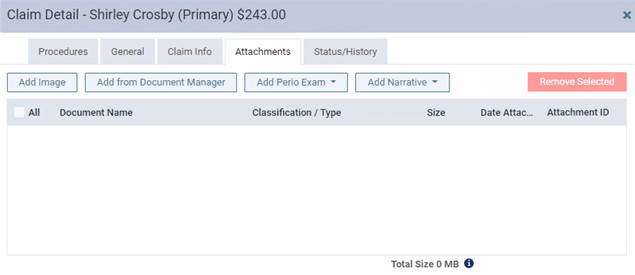
Click (or tap) the Attachments tab.
The options for adding attachments become available.
Note: To reduce delays or non-payments from insurance carriers, Dentrix Ascend alerts you when, according to NEA guidelines, supporting documentation is recommended for any procedures on a claim. An orange warning icon and a message with the applicable procedures and recommended attachment types appear when claim attachments are recommended. For a secondary (or tertiary or quaternary) insurance claim, a warning message includes a recommendation to attach the EOBs from the corresponding primary (and/or secondary and/or tertiary) claims before submitting the secondary (or tertiary or quaternary) claim.

You can ignore a warning and submit the claim without the recommended attachments.
Important: Ignore an attachment recommendation only if you are certain that the payer does not require supporting documentation for the procedure.
-
Do any of the following:
-
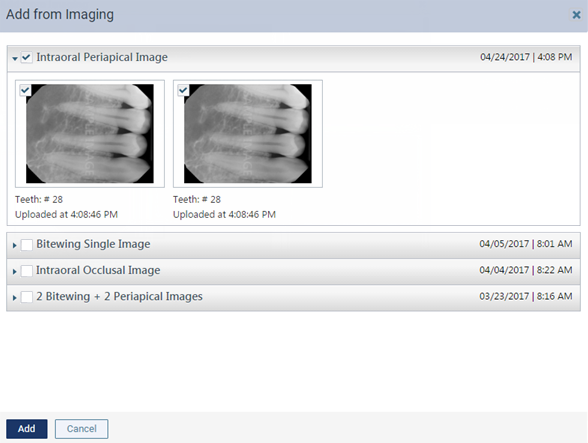
Add the patient's images from Dentrix Ascend Imaging.
Do the following:
-
Click (or tap) Add Image. This button is available only if the payer for this claim is a supported carrier (a carrier that was added to your practice database from the list of supported carriers that Henry Schein maintains; the payer ID of an unsupported carrier is 06126).
The Add from Imaging dialog box appears.
-
Click (or tap) a procedure with the correct date of service to view the corresponding images. Select the checkbox next to the procedure name to attach all the images in that section to the claim, or individually select the checkboxes of images that you want to attach to the claim. Repeat this process as needed.
Notes:
-
If all the images for a given procedure (such as a full mouth series) are selected, they are attached to the claim as a single image with a resolution of 1920 x 1080.
-
The applicable tooth numbers and date of each selected image are included.
-
-
Click (or tap) Add.
-
-
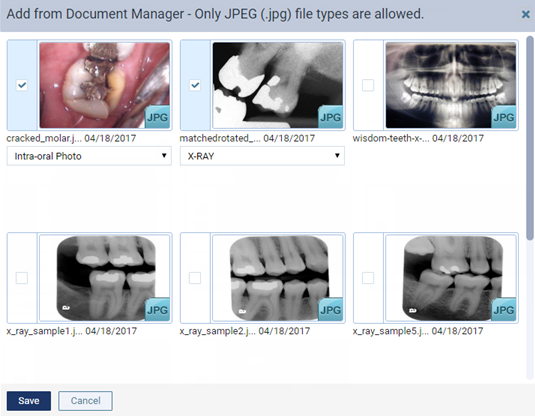
Add images and/or .pdf files from the patient's document manager.
Do the following:
-
Click (or tap) Add From Document Manager. This button is available only if the payer for this claim is a supported carrier (a carrier that was added to your practice database from the list of supported carriers that Henry Schein maintains; the payer ID of an unsupported carrier is 06126).
The Add From Document Manager dialog box appears.
-
Select the checkboxes of the images and/or .pdf files that you want to attach to the claim.
Note: Each page of a .pdf file counts as one attachment. In the example below, there are six attachments (one for the .jpg file, and five for the .pdf file).

-
Select a classification/type for each selected image.
Tip: If necessary, you can change the classification/type later by selecting a different option from the Classification/Type list on the Attachments tab.
-
Click (or tap) Save.
-
-
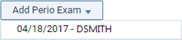
Add the patient's perio exam.
Do the following:
-
Click (or tap) Add Perio Exam to view a menu that lists the dates of the patient's perio exams. This button is available only if the patient has perio exams entered in his or her record and if the payer for this claim is a supported carrier (a carrier that was added to your practice database from the list of supported carriers that Henry Schein maintains; the payer ID of an unsupported carrier is 06126).
-
Click (or tap) the date of the perio exam that you want to attach to the claim.
-
-
Add narratives from the patient's clinical notes.
Do the following:
-
Click (or tap) Add Narrative to view a menu that lists the patient's clinical notes. This button is available only if the patient has clinical notes entered in his or her record and if the payer for this claim is a supported carrier (a carrier that was added to your practice database from the list of supported carriers that Henry Schein maintains; the payer ID of an unsupported carrier is 06126).
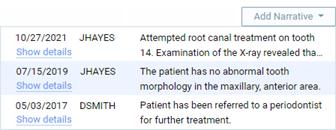
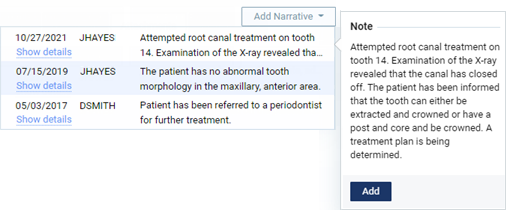
Note: You can click a clinical note's Show details link to view the entire note.
-
Click (or tap) the clinical note that you want to attach as a narrative to the claim.
Note: Alternatively, if you are viewing the details of a note that you want to attach, in the Note pop-up box, click Add to attach that narrative.
-
After attaching the narrative, to see it exactly as the insurance carrier will see it, click (or tap) that narrative's Document Name, which is a link. The image opens in a new browser tab.

-
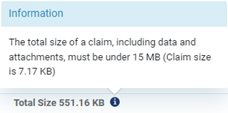
Note: The total claim size (claim data and attached files) must be smaller than 15 MB. You cannot submit the claim if the size is 15 MB or larger. For your reference, the Total Size appears below the list of attachments on the Attachments tab.
To view the size of the claim itself, click the "i" icon.
-
-
Do one of the following:
-
To save and close the dialog box, click (or tap) Save and then Cancel.
-
To save the changes and submit the claim, click (or tap) Submit.
-