Learn how to send electronic claims, or eClaims, with Dentrix. Save time and money by taking advantage of your ability to submit claims electronically. Use these resources to get started with Dentrix eClaims.
To learn how to use Dentrix eClaims, click the topics below.
You can send all your claims with eClaims. eClaims is connected to a large list of payors for electronic claims and attachments.
Watch this video to learn how to set up Dentrix for electronic claim submission. (Duration 1:00)
Key Information
Your User ID was emailed to you when you signed up for eClaims service.
To set up eClaims, from the Office Manager click Maintenance > Practice Setup > Electronic Claims Setup.
If you reset your eClaims password, it must be at least eight characters long and include uppercase and lowercase letters, along with at least one number.
Internet is recommended as your Connection Method.
View the complete list of participating payors by using the Payor ID Search Tool.
You only need to complete eTrans setup on one computer. The settings will apply to all other workstations in your office.
Before you can send electronics claims, you must make sure your practice information in the Office Manager includes all the information required to identify and validate your submissions. A key piece of information is specifying the administrative contact.
Watch this video to learn how to define your practice's administrative contact for claim submission. Duration (1:31)
Key Information
Your practice information must include your full nine-digit ZIP code. If needed, you can search for a complete zip code at the USPS website.
To set up the administrative contact, from the Office Manager click Maintenance > Practice Setup > Practice Resource Setup. In the Practice Resource Setup dialog box, click the Edit button to specify the administrative contact.
The Administrative Contact must be a doctor.
You must enter the following information for each provider in the practice.
A National Provider Identifier, or NPI, is a unique 10-digit identification number required for healthcare providers or healthcare organizations to transmit health information electronically.
NPI numbers may be used in various administrative and financial transactions, including insurance billing, eligibility verification, and other electronic communication with health plans and clearinghouses.
A Type 1 NPI is assigned to an individual healthcare provider, such as a dentist or a dental hygienist. Each dentist should have their own personal Type 1 NPI.
A Type 2 NPI is assigned to a business organization, such as a group dental practice or clinic. For billing purposes, this may be used when claims are submitted under the practice's name or employer identification number.
NPI numbers are administered through the National Plan & Provider Enumeration System (NPPES). Contact the NPPES website for additional information
Entering NPI Numbers in Dentrix
Type 1 NPI numbers can be entered into the NPI field within the provider's profile in Practice Resource Setup.
When working with Type 2 NPI numbers, the organization can be entered into Dentrix as a "Non-Person" provider, and the NPI number assigned to that provider's profile in Practice Resource Setup.
Creating a Non-Person Provider
To add a provider
In the Office Manager, click Maintenance, point to Practice Setup, and then click Practice Resource Setup.
Under Providers, click Add.
Fill in the practice's information and ID numbers as prompted. Pay special attention to the following fields:
Last Name - Enter the practice name.
ID - Type a unique, four-character, alphanumeric ID, such as PRAC (practice). Once you create a provider ID, you cannot edit it.
Non-Person - Check the Non-Person box
Specialty - Select a category that describes your practice, such as General Practice or Pediatric Dentistry. Be aware that the specialty you choose here will determine the taxonomy that will be submitted on the claim.
Address - Type the practice's complete physical business address. Use the full nine-digit zip code. (If you are unsure of the complete zip code, use the USPS zip code lookup webpage)
Class - Select the Primary class
Insurance Claim Options - Select Print Provider's Signature to avoid signing every printed insurance claim, and then select Provider's Name (recommended) or Signature On File.
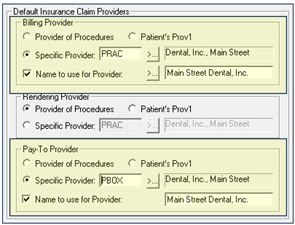
Dentrix allows you to choose the claim provider information as a default option, so that when you create claims those choices are automatically applied. If you enter the settings that you use most commonly, these defaults can save you time each day creating claims. You can change practice defaults at any time.
In the Office Manager, click Maintenance, point to Practice Setup, and then click Practice Defaults.
Under the Default Insurance Claim Providers heading, enter the provider that you created for your Type 2 NPI for both the Billing Provider and Pay-to Provider.
Select the Name to use for Provider: checkbox and type the practice name exactly as you want it to appear on your claim forms.
Using a PO Box for a Payment Address
If you need to use a PO Box as the payment adress, add a second Non-Person provider with the PO Box address information. Follow the above instructions with the following exceptions:
Create a new unique provider ID. Ie. PBOX
Add the PO Box address appropriately
Practice Defaults - Select the provider created with the PO Box address as the Pay-to Provider.
In both the Billing Provider and Pay-to Provider sections, select the check box Name to use for Provider: Type the Practice name exactly as you want it to appear on your claim forms.
You'll need to make sure insurance information for each carrier is set up correctly in Dentrix in order to successfully send electronic claims and avoid claim rejections.
Watch this video to learn how to set up insurance plans in Dentrix to include all the information that is required for electronic claims submission. (Duration 2:48)
Key Information
You must have the correct spelling of the full name and birth date entered in the Family File for both the subscriber and the patient.
You must enter the Subscriber ID number for the subscriber.
Selecting "Other" as a subscriber relationship will cause claims to be rejected. Even if the patient is 18 years old or older, if they are covered under their parents' insurance they need to have the relationship status of "child".
If you are working with an insurance company that does not use group names, you can copy the employer information into the Group Plan field in the Insurance Plan Information dialog box. Then, check the Do Not Include Group Plan Name check box so the employer name doesn't print on the claim.
If you are using one of the Delta Dental plans or Blue Cross Blue Shield plans, make sure to include the state that it is associated with (e.g. Blue Cross Blue Shield of TX).
The payor ID you use in the Dental Insurance Plan Information dialog box is the one from the clearinghouse, not from the insurance company. Click on the search button to see a list of payor IDs, or refer to the Payor ID Search Tool online.
You must fill out the insurance information for each insurance plan accepted by your practice.
You can create claims individually in each patient's Ledger, or all at once through the Office Manager module.
Creating Claims Individually
You should create a dental insurance claim each time an insured patient receives treatment.
Watch this video to learn how to create primary claims individually. Duration (1:12)
Key Information
Claims can only be created when you are viewing the ledger for an individual patient. If the insurance options are not available to select, in the View menu, verify that you are NOT viewing All Family Members.
In addition to the Insurance menu, there are toolbar buttons available for quick access to Today's Procedures and Selected Procedures. You can choose whether these buttons should Batch, Send Electronically, or Print the claims after creating them in the Direct Processing Options setup area (Ledger > File > Direct Processing Options Setup).
The Fast Checkout toolbar button also offers a way to create insurance claims, in combination with other tasks such as entering a payment and printing a walkout statement. These options are set up in File > Fast Checkout Options Setup.
Creating Claims at the Same Time
Some offices choose to create all insurance claims for a given day at the same time instead of one patient at a time throughout the day. The Office Manager allows you to create all primary insurance claims for procedures posted within the selected date range and for selected providers and Billing Types.
Important: If you follow these instructions to create claims as a batch, carefully review the created claims to ensure all required attachments are included!
To batch claims:
In the Office Manager, click File, and then click Batch Ins Claims.
If necessary, change the date range.
The date range will default to today's date.
If you change the date range to include history, be aware that Dentrix will create insurance claims for patients based on their current insurance—even if that insurance wasn't active at the time of the visit.
Choose the providers and billing types to include.
Choose a method to process the claims.
Click Print to create the claims within the ledgers, send them to the batch processor, and immediately send them to the default printer.
Press Send to Batch to create the claims within the ledgers and send them to the batch processor. They will automatically be selected, making it convenient for you to choose the next action (such as printing or sending electronically).
Press Send Electronically to create the claims within the ledgers, send them to the batch processor, and begin the send electronically process.
After you create and batch claims throughout the day, you can send them electronically to the clearinghouse through the Office Manager.
Watch this video to learn how to submit claims electronically. Duration (2:08)
Key Information
To select multiple claims in the Batch Processor, hold down the CTRL key on the keyboard while clicking the claims you want to send.
Don't select the Send All Claims option in the Office Manager because it will send all the claims in your Batch Processor, including claims you may not want to send.
When you submit your claims, the claims are reviewed and reported in a Pre-submission Summary that pops up. It allows you make a final check before sending claims to the clearinghouse.
You can attach images or other information before sending a claim to the Batch Processor.
Watch this video to learn how to add attachments to claims. (Duration 3:37)
Key Information
If you are using Dexis to attach X-rays or oral images, you can only attach up to 10 images per claim. If you need to attach more than 10 images you must use the option to include a composed series of images.
The narratives in the Remarks for Unusual Services on claims with attachments must be 80 characters or less. The claim's NEA number is transmitted with the claim and takes up some of the space that is available when sending regular claims.
If you attach X-rays, you must modify the attachment information data to specify a date.
If you import a Perio Chart, you must modify the Attachment Information to set the attachment type to Perio Chart.
The Import File option is only for .txt files.
The claim and the attachment must be selected and transmitted in the same submission, so you need to batch the claim and the attachment and send them together with the other claims. Do not send claims that have attachments directly from the Ledger.
After you send your claims, the eClaims Transmission Report will appear in your batch processor. The transmission report includes several important pieces of information.
Watch this video to learn how to view and interpret the transmission reports that accompany a claims submission. (Duration 2:33)
Key Information
Delete the claims you have already sent from the Batch Processor so you don't accidentally send them twice.
Review the Pre-Submission Summary and uncheck claims that are not ready to be sent because they have a status of Warning or Rejected.
Always view the Transmission Report, and make sure you look through all the included reports.
Confirmation Report - Allows you to see that the claims you submitted went through correctly or be notified of any problems with the claims. If you have added a new provider but haven't notified eServices, you will see New POL on this report.
Attachment Status Report - Allows you to see that your attachments were sent correctly. A few days after you submit an attachment you will receive an Attachment Status Report that includes an NEA number for the attachment.
Payor/Clearinghouse Report - Allows you to see the status messages received from the insurance companies or their clearinghouses that are processing the claims you submitted. This report shows you what has happened to the claim since it left your office.
Billing Statement - This is an itemized statement showing you all of the claims you submitted during the last billing period. It's broken down by insurance company so you can see who you are sending claims to most often.
Passthrough Report - This patient-specific report shows you an estimate of what the insurance company is going to pay towards your claim so you know what the patient's out-of-pocket total will be.
With a patient selected in the Ledger, double-click the primary insurance claim.
Click Create Secondary.
Creating secondary claims automatically
An option can be enabled to remind you to create secondary claims after you post a primary insurance claim payment.
To create a secondary claim automatically
In the Ledger, click File, and then click Insurance Payment Setup.
Under Additional Options, select Auto-Create Secondary Claim with Primary Payment.
Claim Adjustment Segment (CAS)/Coordination of Benefits (COB)
Before submitting secondary claims electronically, our claims clearinghouse requires you to complete the Claim Adjustment Segment (CAS)/Coordination of Benefits (COB) portion for secondary insurance claims.
If you submit secondary insurance claims without completing the CAS/COB portion for the primary claim, they may be rejected, and you will receive a message similar to the following:
COB claim balancing failed total charge amount.
Claim amount does not equal sum of paid amount and all adjustment amounts.
Other Carrier Claim Out of Balance.
Receipt of a rejection message results from the absence of, or invalid information in, the Claim Adjustment Segment, which represents primary insurance claim adjustments. Adjustment information helps the secondary provider balance the remittance information. Adjustment amounts should fully explain the difference between the submitted charges and the amount paid by the primary insurance carrier. Claims submitters must use the Claim Adjustment Segment to report the primary carrier's claim level adjustments that caused the amount paid to differ from the amount originally charged.
With a patient selected in the Ledger, double-click the primary insurance claim.
Click View Secondary, and then double-click the Claim Information box.
Under Other Subscriber Information, click Primary Claim Adjustment Reason(s).
Complete the following information about the adjustment:
Group Codes
PR - Patient Responsibility - Is the adjusted amount in the segment the patient's responsibility?
CO - Contractual Obligation - Is the adjusted amount not the patient's responsibility due to a contractual obligation between the provider and the payer or a regulatory requirement? For example, a participating provider agreement might be considered a contractual agreement.
PI - Payer Initiated - In the payer's opinion, is the amount in this segment not the patient's responsibility without a supporting contract between the provider and the payer?
OA - Other Adjustment - Use if no other category is appropriate.
CR - Correction and Reversals - Is the claim a reversal of a previously reported claim or claim payment?
Reason Codes - The reason code appears on the ERA/EOB/EEOB that is returned from the payer after you first submit the claim. If necessary, you can use that reason code to resubmit the primary and the secondary claim.
Reason Codes 01-03 - Always use with PR - Patient Responsibility. Note: Always enter Reason Codes 01-09 as double digits, not 1-9.
Reason Code 18 - Use only with OA - Other Adjustment unless the state workers' compensation regulations require CO - Contractual Obligation.
Reason Code 23 - Use only with QA - Other Adjustment.
Reason Code 45 - Use only with PR - Patient Responsibility or CO - Contractual Obligation depending on liability.
Reason Code 85 - Use only with PR - Patient Responsibility.
Reason Code 133 - Use only with QA - Other Adjustment.
Reason Code 136 - Use only with QA - Other Adjustment.
Reason Code 201 - Use only with PR - Patient Responsibility.
Reason Code 209 - Use only with QA - Other Adjustment.
Reason Code 229 - Use only with PR - Patient Responsibility.
Reason Code 238 - Use only with PR - Patient Responsibility.
Reason Code 249 - Use only with CO - Contractual Obligation.
Reason Code 255 - Use only with QA - Other Adjustment.
Reason Code 257 - Use only with QA - Other Adjustment.
Reason Code P3 - Use only with PR - Patient Responsibility.
Reason Code P11 - Use only with QA - Other Adjustment.
Reason Code P16 - Use only with CO - Contractual Obligation or QA - Other Adjustment.
Reason Code W5 - Use only with CO - Contractual Obligation or QA - Other Adjustment.
Amount - Amount of the adjustment.
Click Close.
In the Insurance Claim Information dialog box, in the Remaining Patient Liability Amount box, enter the patient portion from the ERA/EOB (primary claim amount minus the primary claim payment amount minus adjustments).
Creating Secondary Claims if the Information has been Added/Changed
If the secondary insurance information has been changed in the patient's Family File after the primary claim was created, do the following to update the secondary insurance information:
Verify that the correct secondary insurance information in the Family File is correct. Update it as needed.
In the Ledger, double-click the primary insurance claim.
Double-click the Subscriber Information block.
Select Update Secondary Insurance, and then click OK.
Click Create Secondary.
Key Information
Automatic creation of secondary claims can only occur if
you have not already created a secondary claim
a patient had secondary insurance set up in the Famiy File at the time the primary claim was created
Using the Claims Manager, you can search, sort, and customize the list of outstanding insurance claims. To view the details of a claim, select it from the list. You can also add or edit claim statuses and view more information about a patient or insurance plan.
Insurance Aging Report
The Insurance Aging Report includes each insurance carrier with outstanding claims, including the insurance plan name, group plan name, insurance phone number, group number, and each outstanding insurance claim for the insurance carrier. The insurance claim information includes a notation of primary or secondary, the date the claim was sent, the date a tracer was sent, the date the claim was placed on hold, the date the claim was re-sent, any status notes, the patient name, patient birthday, subscriber name, subscriber ID number, estimated insurance payment, and the amount billed to insurance. The amount billed to insurance will be placed in the Current, 31 - 60, 61 - 90, or > 90 column based on how long ago the claim was sent. The primary and secondary claim amounts will each be totaled and printed with a combined total at the bottom of the report.
To generate the report, in the Office Manager, click Reports, point to Ledger, and then click Insurance Aging Report.