
When a patient checks out of your office, you can complete three "fast checkout" tasks with the click of a button:
· Post a payment
· Generate an insurance claim
· Print a receipt
You can use the Fast Checkout button on the Ledger toolbar to quickly take care of these three checkout tasks. You can customize the button to meet the needs of your office.
To set up your checkout options
1. In the Ledger, click File, and then click Fast Checkout Options Setup.
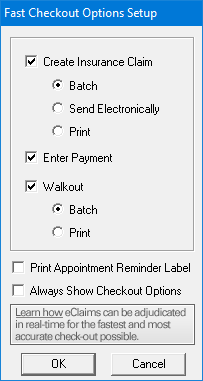
The Fast Checkout Options Setup dialog box appears.

2. Set up the tasks you want to perform when you click the Fast Checkout button. The following options are available:
· Create Insurance Claim - Select to create an insurance claim for today’s procedures, then mark where you want the claim sent:
· Batch - Select to send the claim to the Batch Processor.
· Send Electronically - Select to submit the claim electronically. You must first set up an eServices account to use this feature.
· Print - Select to send the claim directly to the printer.
· Enter Payment - Select to post a payment on the patient’s account.
· Walkout - Select to create a walkout statement or receipt. Then, mark where you want the walkout statement to be sent:
· Batch - Select to send the statement to the Batch Processor.
· Print - Select to send the statement directly to the printer.
3. Do one of the following:
· Print Appointment Reminder Label - Select to print appointment reminders for patients when they check out.
· Always Show Checkout Options - Select to set checkout options for each patient because the tasks you perform at checkout vary.
4. Click OK to save your settings.