

|
Adding and editing insurance profiles
You can add and edit insurance profiles as needed.
To add or edit an insurance profile
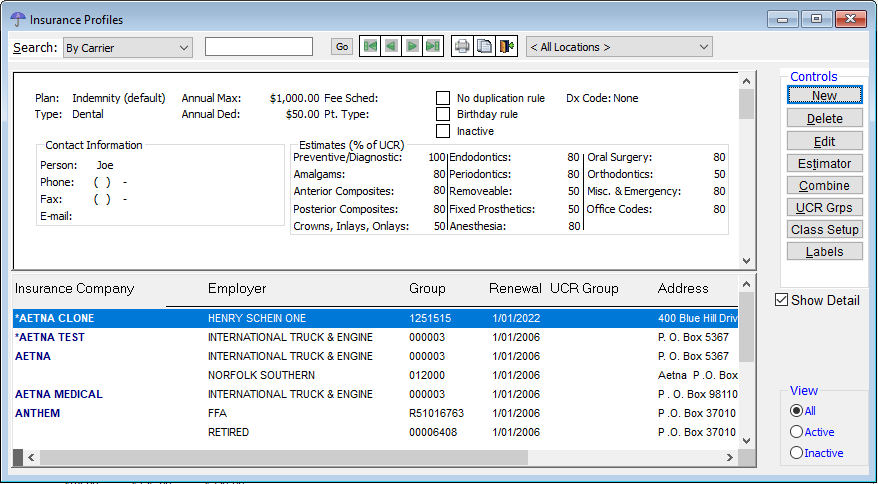
1. From the File menu, click Insurance Profiles.
The Insurance Profiles window appears.
2. Do one of the following:
· To add an insurance profile, click New. In the New Insurance Profiles dialog box appears, click either Create New or Copy Existing.
· To edit an existing insurance profile, select an insurance profile, and then click Edit.
Note: You can also click Combine if you want to combine two duplicate insurance profiles into one.
The Edit Insurance Profile dialog box appears.
3. Set up the options on each tab:
General tab
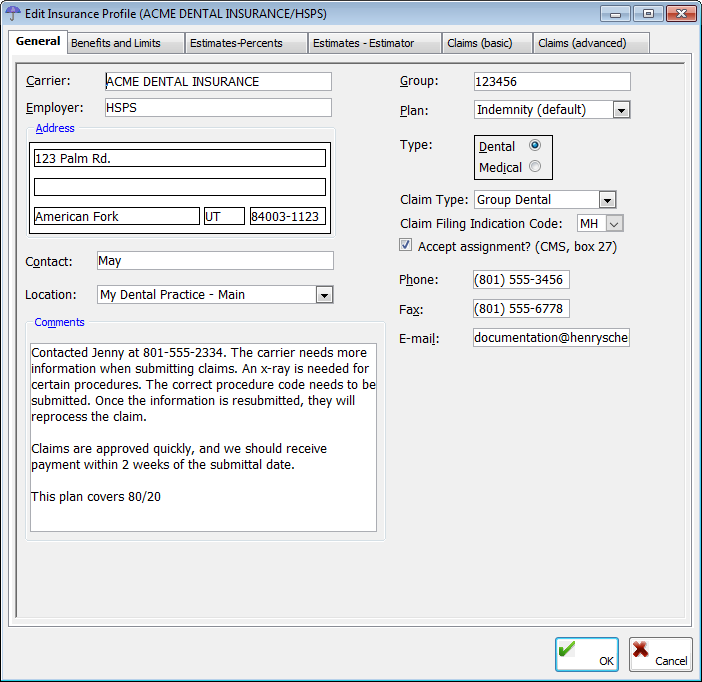
The General tab, which is selected by default when the Edit Insurance Profile dialog box is opened, stores the general options for an insurance profile.
· Carrier – Type the name of the insurance carrier. This field has a limit of 30 characters.
· Group – Type the group number of the insurance plan. This field has a limit of 15 characters.
· Employer – Type the name of the employer for this insurance plan. This field has a limit of 30 characters.
· Address – Type the insurance company's street address, state, and ZIP Code. Also, you can type the ZIP Code and press the Tab key to have the city and state fields be automatically populated if the ZIP Code entered exists. The street address fields each have a limit of 25 characters.
· Contact – Type the name of the contact person at the insurance company. This field has a limit of 35 characters.
· Location – Select the location to associate the insurance profile with. If you are adding a profile, the Location list defaults to the location from which you are currently making the entry.
· Comments – Type any comments about the insurance profile. The scroll bar in the field becomes available when your comments exceed approximately 400 characters. The comments can also be scrolled when viewing them from the Insurance tab of the Patient Information Center.
· Plan – Select one of the following options:
· Indemnity (default) – This insurance plan charges the full office fees and estimates the insurance and patient portions based on information in the Estimate-Percents or Estimate-Estimator tab. Use this plan type either for insurance carriers that you are not contracted with or for insurance carriers that you are contracted with, but you want to charge your office's full fee and write off any contract difference when an insurance payment is received. When adding a profile, the Plan list default selection is Indemnity.
· Managed Care – This insurance plan is a discount type plan where the insurance carrier never reimburses the office any amount. For more information about how to setup this type of plan, see DVE insurance help document.
· PPO – This insurance plan is used for insurance carriers that you are contracted with and that reimburse a percentage of the contracted amount. Use this plan to charge the contracted amount, calculate the estimate based on the percentage entered on the Estimate-Percents tab, and not write off an amount when payment is received. For more information about how to setup this type of plan, see DVE insurance help document.
· Medicaid – This insurance plan bills special Medicaid fees that have been set up in the master fee schedule only to Medicaid.
· DMO Plan Type – This insurance plan is used for insurance carriers that you are contracted with and that reimburse a percentage of the contracted amount. Use this plan to charge the contracted amount, calculate the estimate based on the set fee entered on the Estimate-Estimator tab, and not write off an amount when payment is received. For more information about how to setup this type of plan, see DVE insurance help document.
Note: You can select a plan type wherever you can filter reports by carrier.
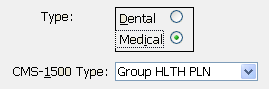
· Type – Select the insurance type: Dental or Medical. If you select Dental, claims sent to this insurance profile will be processed as dental claims. If you select Medical, claims sent to this insurance profile will be processed as medical claims. If you are adding a profile, the default type selection is Dental.
· Claim Type or CMS-1500 Type
· For a dental plan, select the claim type: Group Dental, Medicaid, or EPSDT.
· For a medical plan, select the CMS-1500 Type: Medicare, Medicaid, CHAMPUS, CHAMPVA, Group HLTH PLN, FECA BLK LNG, or Other.
· Claim Filing Indication Code - Use this option to specify the code indicating the type of claim filing:
· MH - Managed Care - Non-HMO
· MA - Medicare A
· MB - Medicare B
· We participate with this plan – Select this check box if your office does participate with this insurance carrier. For a dental claim, this option is for informational purposes only. On a medical claim, this option determines whether or not to accept assignment of the claim and appears in box 27 on the CMS1500 claim form.
· Phone – Type the phone number for the insurance profile.
· Fax – Type the fax number of the insurance profile.
· E-mail – Type the email address of the contact for the insurance profile. This field has a limit of 60 characters.

The Benefits and Limits tab stores the benefit information for the insurance profile.
· Benefits – Set up one of the following renewal options:
· Renewed Annually – Select this option if the policy for this insurance profile renews yearly with the same maximum. This option is selected by default. Also, type the dollar amount of the Maximum benefit in a $,$$$.$$ format, and enter the date that the policy will Renew on to reset the benefits left for patients with this insurance profile to the policy maximum on the specified date.
· Not renewed (lifetime benefit) – Select this option if the policy for this insurance profile covers only up to a specified dollar limit over the life of the policy. Also, type the dollar amount of the Maximum benefit in a $,$$$.$$ format.
Notes:
· The default amount in the Maximum fields is determined by a certain preference setting.
· The default Renew on date is the first day of the new year.
· Reduce Benefits Based On Which Amount – Select the amount upon which to base how benefits are reduced: Estimates, UCR (fee), or Billed (Posted).
Note: You should use the Estimates option.
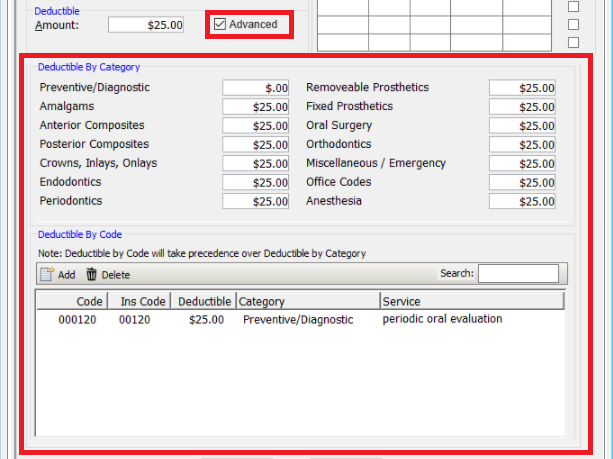
· Deductible – Type the Amount of the patient’s deductible for this policy in a $,$$$.$$ format. If the deductible is to be applied for type A (preventive) procedures, select the Apply Deductible to Preventive check box.
· Advanced - Clicking this button displays an Advanced deductibles dialog box you can use to configure Deductibles By Category and Deductibles By Code.
· Age & Time Limitations – Set up restrictions for up to 10 procedure codes or class of codes:
a. For each code or class of code that you want to add to the insurance profile, do one of the following:
· For a code, double-click in the left-most field to search for and paste in a procedure.
· For a class, right-click in the left-most field, and then click Limitation Classes to select and paste in a class.
b. For each code or class of code, do any of the following:
· In the Only on patients from Age thru Age fields, type the age range limitation for the procedure code. Either field can be left blank to have an open-ended range.
· In the Not more than x times in # of months fields, type the number of times in a certain number of months that the procedure can be performed on a patient. To specify a calendar year restriction instead of 12 months for the maximum allowed number of times you entered, click in the right-most field, click the down arrow to open a menu, and then click Cal Yr.
Tip: You can press the Tab key to move between fields in a row and then to move to the next row.
Note: If an individual procedure in the Estimator table attached to the profile has a time and/or age restriction specified, the Estimator will be used instead of the insurance profile when figuring coverage for that procedure.
· Advanced - When this option is selected,
the dialog box expands to display all deductibles by category and all
deductibles by code for easier viewing.
· Coverage active between – If coverage is only active during a certain part of the year, type the appropriate months. By default, the range entered is January thru December, which means that the coverage is active year-round.
· Primary/Secondary Coord. – Specify the formula for the coordination of primary and secondary policies when one or both of a patient’s plans are managed care, DMO, or PPO:
· Minimum – The insurance benefit is the minimum of what this plan and the secondary would pay individually.
· Minimum + % – After calculating the minimum, the percentage from the Estimates-Percents tab is applied when reducing the benefit.
· Primary – The benefit is the amount associated with the primary insurance only.
· Primary + % – The benefit is the amount that the primary insurance covers, which is then reduced by a percentage.
· Maximum - The benefit is the largest maximum allowable amount of the primary and secondary plan if either were to pay individually. For example, if a patient has Insurance A and B, A's allowable for a certain procedure is $160, and B's allowable is $165, the amount charged will be $165 (the higher of the two).
Notes:
· If this profile is the primary policy for a patient, the selected coordination rule for this policy takes precedence.
· For Canada only, all patients who have Alberta Health Care as their medical coverage, when you post a charge, the coordination of benefits feature is not used.
· Default Fee Schedule – If you have multiple fee schedules, select the fee schedule to use for patients with this insurance profile. The fee schedule you select will take precedence over the provider's default fee schedule (if they are different) when posting charges on a patient's account. By default, the fee schedule for billing insurance is the default fee schedule associated with the provider for whom you are posting procedures.
· Birthday Rule – Use this feature to specify how birthdays are used to coordinate benefits for dependents that have insurance coverage through both parents. If this check box is selected, the insurance policy that is associated with the parent whose birthday comes first in the calendar year will be the primary insurance coverage for the dependent.
· No Duplication Rule – If this profile is for a secondary insurance plan, specify how the primary and secondary insurance benefits are coordinated when both of a patient’s plans are indemnity plans. If the secondary insurance pays on a remaining amount after the primary insurance has paid, clear the check box. If the secondary insurance pays up to a certain percentage no matter how much the primary insurance pays, select this check box.
In most cases, the secondary will pick up where the primary leaves off. In the case where a plan carries the no duplication rule, the secondary will only pay up to a certain amount no matter what the primary pays.
· Profile Other Rule - If this check box is selected, the coordination of benefits (other insurance profiles) will not appear on the claim.
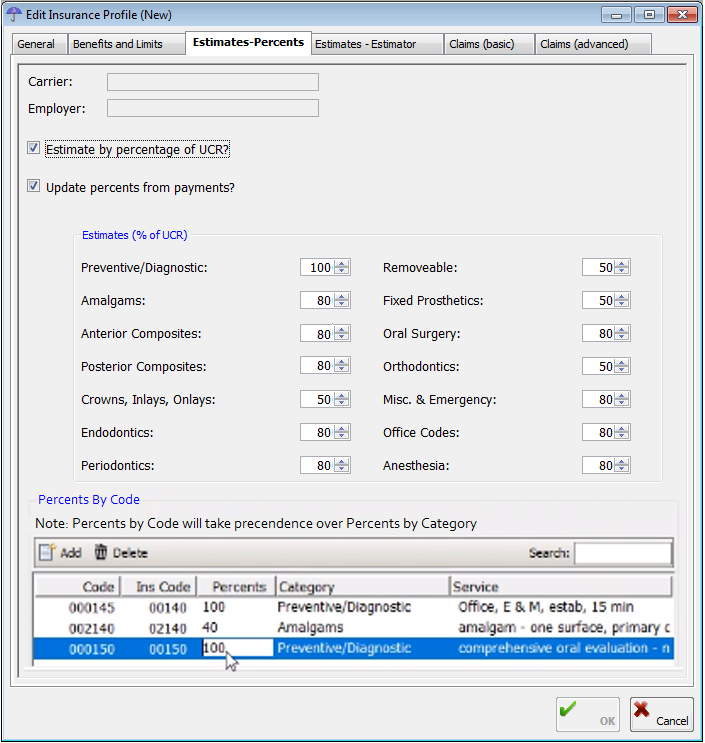
The Estimates - Percents tab stores how insurance coverage is estimated:
· Estimate by percentage of UCR? – Select this check box if the estimated amount the insurance carrier should cover should be calculated using the fees in the fee schedule and the percentages set up under Estimates (% of UCR). Clear this check box if you do not want the insurance estimate to be calculated by a percentage.
· Update Percents from payments – Select this check box if you want the insurance percentages to be updated to more accurately reflect the percentage the insurance carrier actually pays. Insurance portions will be updated according to insurance payments received from the insurance carrier for this plan. Clear this check box if you do not want the percentages to be updated.
· Estimates (% of UCR) – As needed, specify the coverage percentages for any of the procedure categories: Preventative/Diagnostic, Amalgams, Anterior Composites, Posterior Composites, Crowns, Inlays, Onlays, Endodontics, Periodontics, Removeable, Fixed Prosthetics, Oral Surgery, Orthodontics, Misc. & Emergency, and Office Codes. The insurance estimator percentage defaults are the standard 100%, 80%, and 50%.
Note: An estimate for the Estimator and insurance profile is calculated with this formula: Fee - (Deductible x Coverage Percent).
· Percent By Code - Under Percents By Code, do any of the following:
· To add a new insurance profile exception, click Add and then use the Fee Schedule dialog box to add the code exception and related information.
· To edit an existing insurance profile exception, click the box you want to edit and make the needed change.
· To delete an existing insurance profile exception, select the exception you want to delete, and then click Delete.
· To search for a specific insurance profile exception, in the Search box on the right, type the code.
· Alternate Benefit - Click this button to set up alternate codes for billing certain procedures. This button is available only for indemnity plans.
When insurance estimates are calculated, the program first looks for information in the Estimator and then if nothing is found uses the percentages set up under Estimates (% of UCR) on the Estimates-Percents tab. The program collects information from insurance payments as they are entered for each stored profile. As long as you have the Estimator turned on when entering payments for each posted procedure, the Estimator gathers the data and automatically assigns it to the correct insurance profile. Also, as the Estimator gathers data, it analyzes the information and checks to see if the original estimates of the insurance payment are still accurate or should be replaced with more up-to-date information.
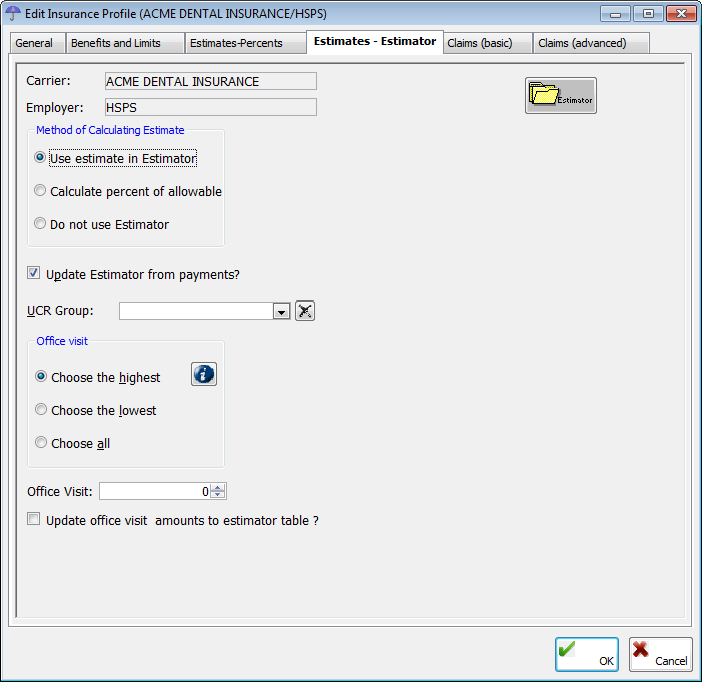
The Estimates - Estimator tab stores estimate options.
· Method of Calculating Estimate – Select one of the following options:
· Use estimate in Estimator – To calculate estimates using the Estimator whether information has been entered manually or gathered automatically from posted payments. This option is selected by default.
· Calculate percent of allowable – To calculate estimates by a percentage of the allowable amount paid by the insurance company.
· Do not use Estimator – To calculate estimates without using the Estimator.
· Update Estimator from payments? – Select this check box to have the Estimator update itself as it learns the dollar amount the insurance carrier pays as payments are posted by procedure. Clear this check box not to have the Estimator learn from payments.
· UCR Group – Select the UCR group that you want to associate the insurance profile with.
· Office Visit (section) – Select the option that pertains to how patient co-pays will be calculated when multiple procedures are posted (co-pays are only applied if they have been set up in the Estimator):
· Choose the highest – To bill the highest co-pay associated with the procedures on a claim.
· Choose the lowest – To bill the lowest co-pay associated with the procedures on a claim.
· Choose all – To bill the sum of all co-pays associated with the procedures on a claim.
· Office Visit (list) - For information about updating office visit fees, refer to the topic about updating office visit fees.
· Estimator - For information about the Estimator, refer to the topics about the Estimator.
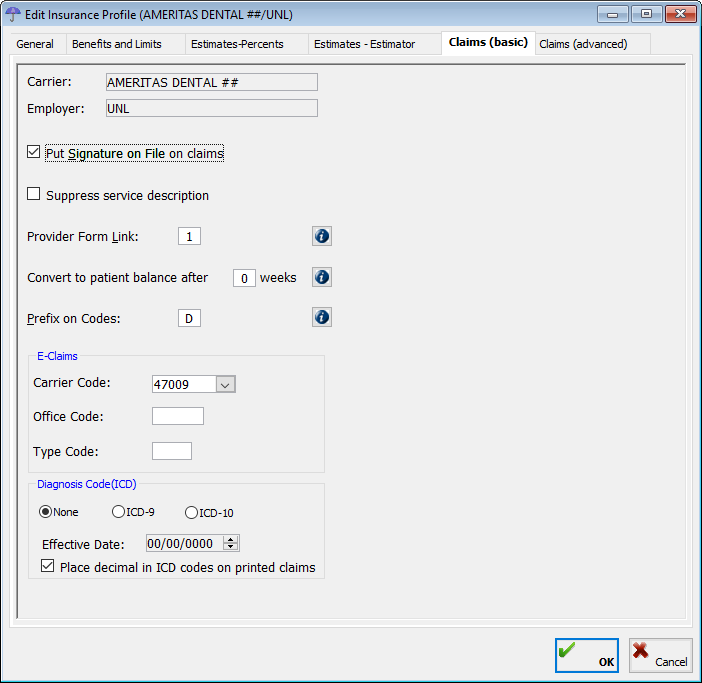
The Claims (basic) tab stores basic claim settings.
· Put signature on File on Claims – Select this check box to have “Signature on file” appear on the appropriate patient signature line on claim forms to indicate that the patient has given permission for the office to release information to the insurance company.
Note: This option has nothing to do with the line on the claim form that assigns benefits either to the practice or to the patient.
· Suppress service description – Select this check box not to include service descriptions on claims.
· Provider Form Link – The provider form link connects this insurance profile to an insurance claim form. If necessary, enter the number of a claim form, or double-click in the field to select and paste in a claim form.
Note: Several profiles can share the same provider form link. Additionally, since you can create unique settings (license numbers, provider name, special ID numbers, and so forth) for each form link, you can have an unlimited number of claim form settings and connections between profiles and providers.
· Convert to patient balance after [number of] weeks – To turn off this feature, set the number of weeks to zero.
Note: Setting the number of weeks will not cause the transfer to occur automatically. You must start the Convert Balances utility manually (for example, as part of running the monthly reports).
· Prefix on Codes – Type the prefix to add to the beginning of ADA codes on insurance claim forms. The default is “D” (if you bill a procedure, such as 03310, the program will place D3310 on the claim).
· E-Claims - If you will be sending e-claims using Envoy, with assistance from a EndoVision Customer Support Specialist or Certified Trainer, set up the following e-claim options:
· Carrier Code - Select the code provided by the e-claims clearinghouse.
· Office Code - Type the code provided by the e-claims clearinghouse.
· Type Code - Type the code provided by the e-claims clearinghouse.
· Emdeon or Mercury - Select an option for both dental claims and eligibility verification.
· Diagnosis Code (ICD) - Select which diagnostic coding system should be used on insurance claims for this insurance profile: None (no diagnosis code; this option is available only for dental insurance plans), ICD-9, or ICD-10. If ICD-10 is selected, in the Effective Date field, enter the date that the inclusion of ICD-10 codes will begin for this insurance profile.
· Place decimal in ICD codes on printed claims - Select this option if you want a decimal placed after the first three characters on printed claims. (Some insurance carriers may prefer/require this while others may reject claims that include a decimal.)
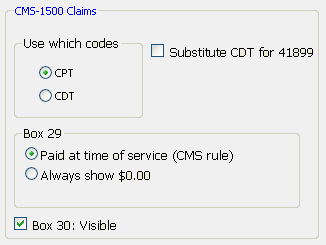
· CMS-1500 Claims – If this profile is for a medical insurance plan, set up the following options:
· Use which codes – Select which codes to use on claims: CPT or CDT.
· Substitute CDT for 41899 – Select this check box if this profile uses CPT codes on claims, to substitute the CDT code for the medical code 41899.
· Box 29 – Select what to show in box 29 on claims: Paid at time of service (CMS rule) or Always show $0.00.
· Box 30 – Visible: Select this check box to show box 30 on claims.
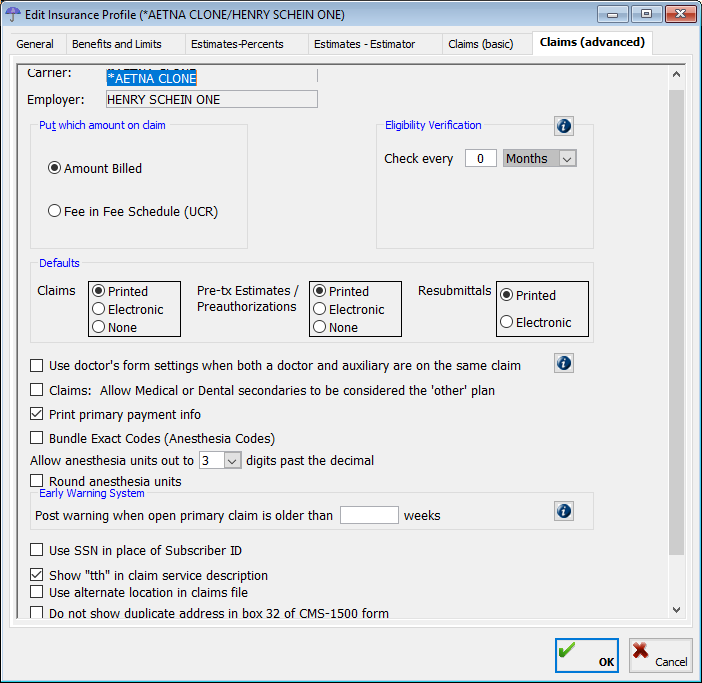
The Claims (advanced) tab stores advanced claim settings.
· Put which amount on claim – Select the amount to put on claims: Amount Billed or Fee in Fee Schedule (UCR).
· Eligibility Verification – Set up the following options for insurance plans that require eligibility verification:
· Check every – Type the number of days, weeks, months, or years to check eligibility and then select Days, Weeks, Months, or Years from the list to indicate the frequency. If Eligibility Verification is set up, in the In-Office Status window, when you check in a patient with this insurance profile, a dialog box will appear so that you can type the verification code and user ID. Alternately, you can type the eligibility information at any time from a patient’s Patient Information Center. If this plan does not require an eligibility check, enter 0.
· Claims – Select where to show eligibility verification on claims: Do not show on claims, Show in place of Subscriber ID #, or Show in place of Group/Plan #.
· Defaults
· Claims – Select how you want claims for this insurance profile to be sent: Printed, Electronic, or None.
· Pre-tx Estimates/Preauthorizations – Select how you want pre-treatment estimates/authorizations sent: Printed, Electronic, or None.
· Resubmittals – Select how you want claim resubmissions sent: Printed or Electronic.
· Use doctor’s form settings when both a doctor and auxiliary are on the same claim – Use this feature to address two common occurrences:
Scenario 1 – In the first scenario, a patient is seen on the same day by two or more providers and at least one is an auxiliary.
· If Use doctor’s form settings when both a doctor and auxiliary are on the same claim is clear, two claims will be created: one with the doctor as the servicing provider and one with the auxiliary as the servicing provider.
· If Use doctor’s form settings when both a doctor and auxiliary are on the same claim is selected, one claim will be created with the doctor as the servicing providers for all procedures.
Scenario 2 – In the second scenario, a patient is seen only by an auxiliary provider on any given day.
· If Use doctor’s form settings when both a doctor and auxiliary are on the same claim is clear, one claim is created with the auxiliary as the servicing provider.
· If Use doctor’s form settings when both a doctor and auxiliary are on the same claim is selected, one claim is created with the doctor as the servicing providers for all procedures.
· Print primary payment info - When this setting is selected, the secondary insurance claim prints the primary insurance payment. Note: Some insurance companies want this information on the secondary claim, and some do not.
· Bundle Exact Codes (Anesthesia Codes) - When this setting is selected, duplicate codes are bundled, rather than listed separately. (This may be necessary to comply with a policy from the ADA that insurance carriers bundle duplicate ADA codes on dental insurance claim forms.) When this setting is cleared, all duplicate codes listed.
· Allow anesthesia units out to __ digits past the decimal - Specify how precise you want anesthesia units to appear.
· Round anesthesia units - When this option is selected, anesthesia units are rounded (according to the Allow anesthesia units... described above).
· Use SSN in place of Subscriber ID - When this option is selected, claims include the subscriber's Social Security number instead of the subscriber ID.
· Show "tth" in claim service description - When this option is selected, claims include the "tth" abbreviation of "tooth" before tooth numbers. (Some payors may require that claims exclude this "tth" abbreviation.)
· Use alternate location in claims file - When this option is selected, the second line of the (legacy) .rec claims file displays the billing address (which may be a different location from the physician's office). (Some payors may require this in the .rec claims file.)
· Do not show duplicate address in box 32 of CMS-1500 form - When this option is selected, if the service facility location was the same as the physician's office, the duplicate address information is not repeated in box 32 of the form.
Claims (CDANet) tab (Canada only)
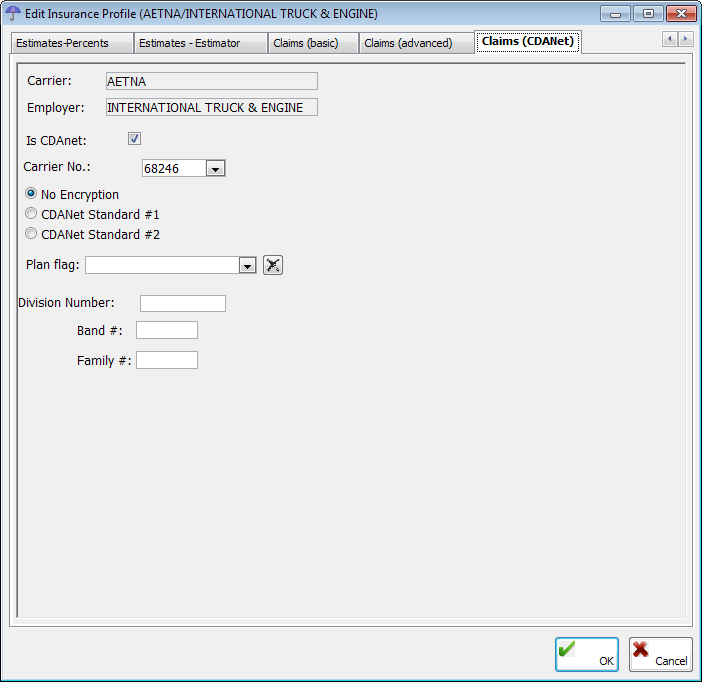
The Claims (CDANet) tab stores the insurance plan's preferences for submitting claims, predeterminations, EOBs, and eligibility requests to the carrier.
· Is CDANet - Select this check box for CDANet, or clear it for iTrans (the rest of the options will become unavailable).
· Carrier No. - Select a carrier.
· Encryption - Select the type of encryption to use for electronic transmissions: No Encryption, CDANet Standard #1, or CDANet Standard #2.
· Plan Flag - Select a plan. To clear
any previous selection, with an option selected, click the Clear
button ![]() .
.
· Division Number - Type the division number. This field has a limit of 10 characters.
· Band # - Type the band number.
· Family # - Type the family number.
4. Click OK.
If you are editing the profile, a confirmation message appears.

5. Click Editing Profile to apply the changes to the existing insurance profile. On the confirmation message that appears, click Yes.
Need more help?
You can visit our website, contact EndoVision Customer Support, or suggest a new feature or improvement on User Voice.