In the Clinic Information dialog box, you can set up options on the Clinic Settings tab.
Note: You can customize the options on this tab for each local clinic and the Central clinic separately.
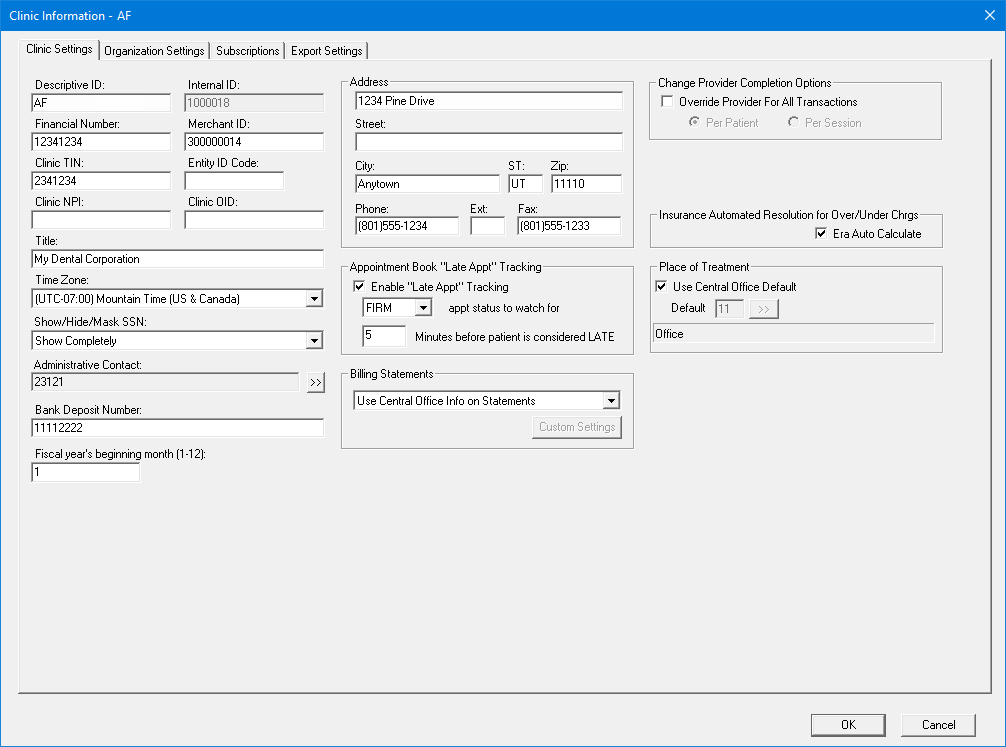
To change the clinic settings
Change any of the following options:
Descriptive ID – Enter an ID that is four to 11 characters in length (the maximum depends on a certain global setting). Valid characters include A-Z, a-z, 0-9, a hyphen (-), and an underscore (_). This ID is used to reference the clinic throughout Dentrix Enterprise and on reports.
Notes:
Changing a clinic's descriptive ID requires the "Clinic ID Change" security right.
The Internal ID is automatically generated and cannot be changed.
Financial Number – Enter the account number for the clinic's financial institution.
Merchant ID – Enter the ID used by the clinic for processing credit card payments.
Clinic TIN – Enter the Tax Identification number of the clinic.
Entity ID Code – Enter the code used to identify the entity for the clinic.
Clinic NPI – Enter the NPI of the clinic.
Clinic OID – Enter an External/Other ID for the clinic.
Title – Enter the name of the clinic.
Time Zone – Select the clinic's time zone. This is required if the clinic needs access to ePrescribe.
Show/Hide/Mask SSN – Select one of the following options:
Use Central Clinic Option - The setting will be the same as that for the Central clinic.
Show Completely – Shows the entire Social Security Number throughout Dentrix Enterprise. This option is selected by default for the Central clinic after the update is installed.
Hide Completely – Hides the Social Security Number. All boxes that display Social Security Number will be blank except in dialog boxes where the number is entered or edited (for example, the Patient Information dialog box).
Mask Completely – Masks all digits of the Social Security Number. Each digit will be replaced with a lowercase x except in dialog boxes where the number is entered or edited.
Mask All But Last Four – Masks all but the last four digits of the Social Security Number. Each of the first five digits will be replaced with a lowercase x except in dialog boxes where the number is entered or edited.
The Social Security Numbers will show, be hidden, or be masked (according to the option you select) in the following areas of Dentrix Enterprise:
Patient Information block (Family File)
Truth in Lending Disclosure Statement (payment plan)
Coupon Book (legacy payment agreement)
Select Patient dialog box (modules from which a patient can be selected)
Patient Route Slip (Appointment Book)
Letters and Quick Letters that have a Social Security Number merge field (Office Manager for Letters, patient-specific modules for Quick Letters, and Doc directory--where the letters are stored)
.OUT files created for a merged letter that has the Social Security Number data field option selected (Doc directory--where the letters are stored)
New Patient List (Standard List) (Office Manager)
New Patient List (Chart Labels) (Office Manager)
Patient Note Report (Office Manager and Family File)
Clinical notes report ((DXOne Reporting and the Clinical Notes window--can be opened from various modules)
Attending Doctor's Statement (Ledger)
Quick Labels that print a patient's Social Security Number (modules from which a patient can be selected)
Dental Chart (Patient Chart)
Patient Progress Notes (Patient Chart)
Practice Organization List (DXOne Reporting)
Provider IDs List (DXOne Reporting)
RVU Utilization Report – Dental (DXOne Reporting)
Utilization Report – Dental (DXOne Reporting)
Patient/Inactive Patient List (DXOne Reporting)
Patient/Inactive Patient List (Chart Number Report) (DXOne Reporting)
Patient/Inactive Patient List (Chart Labels) (DXOne Reporting)
UDS – Age/Gender Report (DXOne Reporting)
UDS – Insurance Financial Class Report (DXOne Reporting)
UDS – Patient Status Report (DXOne Reporting)
Notes:
The SS # box in the Patient Information dialog box (Family File) ignores the Show/Hide/Mask SSN selection.
The Subscriber Id # box in the Insurance Information dialog box (Family File) ignores the Show/Hide/Mask SSN selection.
The "Audit Report – Patient" and "Audit Report – Provider/Staff" (DXOne Reporting) ignore the Show/Hide/Mask SSN selection. Whether or not the Social Security Number is displayed or hidden (blank) is determined by the following criteria:
If a "Patient Changes" or "Provider Changes" entry on an audit trail report is for a Social Security Number that was changed, the Social Security Number shows on the report for that entry.
If a "Patient Changes" or "Provider Changes" entry on an audit trail report is not for a Social Security Number that was changed, the Social Security Number is not shown on the report for that entry.
The Coupons for a legacy payment agreement ignore the Show/Hide/Mask SSN selection. Social Security Numbers are never shown on coupons.
Administrative Contact – Click the Administrative Contact search button ![]() to select the business contact at the clinic. In the Select Provider dialog box that appears, select a provider (only providers listed as providers in the Clinic Resource Setup and who have a 10-digit phone number are displayed), and then click OK.
to select the business contact at the clinic. In the Select Provider dialog box that appears, select a provider (only providers listed as providers in the Clinic Resource Setup and who have a 10-digit phone number are displayed), and then click OK.
Bank Deposit Number – If you want the clinic's bank account number to print on deposit slips, enter the appropriate number.
Fiscal year's beginning month (1-12) – Enter the number of the month that your fiscal year begins. The default value is 1 (January).
Address – Enter the clinic's address, phone number, extension (if applicable), and fax number of the main contact person at the clinic.
Note: The fax number is required if this clinic needs access to ePrescribe.
Appointment Book "Late Appt" Tracking – To allow the time from the scheduled time of appointments to the arrival time of the corresponding patients to be monitored by Dentrix Enterprise, select the Enable "Late Appt" Tracking checkbox. Next, set up the following options:
Appt Status to Watch for – Select the appointment status (statuses can be customized in Practice Definitions) appointments will have before the corresponding patient arrives. Dentrix Enterprise will begin monitoring a patient's visit when the specified status is selected for his or her appointment from the Appointment Information dialog box.
Minutes before patient is considered LATE – A patient will be considered late for his or her appointment when the specified number of minutes has elapsed from the time of the scheduled appointment until the appointment status your office uses to indicate a patient has arrived is selected for that appointment. If a patient is late for his or her appointment, the Late Appt checkbox is selected in the Appointment Information dialog box, and a red dot appears in the upper-right corner of the appointment on the schedule.
Important:
The Appointment Statistics Report relies on the same underlying functionality to accurately track appointment statistics as the Enable "Late Appt" Tracking options do to monitor when a patient is considered late.
Neither of these features will work for purged appointments.
If late appointment tracking is not enabled, you can still run the Appointment Statistics Report, but it will not display statistics about late appointments.
Billing Statements – Select the option that corresponds to the information you want to have appear on printed billing statements:
Use Central Office Info on Statements – To print the name and address of the Central clinic on a statement that is sent to a patient of this clinic.
Use Clinic Info on Statements – To print this clinic's name and address on a statement that is sent to a patient of this clinic.
Use Provider Info on Statements – To print the name and address of the patient's primary provider on a statement that is sent to a patient of this clinic.
Use Custom Settings on Statements – To print a specified name, address, phone number, and message on a statement that is sent to a patient of this clinic. This option is available only if a certain global setting is enabled.
With Use Custom Settings on Statements selected, you can specify the clinic or provider name, clinic address, clinic phone number, and statement message separately, and each clinic can have different settings. The billing information you specify will also affect electronic statements that are sent using QuickBill. To customize the settings for this clinic, do the following:
Click Custom Settings.

The Custom Settings dialog box appears.
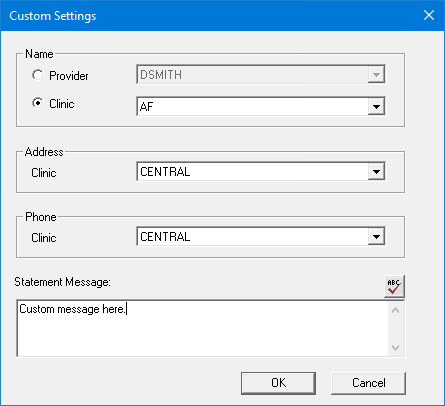
Note: You must be logged in to the Central clinic to make changes to these settings; otherwise, you can only view them.
Set up the following options:
Name – Specify whether you want to use a provider's name or a clinic's name, and then select the desired provider or clinic from the corresponding list.
Address – Select the clinic whose address you want to use.
Phone – Select the clinic whose phone number you want to use.
Statement Message – Enter the message that you want to have appear at the bottom of statements that are sent to patients of this clinic. This message will be used only if the Use same Statement Message for all checkbox is clear when setting up options to generate billing statements. Also, you can click the Check Spelling button ![]() to check the spelling of the message text (this button is available only if a certain preference setting has been enabled).
to check the spelling of the message text (this button is available only if a certain preference setting has been enabled).
Click OK.
Change Provider Completion Options – If the completing provider for procedures is often not the same as the treatment-planning provider, you can change the provider for those procedures. Depending on the option you select, the selected provider in Patient Chart or Ledger will be the provider for any procedures that are completed for the current patient or for all patients. This override is a global setting (it affects all clinics), and the options under Change Provider Completion Options are available only if you are logged in to the Central clinic. To enable the completing provider override feature, select Override Provider For All Transactions, and then select one of the following options:
Per Patient – The specified provider will be used for procedures being entered or completed for a given patient until you select another provider or patient in Patient Chart or Ledger.
Per Session – The specified provider will be used for procedures being entered or completed for all patients until you select another provider in Patient Chart or Ledger or close all Dentrix Enterprise modules.
Insurance Automated Resolution for Over/Under Chrgs – If the 835 EOB import features are enabled, to have Dentrix Enterprise automatically resolve overpayments, select the Era auto Calculate checkbox.
Place of Treatment - To specify the default place of treatment for claims that get created in this clinic, do one of the following:
To use the default place of treatment that was set for the organization, select the Use Central Office Default checkbox.
To override the organization-level default place of treatment, do the following:
Clear the Use Central Office Default checkbox (if it is not already).
Click the Default search button  .
.
The Select Place of Treatment/Service Codes dialog box appears.
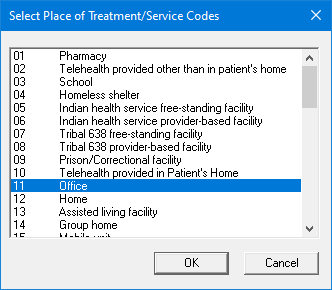
Select a place of treatment.
Click OK.
Note: You can customize the list of places of treatment in the Medical/Cross Code Setup dialog box.
Click OK.
If you changed the Descriptive ID, and if applicable, do one of the following:
If the Password - Clinic ID Change dialog box appears, user verification has been assigned to the "Clinic ID Change" task. Do one of the following:
If your user account has been granted the "Clinic ID Change" security right, enter your credentials in the User ID and Password boxes, and then click OK.
If your user account has not been granted the "Clinic ID Change" security right, have a user with permission temporarily override this restriction so you can save the new ID for the clinic this one time. The overriding user enters his or her credentials in the User ID and Password boxes and then clicks OK.
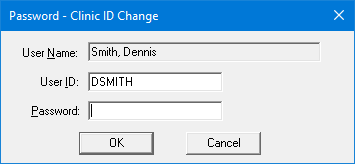
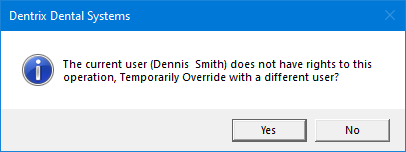
If a message appears, informing you that you do not have rights to this operation, your user account has not been granted the "Clinic ID Change" security right. To have a user with permission temporarily override this restriction so you can save the new ID for the clinic this one time, do the following:
On the message, click Yes.
In the Password - Clinic ID Change dialog box, the overriding user enters his or her credentials in the User ID and Password boxes and then clicks OK.
