In the Clinic Information dialog box, you can set up options on the Organization Settings tab.
Note: You can edit the options on this tab only if you are logged in to the Central clinic. These options affect all clinics in your organization.
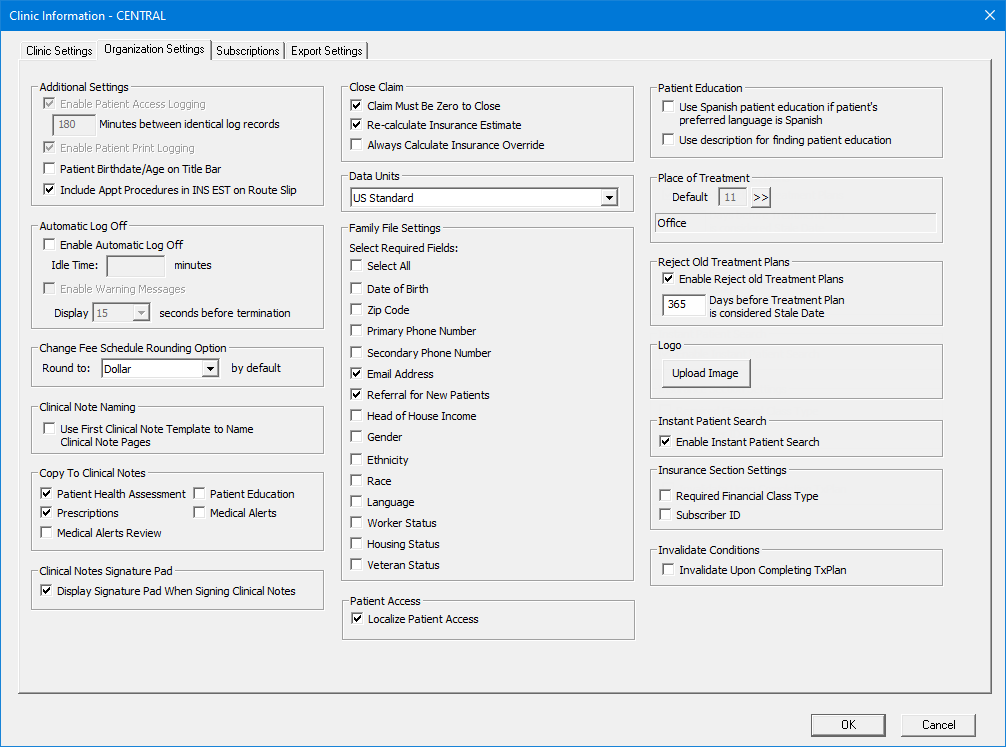
To change organization settings
Set up the following options:
Additional Settings:
Enable Patient Access Logging - To enable the tracking of emergency access to patient information for users without sufficient rights, select this checkbox. If you change this setting, the change is logged in the Audit - Audit Log Status Report.
Note: This checkbox is available only if your user account has been granted the "Audit Logs, Enable/Disable" security right.
When accessing a patient record multiple times the same way (in the same module, at the same clinic, on the same date, and by the same user) within the number of minutes specified in the Minutes between identical records box, Dentrix Enterprise will create only one entry for the Patient Information Accessed Report. In this box, enter a value from 5 to 1440.
Notes:
A short length may increase the number of identical entries that appear on the Patient Information Accessed Report, so you may want to enter a waiting period of 180 minutes or more.
The Minutes between identical records box is available only if the Enable Patient Access Logging checkbox is selected.
Enable Patient Print Logging - Select this checkbox to enable the tracking of the following: when reports that contain patient information are generated; when patient records are accessed; additions, deletions, and modifications of patient information; and when patient health information is exported to a patient's portal. This audit information appears on the Audit - Combined Report. If you change this setting, the change is logged in the Audit - Audit Log Status Report.
Note: This checkbox is available only if your user account has been granted the "Audit Logs, Enable/Disable" security right.
Running any of the following reports triggers an entry in the audit trail:
Treatment Planner - Print Treatment Case, Patient Treatment Case Report.
Prescriptions - Print Prescription.
Office Manager - Day Sheet (Chronological), Day Sheet (Alphabetical), Billing Statements, Billing Statements (Mailing Labels), Family Ledger, Patient's Ledger, Referral Recap, Daily Appointment List, Operatory Appointment List, Unscheduled Appointment List, Unscheduled Treatment Plans, Treatment Plan Approval Report, Treatment Plan Approval Status Report, Perio Exam List, New Patient List (Standard), New Patient List (Chart Labels), New Patient List (Mailing Labels), Patient Notes Report.
Family File - Print Patient Notes.
Chart - Print Dental Chart, Print Progress Notes with Chart, Referral Recap, Referral Slip.
Continuing Care - Continuing Care Display List, Continuing Care Display List Mailing Labels.
Patient Health Assessment - Print Patient Health Assessment, Print Patient Health Assessment Graph.
Ledger - Walkout Statement, Family Walkout Statement, Walkout (Appointment Card), Single Patient Statement, Single Family Statement, Referral Recap.
Office Journal - Office Journal Print Family, By Patient, By Provider, By Referred TO.
Appointment Book - Print Route Slip, Print Appointment Book View.
Patient health exchange - Export file, Send a file to portal.
Note: Dentrix Enterprise records each patient on a given auditable report as a separate record in the audit trail. In addition to the name of the patient, the audit trail includes the date and time of the event, the corresponding patient, the user who printed the report, and the name of the report.
Patient Birthdate/Age on Title Bar - To have the birth date and age of a patient selected in a patient-specific module (except for Family File) appear on the title bar of that module's window, select this option.
Include Appt Procedures in INS EST on Route Slip - The state of this checkbox affects route slips generated in all clinics:
With this checkbox selected:
The Patient Information section includes patient financial information: aged balances, estimated insurance portion, suspended credits, balance, and estimated patient portion (Balance + Appt Amount - Ins Est). The estimated insurance portion (Ins Est) is the insurance estimate for the procedures attached to the appointment for which the route slip is generated.
The Account Information section includes the estimated guarantor portion (Balance + Appt Amount - Ins Est). The estimated insurance portion (Ins Est) includes the insurance estimate for other family members' completed procedures (whether or not they are attached to a claim) and includes the insurance estimate for the procedures attached to the appointment for which the route slip is generated.
With this checkbox clear:
The Patient Information section does not include patient financial information.
The Account Information section does not include the estimated guarantor portion, and the estimated insurance portion is the insurance estimate for the patient's and the other family members' completed procedures (whether or not they are attached to a claim).
Automatic Log Off:
Enable Automatic Log Off - To have users logged off of Dentrix after a specified length of idle time, select this checkbox. Dentrix Enterprise is considered to be idle while there are no mouse movements or keyboard strokes in any Dentrix module on the computer to which a user is logged on. The exceptions to this rule are the DXOne Report Manager, DXPrint, and DXOne Reporting processes, which are used for reports; however, if a report is being run, and the user is logged off automatically, the generation of the report is canceled.
Enter the length of Idle Time in minutes that is allowed before a user is logged off the program. The default is 15 minutes.
Enable Warning Messages - To have a warning message appear before users are logged off automatically, select this checkbox. The message will present the options to the user to continue working in Dentrix without being logged off or to log off immediately. If the message is ignored, after the specified number of seconds, the user is logged off automatically.
In the Display box, enter the length of time in seconds a warning message will appear before a user is logged off automatically. The default is 15 seconds.
After a user is logged off automatically, a message will appear and state that the user was logged off automatically for security purposes. To log back on to Dentrix, the user can click the Office Manager button on that message.
Change Fee Schedule Rounding Option - Select the default rounding option (dollar, dime or penny) for automatic fee schedule changes.
Clinical Note Naming - To have the default name of a new clinical note ("Note#") changed to the category and name of the template that was used to create the note (if multiple templates were used to create the clinical note, the category and name of the first template used is used), select this checkbox. To use the default name ("Note#") for a clinical note that is created using a template, clear this checkbox.
Copy To Clinical Notes:
Patient Health Assessment - To have a clinical note be created automatically each time you enter a health assessment for a patient, select this checkbox. The clinical note will contain the details of the assessment.
Prescriptions - To have a clinical note be created automatically each time you enter a prescription for a patient, select this checkbox.
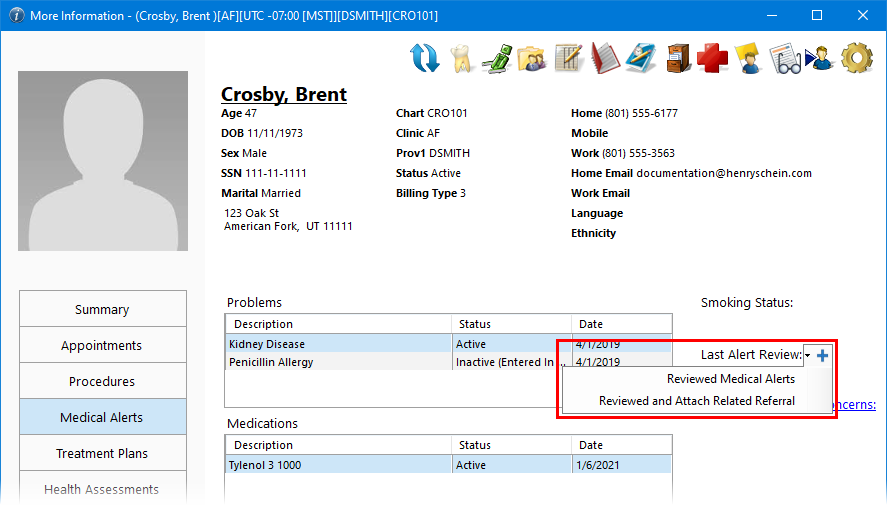
Medical Alerts Review - To copy a list of a patient's problems, allergies, and medications to a clinical note when you specify that you have reviewed a patient's medical alerts from the Medical Alerts dialog box or the More Information window. If a clinical note already exists for today, a list of the patient's problems, allergies, and medications are appended to that clinical note; otherwise, a new clinical note is created and the information is inserted.
OR

Notes:
This functionality does not apply when you add a review to a patient's record from the Medical Alert Review History dialog box.
This functionality does not apply when you specify that you have reviewed a patient's medical alert from the Medical History Review dialog box.
Patient Education - To have the details of a patient education topic be copied automatically into a clinical note each time you record that patient education has been presented to a patient.
Notes:
Dentrix Enterprise will combine several patient education recordings that are done on the same day into one clinical note page (unless the character limit for that page is reached; in which case, an additional page will be added).
If you attempt to edit the date, provider, or education URL of a record in the Patient Education History dialog box, a message, stating that the clinical note will not be updated, will appear.
If you delete a record from the Patient Education History dialog box, the record will remain in the clinical note until you manually delete it from the clinical note (if the note is not locked).
Medical Alerts - To have a clinical note be created automatically each time you enter a problem, a medication/prescription, or an allergy for a patient, select this checkbox.
Note: When a clinical note is created, it is created as the first page of a new note.
Clinical Notes Signature Pad - For military facilities that use Common Access Cards (CAC) or SMART Cards for authorization, to bypass the Sign Clinical Note dialog box, which contains a signature box where you can sign with a mouse, clear the Display Signature Pad When Signing Clinic Notes. With the checkbox selected, the Sign Clinic Note dialog box will appear for signing notes.
Close Claim - Select any of the following options:
Claim Must Be Zero to Close:
With this checkbox selected, if you enter an insurance payment that is more or less than what was expected from insurance, and you do not enter an adjustment to offset the difference, Dentrix Enterprise does not automatically mark the corresponding claim as being closed (although the claim's status still changes to Received). In this case, you would have to manually mark the claim as being closed by using the Close Claim menu option and choosing whether to credit or debit the patient's balance. Conversely, if the insurance payment is not the same as what was expected from insurance, once you enter an offsetting adjustment, Dentrix Enterprise does automatically mark the corresponding claim as being closed.
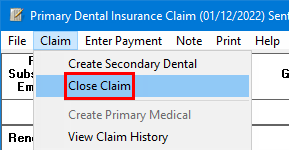
Note: A claim is considered open unless it is marked as being closed either automatically or manually. To find open claims, you can generate the Insurance Claim Aging Report with the Show Open Claims Only checkbox selected.
With this checkbox clear, the functionality of marking a claim as being closed is not available. However, that does not mean you cannot "close" a claim; you can enter an insurance payment (which changes the claim's status to Received) and any write-offs.
Re-calculate Insurance Estimate:
With this checkbox selected, Dentrix Enterprise will recalculate an insurance estimate if changes are made to the corresponding insurance plan's coverage table or payment table.
With this checkbox clear, once Dentrix Enterprise initially calculates an insurance estimate, it will not change the amount if changes are made to the corresponding insurance plan's coverage table or payment table except when the plan's maximum benefits is reached by another family member's claim. In this case, Dentrix Enterprise will recalculate insurance estimates for all open claims for all family members.
Note: This checkbox is available if the Always Calculate Insurance Override checkbox is clear.
Always Calculate Insurance Override:
With this checkbox selected, when you post a completed procedure, in the Enter Procedure(s) dialog box, Dentrix Enterprise does the following:
Displays the Override Ins. Estimate options.
Automatically selects the checkboxes to override the primary insurance estimate and the secondary insurance estimate according to the patient's insurance coverage.
Inserts the estimated insurance portion in the respective boxes as applicable.

Note: You cannot clear either checkbox.
With this checkbox clear, Dentrix Enterprise never automatically enters an override for the primary or secondary insurance estimate for a completed procedure that you post in the Enter Procedure(s) dialog box. In fact, the Override Ins. Estimate options are not even available in the Enter Procedure(s) dialog box.
Notes:
You can view or, if allowed by your office's policies, change the override amounts in the Edit or Delete Procedure dialog box as well.
In the Enter Procedure(s) dialog box and the Edit or Delete Procedure dialog box, the Prim. Ins. checkbox and amount box are available only if the patient has a primary dental insurance plan. Likewise, the Sec. Ins. checkbox and amount box are available only if the patient has a secondary dental insurance plan.
The Always Calculate Insurance Override checkbox does not apply to treatment-planned procedures. In other words, even if the Always Calculate Insurance Override checkbox is selected, if the selected Procedure Status is Treatment Plan in the Enter Procedure(s) dialog box or the Edit or Delete Procedure dialog box, Dentrix Enterprise does not automatically enter an override for the primary or secondary insurance estimate but the Override Ins. Est options are available according to the patient's insurance coverage.
With the Always Calculate Insurance Override checkbox selected, if you change the status of a procedure from Completed to Treatment Plan, Dentrix Enterprise automatically removes any overrides and clears the checkboxes under Override Ins. Estimate. Also, the checkboxes become available.
With the Always Calculate Insurance Override checkbox selected, if a procedure has a Treatment Plan status, and you have entered any overrides, when you change the status to Completed, Dentrix Enterprise clears your manual overrides under Override Ins. Estimate and enters the automatic calculations of the insurance portions according to the patient's insurance coverage. Also, the checkboxes become unavailable.
If you select the Always Calculate Insurance Override checkbox, the Re-calculate Insurance estimate checkbox is cleared and becomes unavailable.
Data Units - Select whether you want to use US or metric units for patient health assessments.
Family File Settings - Select or clear any of the following checkboxes to specify whether certain patient demographics are required for adding or updating a patient record in Family File:
Date of Birth - With this checkbox selected, a birth date must be entered for a patient.
Zip Code - With this checkbox selected, a ZIP Code must be entered for an address that gets attached to a patient.
Primary Phone Number - With this checkbox selected, a primary contact phone number must be entered for a patient.
Secondary Phone Number - With this checkbox selected, a secondary contact phone number must be entered for a patient.
Email Address - With this checkbox selected, either a personal/home email address must be entered for a patient, or it must be indicated that a patient has declined to provide an email address.
Referral for New Patients - With this checkbox selected, a referral source must be selected when a new patient record is created.
Head of House Income - With this checkbox selected, if a patient is the head of house, his or her income must be entered, and the frequency/recurrence must be selected.
Gender - With this checkbox selected, a gender identity must be selected for a patient.
Ethnicity - With this checkbox selected, an ethnicity must be selected for a patient.
Race - With this checkbox selected, a race must be selected for a patient.
Language - With this checkbox selected, a language must be selected for a patient.
Worker Status - With this checkbox selected, a worker status must be selected for a patient.
Housing Status - With this checkbox selected, a housing status must be selected for a patient.
Veteran Status - With this checkbox selected, a veteran status must be selected for a patient.
Note: These are organization-wide settings (for all clinics) and are available only when you are setting up the Central clinic's information.
Patient Access - Select or clear the Localize Patient Access checkbox to prevent all users from accessing patient information across clinics in Appointment Book or to allow all users to access patient information across clinics in Appointment Book.
With this checkbox selected, the following restrictions apply:
When you start the scheduling of an appointment from various areas of Dentrix Enterprise (such as More Information, Treatment Manager, and Scheduling Assistant), the Select View dialog box that appears displays only the Appointment Book views that have been assigned the same clinic as the selected patient's preferred clinic.
If an Appointment Book view includes operatories for multiple clinics, all the operatories for that view appear in Appointment Book, but you can schedule appointments only in the operatories of the clinic that has been assigned to the current view.
In Appointment Book, you can schedule an appointment only in the operatories of the clinic that has been assigned to the current view.
In Appointment Book, you can access patient-specific areas of Dentrix Enterprise (such as Family File) from an appointment only if the appointment was scheduled in the clinic that has been assigned to the current view.
Note: You can open an appointment only if the appointment was scheduled in an operatory of the clinic that has been assigned to the current view.
Patient Education:
Use Spanish patient education if patient's preferred language is Spanish - With this checkbox selected, and if a patient's language preference is Spanish (in the Patient Information dialog box, under Demographics,Spanish is selected as the Language), when the Patient Education dialog box appears for that patient, the Spanish option is selected; otherwise, English is the default selection.

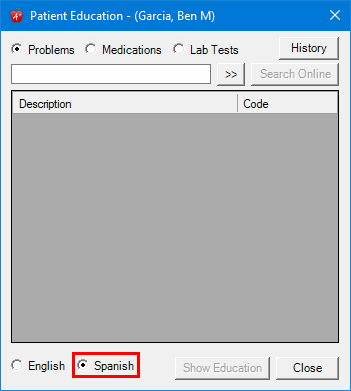
With Spanish or English selected, when you click Search Online to search online with MedlinePlus for patient education resources for a problem, medication, or lab that match the search criteria that you enter, the results will be in Spanish or English, respectively.
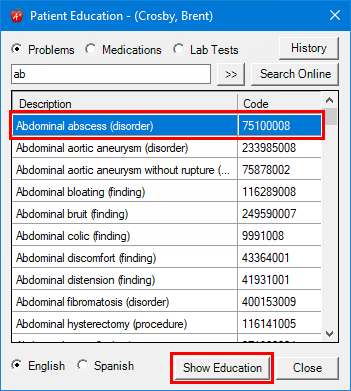
Use description for finding patient education - Select this checkbox to have the description instead of the code ( SNOMED, NDC, or LOINC) be used when you do either of the following:
Click the Patient Education button  in the Medical Alerts dialog box or Patient Prescription dialog box or the Education button in the Lab Tests dialog box to search for patient education resources online with MedlinePlus for a selected problem, medication, allergy, prescription, or lab test.
Click Show Education in the Patient Education dialog box, which you can open from a patient-specific module (such as Family File), to search for patient education resources online with MedlinePlus for a selected topic.
Place of Treatment - To specify the default place of treatment for claims that get created in your organization, do the following:
Click the Default search button  .
.
The Select Place of Treatment/Service Codes dialog box appears.
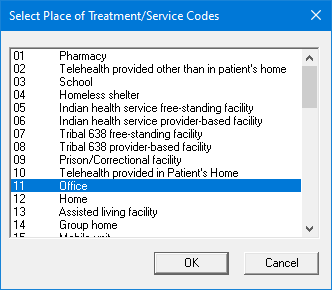
Select a place of treatment.
Click OK.
Notes:
You can customize the list of places of treatment in the Medical/Cross Code Setup dialog box.
You can override the organization-level default place of treatment per clinic.
Reject Old Treatment Plans - To have old treatment-planned procedures archived automatically so they do not show in the Chart or Treatment Planner, select the Enable Reject old Treatment Plans checkbox. Then, in the Days before Treatment Plan is considered Stale Date box, enter the number of days a treatment plan case remains valid. When a treatment plan case becomes "stale," Dentrix Enterprise automatically rejects it, and adds a note, stating why and when the case was rejected, to the case's status history.
Logo - To associate a logo with your organization, click Upload Image. In the Custom Logo dialog box, click Browse to select an image, click Upload, and then click OK on the message that appears when the image is uploaded successfully. Then, close the dialog box.

Note: To remove the Current Image, in the Custom Logo dialog box, click Clear Current Image.
Enable Instant Patient Search - With this checkbox selected, when you are searching for a patient, after you enter the first few characters of your search criteria, Dentrix Enterprise automatically displays matches and updates the list of matches as you enter. With this checkbox clear, when you are searching for a patient, after you enter your search criteria, you must click Search to view the matches.
Insurance Section Settings - Select or clear any of the following checkboxes:
Required Financial Class Type - With this checkbox selected, a financial class type must be selected when an insurance plan is added or edited.
Subscriber ID - With this checkbox selected, a subscriber ID must be entered when an insurance plan is attached to a patient.
Invalidate Conditions:
If the Invalidate Upon Completing Tx Plan checkbox is selected, when you link conditions to a procedure, Automatic is selected by default for Invalidate Upon Completion. Unless you select a different option, when you complete the procedure, the linked condition are invalidated automatically without providing a confirmation message to allow you to choose which, if any, of the linked conditions to invalidate.
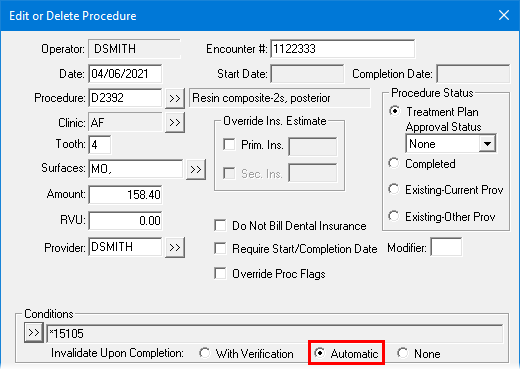
If the Invalidate Upon Completing Tx Plan checkbox is clear, when you link conditions to a procedure, With Verification is selected by default for Invalidate Upon Completion. Unless you select a different option, when you complete the procedure, a confirmation message appears so you can choose which, if any, of the linked conditions to invalidate.

Click OK.