Working with Coverage Tables and Coordination of Benefits
This document provides instructions for creating coverage table templates and adding exceptions in coverage, updating insurance plans, editing coverage tables and exceptions in coverage for insurance plans in Dentrix Ascend. This document also provides an explanation of how Dentrix Ascend calculates insurance estimates.
1. Coverage table templates
Creating coverage table templates
Creating coverage table templates
Dentrix Ascend provides two default templates (which are named "All Procedures") and allows you to create various templates that you can use in your organization for setting up the coverage tables of insurance plans.
Note: Coverage table templates are global (available to all locations across your organization).
To create a coverage table template
-
On the Settings menu, under Production, select Coverage Tables.
The Coverage Table Setup page opens.
-
Do one of the following:
-
Create new - To make an all new coverage table template, click (or tap) New Coverage Table.

-
Base on existing - To make a coverage table template based on an existing template, select the template that is similar to the one that you want to create.
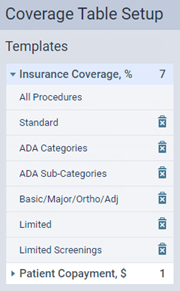
Note: The templates are grouped by type. Expand Insurance Coverage, % to view templates that are based on insurance coverage percentages, or expand Patient Copayment, $ to view templates that are based on fixed, patient copayments.
The options for adding or editing the coverage table template appear. The options that are available depend on whether you are creating a new template or making one that is based on an existing template and whether the template is based on insurance coverage percentages or fixed, patient copayments.
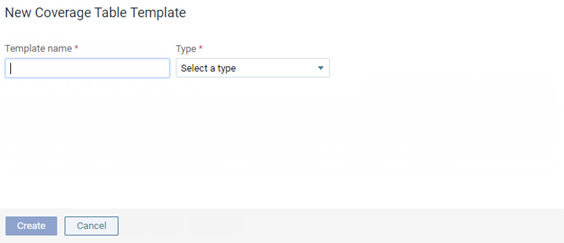
New
Based on Existing
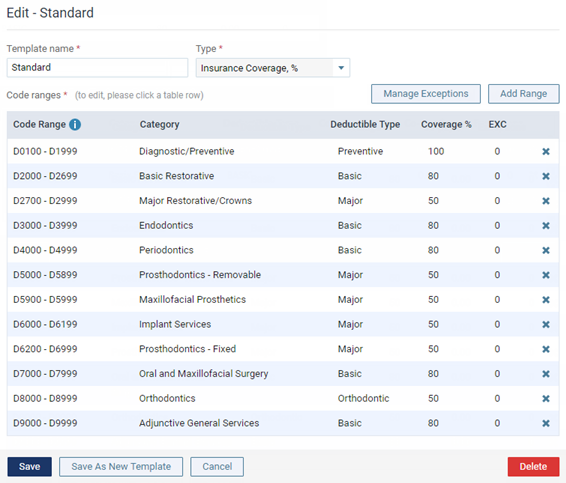
Insurance Coverage, %
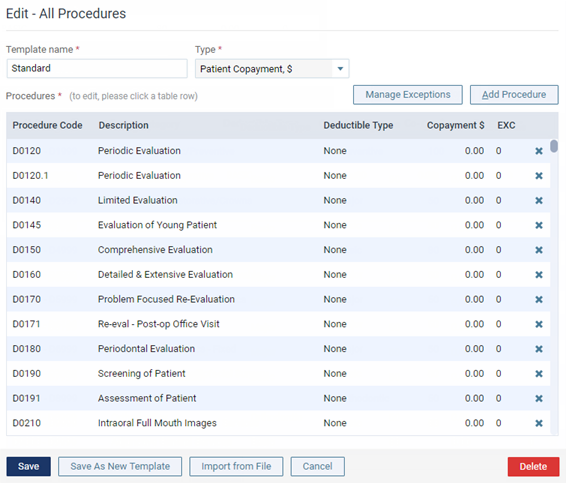
Patient Copayment, $
-
-
Enter or change the Template name. The name must be unique relative to the templates of the same type (Insurance Coverage, % or Patient Copayment, $).
-
If you are creating a new template, from the Type list, select either Insurance Coverage, % or Patient Copayment, $ to specify whether the coverage should be based on a percentage or a fixed amount, respectively. Once you save the template, you cannot change the type.
With a Type selected, the options for creating the template become available.
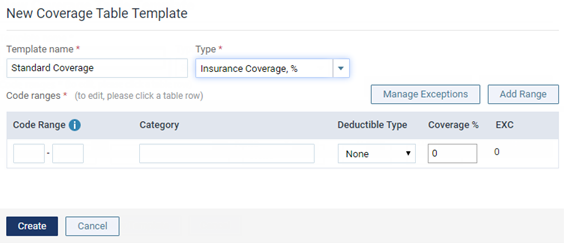
Insurance Coverage, %
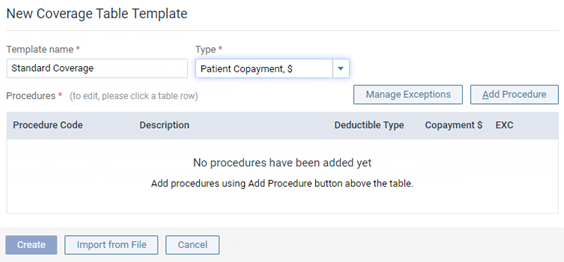
Patient Copayment, $
-
Do one of the following:
-
For an Insurance Coverage, % template, add, edit, and delete the procedure code ranges as needed:
-
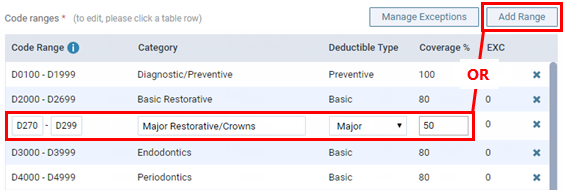
Click (or tap) Add Range to add a procedure code range, or select an existing range to edit that range.
-
Set up the following options for that range as needed:
-
Code Range - The ADA or custom procedure code range. These boxes accept dashes (-), periods (.), numbers, and letters, and they can be up to 10 characters in length. Make sure there are not any overlaps and gaps in the sequence between the starting and ending codes in the range and between other ranges.
You can include an alias procedure codes in a range by typing a period (.) in either box. The Code Range boxes change to allow for entering suffixes. Enter a suffix in either or both suffix boxes. If you need a period in either of the main code boxes (the boxes to the left of the suffix boxes), you must type the period again in that box.
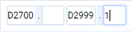
Note: When you change a range and then click (or tap) somewhere else, the text of the range that you modified turns bold. Also, any ranges that overlap or that are invalid become highlighted in red, and you cannot save the changes to the coverage table until those errors are resolved.
-
Category - The procedure category for the procedures in the range.
-
Deductible Type - The type of deductible that the procedures in the range apply to.
-
Coverage % - The percent that the insurance carrier pays on covered charges (after any deductible, up to any allowed amount, and up to any maximum allowed benefit) for procedures in the range.
-
-
Repeat the steps a - b for any other ranges that you want to add or edit.
-
To delete a range, click (or tap) the corresponding Remove button
 , and then click (or tap) Delete on the confirmation message that appears.
Important: If you are deleting the only range in the coverage table, the entire template will be deleted. However, you cannot delete all the ranges in the default template (which is named "All Procedures").
-
-
For a Patient Copayment, $ template, add, edit, and delete the procedure codes as needed:
-
To add procedures codes, do the following:
-
Click (or tap) Add Procedure.
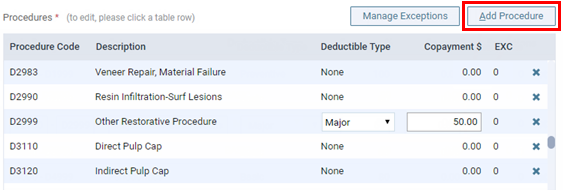
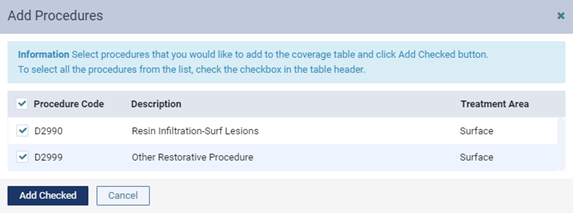
The Add Procedures dialog box appears.
-
Select the checkboxes of the procedure codes that you want to add to the coverage table. You can select or deselect the checkbox in the column header to select and deselect all the procedure codes at the same time.
-
Click (or tap) Add Checked.
Note: If you are adding procedure codes to a coverage table that already has procedure codes, the procedure codes are added at the top of the table, which might not be the correct order; however, when you save the template, the procedure codes will be listed in the correct order.
-
-
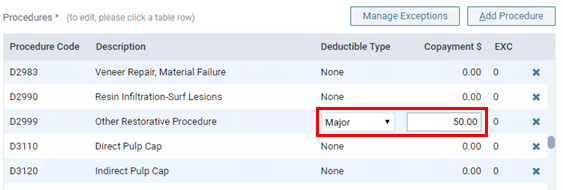
To edit an existing or newly-added procedure code, select it.
-
Set up the following options for that code as needed:
-
Deductible Type - The type of deductible that the procedure applies to.
-
Copayment $ - The patient co-pay. Patients will pay the specified amount for the procedure.
-
-
Repeat the steps a - c for any other codes that you want to add or edit.
-
To delete a code, click (or tap) the corresponding Remove button
, and then click (or tap) Delete on the confirmation message that appears.Important: If you are deleting the only code in the coverage table, the entire template will be deleted. However, you cannot delete all the codes in the default template (which is named "All Procedures").
-
-
-
To add, edit, or delete exceptions to the coverage for specific procedures, click (or tap) Manage Exceptions.
-
Do one of the following:
-
For an all new template, click (or tap) Create.
-
For a template based on another, click (or tap) Save As New Template.
-
Adding exceptions in coverage table templates
Adding exceptions in coverage table templates
You can add exceptions to the percentage covered by insurance for a procedure or range of procedures in any of the coverage table templates.
Important:
-
The exceptions in coverage tables of the type "Insurance Coverage, %" are used by Dentrix Ascend to automatically calculate insurance estimates.
-
The exceptions in coverage tables of the type "Patient Copayment, $" are not used by Dentrix Ascend to automatically calculate insurance estimates.
Notes:
-
If a patient has dual coverage, the exceptions of the primary insurance coverage are used.
-
A posted procedure with an exception will have a warning icon next to it in the following areas of Dentrix Ascend: in the Enter payment dialog box, in the Enter credit adjustment dialog box, on the Payment tab of the Patient Walkout dialog box, and on the treatment plan case preview page. You can click a warning icon to view the details of the exception for the corresponding procedure.
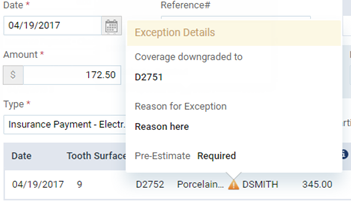
-
You can add exceptions in a coverage table that is attached to an insurance plan.
To add an exception
-
On the Settings menu, under Production, select Coverage Tables.
The Coverage Table Setup page opens.
-
Select a coverage table template.
The options for editing the coverage table appear.
-
Click (or tap) Manage Exceptions.

The Manage Exceptions dialog box appears.
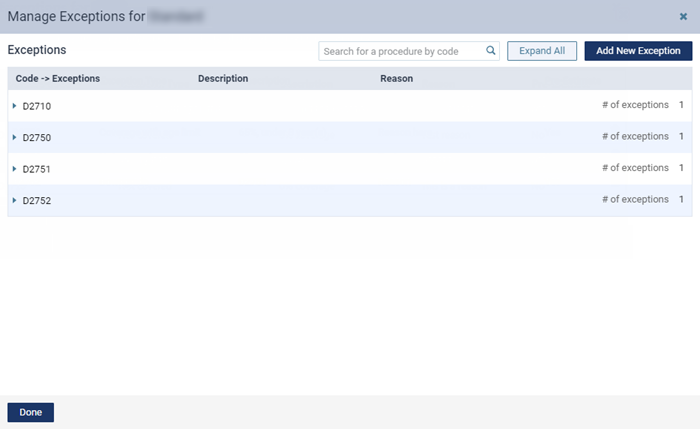
-
Click (or tap) Add New Exception.
The New Exception for Procedure(s) dialog box appears.
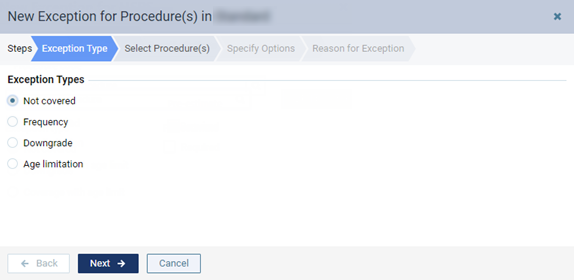
-
Set up the options on the following tabs as needed:
-
Exception Type:
-
Select one of the following options:
-
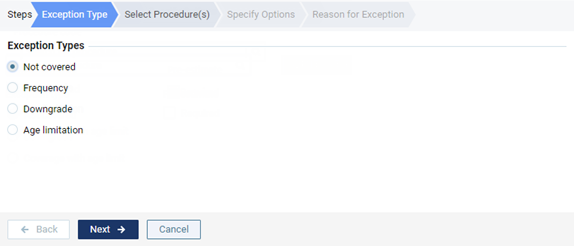
Not covered - To add procedures that are not covered.
-
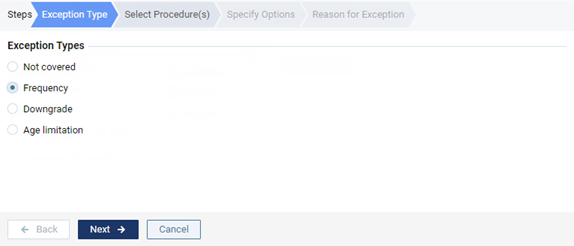
Frequency - To add procedures that are covered at certain intervals.
-
Shared Frequency - To add procedures that are covered at certain intervals. Use this option when a single frequency exception applies to multiple procedures.
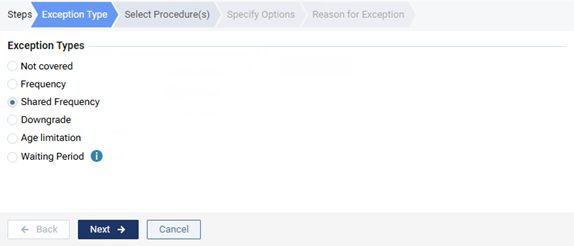
Examples of when you can use the shared frequency exception:
-
A patient cannot have a tooth extracted more than once, but there are multiple procedure codes that can be used for a tooth extraction.
-
A patient cannot have more than two exams per year regardless of the type of each exam (such as limited or comprehensive).
-
A patient cannot have more than four cleanings per year regardless of the reason for each (such as prophy or perio maintenance).
-
-
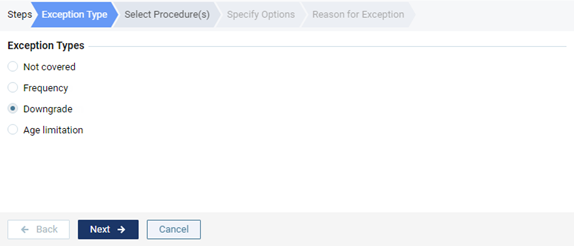
Downgrade - To add a procedure that requires a downgrade.
-
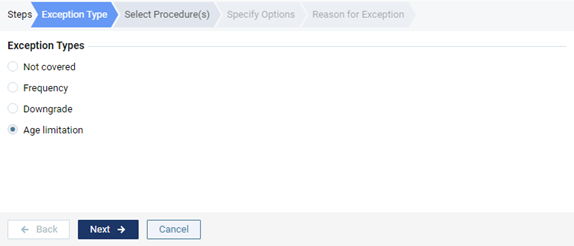
Age limitation - To add procedures that have an age limitation.
-
Waiting Period - To add procedures that have a waiting period.
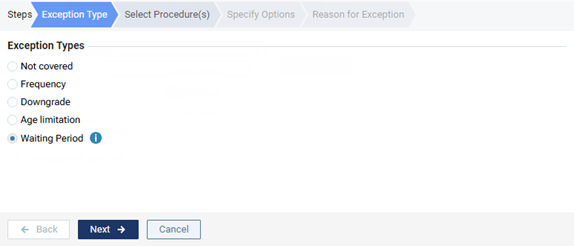
Note: Currently, this exception type is for reference purposes only and not used for insurance estimate calculations.
-
-
Click (or tap) Next.
-
-
Select Procedure(s):
-
Do one of the following:
-
For a "Not covered" exception type, select the check boxes that correspond to the procedure codes that are not covered.
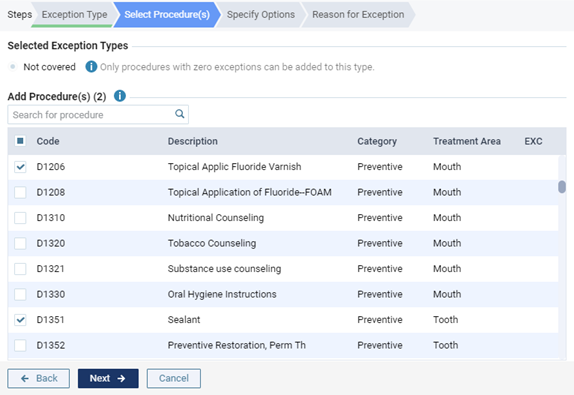
Notes:
-
Only the procedure codes that do not have any exceptions are available for selection.
-
To quickly select or clear all check boxes, select or clear the check box in the header at the top of the list.
-
To quickly select or clear a range of check boxes, click (or tap) the first check box of the desired range, and then, while pressing the Shift key, click (or tap) the last check box of the desired range.
-
-
For a "Frequency" exception type, select the checkboxes that correspond to the procedure codes that are covered at certain intervals.
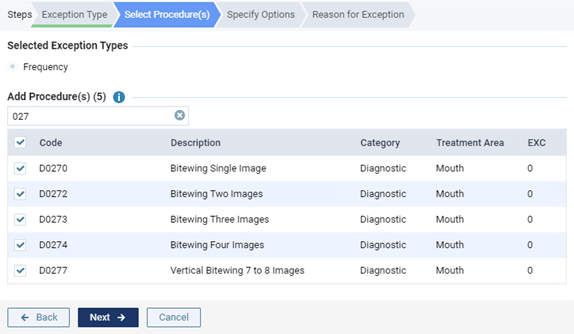
Notes:
-
Only the procedure codes that do not have a "Not covered" exception are available for selection.
-
If a "Frequency" exception already exists for a selected procedure, with that procedure's checkbox selected for this new exception, the existing "Frequency" exception for that procedure will be replaced with this new exception.
-
To quickly select or clear all checkboxes, select or clear the checkbox in the header at the top of the list.
-
To quickly select or clear a range of checkboxes, click (or tap) the first checkbox of the desired range, and then, while pressing the Shift key, click (or tap) the last checkbox of the desired range.
-
-
For a "Shared Frequency" exception type, select the checkboxes that correspond to the procedure codes that are covered at certain intervals.
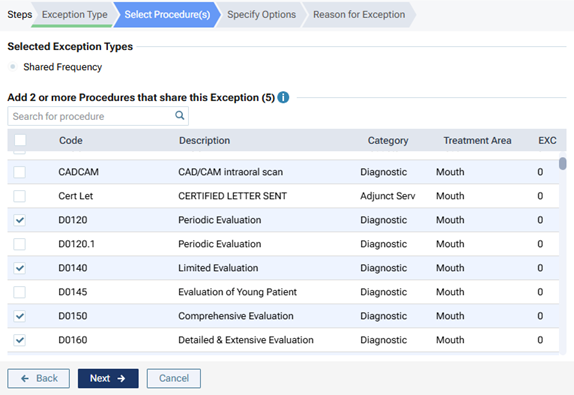
Notes:
-
You must select at least two procedures.
-
A procedure may be associated with at most one of each frequency exception type: one Frequency exception and one Shared Frequency exception.
-
Only procedures that do not have a "Not covered" exception and are not associated with a "Shared Frequency" exception are available for selection.
-
After you select the first procedure, only procedures with the same treatment area (such as mouth or tooth) are available for selection.
-
To quickly select or clear all checkboxes, select or clear the checkbox in the header at the top of the list.
-
To quickly select or clear a range of checkboxes, click (or tap) the first checkbox of the desired range, and then, while pressing the Shift key, click (or tap) the last checkbox of the desired range.
-
-
For a "Downgrade" exception type, select the procedure code that requires a downgrade.
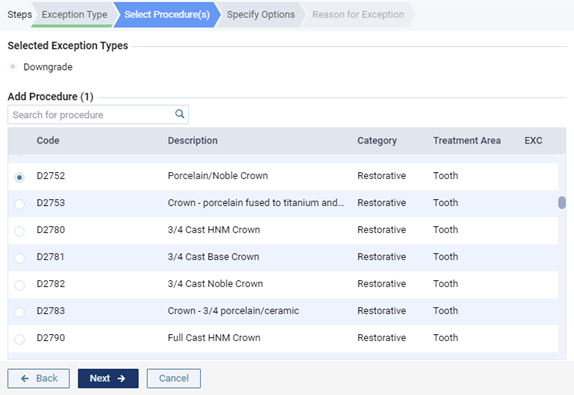
Note: Only the procedure codes that do not have a "Not covered" or "Downgrade" exception are available for selection.
-
For an "Age limitation" exception type, select the check boxes that correspond to the procedure codes that have an age limitation.
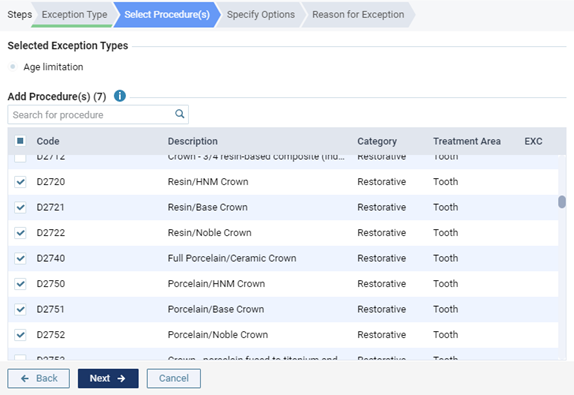
Notes:
-
Only the procedure codes that do not have a "Not covered" exception are available for selection.
-
If an "Age limitation" exception already exists for a selected procedure, with that procedure's checkbox selected for this new exception, the existing "Age limitation" exception for that procedure will be replaced with this new exception.
-
To quickly select or clear all check boxes, select or clear the check box in the header at the top of the list.
-
To quickly select or clear a range of check boxes, click (or tap) the first check box of the desired range, and then, while pressing the Shift key, click (or tap) the last check box of the desired range.
-
-
For a "Waiting Period" exception type, select the checkboxes that correspond to the procedure codes that have a waiting period.
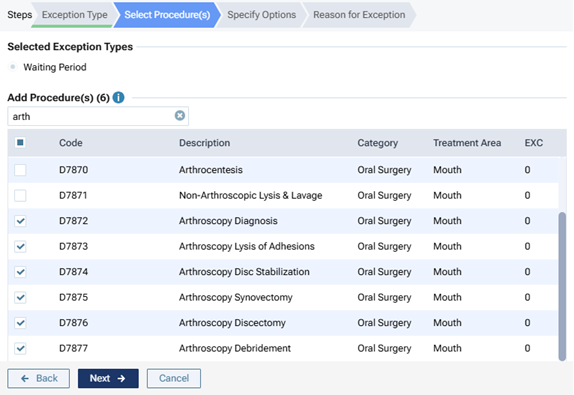
Notes:
-
Only the procedure codes that do not have a "Not covered" exception are available for selection.
-
If a "Waiting Period" exception already exists for a selected procedure, with that procedure's checkbox selected for this new exception, the existing "Waiting Period" exception for that procedure will be replaced with this new exception.
-
To quickly select or clear all checkboxes, select or clear the checkbox in the header at the top of the list.
-
To quickly select or clear a range of checkboxes, click (or tap) the first checkbox of the desired range, and then, while pressing the Shift key, click (or tap) the last checkbox of the desired range.
-
Notes:
-
To search for a procedure, begin entering the code or its description in the Search for procedure box, continue typing as needed to narrow down the procedure code list.
-
After searching for and selecting a procedure, to return to viewing the entire procedure code list, delete the search text from the Search for procedure box.
-
-
Click (or tap) Next.
-
-
Specify Options:
-
Do one of the following:
-
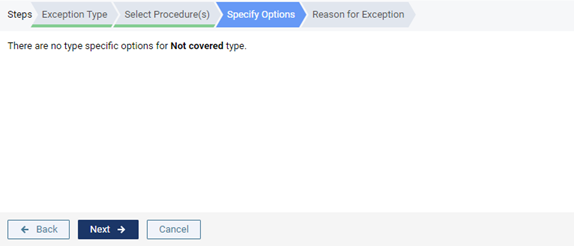
For a "Not covered" exception type, there are no options on this tab.
-
For a "Frequency" exception type, do the following:
-
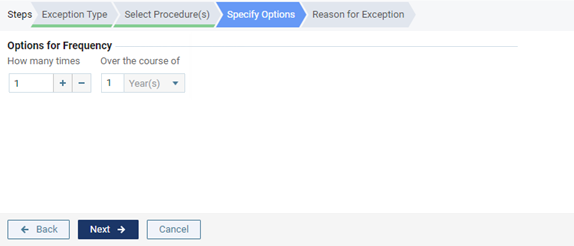
Specify how often the insurance carrier covers this procedure within a given time period. For How many times, either enter a number, or click (or tap) + or - to change the number. For Over the course of, enter a number, and then select Year(s), Month(s), or Day(s) from the list.
-
Either select the Apply per treatment area checkbox to specify that a selected procedure code is covered the specified number of times in the specified period if the treatment area differs, or clear the checkbox to specify that a selected procedure code is covered the specified number of times in the specified period without regard to the treatment area.
Depending on the state of the checkbox, when you treatment plan a selected procedure for this exception, Dentrix Ascend considers the following to calculate an insurance estimate:
-
With the checkbox selected:
-
If a treatment area (such as tooth, quadrant, or arch) applies to the procedure - Dentrix Ascend considers the treatment area alongside the frequency limitation, procedure date, and coverage start date.
For example, if procedure A for the UL quadrant was performed three months ago, and there is a yearly frequency limitation allowed by insurance for procedure A if it is performed on the same treatment area, if you treatment plan procedure A for the UR quadrant today, Dentrix Ascend looks back one year from today (assuming the start date of the patient's insurance plan coverage is at least that far back) and recognizes that the previous posting of procedure A was rendered on a different treatment area from the treatment area for today's planning of procedure A, so the correct estimated insurance portion is calculated (instead of $0.00).
-
If a treatment area (such as tooth, quadrant, or arch) does not apply to the procedure - Dentrix Ascend considers the frequency limitation, procedure date, and coverage start date.
For example, if procedure B was performed three months ago, and there is a yearly frequency limitation allowed by insurance for procedure B if it is performed on the same treatment area, but procedure B does not have a treatment area, if you treatment plan procedure B today, Dentrix Ascend looks back one year from today (assuming the start date of the patient's insurance plan coverage is at least that far back) and recognizes that the previous posting of procedure B was rendered less than a year ago, so today's planning of procedure B is seen as not covered. In this case, the estimated insurance portion is calculated as $0.00.
-
-
With the checkbox clear - Dentrix Ascend considers the frequency limitation, procedure date, and coverage start date.
For example, if procedure C was performed one year ago, and there is a once-every-two-years frequency limitation allowed by insurance for procedure C, if you treatment plan procedure C today, Dentrix Ascend looks back two years from today (assuming the start date of the patient's insurance plan coverage is at least that far back) and recognizes that the previous posting of procedure C was rendered less than two years ago, so today's planning of procedure C is seen as not covered. In this case, the estimated insurance portion is calculated as $0.00.
-
-
-
For a "Shared Frequency" exception type, do the following:
-
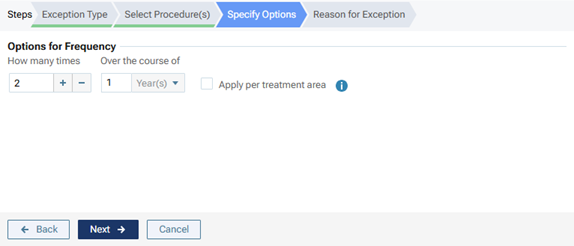
Specify how often the insurance carrier covers these procedures within a given time period. For How many times, either enter a number, or click (or tap) + or - to change the number. For Over the course of, enter a number, and then select Year(s), Month(s), or Day(s) from the list.
-
Either leave the Apply per treatment area checkbox selected to specify that the selected procedure codes are covered the specified number of times in the specified period if the treatment area differs, or clear the checkbox to specify that the selected procedure codes are covered the specified number of times in the specified period without regard to the treatment area.
Depending on the state of the checkbox, when you treatment plan a selected procedure for this exception, Dentrix Ascend considers the following to calculate an insurance estimate:
-
With the checkbox selected:
-
If a treatment area (such as tooth, quadrant, or arch) applies to the procedure - Dentrix Ascend considers the treatment area alongside the frequency limitation, procedure date, and coverage start date.
For example, if procedure A for the UL quadrant was performed three months ago, and there is a yearly frequency limitation allowed by insurance for procedure A if it is performed on the same treatment area, if you treatment plan procedure A for the UR quadrant today, Dentrix Ascend looks back one year from today (assuming the start date of the patient's insurance plan coverage is at least that far back) and recognizes that the previous posting of procedure A was rendered on a different treatment area from the treatment area for today's planning of procedure A, so the correct estimated insurance portion is calculated (instead of $0.00).
-
If a treatment area (such as tooth, quadrant, or arch) does not apply to the procedure - Dentrix Ascend considers the frequency limitation, procedure date, and coverage start date.
For example, if procedure B was performed three months ago, and there is a yearly frequency limitation allowed by insurance for procedure B if it is performed on the same treatment area, but procedure B does not have a treatment area, if you treatment plan procedure B today, Dentrix Ascend looks back one year from today (assuming the start date of the patient's insurance plan coverage is at least that far back) and recognizes that the previous posting of procedure B was rendered less than a year ago, so today's planning of procedure B is seen as not covered. In this case, the estimated insurance portion is calculated as $0.00.
-
-
With the checkbox clear - Dentrix Ascend considers the frequency limitation, procedure date, and coverage start date.
For example, if procedure C was performed one year ago, and there is a once-every-two-years frequency limitation allowed by insurance for procedure C, if you treatment plan procedure C today, Dentrix Ascend looks back two years from today (assuming the start date of the patient's insurance plan coverage is at least that far back) and recognizes that the previous posting of procedure C was rendered less than two years ago, so today's planning of procedure C is seen as not covered. In this case, the estimated insurance portion is calculated as $0.00.
-
-
-
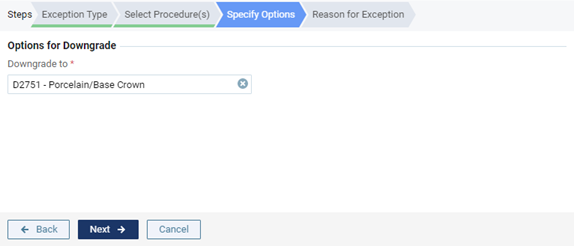
For a "Downgrade" exception type, in the Downgrade to search box, begin entering the code or description of the substitute procedure, continue typing as needed to narrow the results, and then select the correct code.
-
For an "Age limitation" exception type, set up the following options:
-
Age limitation - Enter a minimum age limit (as young as 0 years) and a maximum age limit (as old as 110+ years) to specify that the insurance carrier covers this procedure only for patients whose age is within the specified limit. Also, you can use the left slider to change the minimum age and the right slider to change the maximum age.
Note: If the patient's age is not within the specified limit, this exception is ignored, and the percentage (%) in the coverage table is used.
-
Coverage, % or Downgrade - Do one of the following:
-
Specify a coverage percentage - Select the Coverage, % option. In the box, enter the percentage of the fee charged that the insurance carrier covers for this procedure when the patient's age is within the specified range.
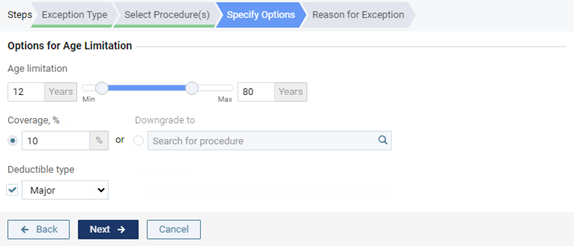
Note: The Coverage, % box is available only for coverage tables that are based on insurance coverage percentages.
-
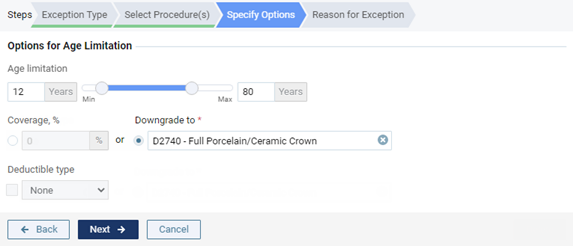
Specify a downgrade - Select the Downgrade to option. In the Search for procedure box, begin entering the code or description of the substitute procedure, continue typing as needed to narrow the results, and then select the correct code to use when the patient's age is within the specified range.
-
-
Deductible Type - If the patient must pay a deductible for this procedure when the patient's age is within the specified range, select this checkbox, and then select the correct type of deductible from the corresponding list.
Notes:
-
The Deductible Type checkbox is available only if the Coverage, % option is selected.
-
Whether or not the Deductible type checkbox is selected, if the patient's age is not within the specified limit, this exception is ignored, and the deductible type that normally applies to this procedure is used.
-
-
-
For a "Waiting Period" exception type, specify the length of the waiting period that is required for the insurance carrier to cover this procedure. For the box, either enter a number, or click (or tap) + or - to change the number. From the list, select Year(s), Month(s), Week(s) or Day(s) from the list.
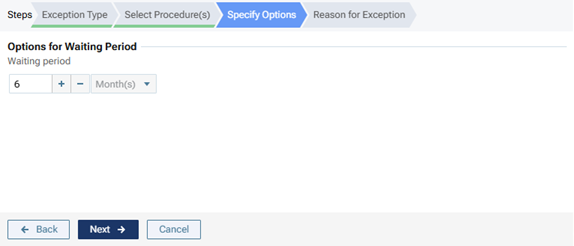
Note: Currently, this exception type is for reference purposes only and not used for insurance estimate calculations.
-
-
Click (or tap) Next.
-
-
Reason for Exception:
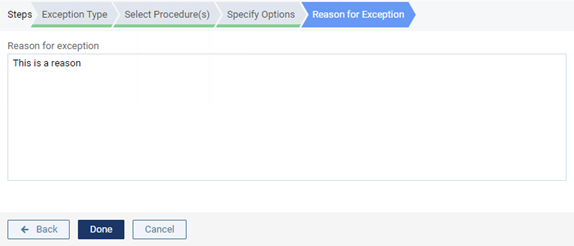
In the box, enter the reason for the exception in coverage for this procedure.
-
-
Click (or tap) Done.
Note: This button is available only if the Reason for Exception tab is selected.
2. Insurance plans
Updating insurance plan information
Updating insurance plan information
You can update the information for an insurance plan attached to an insurance carrier that was added to your organization's database. Any changes made to a plan's information affect all patients covered by that plan.
Note: Updating insurance plans requires the "Edit Insurance Plans" security right. However, if you have not been granted the "Edit Insurance Plans" security right, you can select a Max allowable amount fee schedule for the plan if you have been granted the "Assign Fee Schedule to Plan" security right.
To update an insurance plan
On the Home menu, under Insurance, select Carriers.
The Insurance Carriers page opens.
-
Select an insurance carrier.
Tip: To help you locate an insurance carrier quickly, in the Filter box, enter part or all of a carrier's name, plan/employer, or group number to filter the carrier list so that it displays only those carriers that match what you enter.
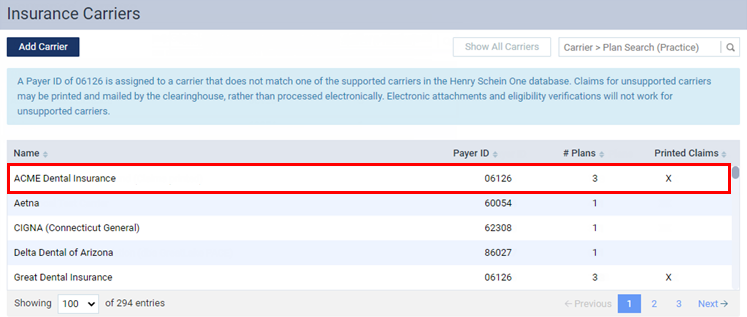
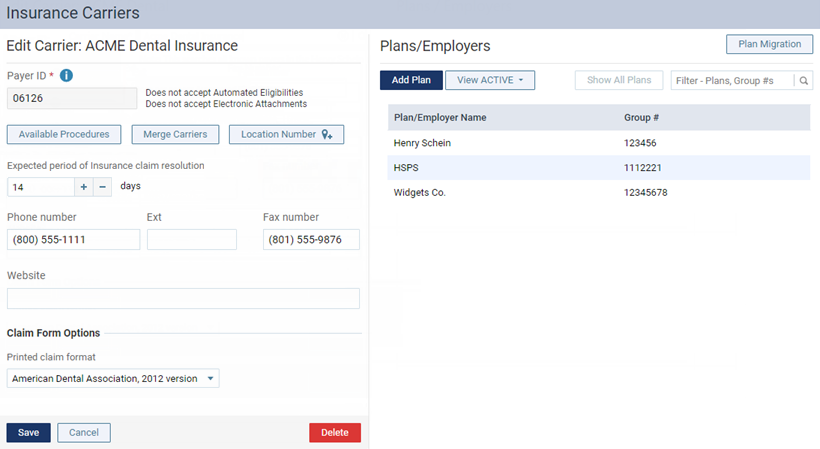
The options to edit the insurance carrier become available.
-
Under Plans/Employers, select an insurance plan.
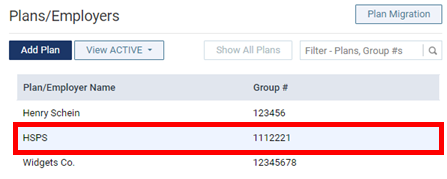
Tip: To help you locate a plan quickly, in the Filter box, enter part or all of the plan/employer name or group number to filter the plan list so that it displays only those plans that match what you enter.
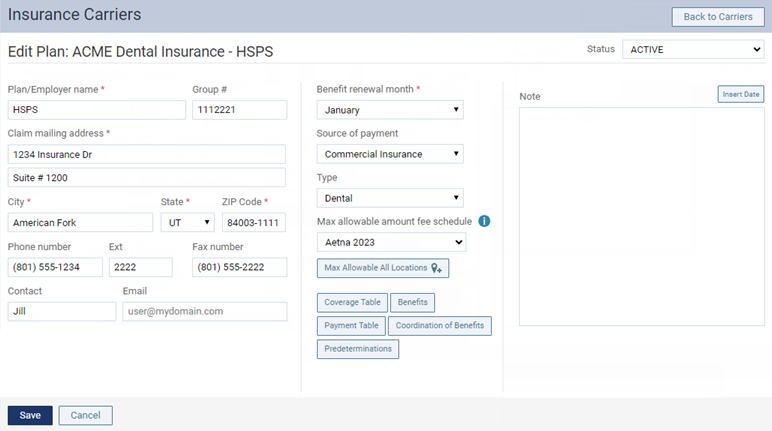
The options for editing the insurance plan become available.
-
Change the plan information, such as the name or address, as needed:
-
Plan/Employer Name - The name of the employer or insurance plan.
-
Group # - The group plan number.
-
Claim mailing address - The address where claims for the insurance plan are sent.
Notes:
-
If you click in the first box to change the street address, a list of matching addresses appears. If you remove the street address, and begin typing a different address, as you type, matching addresses appear; continue typing as needed to narrow down the results.
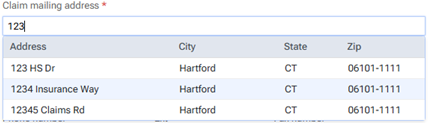
The list of matching addresses comes from the claim mailing addresses that have been entered across all the existing insurance plans in your organization's database.
-
Selecting an address updates the street address, city, state abbreviation, and ZIP Code for this plan accordingly.
-
If the correct address is not found, finish typing the street, and then specify the remaining parts of the address manually.
-
If you select an address, you can edit any part of the address as needed for this plan. Any changes that you make do not affect the addresses of any other plans.
-
-
ZIP Codes must be nine digits.
-
-
Phone - The insurance plan administrator's contact phone number and extension (if applicable).
-
Fax Number - The fax number of the insurance plan administrator.
-
Contact - The name of the insurance plan administrator.
-
Email - The insurance plan administrator's email address.
-
Benefit Renewal Month - The month that the insurance plan's benefits reset.
-
Source of Payment - The type of insurance company that will remit payment: CHAMPUS, Blue Cross/Blue Shield, Commercial Insurance, Commercial Insurance (PPO), Commercial Insurance (DHMO), Medicare Part B, or Medicaid.
-
Type - The plan covers dental or medical procedures.
-
Missing tooth clause? - Indicates if a missing tooth clause applies to the plan. Select one of the following options: Not Specified, Yes, or No.
Note: Currently, this option is for reference only.
-
Eligibility coverage level - Indicates the type of coverage that applies to the plan. Select one of the following options: Not Specified, Individual, Family, Employee Only, Employee and Spouse, Employee and Children, Spouse Only, Spouse and Children, Children Only, or Dependents Only.
Note: Currently, this option is for reference only.
-
Crowns/Bridges paid on - Indicates if the plan guidelines base payment on the preparation or seat date for procedures such as crowns and bridges. Select one of the following options: Not Specified, Prep Date, or Seat Date.
Note: Currently, this option is for reference only.
-
Max allowable amount fee schedule - The schedule of allowed charges for the insurance plan (PPO or DHMO plan only). The selected fee schedule will be used to determine a patient's portion and the recommended write-off.
Important: For each provider (and each location that is set up as a billing provider for claims) who participates with this insurance plan, in that provider's user account (or that location's settings), you must select this carrier in the Contracted With section.
Note: When you expand the list, you can use the search box at the top to quickly locate a fee schedule. Begin typing part of a fee schedule name in the box to see the matching fee schedules in the list. Continue typing as needed to narrow down the results. Select the correct fee schedule.
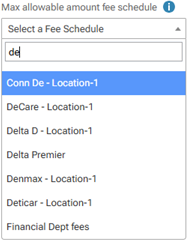
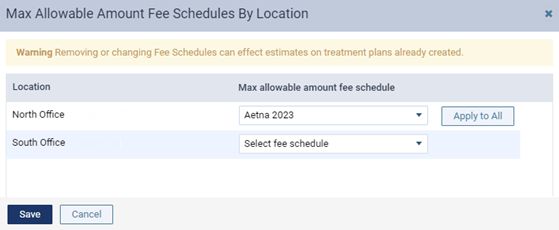
You can also click (or tap) Max Allowable All Locations to open the Max Allowable Amount Fee Schedules By Location dialog box and set the max allowable fee schedule for the insurance plan by location.
-
Coverage Table - The coverage table for the plan. Click (or tap) Coverage Table to open the Coverage Table for dialog box.
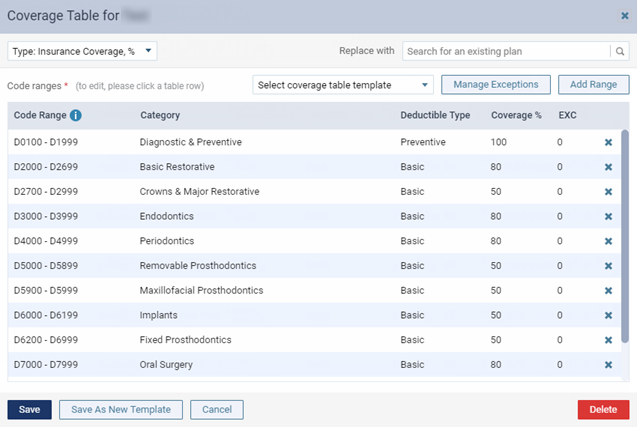
For a coverage table that is based on insurance coverage percentages, change the default deductible type and/or coverage percentage for each procedure code range. For a coverage table that is based on fixed, patient copayments, change the default deductible type and/or copayment amount.
Note: You can also add, edit, or delete exceptions to the coverage for specific procedures.
-
Benefits - The required deductibles and maximum benefits for the plan. Click (or tap) Benefits to open the Deductible and Benefits dialog box.

Enter the required deductible amounts for each deductible type, enter the maximum benefits allowed, and then click (or tap) Save.
Note: Adding required deductibles and maximum benefits to insurance plans requires the "Edit Benefits" security right.
-
Payment Table - The payment table for the plan. Click (or tap) Payment Table to open the Payment Table dialog box.
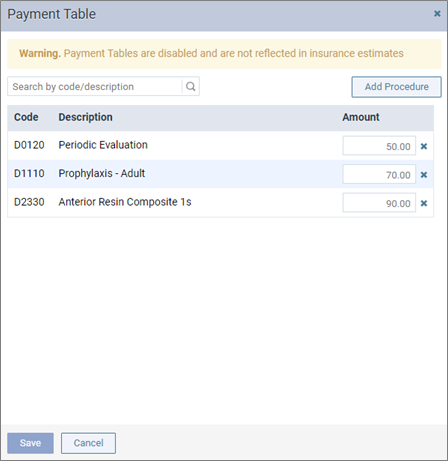
Manually add, edit, and remove procedures in the plan's payment table as needed.
-
Coordination of Benefits - The methods for handling the Coordination of Benefits (COB) between primary and secondary insurance claims for a patient with this insurance plan as his or her secondary plan. Click (or tap) Coordination of Benefits to open the Coordination of Benefits for dialog box.
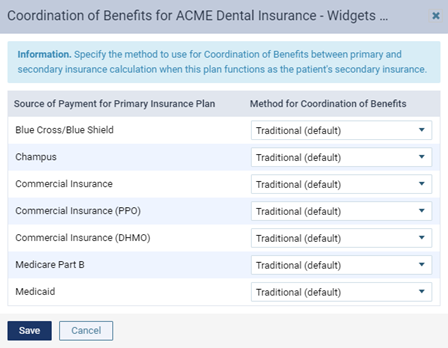
For each Source of Payment for Primary Insurance Plan, select a Method for Coordination of Benefits, and then click (or tap) Save.
Notes:
-
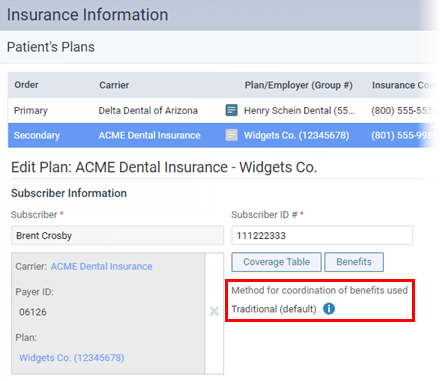
If this insurance plan is attached to a patient's record as a secondary plan, the method being used for coordinating benefits appears on the patient's Insurance Information page when the options for the secondary plan are being displayed.
-
For more information about the coordination of benefits, refer to the topic about Coordination of benefits.
-
Changing the coordination of benefits for insurance plans requires the "Edit Insurance Plans" security right.
-
-
Predeterminations - The procedures that require a predetermination (pre-authorization) under this plan. Click (or tap) Predeterminations to open the Manage Predeterminations dialog box.
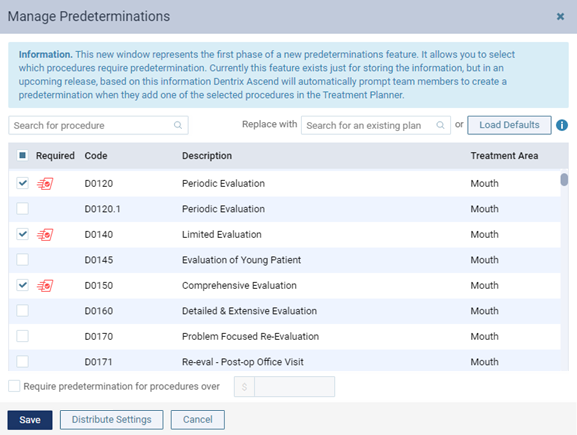
Do any of the following:
-
Select checkboxes:
-
To select the checkboxes of the listed procedures that commonly require a predetermination, click (or tap) Load Defaults. Be aware that doing this replaces the current selections.
-
To select the checkboxes of the listed procedures according to the selections from another insurance plan, enter your search criteria (part of a carrier name, plan/employer name, or group number) in the Replace with box, continue typing as needed to narrow the results, and then select the correct plan. Be aware that doing this replaces the current selections.
-
Manually select or clear the checkboxes of procedures in the list as needed.
Note: To quickly locate a procedure, begin entering part of its code, description, or treatment area in the Search for procedure box. The procedures that match your search criteria are listed. Continue typing as needed to narrow the results.
-
-
Set a charge threshold - To require a predetermination for any procedure that is not selected in the list but whose charge equals or exceeds a certain amount, select the Require predetermination for procedures over checkbox, and then enter an amount in the box provided.
-
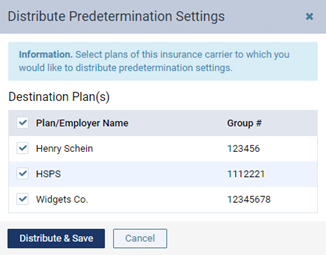
Copy selections to other plans - To copy this plan's selections to other plans that are associated with this plan's carrier, click (or tap) Distribute Settings. In the Distribute Predetermination Settings dialog box, select the checkboxes of the correct plans, and then click (or tap) Distribute & Save. Be aware that doing this replaces the current selections for the destination plans.
-
-
Note - A note that is specific to this insurance plan. You can enter text, such as information from an EOB or other document from the insurance carrier. Also, you can insert a date if needed. The note is accessible from all patient records that have this insurance plan attached.
-
-
Click (or tap) Save.
Editing coverage tables
Editing coverage tables
You can edit the coverage table that is attached to an insurance plan. A coverage table references the procedures that a carrier covers and either the percentage covered or the patient copayment. Along with deductibles and benefits, a coverage table allows for accurate insurance estimates.
Tip: You can also replace the coverage table of any given insurance plan with the coverage table from any other plan or from a coverage table template.
Important:
-
Changing an insurance plan's coverage table affects all patients who are covered by that insurance plan.
-
Changing a plan's coverage does not update the fees that are associated with treatment-planned procedures. You must either edit the fees manually for the procedures in a treatment plan case or delete and re-create the case and procedures.
To edit a coverage table
On the Home menu, under Insurance, select Carriers.
The Insurance Carriers page opens.
-
Select an insurance carrier.
The options for editing the insurance carrier become available.
-
Under Plans/Employers, select an insurance plan.
The options for editing the insurance plan become available.
-
Click (or tap) Coverage Table.
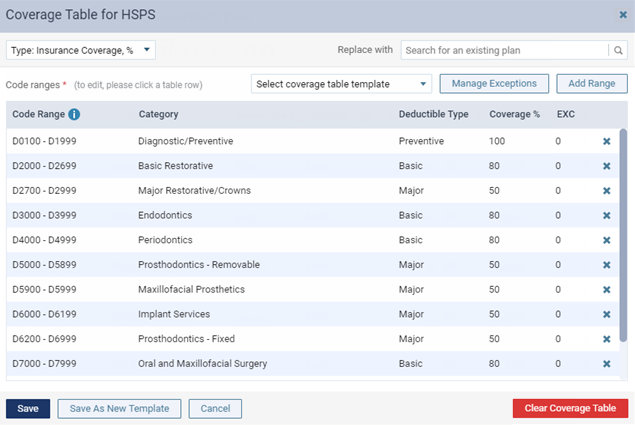
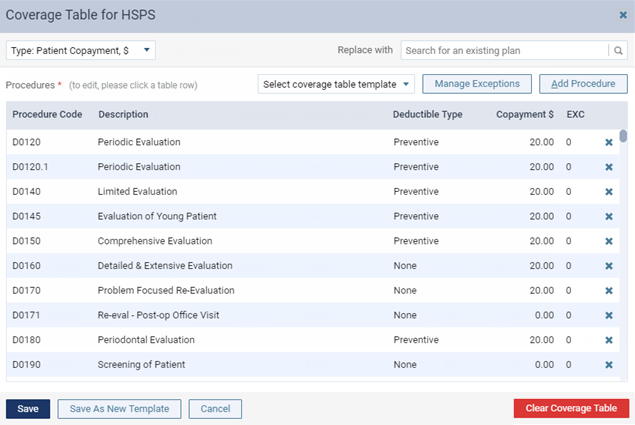
The Coverage Table dialog box appears.
Insurance Coverage, %
Patient Copayment, $
-
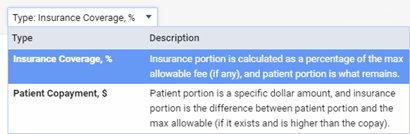
If necessary, you can change the type of coverage table. From the Type list, select either Insurance Coverage, % or Patient Copayment, $ to specify whether the coverage should be based on a percentage or a fixed amount, respectively.
Notes:
-
If you change the type from Insurance Coverage, % to Patient Copayment, $, the coverage table changes to either the previous version of the patient copayment ($) type coverage table for this plan or, if this is the first time that you have changed the type, the default patient copayment ($) type coverage table.
-
If you change the type from Patient Copayment, $ to Insurance Coverage, %, the coverage table changes to either the previous version of the insurance coverage (%) type coverage table for this plan or, if this is the first time that you have changed the type, the default insurance coverage (%) type coverage table.
-
-
If necessary, you can replace the coverage table with that of a template or another plan, or you can delete the coverage table to make a new one from scratch (not recommended).
-
Do one of the following:
-
For an Insurance Coverage, % table, add, edit, and delete the procedure code ranges as needed:
-
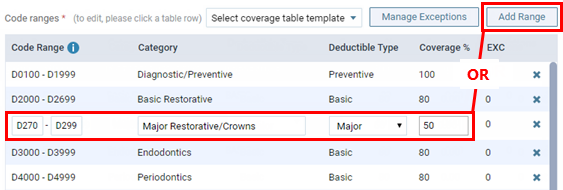
Click (or tap) Add Range to add a procedure code range, or select an existing range to edit that range.
-
Set up the following options for that range as needed:
-
Code Range - The ADA or custom procedure code range. These boxes accept dashes (-), periods (.), numbers, and letters, and they can be up to 10 characters in length. Make sure there are not any overlaps and gaps in the sequence between the starting and ending codes in the range and between other ranges.
You can include an alias procedure codes in a range by typing a period (.) in either box. The Code Range boxes change to allow for entering suffixes. Enter a suffix in either or both suffix boxes. If you need a period in either of the main code boxes (the boxes to the left of the suffix boxes), you must type the period again in that box.
Note: When you change a range and then click (or tap) somewhere else, the text of the range that you modified turns bold. Also, any ranges that overlap or that are invalid become highlighted in red, and you cannot save the changes to the coverage table until those errors are resolved.
-
Category - The procedure category for the procedures in the range.
-
Deductible Type - The type of deductible that the procedures in the range apply to.
-
Coverage % - The percent that the insurance carrier pays on covered charges (after any deductible, up to any allowed amount, and up to any maximum allowed benefit) for procedures in the range.
-
-
Repeat the steps a - b for any other ranges that you want to add or edit.
-
To delete a range, click (or tap) the corresponding Remove button
, and then click (or tap) Delete on the confirmation message that appears.Important: If you are deleting the only range in the coverage table, the entire table will be deleted.
-
-
For a Patient Copayment, $ table, add, edit, and delete the procedure codes as needed:
-
To add procedures codes, do the following:
-
Click (or tap) Add Procedure.
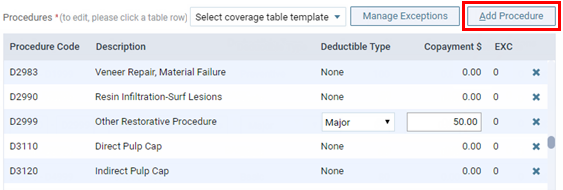
The Add Procedures dialog box appears.
-
Select the check boxes of the procedure codes that you want to add to the coverage table. You can select or deselect the check box in the column header to select and deselect all the procedure codes at the same time.
-
Click (or tap) Add Checked.
Note: If you are adding procedure codes to a coverage table that already has procedure codes, the procedure codes are added at the top of the table, which might not be the correct order; however, when you save the template, the procedure codes will be listed in the correct order.
-
-
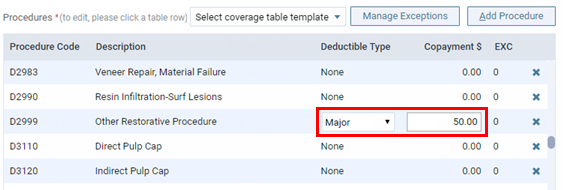
To edit an existing or newly-added procedure code, select it.
-
Set up the following options for that code as needed:
-
Deductible Type - The type of deductible that the procedure applies to.
-
Copayment $ - The patient co-pay. Patients will pay the specified amount for the procedure.
-
-
Repeat the steps a - c for any other codes that you want to add or edit.
-
To delete a code, click (or tap) the corresponding Remove button
, and then click (or tap) Delete on the confirmation message that appears.Important: If you are deleting the only code in the coverage table, the entire table will be deleted.
-
-
-
To add, edit, or delete exceptions to the coverage for specific procedures, click (or tap) Manage Exceptions.
-
Do one of the following:
-
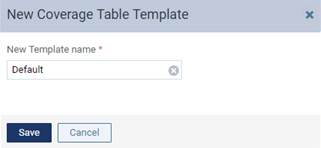
To apply the changes to the coverage table and create a new coverage table template using the specified coverage options, click (or tap) Save As New Template. In the New Coverage Table Template dialog box that appears, enter a name for the template, and then click (or tap) Save.
-
To apply the changes to the coverage table, click (or tap) Save.
-
-
Click (or tap) Save or Cancel.
Editing exceptions in coverage tables
Editing exceptions in coverage tables
You can edit exceptions that have been added previously to a coverage table that is attached to an insurance plan.
Important:
-
The exceptions in coverage tables of the type "Insurance Coverage, %" are used by Dentrix Ascend to automatically calculate insurance estimates.
-
The exceptions in coverage tables of the type "Patient Copayment, $" are not used by Dentrix Ascend to automatically calculate insurance estimates.
Notes:
-
If a patient has dual coverage, the exceptions of the primary insurance coverage are used.
-
A posted procedure with an exception will have a warning icon next to it in the following areas of Dentrix Ascend: in the Enter payment dialog box, in the Enter credit adjustment dialog box, on the Payment tab of the Patient Walkout dialog box, and on the treatment plan case preview page. You can click a warning icon to view the details of the exception for the corresponding procedure.
-
Editing exceptions in an insurance plan's coverage table requires the "Edit Insurance Plans" security right.
-
You can also edit exceptions in any of the coverage table templates.
To edit an exception
On the Home menu, under Insurance, select Carriers.
The Insurance Carriers page opens.
-
Select an insurance carrier.
The options for editing the insurance carrier become available.
-
Under Plans/Employers, select an insurance plan.
The options for editing the insurance plan become available.
-
Click (or tap) Coverage Table.
The Coverage Table dialog box appears.
-
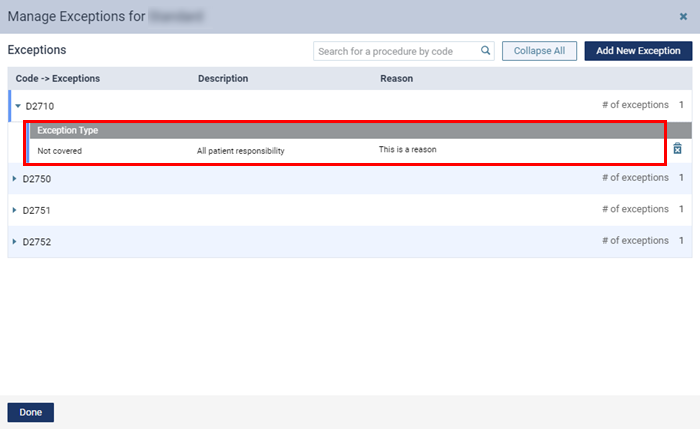
Click (or tap) Manage Exceptions.

The Manage Exceptions dialog box appears.
-
In the Exceptions list, expand a Code to view the corresponding exceptions, and then select an exception.
Notes:
-
To search for a procedure code, begin entering a code in the Search for a procedure by code box, and continue typing as needed to narrow the list.
-
If at least one Code is expanded, to quickly collapse them all, click (or tap) Collapse All. If they are all collapsed, to expand them all, click (or tap) Expand All.
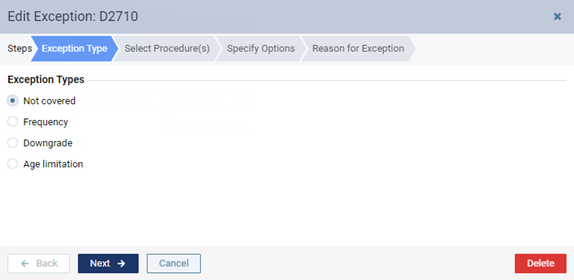
The Edit Exception dialog box appears.
-
-
Set up the options on the following tabs as needed:
-
Exception Type:
-
Select one of the following options:
-
Not covered - To add procedures that are not covered.
-
Frequency - To add procedures that are covered at certain intervals.
-
Shared Frequency - To add procedures that are covered at certain intervals. Use this option when a single frequency exception applies to multiple procedures.
Examples of when you can use the shared frequency exception:
-
A patient cannot have a tooth extracted more than once, but there are multiple procedure codes that can be used for a tooth extraction.
-
A patient cannot have more than two exams per year regardless of the type of each exam (such as limited or comprehensive).
-
A patient cannot have more than four cleanings per year regardless of the reason for each (such as prophy or perio maintenance).
-
-
Downgrade - To add a procedure that requires a downgrade.
-
Age limitation - To add procedures that have an age limitation.
-
Waiting Period - To add procedures that have a waiting period.
Note: Currently, this exception type is for reference purposes only and not used for insurance estimate calculations.
-
-
Click (or tap) Next.
-
-
Select Procedure(s):
-
Do one of the following:
-
For a "Not covered" exception type, select the check boxes that correspond to the procedure codes that are not covered.
Notes:
-
Only the procedure codes that do not have any exceptions are available for selection.
-
To quickly select or clear all check boxes, select or clear the check box in the header at the top of the list.
-
To quickly select or clear a range of check boxes, click (or tap) the first check box of the desired range, and then, while pressing the Shift key, click (or tap) the last check box of the desired range.
-
-
For a "Frequency" exception type, select the checkboxes that correspond to the procedure codes that are covered at certain intervals.
Notes:
-
Only the procedure codes that do not have a "Not covered" exception are available for selection.
-
If a "Frequency" exception already exists for a selected procedure, with that procedure's checkbox selected for this new exception, the existing "Frequency" exception for that procedure will be replaced with this new exception.
-
To quickly select or clear all checkboxes, select or clear the checkbox in the header at the top of the list.
-
To quickly select or clear a range of checkboxes, click (or tap) the first checkbox of the desired range, and then, while pressing the Shift key, click (or tap) the last checkbox of the desired range.
-
-
For a "Shared Frequency" exception type, select the checkboxes that correspond to the procedure codes that are covered at certain intervals.
Notes:
-
You must select at least two procedures.
-
A procedure may be associated with at most one of each frequency exception type: one Frequency exception and one Shared Frequency exception.
-
Only procedures that do not have a "Not covered" exception and are not associated with a "Shared Frequency" exception are available for selection.
-
After you select the first procedure, only procedures with the same treatment area (such as mouth or tooth) are available for selection.
-
To quickly select or clear all checkboxes, select or clear the checkbox in the header at the top of the list.
-
To quickly select or clear a range of checkboxes, click (or tap) the first checkbox of the desired range, and then, while pressing the Shift key, click (or tap) the last checkbox of the desired range.
-
-
For a "Downgrade" exception type, select the procedure code that requires a downgrade.
Note: Only the procedure codes that do not have a "Not covered" or "Downgrade" exception are available for selection.
-
For an "Age limitation" exception type, select the check boxes that correspond to the procedure codes that have an age limitation.
Notes:
-
Only the procedure codes that do not have a "Not covered" exception are available for selection.
-
If an "Age limitation" exception already exists for a selected procedure, with that procedure's checkbox selected for this new exception, the existing "Age limitation" exception for that procedure will be replaced with this new exception.
-
To quickly select or clear all check boxes, select or clear the check box in the header at the top of the list.
-
To quickly select or clear a range of check boxes, click (or tap) the first check box of the desired range, and then, while pressing the Shift key, click (or tap) the last check box of the desired range.
-
-
For a "Waiting Period" exception type, select the checkboxes that correspond to the procedure codes that have a waiting period.
Notes:
-
Only the procedure codes that do not have a "Not covered" exception are available for selection.
-
If a "Waiting Period" exception already exists for a selected procedure, with that procedure's checkbox selected for this new exception, the existing "Waiting Period" exception for that procedure will be replaced with this new exception.
-
To quickly select or clear all checkboxes, select or clear the checkbox in the header at the top of the list.
-
To quickly select or clear a range of checkboxes, click (or tap) the first checkbox of the desired range, and then, while pressing the Shift key, click (or tap) the last checkbox of the desired range.
-
Notes:
-
To search for a procedure, begin entering the code or its description in the Search for procedure box, continue typing as needed to narrow down the procedure code list.
-
After searching for and selecting a procedure, to return to viewing the entire procedure code list, delete the search text from the Search for procedure box.
-
-
Click (or tap) Next.
-
-
Specify Options:
-
Do one of the following:
-
For a "Not covered" exception type, there are no options on this tab.
-
For a "Frequency" exception type, do the following:
-
Specify how often the insurance carrier covers this procedure within a given time period. For How many times, either enter a number, or click (or tap) + or - to change the number. For Over the course of, enter a number, and then select Year(s), Month(s), or Day(s) from the list.
-
Either select the Apply per treatment area checkbox to specify that a selected procedure code is covered the specified number of times in the specified period if the treatment area differs, or clear the checkbox to specify that a selected procedure code is covered the specified number of times in the specified period without regard to the treatment area.
Depending on the state of the checkbox, when you treatment plan a selected procedure for this exception, Dentrix Ascend considers the following to calculate an insurance estimate:
-
With the checkbox selected:
-
If a treatment area (such as tooth, quadrant, or arch) applies to the procedure - Dentrix Ascend considers the treatment area alongside the frequency limitation, procedure date, and coverage start date.
For example, if procedure A for the UL quadrant was performed three months ago, and there is a yearly frequency limitation allowed by insurance for procedure A if it is performed on the same treatment area, if you treatment plan procedure A for the UR quadrant today, Dentrix Ascend looks back one year from today (assuming the start date of the patient's insurance plan coverage is at least that far back) and recognizes that the previous posting of procedure A was rendered on a different treatment area from the treatment area for today's planning of procedure A, so the correct estimated insurance portion is calculated (instead of $0.00).
-
If a treatment area (such as tooth, quadrant, or arch) does not apply to the procedure - Dentrix Ascend considers the frequency limitation, procedure date, and coverage start date.
For example, if procedure B was performed three months ago, and there is a yearly frequency limitation allowed by insurance for procedure B if it is performed on the same treatment area, but procedure B does not have a treatment area, if you treatment plan procedure B today, Dentrix Ascend looks back one year from today (assuming the start date of the patient's insurance plan coverage is at least that far back) and recognizes that the previous posting of procedure B was rendered less than a year ago, so today's planning of procedure B is seen as not covered. In this case, the estimated insurance portion is calculated as $0.00.
-
-
With the checkbox clear - Dentrix Ascend considers the frequency limitation, procedure date, and coverage start date.
For example, if procedure C was performed one year ago, and there is a once-every-two-years frequency limitation allowed by insurance for procedure C, if you treatment plan procedure C today, Dentrix Ascend looks back two years from today (assuming the start date of the patient's insurance plan coverage is at least that far back) and recognizes that the previous posting of procedure C was rendered less than two years ago, so today's planning of procedure C is seen as not covered. In this case, the estimated insurance portion is calculated as $0.00.
-
-
-
For a "Shared Frequency" exception type, do the following:
-
Specify how often the insurance carrier covers these procedures within a given time period. For How many times, either enter a number, or click (or tap) + or - to change the number. For Over the course of, enter a number, and then select Year(s), Month(s), or Day(s) from the list.
-
Either leave the Apply per treatment area checkbox selected to specify that the selected procedure codes are covered the specified number of times in the specified period if the treatment area differs, or clear the checkbox to specify that the selected procedure codes are covered the specified number of times in the specified period without regard to the treatment area.
Depending on the state of the checkbox, when you treatment plan a selected procedure for this exception, Dentrix Ascend considers the following to calculate an insurance estimate:
-
With the checkbox selected:
-
If a treatment area (such as tooth, quadrant, or arch) applies to the procedure - Dentrix Ascend considers the treatment area alongside the frequency limitation, procedure date, and coverage start date.
For example, if procedure A for the UL quadrant was performed three months ago, and there is a yearly frequency limitation allowed by insurance for procedure A if it is performed on the same treatment area, if you treatment plan procedure A for the UR quadrant today, Dentrix Ascend looks back one year from today (assuming the start date of the patient's insurance plan coverage is at least that far back) and recognizes that the previous posting of procedure A was rendered on a different treatment area from the treatment area for today's planning of procedure A, so the correct estimated insurance portion is calculated (instead of $0.00).
-
If a treatment area (such as tooth, quadrant, or arch) does not apply to the procedure - Dentrix Ascend considers the frequency limitation, procedure date, and coverage start date.
For example, if procedure B was performed three months ago, and there is a yearly frequency limitation allowed by insurance for procedure B if it is performed on the same treatment area, but procedure B does not have a treatment area, if you treatment plan procedure B today, Dentrix Ascend looks back one year from today (assuming the start date of the patient's insurance plan coverage is at least that far back) and recognizes that the previous posting of procedure B was rendered less than a year ago, so today's planning of procedure B is seen as not covered. In this case, the estimated insurance portion is calculated as $0.00.
-
-
With the checkbox clear - Dentrix Ascend considers the frequency limitation, procedure date, and coverage start date.
For example, if procedure C was performed one year ago, and there is a once-every-two-years frequency limitation allowed by insurance for procedure C, if you treatment plan procedure C today, Dentrix Ascend looks back two years from today (assuming the start date of the patient's insurance plan coverage is at least that far back) and recognizes that the previous posting of procedure C was rendered less than two years ago, so today's planning of procedure C is seen as not covered. In this case, the estimated insurance portion is calculated as $0.00.
-
-
-
For a "Downgrade" exception type, in the Downgrade to search box, begin entering the code or description of the substitute procedure, continue typing as needed to narrow the results, and then select the correct code.
-
For an "Age limitation" exception type, set up the following options:
-
Age limitation - Enter a minimum age limit (as young as 0 years) and a maximum age limit (as old as 110+ years) to specify that the insurance carrier covers this procedure only for patients whose age is within the specified limit. Also, you can use the left slider to change the minimum age and the right slider to change the maximum age.
Note: If the patient's age is not within the specified limit, this exception is ignored, and the percentage (%) in the coverage table is used.
-
Coverage, % or Downgrade - Do one of the following:
-
Specify a coverage percentage - Select the Coverage, % option. In the box, enter the percentage of the fee charged that the insurance carrier covers for this procedure when the patient's age is within the specified range.
Note: The Coverage, % box is available only for coverage tables that are based on insurance coverage percentages.
-
Specify a downgrade - Select the Downgrade to option. In the Search for procedure box, begin entering the code or description of the substitute procedure, continue typing as needed to narrow the results, and then select the correct code to use when the patient's age is within the specified range.
-
-
Deductible Type - If the patient must pay a deductible for this procedure when the patient's age is within the specified range, select this checkbox, and then select the correct type of deductible from the corresponding list.
Notes:
-
The Deductible Type checkbox is available only if the Coverage, % option is selected.
-
Whether or not the Deductible type checkbox is selected, if the patient's age is not within the specified limit, this exception is ignored, and the deductible type that normally applies to this procedure is used.
-
-
-
For a "Waiting Period" exception type, specify the length of the waiting period that is required for the insurance carrier to cover this procedure. For the box, either enter a number, or click (or tap) + or - to change the number. From the list, select Year(s), Month(s), Week(s) or Day(s) from the list.
Note: Currently, this exception type is for reference purposes only and not used for insurance estimate calculations.
-
-
Click (or tap) Next.
-
-
Reason for Exception:
In the box, enter the reason for the exception in coverage for this procedure.
-
-
Click (or tap) Done.
Note: This button is available only if the Reason for Exception tab is selected.
3. Insurance estimates
Understanding how insurance estimates are calculated
Understanding Insurance Estimate Calculations
Dentrix Ascend calculates insurance portions, write-off adjustments, and patient portions automatically. The explanation that follows covers estimates for primary and secondary plans. The same rules and calculations that apply to secondary plans apply to plans for other coverage orders (tertiary, quaternary, and so forth); however, the calculations are not performed automatically.
The commercial insurance plans that Dentrix Ascend supports are PPO (Preferred Provider Organization), DHMO (Dental Health Maintenance Organization), and indemnity.
Notes:
-
Before calculating insurance estimates for procedures posted on the current date, Dentrix Ascend takes into account any pending primary and secondary claims (in the order they were sent, and claims with the highest total billed amount being handled first) for the patient, the subscriber of the patient's plan (if not the same person), and any other dependents on the plan. However, insurance estimates do not take into account a tertiary plan unless a claim for that plan is attached to a secondary claim; likewise, estimates do not take into account a quaternary plan unless a claim for that plan is attached to a tertiary claim; and so forth.
-
Dentrix Ascend processes procedures being billed to insurance chronologically (oldest to newest, by procedure dates), by descending procedure predetermination or override amounts (largest to smallest), and then by descending procedure amounts (largest to smallest).
-
When calculating estimates for an insurance payment, Dentrix Ascend processes only the procedures associated with the current claim. The maximums and deductibles are calculated as if the current claim is the next one to be paid.
-
For Dentrix Ascend to calculate estimates for procedures posted on the current date, the patient must have an active primary insurance plan with coverage dates that include the dates of those posted procedures.
-
In a patient's ledger, estimates can include procedures posted on the current date (whether or not those procedures are attached to a claim) and procedures posted on prior dates (only if those procedures are attached to a claim). In a patient's treatment plan, estimates can include procedures regardless of when were planned (on the current date or on prior dates) even if they are not attached to a predetermination.
-
The deductible type for multiple procedures posted on the same date is determined by the first procedure.
-
The billing provider, which is determined by the insurance defaults, may be different from the provider who is associated with a procedure.
-
Patient payments and credit adjustments that are applied to procedures reduce the estimated patient portion. Insurance payments that are less than what is expected to be paid reduce the estimated insurance portion and increase the estimated patient portion. Partial insurance payments (more is expected to be paid) reduce the estimated insurance portion.
For additional help with understanding fees (where they come from and how they figure into insurance estimates) and insurance estimates (including a more detailed look at how they are calculated), refer to the following information.
Who this is information for: Anyone in your office who has ever stared at a procedure's estimate and asked, "Where did that number come from?"—front desk, treatment coordinators, billing staff, office managers, and anyone training new hires.
The big idea: When you post or chart a procedure, Dentrix Ascend has to fill in four numbers:
-
Charge - How much does this procedure cost?
-
Insurance Portion - How much will insurance pay?
-
Write-off - How much do we "eat" because of our contract with the carrier?
-
Patient Portion - How much does the patient owe?
These four numbers always have to add up to the same thing:
-
Charge = Insurance Portion + Write-off + Patient Portion
Everything explained here is how Dentrix Ascend fills in those four boxes.
Glossary
|
Word |
What it really means |
|
UCR |
Your office's normal price. Stands for Usual, Customary, Reasonable. Think of it like the sticker price on a car. |
|
Allowed Amount / Contracted Fee / Max Allowable |
The price the insurance company has agreed to honor under your contract. Think of it like the negotiated price—almost always lower than UCR. |
|
MAF (Max Allowable Fee Schedule) |
The list of contracted fees the carrier gave you, code by code. |
|
Write-off |
UCR minus Allowed. The discount you agreed to eat by signing the contract. |
|
Insurance Portion |
What insurance is expected to pay. |
|
Patient Portion |
What the patient (the guarantor) is expected to pay. |
|
Deductible |
What the patient has to pay before insurance starts paying. Think of it like the deductible on car insurance. |
|
Benefits / Maximum |
The cap on what insurance will pay this year (or lifetime, for ortho). Once you hit it, insurance stops paying. |
|
Coverage % |
The percentage insurance covers after the deductible. 80% / 60% / 50% are typical. |
|
Coverage Table |
The plan's list of which procedures are covered and at what %. |
|
Payment Table |
A list of fixed dollar amounts insurance will pay for specific procedures (overrides the %). |
|
Coordination of Benefits (COB) |
The rules for how primary and secondary insurance work together. |
|
Maxed Out |
The patient has used up all of their annual or lifetime benefit. |
1. The Three Office Modes (Pick One)
Every office picks one way to handle write-offs at the organization level. This is the single biggest decision affecting estimates, because it changes what number actually shows up on the procedure in the ledger.
Mode A - Auto-post the write-off
-
The procedure shows UCR as the price.
-
The write-off is calculated and posted automatically when the claim is created.
Think of it as: "List the full price, then subtract the discount automatically when we mail the bill."
Mode B - Manual write-off (post during adjudication)
-
The procedure shows UCR as the price.
-
The write-off is calculated, but it doesn't actually post until your billing person applies it during EOB/ERA adjudication.
Think of it as: "List the full price. Wait for the insurance check, then write off the discount when we reconcile."
Mode C - No write-off / Post Contracted Fee (a.k.a. Post Max Allowable / Post Primary Max Allowable)
-
The procedure shows the contracted fee as the price (no separate write-off line on the ledger).
-
The UCR is still billed on the claim. The carrier still sees your normal price for their records. Dentrix Ascend just keeps it in a separate "UCR fee" field on the procedure instead of posting a write-off entry.
Think of it as: "Skip the ‘list price minus discount' dance on the ledger. Post the discounted price directly. The carrier still sees our regular price on the claim."
A simple comparison:
|
Mode |
Procedure shows |
UCR billed on the claim? |
Contracted fee on the claim? |
Write-off on the ledger? |
|
A - Auto write-off |
UCR |
Yes |
Yes (the "Allowed Amount") |
Yes (auto when claim is created) |
|
B - Manual write-off |
UCR |
Yes |
Yes (the "Allowed Amount") |
Yes (when staff adjudicates the EOB) |
|
C - Post Max Allowable |
Contracted fee |
Yes (kept in a separate UCR fee field) |
Yes (it's the same as the procedure amount in this mode) |
No |
Heads up: Mode C requires both the organization setting and a feature enabled. Without the feature enabled, picking "No write-off" in the menu won't actually swap the procedure amount.
2. The Big Picture Formula
Every estimate is just these steps, in order:
-
Figure out the Charge (UCR in Modes A and B; the contracted fee in Mode C).
-
Figure out what insurance will pay (the Insurance Portion).
-
Figure out the Write-off (UCR minus Allowed, when you're contracted; otherwise zero).
-
Whatever's left is the Patient Portion.
Steps 1 and 3 are basically lookups. Step 2 is the complicated one—it walks through the following:
-
Did anyone enter a manual override?
-
Is the procedure in the payment table (fixed dollar amount)?
-
Is the procedure in the coverage table (percentage)?
-
Are there any special rules (not covered, frequency limits, downgrades, age limits)?
-
Has the patient met their deductible?
-
Does the patient have any benefits left?
-
Is there a secondary insurance? How does it coordinate?
We'll walk through each of those.
3. Where Does the Procedure Charge Come From?
Dentrix Ascend looks for the price in this order:
-
Does the provider have their own fee schedule? Use that.
-
If not, does the location have a preferred fee schedule? Use that.
-
If neither, the price is 0.
A few exceptions:
-
If the patient is on the sliding fee program (uninsured, low income), the price gets adjusted down using the office's sliding fee table.
-
If the patient has a discount plan (and no insurance), use the discount plan's fee schedule.
-
If your office is in Mode C, and the rendering/billing provider is contracted with the carrier, and the carrier has a Max Allowable Fee Schedule, the procedure amount becomes the contracted fee instead of UCR.
4. Two Special Numbers: UCR and Allowed Amount
For every estimate involving insurance, Dentrix Ascend keeps track of two numbers:
-
UCR - your office's normal price for this procedure.
-
Allowed Amount - what your contract with the carrier says you're allowed to charge for it (looked up on the MAF).
The difference between them is the Write-off:
-
Write-off = UCR - Allowed Amount (only if your provider is contracted with the carrier; otherwise zero)
The Allowed Amount also affects the math itself:
-
If Allowed < UCR - Insurance bases its % on the Allowed amount. There's a write-off.
-
If Allowed ≥ UCR - Insurance bases its % on the UCR (the smaller of the two). No write-off.
-
If your provider isn't contracted with the carrier - No write-off. The patient owes whatever insurance doesn't pay.
-
If the carrier doesn't have a MAF on file - No Allowed Amount. No write-off.
Important: Mode C still bills UCR on the claim
In Mode C, the procedure on the ledger uses the contracted fee directly, so there's no separate write-off line. But the claim still shows UCR as the billed amount. Carriers expect to see your normal price for their records. Dentrix Ascend tracks the UCR in a separate "UCR fee" field on the procedure when the office is in Mode C, and that's what gets sent on the claim.
In other words:
-
What posts to the ledger changes between modes.
-
What the carrier sees on the claim doesn't—UCR is always submitted.
Post UCR for Maxed Patients
A newer setting lets you say, "For these specific carriers and providers, when the patient runs out of insurance benefits, switch the procedure amount back to UCR (instead of the contracted fee)."
This kicks in when all of these are true:
-
The feature is turned on for your org.
-
The patient's primary insurance is maxed out (annual individual or annual family benefit fully used).
-
If the patient has a secondary, it has to be maxed out too.
-
The provider x insurance carrier combination is in the Post UCR for Maxed Patients list.
Note: For patients with a secondary, both the primary and the secondary carrier x provider have to be in the list.
When all of those line up:
-
The procedure amount switches to UCR.
-
The write-off adjustment is cleared.
-
The carrier still won't pay anything, because the patient has no benefits left, so the patient ends up owing UCR.
If any one condition isn't met (most commonly: the carrier isn't in the list), Dentrix Ascend keeps using the contracted fee even though the patient is maxed. Insurance still pays $0, so the patient owes the contracted amount.
Why would a practice opt in? Some carriers want to see UCR (instead of the negotiated rate) on the claim once the patient is maxed, sometimes for tracking, sometimes for audit. The opt-in lets you give those carriers what they want, carrier by carrier.
5. "Outstanding Insurance Estimates": On or Off
Each procedure has a switch called Outstanding Insurance Estimates.
-
ON (auto-calculate) - Dentrix Ascend does all the math automatically using the steps in this guide.
-
OFF (manual) - You type the four numbers yourself: Primary Ins. Portion, Secondary Ins. Portion, Ins Write-off, and Patient Portion. Dentrix Ascend just makes sure they add up. Everything else is ignored—overrides, payment table, coverage table, exceptions, deductibles, benefits.
Most procedures stay on auto-calc. Manual is mainly used for unusual situations.
6. The 7 Steps Ascend Runs (When Auto-Calc Is On)
For every procedure that has insurance, Dentrix Ascend runs these steps in order. Steps 1 and 2 can short-circuit the rest.
Step 1 - Did the user enter a manual override?
-
If yes - The override is the Insurance Portion. Skip everything else (payment table, coverage table, deductible, benefits).
-
The override can never exceed the Charge.
-
The Write-off still depends on whether you're contracted with the carrier and whether there's an MAF.
Step 2 - Is the procedure in the Payment Table?
-
The payment table is a list of fixed dollar amounts insurance will pay for certain procedures.
-
If yes (and the plan uses a percentage coverage table) - Use the payment table amount instead of doing percentage math.
-
If no - Move on to the coverage table.
-
For copay plans (DHMO) - The payment table is ignored entirely. Copay always wins.
Step 3 - Look up the procedure in the Coverage Table
The coverage table tells you:
-
The coverage % (example: 80% for preventive, 60% for basic, 50% for major).
-
The deductible type (Preventive, Basic, Major, Ortho, or None).
-
Any special rules (exceptions) - see Section 7.
If the procedure isn't in the coverage table at all, insurance pays nothing. The patient owes the Allowed Amount (or the full UCR if you're not contracted).
Step 4 - Subtract the Remaining Deductible
-
If the patient still owes 50 toward their deductible, the first 50 of the basis amount goes toward that. Insurance starts paying after that.
Step 5 - Apply the Coverage % (or payment table cap)
-
If the payment table does not apply - Insurance Portion = (Basis after deductible) × Coverage %.
-
If the payment table applies - Insurance Portion = the smaller of the % calculation and the payment table dollar amount.
Step 6 - Cap by Remaining Benefits
-
Insurance can never pay more than the patient has left in their annual maximum (or lifetime maximum, for ortho).
-
If the patient has 200 left and the math says insurance owes 300, it gets capped at 200.
Step 7 - The Patient Owes Whatever's Left
-
PPO formulas:
-
Patient = min(Charge, Contracted Fee) - Insurance Portion - Write-off
-
-
Indemnity formula (no contract / no write-off):
-
Patient = Charge - Insurance Portion
-
That's it. Now let's drill into the trickier bits.
7. Special Rules (Coverage Exceptions)
A coverage row can have a special rule attached. Ascend applies them in priority order - only one wins per procedure. From highest priority (applied first) to lowest:
-
Not Covered
-
Waiting Period (display only—calculate as if no exception)
-
Frequency Limit
-
Age Limit
-
Downgrade
Not Covered
Insurance pays 0. The patient owes the Allowed Amount (or full UCR if no MAF / not contracted). No write-off if not contracted.
Frequency Limit
"Once every 6 months" or "Twice a year."
-
For procedures with a tooth/surface (like D2140 fillings):
-
Same procedure on the same tooth+surface within the limit → treat like Not Covered.
-
Same procedure on a different tooth+surface → calculate as normal.
-
-
For procedures without a tooth (like D0140 exams):
-
Within the limit → calculate as normal.
-
Beyond the limit → treat like Not Covered.
-
Downgrade
"We'll cover the cheaper version." For example, the carrier covers D0140 (problem-focused exam) at the price of D0120 (periodic exam).
Two key points:
-
The Insurance Portion uses the downgrade procedure's Allowed amount and coverage %.
-
The Insurance Portion can never be more than what the original procedure would have paid normally—if the downgrade math comes out higher than the original, fall back to the original calculation.
-
The deductible still uses the original procedure's deductible type (not the downgrade's).
Age Limit
"Sealants only covered for kids 6-14."
-
Patient is outside the age range - Calculate as normal (the row keeps its regular coverage rate).
-
Patient is inside the age range - Apply the exception:
-
Either an alternate coverage % (for example, covered at 80% instead of 100%).
-
Or a downgrade procedure (treat it like a downgrade for this patient).
-
Waiting Period
A flag for your information. Doesn't change the math.
8. Copay (DHMO) Plans
Some plans use patient copays instead of percentages. Each procedure has a fixed dollar amount the patient pays; insurance covers the rest, up to the Allowed Amount.
The same provider-contracted vs. not-contracted, MAF vs. no-MAF logic applies. The basic idea:
-
The patient pays the smaller of the copay or the procedure charge.
-
Insurance pays whatever's left, up to the Allowed Amount (when there's a MAF and the provider is contracted).
-
The exceptions (frequency, age limit, downgrade) and the payment table are ignored for copay plans—the copay table is the rule.
9. Insurance Estimate Overrides
Each procedure has two override fields: Primary and Secondary.
If you type a value in:
-
That value becomes the Insurance Portion for that plan.
-
All the math is skipped—no payment table, no coverage table, no deductible, no benefits cap.
-
The override can't be more than the procedure Charge.
-
Write-off is still calculated based on whether the provider is contracted with the carrier and whether there's a MAF.
10. Deductibles, Explained
Deductibles work in three buckets:
-
Annual Individual Deductible - What this patient owes before insurance pays, this year.
-
Annual Family Deductible - What the whole family owes before insurance pays, this year.
-
Lifetime Individual Deductible - What this patient owes once, ever.
Each bucket can also be split by deductible type (Preventive, Basic, Major, Ortho).
The rule: Take the smallest binding amount.
-
If any bucket is already met, the deductible required is 0.
-
Otherwise, take the smallest of the remaining amounts.
For ortho, only the Lifetime Ortho deductible matters.
A required deductible of 0 or empty = no deductible needed.
A required deductible > 0 with less met = deductible still applies.
Each procedure consumes part of the deductible as it goes. So if you're estimating three procedures in a row, the second and third see the deductible getting "used up" by the first.
11. Benefits, Explained
Benefits work just like deductibles—three buckets:
-
Annual Individual Maximum - Most insurance will pay for this patient this year.
-
Annual Family Maximum - Most insurance will pay for the whole family this year.
-
Lifetime Ortho Maximum - Most insurance will pay for ortho, ever.
The rule: Take the smallest binding amount.
Some plans also track Annual / Lifetime Implant maximums separately. They show in the UI but currently don't cap the insurance estimate the way the annual maximums do - treat them as informational for now.
A maximum of 0 or empty = no benefit, insurance pays 0.
A maximum > 0 that's fully used = the patient is maxed out for the year.
12. Secondary Insurance and Coordination of Benefits
When a patient has two plans, the secondary plan handles the leftover differently depending on its COB Method:
|
Method |
What it does |
|
Traditional |
Secondary calculates as if it were the only plan. No reduction for what primary paid. This is the default if no COB rule matches. |
|
Maintenance of Benefits (MOB) |
Secondary's basis amount is reduced by what primary paid (or estimated to pay) before applying secondary's coverage %. |
|
Carve Out / Non-duplication |
Same reduction, but applied after secondary's coverage %. The carrier never pays more than its own share minus what primary already paid. |
The Write-off ends up as the larger of the two plans' write-offs (whichever protects the patient more).
What is "Source of Payment"? Each plan has a Source of Payment (Commercial, Medicaid, Discount, etc.). The COB row on the secondary plan tells the system "if the primary's source of payment is X, use this COB method."
13. Special Per-Line Flags on Fee Schedules
A fee schedule can mark individual procedure codes with:
|
Flag |
What it does |
|
Paid in Full |
"If insurance pays this, we eat the rest." Patient owes 0; the whole remaining balance becomes a write-off. |
|
No Write-off |
"Don't write off the difference." Even if the contracted fee is less than UCR, no write-off is generated. The patient owes UCR. |
|
Post UCR Fee |
"For this code, ignore Mode C and post UCR like Mode A." Lets you mix and match modes per code. |
14. Examples
Setup for all examples:
-
UCR = 234
-
Allowed (MAF) = 217
-
Coverage % = 60%
-
Annual Individual benefit remaining = 800
-
Annual Family benefit remaining = 1,200
-
Annual Individual Basic deductible remaining = 25
-
Procedure is in the coverage table with deductible type Basic
-
No payment table entry, no override, no exception
Example 1 - Mode A (Auto write-off), contracted, has a MAF
Step 1: No override.
Step 2: Not in payment table.
Step 3: Coverage table says 60% for Basic deductible type.
Step 4: Apply $25 deductible. Basis = $217 − $25 = $192.
Step 5: Insurance = $192 x 60% = $115.20.
Step 6: Plenty of benefits left ($800), no cap.
Step 7: Write-off = $234 − $217 = $17.
Patient = $217 − $115.20 − $17 = $84.80.
Procedure shows: Charge 234, Insurance 115.20, Write-off 17, Patient 84.80.
Example 2 - Same scenario, Mode C (Post Max Allowable)
Procedure amount becomes the Allowed = $217.
The claim still shows UCR ($234) as the billed amount.
Step 4: Apply $25 deductible. Basis = $217 − $25 = $192.
Step 5: Insurance = $192 x 60% = $115.20.
Step 7: Patient = $217 - $115.20 = $101.80.
Procedure shows: Charge 217, Insurance 115.20, Write-off 0 (built into the price), Patient 101.80.
Claim shows: UCR 234 as the billed amount; 217 as the Allowed/contracted fee.
Example 3 - Patient is maxed out, certain feature is enabled, carrier opted in (Mode C)
Patient has used 100% of their annual individual benefit.
The carrier x provider IS in the Post UCR for Maxed Patients list.
Procedure amount switches from $217 (Allowed) to $234 (UCR).
Write-off adjustment is cleared.
Step 6: Remaining benefit = 0, so Insurance = $0.
Step 7: Patient = $234.
Procedure shows: Charge 234, Insurance 0, Write-off 0, Patient 234.
Claim shows: UCR 234 (no contracted fee, since we're intentionally bypassing it).
If the carrier weren't opted in, the procedure would stay at 217 with Patient 217 (insurance still pays 0 because the patient is maxed).
Example 4 - Override of 200 entered as Primary, no MAF
Step 1: Override = $200, so Insurance = $200. Skip the rest.
Write-off = $0 (no MAF in this scenario).
Patient = $234 − $200 = $34.
Procedure shows: Charge 234, Insurance 200, Write-off 0, Patient 34.
Example 5 - Downgrade D0140 to D0120
D0140 (original): UCR 234, Allowed 217, Coverage 60%, deductible already met.
D0120 (downgrade): UCR 120, Allowed 100, Coverage 60%.
Step 3: Downgrade applies.
Insurance = $100 x 60% = $60 (using downgrade's numbers).
Cap check: $60 isn't above what the original would have paid ($217 x 60% = $130.20).
Keep $60.
Step 7: Write-off = $234 − $217 = $17.
Patient = $217 - $60 = $157.
Procedure shows: Charge 234, Insurance 60, Write-off 17, Patient 157.
Example 6 - Secondary insurance with Maintenance of Benefits
Same primary as Example 1 (Insurance 115.20, Write-off 17). Secondary plan: 60% coverage, no MAF, COB = MOB.
The big idea: the secondary's basis gets reduced by what the primary paid before the secondary applies its 60%. So instead of the secondary calculating as if it were the only plan and possibly paying another 140, it just "tops off" what primary couldn't cover.
The Patient Portion ends up smaller than it would have been with primary alone, because secondary chips in some of what primary didn't cover.
Quick Reference Tables
Standard formula by setup
|
Has MAF? |
Provider contracted? |
Insurance Portion |
Write-off |
Patient |
|
Yes |
Yes, Allowed < UCR |
Allowed x Coverage % |
UCR - Allowed |
Allowed - Insurance |
|
Yes |
Yes, Allowed ≥ UCR |
UCR x Coverage % |
0 |
UCR - Insurance |
|
Yes |
No |
Allowed x Coverage % (or UCR x %, whichever is smaller) |
0 |
UCR - Insurance |
|
No |
n/a |
UCR x Coverage % |
0 |
UCR - Insurance |
What posts where, by mode
|
Mode A (Auto) |
Mode B (Manual) |
Mode C (Post Max Allowable) |
|
|
Procedure amount on the ledger |
UCR |
UCR |
Contracted fee |
|
Write-off line on the ledger |
Auto when claim is created |
When billing person adjudicates |
None |
|
UCR sent on the claim |
Yes |
Yes |
Yes (separate UCR fee field) |
|
Contracted fee sent on the claim |
Yes |
Yes |
Yes (it's the same as the procedure amount) |
Where to find each setting
|
Setting |
Where it lives |
|
Auto / Manual / No write-off mode |
Settings > Ledger Options > Write-off option |
|
Enable Payment Tables |
Settings > Ledger Options |
|
Insurance defaults (billing vs rendering provider) |
Settings > Insurance Defaults (per location) |
|
Provider's contracted carriers |
Provider profile > Contracted with |
|
Per-line Paid in Full / No Write-off / Post UCR Fee |
Fee Schedules > schedule item |
|
Max Allowable Fee Schedule (MAF) |
Carrier Plan > Max allowable amount fee schedule |
|
Coverage Table / Payment Table / Benefits / Deductibles / COB |
Carrier Plan |
|
Insurance Estimate Overrides (Primary / Secondary) |
Procedure > Insurance Estimates tab |
|
Outstanding Insurance Estimates (on/off) |
Procedure > Insurance Estimates tab |
|
Post UCR for Maxed Patients (per provider × carrier) |
Insurance Carriers > Post UCR for Maxed Patients |
Cheat-Sheet Glossary (the very short version)
-
UCR - Your normal price.
-
Allowed Amount / Contracted Fee / Max Allowable - What your contract says you can charge.
-
MAF - The spreadsheet of contracted fees.
-
Write-off - UCR minus Allowed (the discount you eat).
-
Insurance Portion - What insurance is expected to pay.
-
Patient Portion - What the patient owes.
-
Deductible - What the patient pays before insurance starts paying.
-
Benefits / Maximum - The cap on what insurance pays this year.
-
Coverage % - The percentage insurance pays after the deductible.
-
Payment Table - Fixed dollar amounts that override the %.
-
COB - The rules for combining primary and secondary insurance.
-
Maxed Out - The patient has used up all their annual or lifetime benefit.
-
Mode C / Post Max Allowable / Post Primary Max Allowable - Post the contracted fee directly on the procedure (UCR is still billed on the claim).