Adding insurance plans
After you have added an insurance carrier to your organization's database, you can attach plans to it.
Tip: You can also add a plan when you are attaching insurance to a patient.
Note: Adding plans to insurance carriers requires the "Create Insurance Plans" security right.
To add a plan to an insurance carrier
-
On the Home menu, under Insurance, click (or tap) Carriers.
The Insurance Carriers page opens.
-
Select an insurance carrier.
Tip: To help you locate an insurance carrier quickly, in the Filter box, enter part or all of a carrier's name, plan/employer, or group number to filter the carrier list so that it displays only those carriers that match what you enter.

The options to edit the insurance carrier become available.

-
Under Plans/Employers, click (or tap) Add Plan.

The options for adding the insurance plan become available.

-
Enter the plan or employer name, and set up the other options as needed.
Set up the following options:
-
Plan/Employer Name - The name of the employer or insurance plan.
-
Group # - The group plan number.
-
Claim mailing address - The address where claims for the insurance plan are sent.
Notes:
-
When you click in the first box, start typing a street address, city, state abbreviation, or ZIP Code. A list of matching addresses appears. Continue typing as needed to narrow down the results.

The list of matching addresses comes from the claim mailing addresses that have been entered across all the existing insurance plans in your organization's database.
-
Selecting an address updates the street address, city, state abbreviation, and ZIP Code for this plan accordingly.
-
If the correct address is not found, finish typing the street, and then specify the remaining parts of the address manually.
-
If you select an address, you can edit any part of the address as needed for this plan. Any changes that you make do not affect the addresses of any other plans.
-
-
ZIP Codes must be nine digits.
-
-
Phone - The insurance plan administrator's contact phone number and extension (if applicable).
-
Fax Number - The fax number of the insurance plan administrator.
-
Contact - The name of the insurance plan administrator.
-
Email - The insurance plan administrator's email address.
-
Benefit Renewal Month - The month that the insurance plan's benefits reset. By default, January is selected, but you can select a different month if applicable.
-
Source of Payment - The type of insurance company that will remit payment: CHAMPUS, Blue Cross/Blue Shield, Commercial Insurance, Commercial Insurance (PPO), Commercial Insurance (DHMO), Medicare Part B, or Medicaid.
-
Type - The plan covers dental or medical procedures.
-
Missing tooth clause? - Indicates if a missing tooth clause applies to the plan. Select one of the following options: Not Specified, Yes, or No.
Note: Currently, this option is for reference only.
-
Eligibility coverage level - Indicates the type of coverage that applies to the plan. Select one of the following options: Not Specified, Individual, Family, Employee Only, Employee and Spouse, Employee and Children, Spouse Only, Spouse and Children, Children Only, or Dependents Only.
Note: Currently, this option is for reference only.
-
Crowns/Bridges paid on - Indicates if the plan guidelines base payment on the preparation or seat date for procedures such as crowns and bridges. Select one of the following options: Not Specified, Prep Date, or Seat Date.
Note: Currently, this option is for reference only.
-
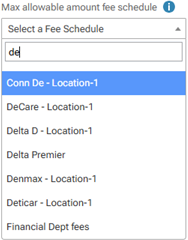
Max allowable amount fee schedule - The schedule of allowed charges for the insurance plan (PPO or DHMO plan only). The selected fee schedule will be used to determine a patient's portion and the recommended write-off.
Important: For each provider (and each location that is set up as a billing provider for claims) who participates with this insurance plan, in that provider's user account (or that location's settings), you must select this carrier in the Contracted With section.
Note: When you expand the list, you can use the search box at the top to quickly locate a fee schedule. Begin typing part of a fee schedule name in the box to see the matching fee schedules in the list. Continue typing as needed to narrow down the results. Select the correct fee schedule.

You can also click (or tap) Max Allowable All Locations to open the Max Allowable Amount Fee Schedules By Location dialog box and set the max allowable fee schedule for the insurance plan by location. Access to this dialog box is available only if the Plan/Employer Name, Claim mailing address, City, State, ZIP Code, and Benefit renewal month have been entered.

-
Coverage Table - The coverage table for the plan. Click (or tap) Coverage Table to open the Coverage Table for dialog box. Access to this dialog box is available only if the Plan/Employer Name, Claim mailing address, City, State, ZIP Code, and Benefit renewal month have been entered.

For a coverage table that is based on insurance coverage percentages, change the default deductible type and/or coverage percentage for each procedure code range. For a coverage table that is based on fixed, patient copayments, change the default deductible type and/or copayment amount.
Note: You can also add exceptions, which are used by Dentrix Ascend to automatically calculate insurance estimates.
-
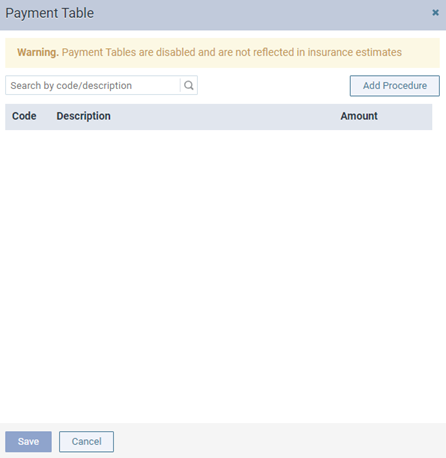
Payment Table - The payment table for the plan. Click (or tap) Payment Table to open the Payment Table dialog box. Access to this dialog box is available only if the Plan/Employer Name, Claim mailing address, City, State, ZIP Code, and Benefit renewal month have been entered.

Manually add procedures in the plan's payment table as needed.
-
Predeterminations - The procedures that require a predetermination (pre-authorization) under this plan. Click (or tap) Predeterminations to open the Manage Predeterminations dialog box. Access to this dialog box is available only if the Plan/Employer Name, Claim mailing address, City, State, ZIP Code, and Benefit renewal month have been entered.

Do any of the following:
-
Select checkboxes:
-
To select the checkboxes of the listed procedures that commonly require a predetermination, click (or tap) Load Defaults. Be aware that doing this replaces the current selections.
-
To select the checkboxes of the listed procedures according to the selections from another insurance plan, enter your search criteria (part of a carrier name, plan/employer name, or group number) in the Replace with box, continue typing as needed to narrow the results, and then select the correct plan. Be aware that doing this replaces the current selections.
-
Manually select or clear the checkboxes of procedures in the list as needed.
Note: To quickly locate a procedure, begin entering part of its code, description, or treatment area in the Search for procedure box. The procedures that match your search criteria are listed. Continue typing as needed to narrow the results.
-
-
Set a charge threshold - To require a predetermination for any procedure that is not selected in the list but whose charge equals or exceeds a certain amount, select the Require predetermination for procedures over checkbox, and then enter an amount in the box provided.
-
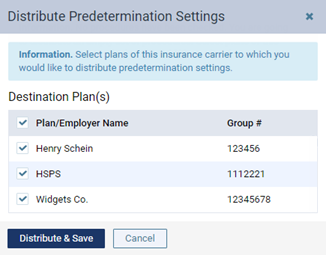
Copy selections to other plans - To copy this plan's selections to other plans that are associated with this plan's carrier, click (or tap) Distribute Settings. In the Distribute Predetermination Settings dialog box, select the checkboxes of the correct plans, and then click (or tap) Distribute & Save. Be aware that doing this replaces the current selections for the destination plans.

-
-
Note - A note that is specific to this insurance plan. You can enter text, such as information from an EOB or other document from the insurance carrier. Also, you can insert a date if needed. The note is accessible from all patient records that have this insurance plan attached.
-
-
Click (or tap) Save.
-
To enter the required deductibles and maximum benefits for the plan, click (or tap) Benefits to open the Deductible and Benefits dialog box. Access to this dialog box is available only after you save the plan.

Enter the required deductible amounts for each deductible type, enter the maximum benefits allowed, and then click (or tap) Save.
Note: Adding required deductibles and maximum benefits to insurance plans requires the "Edit Benefits" security right.
-
To specify the methods for handling the Coordination of Benefits (COB) between primary and secondary insurance claims for a patient with this insurance plan as his or her secondary plan, click (or tap) Coordination of Benefits to open the Coordination of Benefits for [Carrier - Plan] dialog box. Access to this dialog box is available only after you save the plan.

For each Source of Payment for Primary Insurance Plan, select a Method for Coordination of Benefits, and then click (or tap) Save.
Notes:
-
If this insurance plan is attached to a patient's record as a secondary plan, the method being used for coordinating benefits appears on the patient's Insurance Information page when the options for the secondary plan are being displayed.

-
For more information about the coordination of benefits, refer to the topic about Coordination of benefits.
-
Changing the coordination of benefits for insurance plans requires the "Edit Insurance Plans" security right.
-
-
Click (or tap) Save.