By default, the Appointment List window features 14 columns that provide you with patient information such as the following:
|
Column Name |
Description |
|
Indicates the time the appointment is scheduled. |
|
|
Indicates the patient's or appointment's status: Not Confirmed, Firm, Emergency, and so on. |
|
|
Indicates the patient's insurance eligibility. You must have an eCentral account and be registered to receive eligibility responses through eCentral Insurance Manager. |
|
|
A symbol indicates that the patient is new to your practice. |
|
|
The patient's name. |
|
|
Indicates the patient has a medical condition or allergy. |
|
|
Indicates the patient's primary provider. |
|
|
Indicates that the patient has an additional provider. |
|
|
Indicates the operatory. |
|
|
Indicates the reason for the appointment by listing procedure descriptions. |
|
|
A symbol indicates continuing care is attached. |
|
|
Indicates the appointment length in minutes. |
|
|
Indicates the patient's home phone number as recorded in the Family File. |
|
|
Indicates the patient's mobile phone number as recorded in the Family File. |
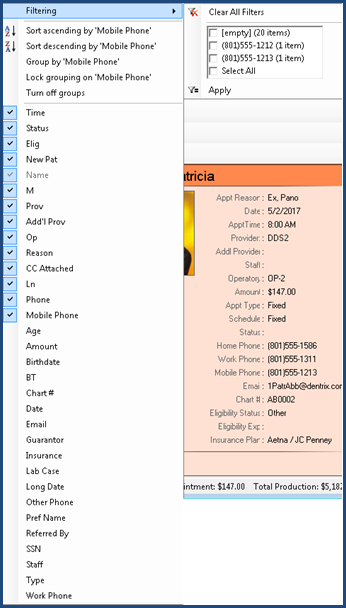
You can adjust the width of each column,apply filters, change the sort order, or group the list by column. You can also temporarily add columns to or delete them from the Appointment List window.
To modify the Appointment List's columns
1. In the Appointment List window, right click a column heading.
The following submenu appears.

2. To add or remove a column, complete one of the following tasks:
To add a column, select an item without a check mark.
To remove a default column, clear the check mark adjacent to the item you want to remove.
Note: Any changes you make are temporary and only remain in place until you click the Refresh button or close the Appointment List window.
3. To change the sort order of the list or to group listings, select the appropriate option under Filtering.
4. To set or remove a particular filter, complete one of the following tasks:
To set a filter, point to Filtering, select the check box corresponding to the item you want to filter the list by, and then click Apply.
To remove a filter, right-click the appropriate column, point to Filtering, clear the check box corresponding to the item you are filtering by, and then click Apply.
Note: Filters remain in force until you remove them.