Using the Appointment Book, you can create appointments for patients requiring continuing care. To set a patient's scheduled appointment for his or her continuing care visit, you must attach continuing care to the appointment. Otherwise, the appointment is treated as if it were not a continuing care appointment, and when you print reminder cards, one does not print for every patient scheduled for his or her continuing care visit.
To create a continuing care appointment
1. Find a new appointment time, locate an open schedule space, and then double-click the appropriate operatory at the desired time.
The Select Patient dialog box appears.

2. Select the patient you want, and then click OK.
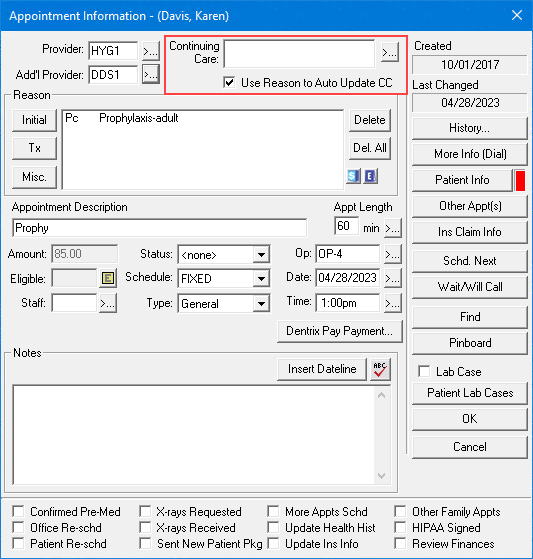
The Appointment Information dialog box appears.

3. To attach a continuing care type to an appointment, do one of the following.
If the appointment reason, such as Prophy - Adult, is attached to a continuing care type in the Procedure Code Editor (see Attaching continuing care types), and Use Reason to Auto Update CC is selected, the appropriate continuing care types are automatically attached to the appointment.
To attach a continuing care type manually:
Clear Use Reason to Auto Update CC prior to entering the appointment reason.
Click the Continuing Care search button.
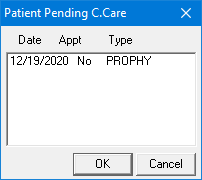
The Patient Pending C. Care dialog box with a list of all continuing care types for that patient appears.

Select the continuing care types you want to attach, and then click OK.
Notes:
When you select Use Reason to Auto Update CC and then select a procedure attached to a continuing care type that is not set up for the patient, a message appears asking if you want to set up this type for the patient using the default settings. Click Yes to set up the continuing care type automatically.
If the continuing care type you need is already attached to another appointment, a message appears asking if you want to attach the continuing care type to the current appointment. Click Yes to attach it to the current appointment.
If you want to create Continuing Care appointment reminder cards, you must attach Continuing Care to an appointment.
4. To select a provider other than the patient's primary provider, click the Provider search button and select the appropriate provider.
5. Click OK to save the appointment information and return to the Appointment Book.
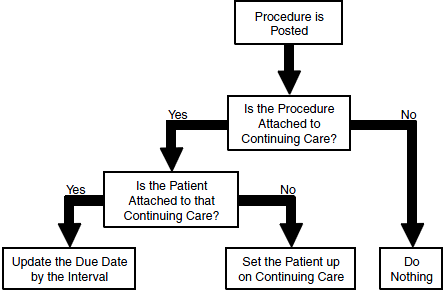
The flow chart below demonstrates how Dentrix determines whether to set up Continuing Care for a patient or to update that patient's continuing care due date when you post a procedure:
