

|
Adding and editing the services of a fee schedule
A fee schedule contains a list of the services performed in your office and the charges for those services (not the amount for which you are reimbursed by insurance companies). A service contains ADA codes, service descriptions, and other information about the services you provide to complete claim forms, generate patient statements, receive payment for services, and specify discounts.
You can add and edit a service that belongs to a fee schedule, unless it's a reserved service fee code.
To add or edit a fee schedule service
1. From the File menu, click Fee Schedules.
The Fee Schedule window appears.
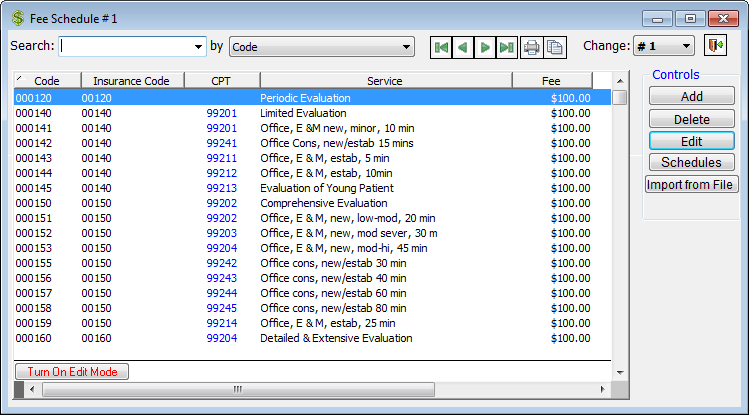
2. From the Change list, select a fee schedule.
3. Do one of the following:
· To add a service to a fee schedule, click Add.
· To edit an existing service, select a service, and then click Edit.
The Edit Fee Code dialog box appears.
4. Set up the options on each tab:
General tab

The General tab, which is selected by default when the Edit Fee Code dialog box is opened, stores general information for the service:
· Coding
· ADA/CDA – Type the unique six-digit code internal code. This code should be a zero followed by the five-digit ADA code. This code is usually the same as the Insurance (CDT), but it can be different. This field accepts alphanumeric codes (up to six characters in length), such as 0A0140 and 0B0140. You can have multiple internal codes, each with a different fee, attached to the same procedure code. Changes to a fee’s code in Fee Schedule 1 can affect all other fee schedules and the Estimator with the proper preference enabled.
Important: You cannot add the following reserved codes to any fee schedule: 000001 through 000100, 009998, and 009999.
· Insurance (CDT) – Type the code that will appear on claim forms. This code is usually the same as the internal ADA/CDA code, but it can be different. This allows you to have multiple instances of a procedure code in any given fee schedule (as long as the insurance codes are different). Also, whereas the ADA/CDA code must be unique, the Insurance (CDT) code does not, so any number of procedure codes in a given fee schedule can have the same insurance code.
This field accepts alphanumeric codes (up to ten characters in length). For Canada only, you can enter a code in an NN.NNLL (number + number+ decimal + number + number + letter + letter) format.
Note: You do not need to type the prefix "D" of the ADA Procedure Code.
· Description - Type the descriptive name for the service as you want it to appear on dental claim forms. This field has a limit of 35 characters. You can also type a name for the service as you want it to show On Statements sent to patients (limit 17 characters), and On Appointment (limit 5 characters) if you want a different description to appear in the Appointment Book. If the On Statement or On Appointment field is left blank, the description from the Description field will be used. Changes to a fee’s description in Fee Schedule 1 can affect all other fee schedules and the Estimator with the proper preference enabled.
· Fee – Type the fee you charge for the service in a $,$$$,$$$.$$ format. Changes to a fee’s code in Fee Schedule 1 can affect all other fee schedules and the Estimator with the proper preference enabled.
· Office visit procedure? - Select this check box to specify that the service requires an office visit fee.
· Inactive - Select this check box to set this fee code to be inactive.
· Select allowed teeth – In the tooth chart, leave a tooth oval blue if this procedure code can be posted to that tooth. Click a blue oval to remove the color if you want to prohibit this procedure from being posted to that tooth. For instance, you may want to prohibit a posterior procedure code from being posted to an anterior tooth. If you try to post a procedure code to a prohibited tooth, a message will appear to inform you that the code is not valid for the selected tooth. By default, all ovals in the tooth chart are blue. If this procedure is for supernumerary teeth, select the Supernumerary Teeth check box to change the tooth numbering on the chart.
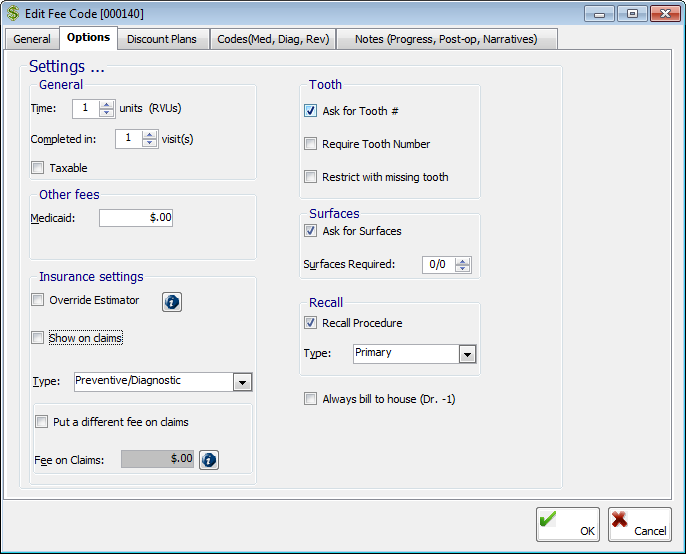
The Options tab stores other general options for the service:
· General
· Time – Enter the number of time units (Relative Value Units, or RVUs) for the service. This time is used on statistical reports.
· Completed in – Enter the number of visits the service will require to be completed. If the value is greater than one, the service will not be posted with a complete date until all the visits are completed (if this procedure is marked as needing to be completed in two or more visits, the program will allow multiple visits to be posted for this procedure).
· Taxable – Select this check box if tax should be added to the cost of the service.
· Other fees – Type the Medicaid fee in a $$$,$$$.$$ format. You can use the lab fee to track lab costs associated with the service.
· Insurance Settings
· Override Estimator – Select this check box if the service is not covered by any insurance plan or cannot be billed to insurance. With this check box selected, the default insurance estimate for the service will be 0 dollars for all plans.
· Show on claims – Select this check box to allow the service to show on claims. This check box is selected by default.
· Type – Select the procedure category to which you want to assign the service. This type is used to calculate insurance estimates if the Estimator is not being used to calculate insurance portions and a patient’s insurance is not a Medicaid plan. The list of available types corresponds to the procedure categories on the Estimates-Percents tab of the Edit Insurance Profile dialog box for an insurance profile. Also, the code for this fee will appear under the corresponding category on the Tabulated Production report
· Put a different fee on claims – Select this check box if you want the fee that appears on claims to be different than the fee that is posted to patients’ ledgers (the Fee entered on the General tab), and then type the desired fee in the Fee on Claims field. Most often, you'll want to have the amount on a claim be different than what is posted if you post a procedure in stages but want to put the entire amount on the claim right away.
Important: For this feature to work properly, in addition to selecting this check box and entering a fee, you must assign the fee schedule of this service as the default fee schedule for an insurance profile.
· Tooth
· Ask for Tooth # – Select this check box to have the option to type a tooth number or quadrant when posting the service.
· Require Tooth Number – Select this check box if you want a tooth number or quadrant to be required when post the service. This check box is available only if Ask for Tooth # is selected.
· Restrict with missing tooth – Select this check box to have a message appear when you attempt to post the service for a missing tooth. The message states that you cannot post this procedure to a missing tooth.
Tip: You can update a patient's chart of missing teeth from the Treatment Plans tab of the Patient Information Center or during posting (click the Missing Teeth option on the Options button menu).
· Surfaces
· Ask for Surfaces – Select this check box to have the option to type surfaces or roots when you post the service.
· Surfaces Required – Enter the ratio of surfaces that are required when you post the service. The ratio is the minimum number of possible surfaces out of the maximum number of possible surfaces (for example, a 3-surface filling would be entered as 3/3, and a filling on 4 or more surfaces or incisal edge would be entered as 1/5). If the ratio is left at 0/0, an error will appear when you post the service. This check box is available only if Ask for Surfaces is selected.
· Recall
· Recall Procedure – Select this check box if you want the service to be a recall procedure.
· Type – Select a recall type.
· Always bill to house (Dr. -1) - Select this check box if you want the production and receivables for this service to be credited to the house doctor regardless of which provider performs the procedure.
Discount Plans tab
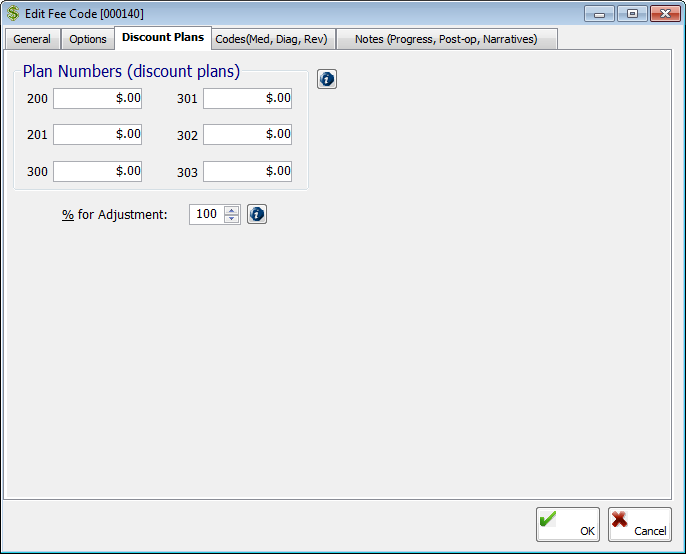
The Discount Plans tab stores the discount plans. Discounts are automatically applied to patients’ portions of charges when services are posted to accounts that have been assigned plans:
· Plan Numbers (discount plans) - Type the discounted amount for the service using the following criteria:
· 100 – This indicates that there are no automatic discounts for a patient who has been assigned this plan. This is the default plan.
· 200 and 201 – This indicates that a patient who has been assigned one of these plans gets the automatic discount, assuming he/she pays the minimum percentage (% for Adjustment) of the new charges at the time of posting.
· 300, 301, 302, and 303 – This indicates that a patient who has been assigned one of these plans gets the automatic discount regardless of any minimum payment at the time of posting.
Note: You can have seven discount plan variations per fee schedule. If you require more discounts, create additional fee schedules.
· % for Adjustment - Type the desired percentage using the following criteria:
· For 200 series plans, the percentage indicates the portion a patient who has been assigned one of these plans must pay at the time of posting to qualify for the discount.
· For 300 series plans, the percentage indicates the portion a patient who has been assigned one of these plans can pay at the time of posting, but he or she will get the discount regardless of whether the minimum payment is made.
Codes (Med, Diag, Rev) tab
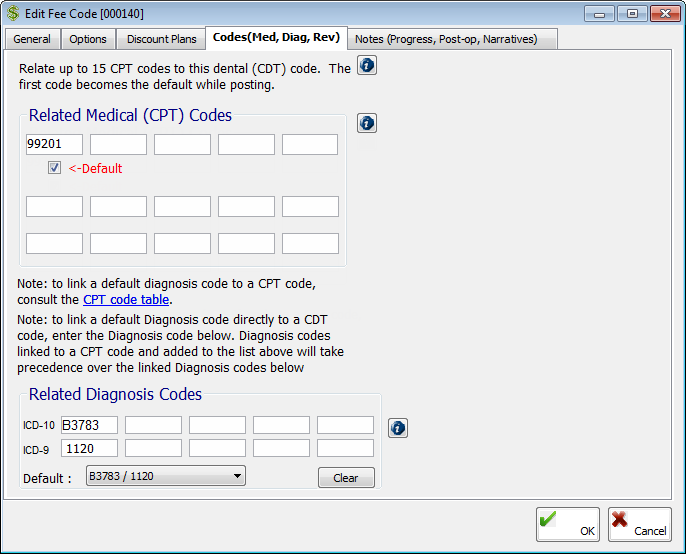
On the Codes (Med, Diag, Rev) tab, you can associate medical codes and diagnostic codes (ICD-9 and ICD-10) with a dental code so that medical claims can be created when you post dental procedures covered by medical insurance.
Note: Cross coding is relating dental (CDT) procedure codes to medical (CPT) procedure codes and diagnosis codes (ICD-9 and ICD-10). With cross coding set up, when you post charges or create treatment plans for dental procedures, those procedures are cross coded automatically, so the associated CPT and diagnosis codes (ICD-9 and ICD-10) will be entered for you.
Set up any of the following options:
· Under Related Medical (CPT) Codes, type the desired medical codes, or double-click in a field to select and paste in a medical code. You can link up to 15 CPT codes to one dental code. The first code entered is the default when you post this procedure if the <-Default check box is selected.
· Under Related Diagnostic Codes, double-click in a field to select and paste in a diagnosis code (consisting of one ICD-10 code and/or one ICD-9 code). You can link up to 5 diagnosis codes to one dental code. To remove an entry, click in the corresponding field, and then click Clear. Select the Default diagnosis code; by default, the first diagnosis code entered is selected.
Note: Any diagnosis codes that are associated with CPT codes that are entered under Related Medical (CPT) Codes will take precedence over those diagnosis codes that are entered under Related Diagnostic Codes.
Notes (Progress, Post-op, Narratives) tab
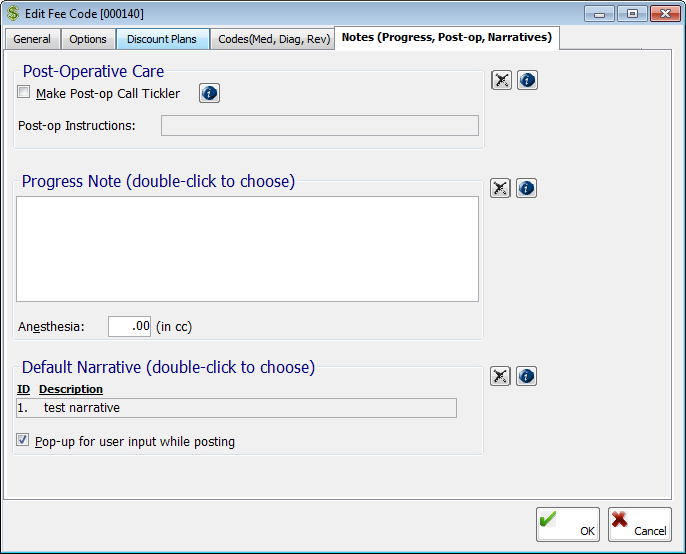
The Click Notes (Progress, Post-op, Narratives) tab stores notes for the service:
· Make Post-op Call Tickler – Select this check box if you want to create a reminder to follow up with the patient who has the procedure performed or to monitor the treatment. The patients on this reminder list will show on the Post-op Call List of the end-of-day reports.
· Post-op Instructions – To have post-operative
instructions print for the patient to take home when you post the procedure,
double-click in the field to select and paste in a post-operative note.
You can click the Remove button
 to clear any previous selection.
· Progress
Note – Type a note, or double-click in the field to select
and paste in a progress note. You can click the Remove
button to clear any previous
selection. You can customize the text of progress notes that are pasted
into the field. Every time you post this procedure, the associated
progress note is added to the patient's progress
notes, and once the note is locked,
it becomes a legal clinical record that cannot be altered.
· Anesthesia – Type the amount of anesthesia, in CCs, that is usually administered for the service in a ###.## format.
· Default
Narrative – Double-click in the field to select and paste in
the default narrative that will get added to claims when you post
or treatment
plan the procedure. You can click the Remove
button to clear any previous
selection. Also, if you have attached a narrative, the Pop-up
for user input while posting check box is available. With this
check box selected, the narrative appears automatically when you post
or treatment plan this procedure so that you can preview the narrative
and make any changes. With this check box cleared, to view or change the
narrative, you must click the Narratives
option from the Options button
menu during posting or treatment planning.

On the ClinicalVision tab, you can select the default chart settings for the service:
· Material, Condition, Area, and Arch lists - Make the appropriate selections for the service when posting from ClinicalVision. ClinicalVision is an add-on product that can be purchased separately from EndoVision.
Note: If the selected Condition for this fee code is "Watch," to have the watched tooth be charted automatically in ClinicalVision when this fee code is treatment planned, the Enable Advanced Watch option must be turned on in ClinicalVision.
· Pass To CV - To have the information for this fee code be passed to ClinicalVision when it is posted, select the Pass To CV check box.
· Attach Perio Chart when posting from CV - With this option selected for a fee code, when that fee code is posted in ClinicalVision and the patient has a perio chart, the most current perio chart is automatically added as an attachment.
5. Click OK.
A message appears and asks if you want to apply the change to this fee code to the other fee schedules and/or Estimator tables.
6. Click Yes to apply to change to the other fee schedules and/or Estimator tables or No to apply to change to just the currently selected fee schedule.
Need more help?
You can visit our website, contact EndoVision Customer Support, or suggest a new feature or improvement on User Voice.