

|
Adding and editing practice locations
A practice location is a facility where you do business and/or treat patients. You can have multiple practice locations. You can add and edit practice locations as needed.
To add or edit a practice location
1. From the File menu, click Locations.
The Practice Locations Table window appears.
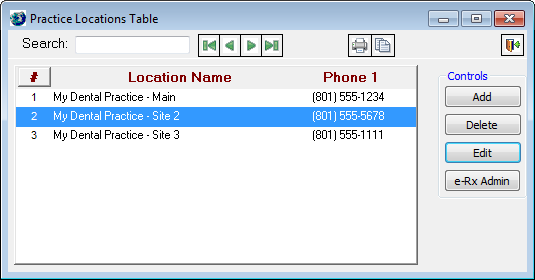
Note: The default sort order of the locations is determined by a preference setting.
2. Do one of the following:
· To add a practice location, click Add.
· To edit an existing practice location, select a practice location, and then click Edit.
The Edit Practice Location dialog box appears.
3. Set up the options on each tab:
Demographics tab
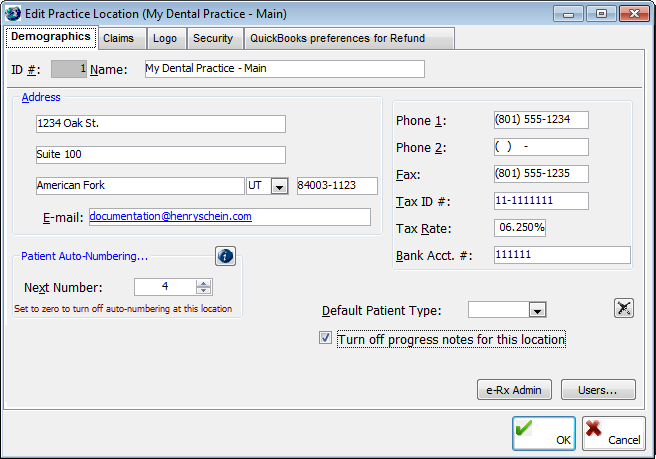
The Demographics tab, which is selected by default when the Edit Practice Location dialog box is opened, stores general location information:
· ID # - If you are adding a new practice location, type a unique ID for the practice location. If the global preference for location auto-numbering has been turned on, the ID is generated automatically and cannot be edited. In this case, the program assigns the next available number when you add a practice location, according to a certain preference setting (for example, the first practice location created is 1; the second, 2; and so forth). If you are adding a new practice location, after you click OK, you cannot edit the ID.
· Name – Type the name for the practice location. The name field has a limit of 50 characters.
· Address – Type the address and email address of the practice location. If you double-click in the ZIP Code field to select and paste in a postal code, the city and state fields are populated automatically. Line 1 of the street address is limited to 50 characters; line 2 of the street address is limited to 30 characters. The email address field has a limit of 50 characters.
· Patient Auto-Numbering – Enter the Next Number with which you want to begin the patient auto-numbering sequence for the practice location. The number must be greater than or equal to one. This option is available only if the global preference setting for patient auto-numbering has been turned on.
· Allow posting treatment/treatment plans to this location - Select this option (if it is available) if you want to be able to post treatments and treatment plans to this practice location.
· Allow posting payments/adjustments/refunds to this location - Select this option (if it is available) if you want to be able to post payments, adjustments, and refunds to this practice location.
· Phones and IDs – Type the phone and fax numbers for the practice location. Type the tax ID number and the tax rate for the practice location. Type the bank account number for the practice location.
· Default Patient Type – Select the
default patient type for this practice location to assign the selected
type to patient records created in this location. Click the
Remove button  to clear any previous selection.
· TransFirst Merchant ID - Select
a TransFirst Merchant ID for processing credit card using TransFirst at
this location. Click the Remove
button to clear any previous
selection.
· Turn off progress notes for this location - Select this option (if it is available) to turn off the display of progress notes for this practice location.
· Statements: Simple interest on balances - Select this option (if it is available) to have simple interest calculated and included with patient balances for patients at this location.
· Allow Diagnosis Code on Rx? - Select this option (if it is available) to allow diagnosis codes (when specified) to be included on patient prescriptions.
· e-Rx Admin – Click this button to set up electronic prescriptions using ePrescribe for this location.
· Users – Click this button to select which users are permitted to log on to the practice location.
Claims tab
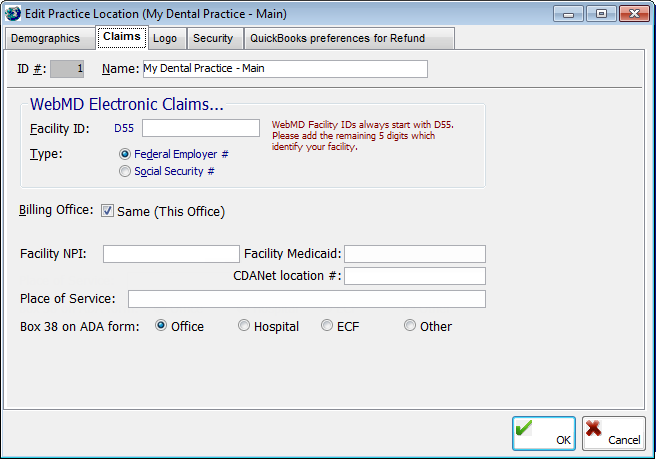
The Claims tab stores claim information for the practice location:
· WebMD Electronic Claims
· Type the appropriate five-digit Facility ID, which will show on HCFA claim forms. A WebMD Facility ID must start with D55 followed by the five digits that identify your facility. Do not type D55 in the field provided because it is automatically attached to the facility ID.
· Select Federal Employer # to indicate that your facility uses the Federal Employer number when claims are processed, or select Social Security # to indicate that the practice location uses the Social Security number when claims are processed.
· Billing Office – Select the Same (this Office) check box if the practice location is the billing office for claims that are submitted to insurance companies.
· Facility NPI – Type the National Provider Identification number for the practice location.
· Facility Medicaid - Type the practice location's Medicaid number.
· CDANet location # (Canada only) - Type the practice location's CDANet number. This option is available only for the Canadian version of EndoVision.
· Place of Service - Select the default place of service for posting charges at this location.
· Box 38 on ADA form - Select the default value for box 38 on claims created from this location.
Logo tab
![]()
On the Logo
tab, you can add a logo that will appear on various printed reports for
the practice location. To select a logo for the practice location, click
Locate, browse for and select
a graphic file, and then click Open.
The type of files that you can import are JPEG Files (*.JPG), Bitmap Files
(*.BMP), and Windows MetaFile (*.WMF). A preview of the logo appears under
Image. You can click the Remove
button to clear any previous
selection.
Security tab
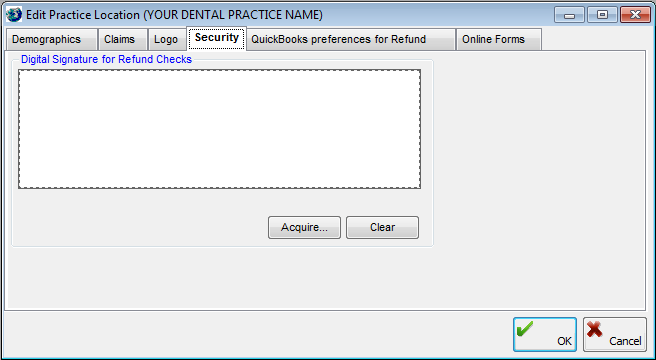
Lets you specify a digital signature to be used for refund checks:
· Acquire - Acquires the digital signature from a supported signature device.
· Clear - Clears the digital signature.
QuickBooks Preferences for Refund
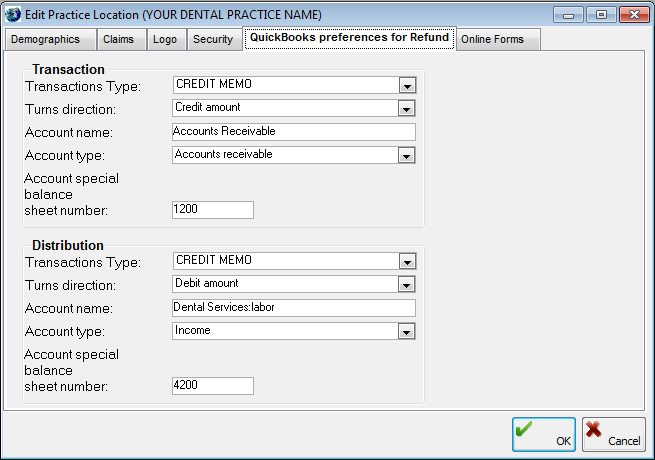
Use these settings to specify your Transaction and Distribution preferences when issuing a QuickBooks refund:
· Transactions Type - The type of transaction for which a refund is being issued.
· Turns direction - Select Debit Amount or Credit Amount.
· Account name - The name of the account.
· Account type - The type of account: Accounts Receivable, Income, Other Current Asset.
· Account special balance sheet number - The balance sheet number for the account.
Online Forms tab
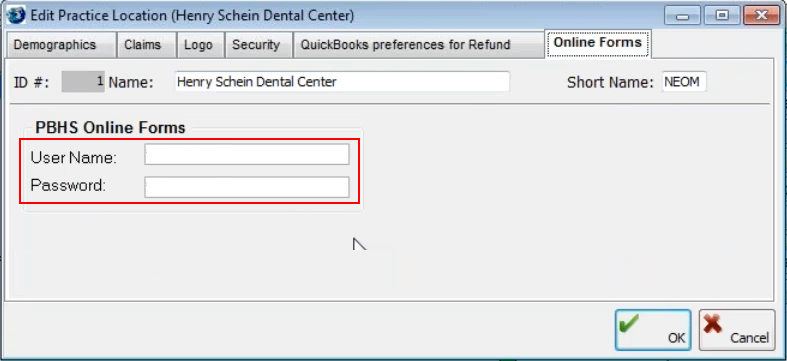
You can use a location filter to specify the location from which you want to download forms from PBHS. With the Use Location Filter to Download Forms Preferences option selected, you can use the Online Forms tab to specify the user name and password for each PBHS Location. The user name and password you specify on this tab is associated with the specified location, so you can access the PBHS forms at that location.
Then, when you download forms (using the Download button on the toolbar), in the Download Forms dialog box, you can select the Location and Location ID for the forms you want to download.
To set the Location Filter to Download Forms preference
1. From the Utilities menu, click Preferences.
2. In the Preferences dialog box, click the Operation tab.
3. Select Use Location Filter to Download Forms.
4. Click OK.
CC Terminals tab
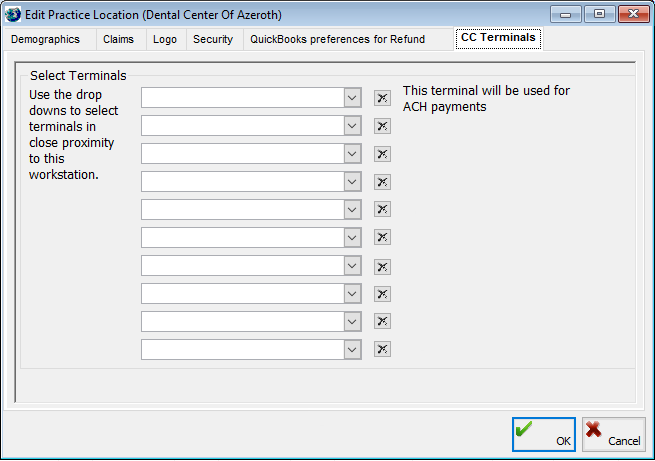
Use the drop-down lists to select terminals in close proximity to this workstation.
Notes:
· Terminals are defined in the Terminal Table dialog box.
· The terminals you select here appear in the Terminal drop-down list when you post an e-Payment.
· The terminal you select at the top of the list (in the first position) will be used for Automated Clearing House (ACH) payments.
4. Click OK.
Need more help?
You can visit our website, contact EndoVision Customer Support, or suggest a new feature or improvement on User Voice.