

|
Posting patient payments
You can post patient payment to a patient's account.
To post a payment
1. In a patient’s Patient Information Center, on the Control Panel, under Transactions, click Payment. Alternately, under Transactions, from the Other menu, point to Payment, and then click Regular Payment.
The Payment window appears.
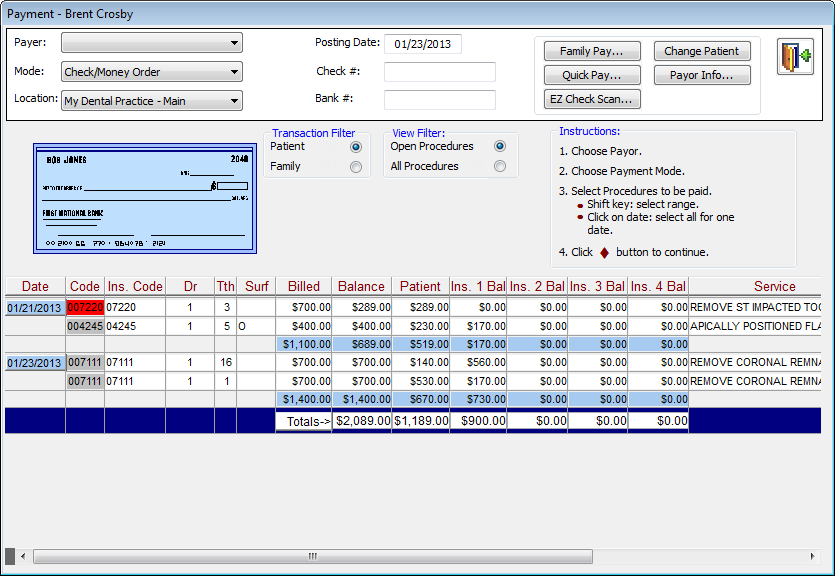
2. Enter payment information using one of the following methods:
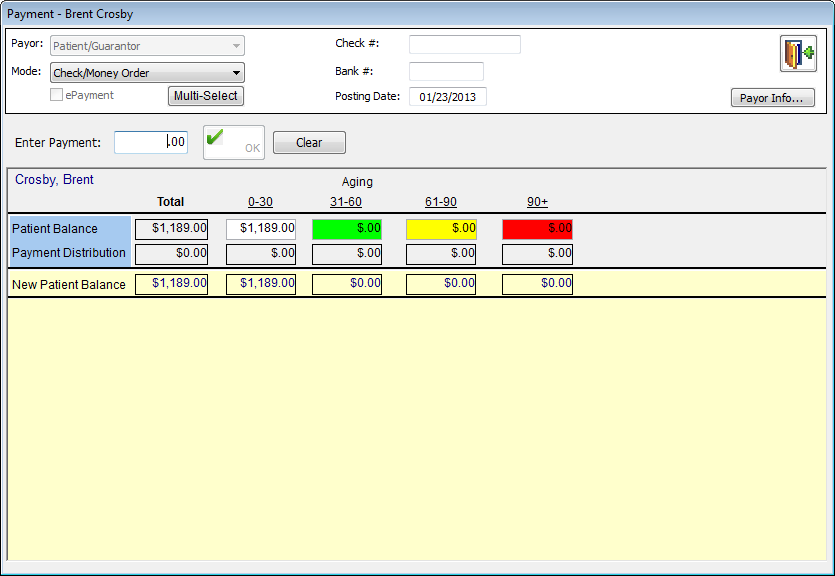
Normal Pay (posting a patient payment to selected procedures)
a. From the Payer list, select “Patient/Guardian” or "All Pmnts. to Forwarding Balances" (use money from the patient's balance forward).
b. Select the Mode or method of payment. For a check or money order, type the Check Number and Bank # (bank routing number). If you do not enter the check and bank number, the check will not appear on the deposit slip. For an electronic funds transfer (EFT), type the Ref #.
c. Select the Location where the payment is being made.
d. Leave the current Posting Date entered, or enter the correct date that the payment is being posted in a mm/dd/yyyy format. By default, the current date is already entered.
e. Under Transaction Filter, make sure Patient is selected.
f. If necessary, select a View Filter option to filter the procedures being viewed:
· Open Procedures - To view only the procedures with a balance.
· All Procedures - To view all procedures.
g. Select the procedures for which you want to post the payment:
Tip: To select all the procedures for a date, click that date in the Date column. To select all the procedures in a range, click the first procedure in the range, and then, while holding down the Shift key, click the last procedure in the range. The color code used in the Code column is the same as for the Ledger.
Notes:
· If you need to choose a different patient whose account you want post a payment to, click Change Patient to select a patient.
· To add the payor’s information, click Payor Info.
h. Click the Exit/Continue button.
One of the following occurs, depending on what the Exit/Continue button looks like:
· If the button has an open door icon on it, the Payment dialog box closes because no payor and procedures have been selected.
· If the button has a green check mark on it, the Payment dialog box changes so that you can continue posting the payment.

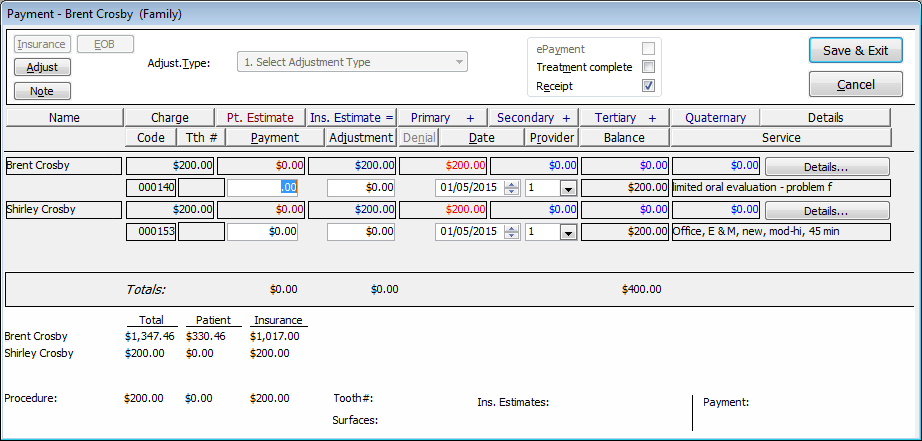
i. For each procedure, set up the following options:
· Payment – Type the amount of the payment being made.
· Adjustment – Type the amount to adjust in the Adjustment field, or click Adjust to enter the amount of the adjustment. Then, from the Adjust. Type list, select the adjustment type.
· Date – Leave the current date entered, or enter a different date in a mm/dd/yyyy format.
· Provider – Select the provider.
· Details – Click this button to view any transactions associated with the selected procedure.
![]()
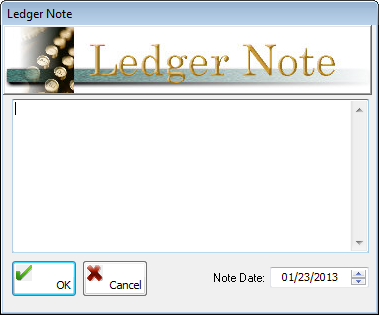
j. To enter notes regarding the account, click Note.
k. If this is an electronic payment, select ePayment.
l. Select the Treatment complete check box to mark the procedures to which you are posting a payment complete in the Ledger automatically after you click Save & Exit.
m. Select the Receipt check box to view the receipt for the payment after you click Save & Exit.
n. Click Save & Exit.
A preview of the receipt and the Claim Submission dialog box may appear.
Normal Pay by Family Line Items (posting one payment to multiple
family members for selected procedures)
a. From the Payer list, select “Patient/Guardian” or "All Pmnts. to Forwarding Balances" (use money from the patient's balance forward).
b. Select the Mode or method of payment. For a check or money order, type the Check Number and Bank # (bank routing number). If you do not enter the check and bank number, the check will not appear on the deposit slip. For an electronic funds transfer (EFT), type the Ref #.
c. Select the Location where the payment is being made.
d. Leave the current Posting Date entered, or enter the correct date that the payment is being posted in a mm/dd/yyyy format. By default, the current date is already entered.
e. Under Transaction Filter, select Family.
The transactions for all family members appear.
f. If necessary, select a View Filter option to filter the procedures being viewed:
· Open Procedures - To view only the procedures with a balance.
· All Procedures - To view all procedures.
g. Select the procedures for which you want to post the payment:
Tip: To select all the procedures for a date, click that date in the Date column. To select all the procedures in a range, click the first procedure in the range, and then, while holding down the Shift key, click the last procedure in the range. The color code used in the Code column is the same as for the Ledger.
Notes:
· If you need to choose a different patient whose account you want post a payment to, click Change Patient to select a patient.
· To add the payor’s information, click Payor Info.
h. Click the Exit/Continue button.
One of the following occurs, depending on what the Exit/Continue button looks like:
· If the button has an open door icon on it, the Payment dialog box closes because no payor and procedures have been selected.
· If the button has a green check mark on it, the Payment dialog box changes so that you can continue posting the payment.
i. For each procedure, set up the following options:
· Payment – Type the amount of the payment being made.
· Adjustment – Type the amount to adjust in the Adjustment field, or click Adjust to enter the amount of the adjustment. Then, from the Adjust. Type list, select the adjustment type.
· Date – Leave the current date entered, or enter a different date in a mm/dd/yyyy format.
· Provider – Select the provider.
· Details – Click this button to view any transactions associated with the selected procedure.
![]()
j. To enter notes regarding the account, click Note.
k. If this is an electronic payment, select ePayment.
l. Select the Treatment complete check box to mark the procedures to which you are posting a payment complete in the Ledger automatically after you click Save & Exit.
m. Select the Receipt check box to view the receipt for the payment after you click Save & Exit.
n. Click Save & Exit.
A preview of the receipt and the Claim Submission dialog box may appear.
Family Pay (posting one payment to multiple family members, and
paying off the oldest balances first)
a. Click Family Pay.
The Payment dialog box changes.
Note: The Payor list has Patient/Guardian selected automatically. You cannot change the selection.
b. Do one of the following:
· Post a payment using one payment type:
1) From the Mode list, select the method of payment.
2) For a check or money order, type the Check Number and Bank #. For an electronic funds transfer (EFT), type the Ref #. If applicable to the selected method of payment, select the ePayment check box. If you do not enter the check and bank number, the check does not appear on the deposit slip.
3) In the Enter Payment field, type the amount of the payment being made, and then press the Tab key to allocate the payment to the oldest balance first and then any remaining amount to subsequent balances until all of the payment is applied. You can click Clear to clear any previous entry.
· Post a payment using multiple payment types:
1) Click Multi-Select below the Mode list. The Mode list becomes a scrolling list box with payment types.
2) Select the appropriate methods of payment from the Mode list box to add the types to the list box below the Mode list box.
3) For each payment type, set up payment information (ePayment, Check #, Bank #, and Amount) as applicable.
Note: You can click Clear to clear all of the selected modes of payment. To remove a type from the lower list box, deselect the type in the Mode list box. While in multi-select mode, you can click Single Select to return to posting with a single method of payment.
c. Leave the current Posting Date entered, or enter a different date in a mm/dd/yyyy format.
d. If the preference setting to allow manual redistribution of a family payment is enabled, the Payment Distribution field in the Total column turns yellow. Change the values for each patient's balance as desired.
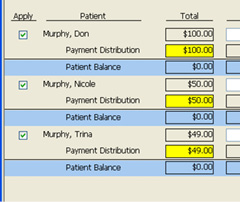
e. Select the Apply check box next to the names of the patients to whom the payment is to be applied.
f. To add the payor’s information, click Payor Info.
g. Click OK.
Note: If you select multiple payment types, after the payment is posted, the Ledger will have separate line items for each payment type that is used. The type will appear in the Payment by column of the Ledger. Also, the deposit slip will separate each payment type into categories.
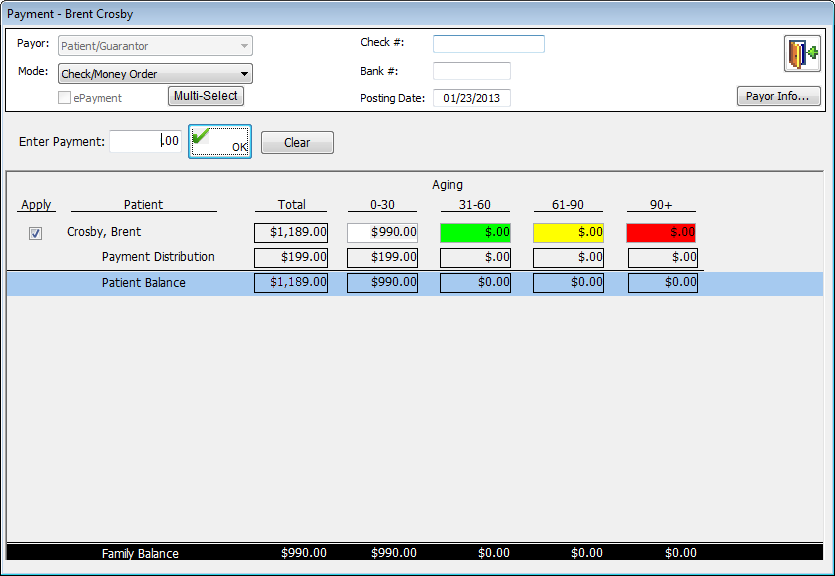
Quick Pay (posting a patient payment that is to be applied to only
the patient selected, and paying off the oldest balance first)
a. Click Quick Pay.
The Payment dialog box changes.
Note: The Payor list has Patient/Guardian selected automatically. You cannot change the selection.
b. Do one of the following:
· Post a payment using one payment type:
1) From the Mode list, select the method of payment.
2) For a check or money order, type the Check Number and Bank #. For an electronic funds transfer (EFT), type the Ref #. If applicable to the selected method of payment, select the ePayment check box. If you do not enter the check and bank number, the check does not appear on the deposit slip.
3) In the Enter Payment field, type the amount of the payment being made, and then press the Tab key to allocate the payment to the oldest balance first and then any remaining amount to subsequent balances until all of the payment is applied. You can click Clear to clear any previous entry.
· Post a payment using multiple payment types:
1) Click Multi-Select below the Mode list. The Mode list becomes a scrolling list box with payment types.
2) Select the appropriate methods of payment from the Mode list box to add the types to the list box below the Mode list box.
3) For each payment type, set up payment information (ePayment, Check #, Bank #, and Amount) as applicable.
Note: You can click Clear to clear all of the selected modes of payment. To remove a type from the lower list box, deselect the type in the Mode list box. While in multi-select mode, you can click Single Select to return to posting with a single method of payment.
c. To add the payor’s information, click Payor Info.
d. Click OK.
Note: If you select multiple payment types, after the payment is posted, the Ledger will have separate line items for each payment type that is used. The type will appear in the Payment by column of the Ledger. Also, the deposit slip will separate each payment type into categories.
3. If this is an e-payment, in the Create/Edit e-Payment dialog box that appears, process the credit or debit card as follows:
a. Type the Amount of the payment, and select the card Type (Credit Card or Debit Card).
b. Verify that the information (name and address) for the card's Account Holder is correct. If not, make the necessary changes.
c. Do one of the following:
· Select Credit Card on File to use a card that is stored in your database, and then select the correct card. This option is available only if there is already a card on file.
· Select New Card, and then next to Terminal select the credit card terminal you will use to process the card.
Note: Terminals are defined in the Terminal Table dialog box and assigned to locations when you add or edit practice locations.
Important: The credit card number must be valid for the type of credit card (VISA, MasterCard, and so forth) selected in the Payment window.
d. Click Submit e-Payment.
e. The first time you use the credit card terminal, a code appears in the Entry Code field. Enter the code that appears next to Entry Code on the terminal's pinpad.
f. After you get a response from the card processor, click OK.
Need more help?
You can visit our website, contact EndoVision Customer Support, or suggest a new feature or improvement on User Voice.