Adding and editing EHR narratives
You can add a narrative at any time but you can only edit narratives that are not locked.
To add or edit an EHR narrative
1. In the EHR Narratives window, do one of the following:
· To add a narrative, click New  , select the narrative, and then click Open
  .
.
· To edit an existing narrative, select a narrative, and then click Open  .
.
The EHR Narrative Edit window appears.
2. Perform any of the following tasks:
· Add and format the text of the narrative.
· Drag text variables (either a category or an item) from the Narrative Fields tree to the document. Alternately, you can double-click a text variable or, with a text variable selected, click the Paste button  to insert that text variable. The default text (highlighted in yellow and enclosed in double arrows << >>) or your custom text appears in the narrative where the text variable was inserted.
Notes:
· To add a text variable to the bottom first-level items of the EHR Narrative Fields tree, click the New Root button  .
.
· To add a text variable below the category or item that is currently selected in the EHR Narrative Fields tree, click the New button  .
.
· To edit the text and/or label of a text variable in the EHR Narrative Fields tree, select that text variable, and then click the Open button  .
.
· To delete a text variable from the EHR Narrative Fields tree, select that text variable, and then click the Delete button  .
.
· To sort the text variables, click any of the following sorting buttons  :
:
· Sort alphabetically within categories - To sort the categories and items in each category alphabetically in ascending order.
· Sort by user-defined order - To sort the categories and items in each category according to the order that you specify.
· Up and Down - To move a selected category or item up or down in the list. These buttons are available only if the Sort by user-defined order option is being used.
· Drag merge fields from the EHR Case Fields tree to the document. Alternately, you can double-click an item to insert that merge field.
Note: To customize an insertable table for a merge field in the EHR Case Fields tree, right-click a field that is an insertable table, and then click Edit Option.
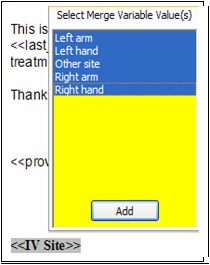
Tip: When you add a merge field that has multiple options, you can double-click the merge field in the document to open a shortcut menu, select as many items in the list as you want, and then click Add. The original merge field changes to a list of separate merge fields in the document.

· Export, save, print, and email the EHR narrative from the File menu and side toolbar.
· Cut, copy, paste, find, replace, spell check, and format the text of, and insert tables into, the EHR narrative by clicking the respective options from the Edit menu and side toolbar.
· Insert objects, files, dates, times, images, hyperlinks, and bookmarks into the EHR narrative by clicking the respective options from the Insert menu.
· Change the font and font attributes, text alignment, and zoom percentage, and create bulleted and numbered lists for the EHR narrative from the formatting toolbar.
· Change the tabs and margins for the EHR narrative by clicking and dragging the items on the ruler bars.
· Select the Provider. The provider selected by default can be different, depending upon the following criteria:
· If the patient has an appointment on the date of service, it is the provider attached to the appointment.
· If the patient has no appointments on the date of service, it is the EHR case provider.
· If the patient has multiple appointments on the date of service, all the providers for the date of service are compared to find out which providers are dentists and which providers are auxiliaries. Then, if there is only one dentist, it is that provider. Or, if there is more than one dentist, it is the EHR case provider.
· Type a Subject for the EHR narrative. When you insert a narrative template into an EHR narrative, the subject is updated automatically with the name of the template and tooth numbers from the EHR case.
· Click the Power Merge button to merge the patient information that corresponds the EHR Case Fields that have been inserted into the EHR narrative.
Note: You can also select the EHR Narrative: Auto Merge Fields preference (on the Operation tab) to automatically merge the template fields that auto-populate when the template is selected.
· Click Collaborator to merge patient health history and registration information using PBHS Collaborator, if the add-on service has been purchased and enabled.
· Click Review to specify that a provider has reviewed the EHR narrative.
3. Click Save.
Need more help?
You can visit our website, contact EndoVision Customer Support, or suggest a new feature or improvement on User Voice.


