

|

The WebSync Wizard
The WebSync Wizard helps you set up WebSync so that you can transfer information back and forth between the toolbar and your eCentral website.
The WebSync Wizard helps you set up the following WebSync features:
· Performing correspondence upload overrides
· Performing patient upload overrides
· Performing referral upload overrides
· Performing claim tracking upload overrides

To set up each WebSync option in the wizard, click Next to continue to the next step. If, at any time, you need to return to a previous step, click Back.
To set up a specific WebSync feature without going through all the steps in the wizard, select the feature from the navigation list. However, you must complete all the steps in the wizard once before you can jump to individual steps.
To save any changes you make, you must click Finish before you exit the wizard. If you need to exit the wizard before you click Finish, click Cancel. However, all your changes will be lost.
Running WebSync
Running WebSync synchronizes the information in your practice management software with that in your eCentral website. Running WebSync allows you to upload information to your eCentral website and import new online accounts, online information changes, and online payments into your practice management software. Running WebSync also sends the correspondence you have requested to your patients.
You can customize the information you want to synchronize in WebSync setup. You can also customize the frequency of the reminders that are generated about WebSync.
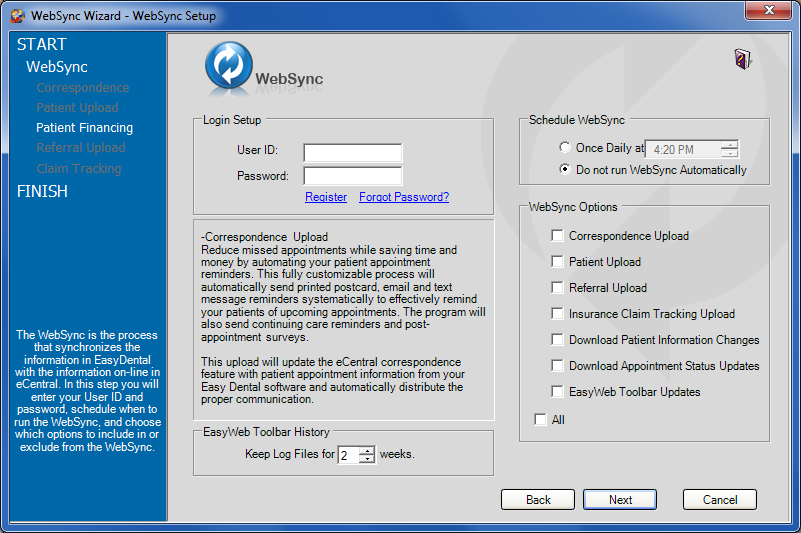
Logging in
To log in
· Under Login Setup, enter the user ID and password you received when you registered your eCentral account.
· If you have not registered, click Register.
· If you forgot your user ID or password, click Forgot Password?.
Scheduling WebSync
You can run WebSync automatically in the Schedule WebSync dialog box.
To schedule WebSync
· To run WebSync automatically at a specific time, select Once Daily at and select a time.
· If you do not want WebSync to run automatically, select Do not run WebSync Automatically.
Setting WebSync options
To set WebSync options
· Under WebSync Options, select the options you want to include during WebSync:
· Correspondence Upload
· Patient Upload
· Referral Upload
· Insurance Eligibility Upload
· Insurance Claim Tracking Upload
· Download Patient Information Changes
· Download Appointment Status Updates
· EasyWeb Toolbar Updates
· To include all the options in WebSync, select All.
Uploading correspondence
Sending correspondence to your patients keeps them informed about their scheduled appointments and Continuing Care deadlines. Correspondence helps you reduce the number of missed appointments in your office and keeps your patients informed about their treatment needs.
You can send appointment reminders and Continuing Care reminders to your patients via letters, postcards, e-mail, or text messages. You must set up these correspondences in the EasyWeb toolbar and your eCentral website before you can send them.

Selecting correspondence types
To select a correspondence type
· Under Correspondence Types, select the correspondence types that you want to send to your patients. You can select one, two, or all options.
· E-mail - Lets you send e-mail to those patients with e-mail addresses set up.
· Text Message - Lets you send text messages to patients with a cell phone listed as an alternate phone number.
· Postcard - Lets you print and send postcards to patients with an address set up.
Note: Enabling any of these options indicates that you agree to the pricing terms and conditions.
· Click Pricing and Terms of Use to view those terms and conditions.
Selecting correspondence filters
To select a correspondence filter
· Under Select Correspondence, select the correspondence you want to send. By default, ten correspondence filters are available:
· Appointment Reminder, 1 day before appt.
· Appointment Reminder, 14 days before appt.
· Appointment Reminder, 30 days before appt.
· Continuing Care Reminder, 1 day before appt.
· Continuing Care Reminder, 14 days before appt.
· Continuing Care Reminder, 30 days before appt.
· Continuing Care Due, 1 day past due
· Continuing Care Due, 14 days before due date
· Continuing Care Due, 30 days before due date
· Continuing Care Due, 90 days past due
· To send a correspondence that is not on the list, click New.
· To change the settings of one of the default correspondences, click Edit.
Note: Clicking either of these buttons opens the Edit Correspondence dialog box. See Editing correspondences for mor information.
Assigning appointment statuses
To assign an appointment status
· Under eCentral Appointment Status, from the Status list, select the appointment status you want to assign to appointments that are confirmed electronically from the list.
Editing correspondences
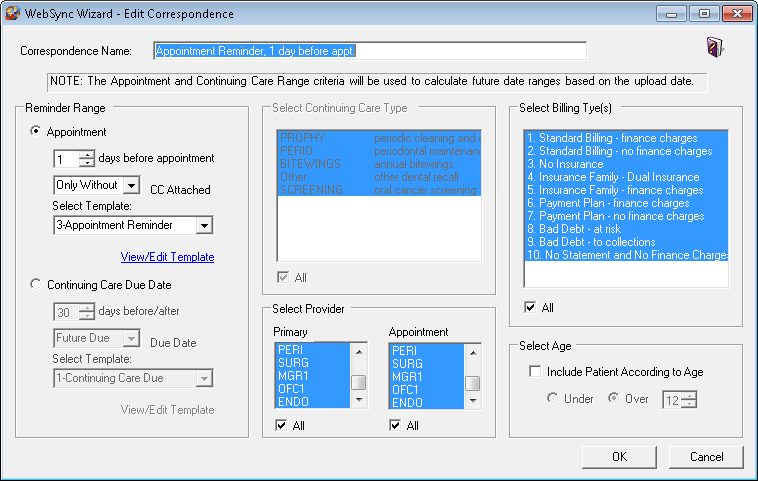
Entering correspondence names
To enter a correspondence name
In the Correspondence Name field, enter the name you want to use for the correspondence you are creating or editing.
Setting a reminder range
Under Reminder Range, select whether you want to sort the range of the reminder by appointment or Continuing Care due date. The range you select will be the range that is used to determine which patients receive this correspondence.
If you select Appointment, complete the following steps:
1. Select the number of days before the appointment you want to send the correspondence.
2. From the CC Attached list, select one of the following options:
· Select Only With, to send correspondence to only those appointments that are attached to the Continuing Care types specified.
· Select Only Without, to send correspondence to only those appointments that do not have any Continuing Care types attached.
· Select All, to send correspondence to all appointments in the date range that are attached to any of the Continuing Care types.
3. Under Select Template, select the template you want to use for this correspondence.
Note: The templates are those you set up on your eCentral account. Click View/Edit Template to go to your eCentral account to view or modify these templates.
If you select Continuing Care Due Date:
1. Select the number of days before or after the due date you want to send the correspondence.
2. From the Due Date list, select whether you want to send the correspondence before or after the due date.
3. Under Select Template, select the template you want to use for this correspondence.
Note: The templates are those you set up on your eCentral account. Click View/Edit Template to go to your eCentral account to view or modify these templates.
Selecting Continuing Care types
To select a Continuing Care type
· Under Select Continuing Care Type, select the type or types that you want to include in this correspondence.
Note: Correspondence will be sent only to the Continuing Care types you selected. Five Continuing Care types are available.
· To select all of these types, click All.
Selecting providers
Note: You may only select a provider is you select Appointment under Reminder Range.
To select a provider
· Under Select Provider, select the providers you want to include in this correspondence.
Note: You can include providers based on a patient’s primary provider or appointment provider. Correspondence will be sent only to the selected providers.
· To select all of these types, click All.
Selecting billing types
To select a billing type
· Under Select Billing Types, select the billing types you want to include.
Note: Only patients with the selected billing types will be included. The billing types that are available are those that you set up in Working with practice definitions in Reports.
· Click All to include all billing types.
Selecting patients according to their ages
To select a patient according to his or her age
1. Under Select Age, click Include Patients According to Age to send correspondence to only those patients who are under or over a certain age.
2. Select Under or Over.
3. Select an age from the list.
Setting up patient uploads
The Patient Upload Setup window lets you select which items to include in the patient upload process. Only patients with a patient status (not non-patient) who have signed a web consent form and have a consent date in Setting up patients will be included in the upload.

Setting Accounts module options
Select the patient’s Accounts module items that you want to include on your practice's website.
To set an Accounts module option
· Under Accounts, select one or more of the following options as appropriate.
· Family/Patient Account Transactions - Select to upload account transactions that occurred on or after the first transaction date for the family.
· Click List Individual Patient Balances of Family to break down the balances by individual.
· Account Information - Select to upload aged balances, last payment, last insurance payment, last statement date, outstanding billed to medical/dental, expected from dental insurance, and guarantor portion of total balance.
Note: You must have selected Use Guarantor's User ID and Password in the Patient Settings dialog box to upload account information. See Setting up patients for more information.
· Payment Agreement Information - Select to upload payment amount, amount past due, payment due, and due date.
Entering messages for patients
To enter a message for patients
· Under Patient Message, enter a generic message that will be sent to all patients during the upload.
Uploading patients' clinical information
To upload a patient's clinical information
· Under Patient's Clinical Information, click Treatment Plan to upload all treatment-planned procedures for patients.
· Click Include Estimates to upload insurance estimate information along with the treatment information.
· Click Include Case Note to upload patient case notes.
· Click Use Patient Friendly Descriptions to upload procedure descriptions in lay terms.
Uploading appointment information
To upload appointment information
· To upload all future appointment information for a family, click Appointment Date, Time and Provider.
Selecting provider ranges
To upload only certain providers' patients, you can select a range of providers.
To select a provider range
1. Under Select Provider, click the From search button, and then select a provider from the list.
Note: Select <ALL> to include all providers.
2. Click the To search button, and then select a provider from the list.
Note: Select <ALL> to include all providers.
Selecting billing types
The only billing types that are available are the billing types that you have set up in the Reports module.
To select billing types
· Under Billing Type(s), select the billing types that you want to include from the list.
Only patients with the selected billing types will be uploaded.
· Click All to include all billing types.
Setting up patient financing
When you set up patient financing, patients can make online payments through your eCentral website. The Patient Financing Setup window allows you to set up payment and adjustment types for online payments and enter your merchant number for patient financing.

Selecting payment and adjustment types for online payments
Select the payment and adjustment types that will be entered into the Ledger for the online patient payments.
To select payment and adjustment types for online payments
· From the appropriate lists, select payment and adjustments types for credit card payments, electronic check payments, credit card credits, or electronic check credits.
Processing patient financing
To process patient financing
· Under Patient Financing, enter the Merchant Number that Citi Health assigned to you.
Uploading referrals
You can use eCentral to send electronic referral e-mail messages to other dental professionals. You can also use eCentral to accept patient referrals and upload them. Referrals are uploaded and e-mail messages are sent during the eSync process.

Including patient referrals
To include patient referrals
1. Under Include Patient Referrals, select the amount of time that can elapse since the patient created the referral.
Note: For example, if you want to upload all patient referrals that have been entered in the last week, select 7 and Day(s).
2. Select Skip Referrals Already Uploaded to skip patient referrals that have been entered within the specified date range but have already been uploaded.
Uploading patient chart information
To upload a patient's chart information
· Under Patient Chart Information, select Include Last Perio Exam Date and/or Include Medical Alerts.
Uploading insurance information
To upload insurance information
· Under Insurance Information, select Dental Insurance and/or Medical Insurance.
Uploading referring providers
To upload a referring provider
Under Referring Provider, select one of the following:
· Use Patient’s Prov1 to upload the referred patient’s primary provider listed in the Patients module.
· Use Provider and then select the appropriate provider from the list.
Uploading progress notes
Under Progress Notes, select the progress notes you want the include in the upload.
To upload progress notes
1. Select one of the following:
· Do Not Include Progress Notes if you do not want to upload the patient’s progress notes from the Chart.
· Include Progress Notes if you want to include these notes.
2. Enter a date span.
a. In the From fields, select a number, and then from the list, select Year(s) ago, Month(s) ago, Week(s) ago, or Day(s) ago.
b. In the To fields, select a number, and then select Today, Month(s) ago, Week(s) ago, or Day(s) ago.
Note: Only progress notes that fall within this date span will be included.
3. Select the notes that you want to include.
· Completed
· Procedure Notes
· Existing
· Clinical Notes
· Conditions
· Treatment Plan
a. If you select Include Treatment Plan, select one of the following:
· Include Entire Treatment Plan
· Include Only Treatment Plan for Referred Dr.
Entering referral notes
To enter a referral note
1. Under Referral Note, enter a note.
2. Select Include Referral Note to include the note in the e-mail that is sent to the doctor you are sending the referral to.
Viewing insurance eligibility
The eCentral Insurance Center lets you find and view the details of patient insurance eligibility information without having to contact insurance companies directly.
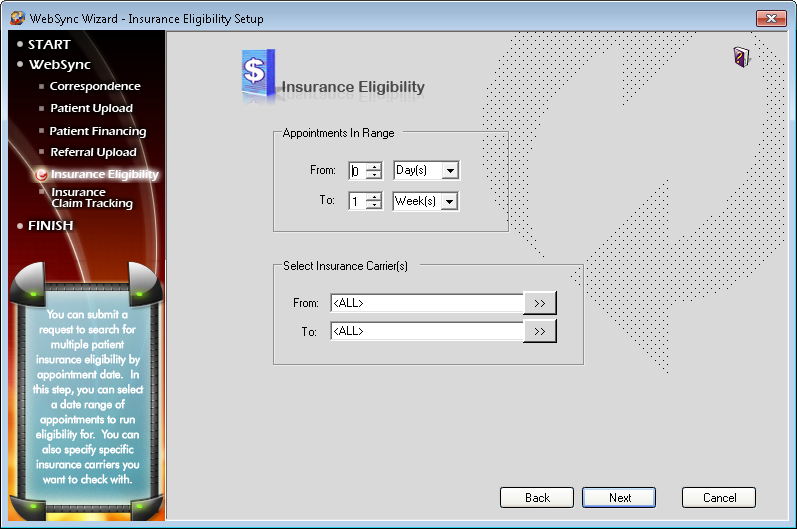
Setting an appointments range
Under Appointments in Range you can set a date range in which to check eligibility for patients who have appointments scheduled. You can set the date range as a number of days or a number of weeks.
To set an appointment range
1. In the From fields, select a number and then select Days or Weeks.
2. In the To fields, select a number and then select Days or Weeks.
Selecting insurance carriers
Under Select Insurance Carrier(s) you can qualify the appointment range search and reduce the number of search results found in the appointment range. You can select a single carrier or a range of carriers.
To select insurance carriers
1. Click the From and To search buttons.
The Select Dental Insurance Plan dialog box appears.

2. Do one of the following:
· To show eligibility information from a range of insurance carriers, select a different carrier from the list for the From and To fields, and then click OK.
· To show eligibility information from all insurance carriers, leave the fields set to <ALL>.
Setting up insurance claim tracking
The Insurance Claim Tracking Setup window allows you to track claims by selecting certain search criteria for claims.
Note: Insurance claim tracking lets you track the progress of claims that you created in Ledger.
![]()
Selecting claim billing providers
You can sort the claims created by certain billing providers in your electronic claim tracking.
To filter the claims by billing provider
1. Click the From search button, and then from the list, select the beginning provider for the range.
2. Click the To search button, and then from the list, select the ending provider for the range.
Setting a minimum days past due filter
You can filter the claims according to the balance days past due.
To filter claims according to minimum days past due
· Select Over 30, Over 60, or Over 90.
· To include all claims regardless of the past due date, select Over 0.
Selecting a range of insurance carriers
Select the insurance carriers you want to include in your electronic claim tracking.
To select a range of insurance carriers
1. Click the From search button, and then from the list, select the beginning carrier for the range.
2. Click the To search button, and then from the list, select the ending carrier for the range.
Including pre-treatment estimates
To include pre-treatment estimates
· Select Include Pre-treatment Estimates.
Exiting WebSync Wizard
You must click Finish to save any changes you make before you exit the wizard.
If you click Cancel or leave the wizard without clicking Finish, all your changes will be lost.
To exit WebSync Wizard
· Click Finish in WebSync Wizard.
