In Dentrix Enterprise, you can record a patient’s medical history using an electronic form. The form consists of several sections that a provider goes through with the patient. All required questions on the form must be answered. Then, a provider or staff member and, if required, a patient or guardian must sign the form. Also, you can save a copy of the completed form as a .pdf file in a folder and/or in the patient’s Document Center record.
Notes:
This topic is intended for Indian Health Service facilities only.
On each client computer that connects to the Dentrix Enterprise database, in the SQL Server Configuration Manager, TCP/IP must be enabled, and the alias for Dentrix must use that protocol.
There is a global setting that controls the availability of the medical health history features. The following are available if "IHS only" is selected for that global setting:
The Patient Health History Wizard button on the toolbar of the Family File, Chart, or Ledger. Clicking this button opens the Dental Patient Medical Assessment window.
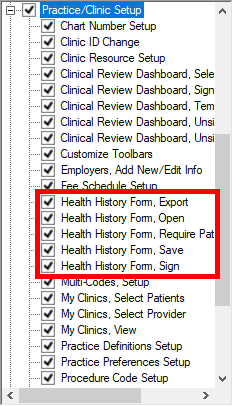
The "Health History Form, Require Patient Signature" security right (in the "Practice/Clinic Setup" category) determines whether the Require Patient signature checkbox is available or not on the form for a given user.
The "Health History Form, Open," "Health History Form, Sign", "Health History Form, Export," and "Health History Form, Save" security rights (in the "Practice/Clinic Setup" category) determine if a user can open, sign, export, and save assessments, respectively.
To complete a medical health history assessment
In Family File, Patient Chart, or Ledger, with a patient selected, click the Patient Health History Wizard button  on the toolbar.
The Dental Patient Medical Assessment window opens.
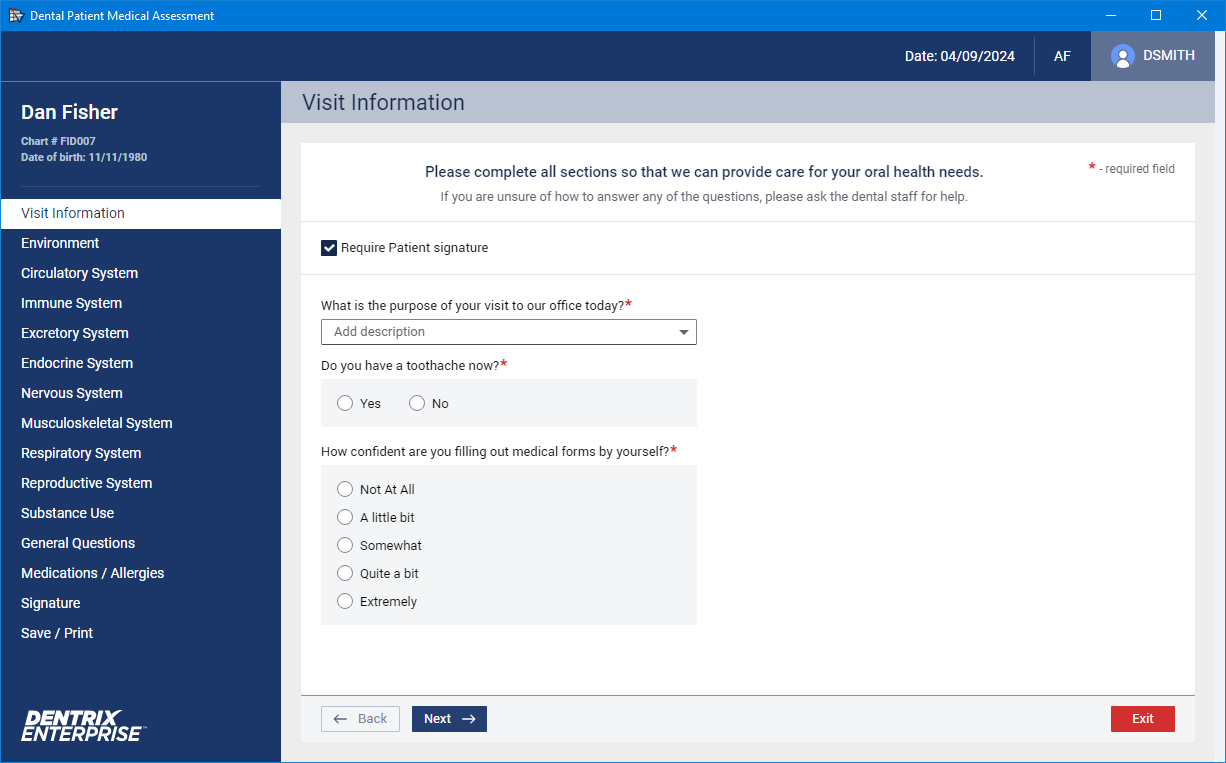
This window includes the following:
The current date, the clinic that you are logged in to, and your user ID.
The patient’s name, chart number, and birth date.
The sections of the assessment. With a section selected on the navigation bar, the corresponding options are available.
Notes:
To navigate between sections of the assessment, click Next or Back as needed, or select a section on the navigation bar.
If you attempt to navigate to another section before answering all required questions in the section that you are currently viewing, Dentrix Enterprise helps you easily identify missing required information.
If you click Next or Back.
![]()
If you click another section and then click No on the message (or X to close the message) that appears.
![]()
You stay on the current section, the fields are outlined in red, and red text "Required" appears. Additionally, if the first unanswered required question is not visible, the form scrolls automatically to that field.
![]()
If you leave an incomplete section, you can return later to continue where you left off without losing information.
All required questions must be answered; otherwise, you and the patient (if applicable) cannot sign the assessment.
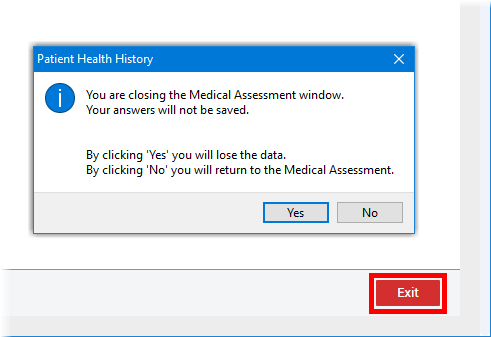
If you click Exit to close an assessment, and there are unsaved changes, a confirmation message appears and allows you to either exit without saving or return to the assessment.
Complete the Visit Information section, and then click Next.
Complete the Environment section, and then click Next.
With the Circulatory System section, do one of the following:
If this is the first assessment being completed for the patient, or if there are changes in the patient's health history since his or her previous assessment, complete the Circulatory System section, and then click Next. Then, proceed to the next step.
If an assessment has been completed previously for the patient, and there are not changes in the patient's health history since his or her previous assessment, click No Updates to load the data from the previous visit's form into the Circulatory System section and the remaining sections (except Signature). You are automatically taken to the Signature section. Skip to step 15.
Note: Even if you click No Updates, before signing the form, you can navigate to any of the sections as needed to make changes.
Complete the Immune System section, and then click Next.
Complete the Excretory System section, and then click Next.
Complete the Endocrine System section, and then click Next.
Complete the Nervous System section, and then click Next.
Complete the Musculoskeletal System section, and then click Next.
Complete the Respiratory System section, and then click Next.
Complete the Reproductive System section, and then click Next.
Complete the Substance Use section, and then click Next.
Complete the General Questions section, and then click Next.
Complete the Medications / Allergies section, and then click Next.
Complete the Signature section, and then click Next.
In the Save / Print section, save a copy of the assessment as a .pdf file in a folder and/or in the patient’s Document Center record, and then click Finish & Save.