Providing treatment consent forms
You can present a treatment plan case to a patient and provide details of the case in an online form or on a printed copy for the patient to view. In addition to providing details of the case, the online form or printed copy will have one of the financial disclaimers (Insured/Uninsured Disclaimers), the Consent for Dental Treatment message, and any applicable custom treatment consent messages.
To document that the patient was provided the necessary information before giving his or her consent, the provider can digitally sign the treatment plan. Also, to document that someone witnessed the informed consent, a staff member or another provider can digitally sign the treatment plan. Once the patient has looked over the treatment plan and has read and understands the disclaimer and any treatment consent messages, if he or she wants to have the recommended treatment performed, he or she can sign the online form or printed copy (if a signature line is provided) to indicate acceptance of the treatment plan.
Note: Be aware of the following regarding the signatures of the provider and witness on a printed treatment plan or on a form that is sent electronically:
-
If the provider digitally signs and then prints the treatment plan, "Signed on: [dd/mm/yyyy]" appears above the Provider Signature line.
-
If the provider digitally signs and then electronically sends the form, "Signed by [Provider's first and last name] on [dd/mm/yyyy]" appears at the bottom of the form.
-
If the witness digitally signs and then prints the treatment plan, only the Witness Signature line appears. A statement regarding the signature does not appear.
-
If the witness digitally signs and then electronically sends the form, the Witness Signature line and a statement regarding the signature do not appear.
To provide a consent for treatment form to a patient
-
If the correct patient is not already selected, use the Patient Search box to access the patient's record.

-
Do one of the following:
-
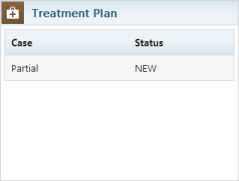
If the patient's Overview page is not already open, on the Patient menu, under General, select Overview. The patient's Overview page opens. Click (or tap) the Treatment Plan box.
-
On the Patient menu, under Clinical, select Treatment Planner.
The patient's clinical record opens with the Tx Planner tab selected.
-
-
Under Active, select a case.
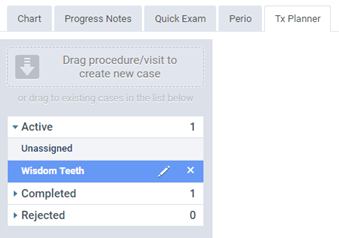
The recommended treatment for the selected case appears.
-
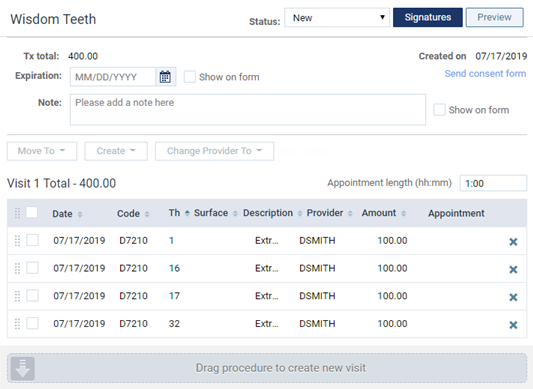
To indicate that the provider is providing the patient with a consent form, click (or tap) Signatures.

The Signatures for [case name] dialog box appears.
-
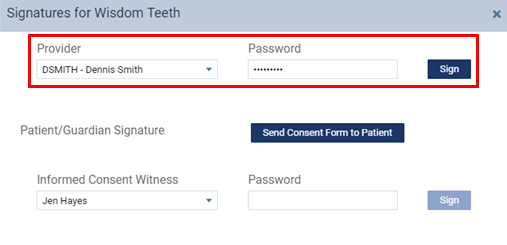
Select the correct Provider (only providers who have access to the current location are available), have the provider enter his or her Password, and then click (or tap) Sign.
-
To send the consent form for this case to the online patient forms portal, click (or tap) Send consent form. (Ignore steps 11-13.)
The Request Forms dialog box appears.
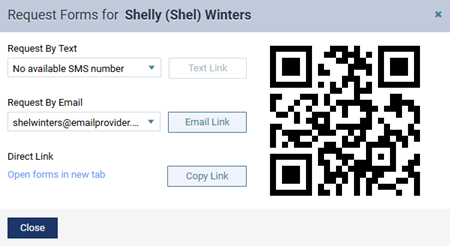
-
Do one of the following:
-
To send the portal link to a mobile phone number, select the desired number from the list, and then click (or tap) Text Link. This button is available only if the patient has a mobile phone number entered in his or her record. The mobile phone numbers of the patient and his or her primary contact are available for selection.
-
To send the portal link to an email address, select the desired address from the list, and then click (or tap) Email Link. This button is available only if the patient has an email address entered in his or her record. The email addresses of the patient and his or her primary contact are available for selection.
-
To copy the portal link to the Window Clipboard, click (or tap) Copy Link. You can then paste the link in a document or email message for the patient
-
To open the patient's portal on another tab of your Web browser (for instance, if you are opening it on a practice-owned mobile device that the patient can use to complete forms in the office; be sure to close any other Dentrix Ascend tabs before giving the device to the patient), you can click (or tap) the Open forms in new tab link.
-
To access the patient's portal link on a mobile device, use the camera on that device to scan the QR code, and then tap the link that appears on the mobile device.
Important:
-
Since using a mobile device to scan a QR Code to open a patient's portal registers that mobile device with Dentrix Ascend, you should use a mobile device that is owned by your practice.
-
Using a QR code requires that your mobile device meet the following specifications: for an Apple device, iOS 11 and the Safari browser; or for an Android device, Android 4 or newer and the Chrome browser.
-
-
-
Close the Request Forms dialog box.
-
Close the Signatures for [case name] dialog box.
-
The patient accesses his or her online portal to view and sign the form.
The patient does the following:
-
The patient (or the patient's representative) clicks the link in the text message (or button in the email message) he or she receives.
-
The patient does one of the following:
-
If the patient is accessing the patient forms portal from an email message, he or she does the following:
-
The system generates a unique six-digit OTP and sends it to the patient’s email address (if the patient is his/her own primary contact) or the email address of the patient’s primary contact (if someone else is the patient’s primary contact). The patient opens the email message with the verification code (OTP).
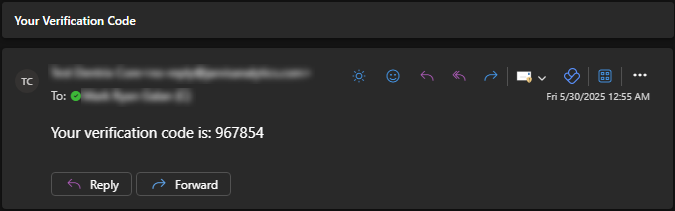
Note: The OTP is valid for two hours.
-
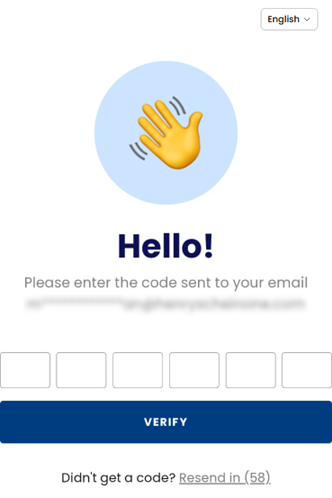
In the patient forms portal, the patient enters the OTP and then clicks (or taps) Verify.
Notes:
-
The patient has three attempts to enter a given OTP correctly.
-
After three failed attempts, or if the OTP has expired, the patient can request a new OTP:
-
The patient can request a new OTP up to three times per form access session (per unique link click leading to an authentication attempt).
-
Requesting a new OTP invalidates any OTP sent previously for that session.
-
Each new OTP is valid for two hours.
-
-
-
-
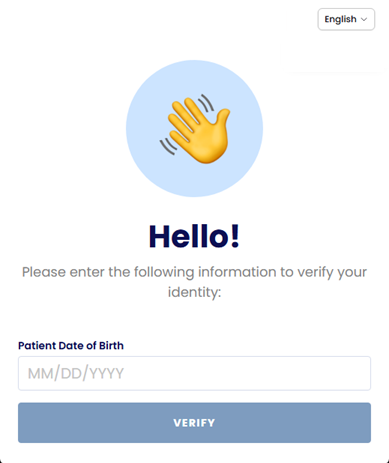
If the patient is accessing the patient forms portal from a text message, he or she does the following:
-
In the patient forms portal, the patient enters his or her birth date and then clicks (or taps) Verify.
-
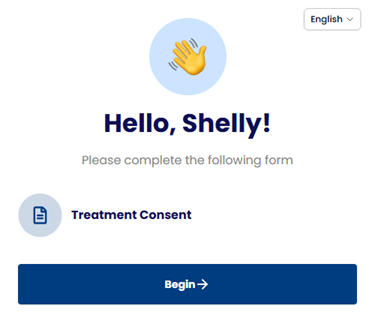
The patient portal displays "Treatment Consent."
-
-
The patient clicks (or taps) Begin.
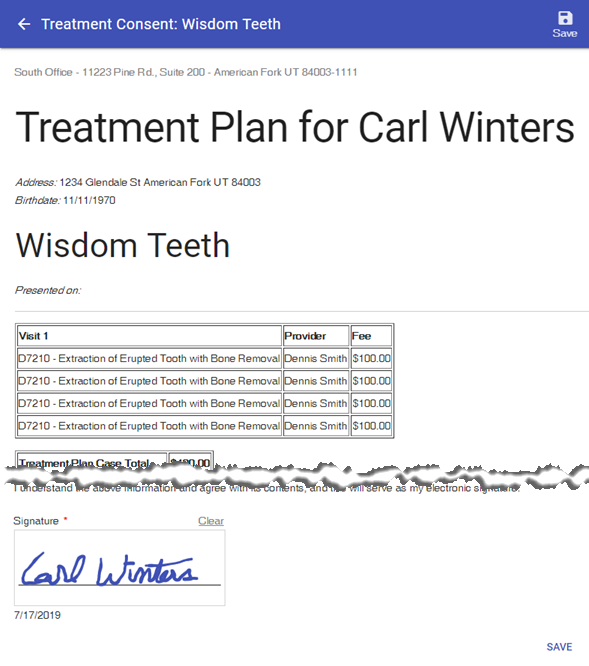
The Treatment Plan for the patient appears.
-
The patient looks over the treatment plan, reads the financial disclaimer and any treatment consent messages.
-
In the Signature area, the patient signs his or her name using a mouse or a finger (on touch-enabled devices only).
-
The patient clicks (or taps) Submit.
When the patient signs the consent form, the case Status automatically changes to "Accepted," and the date that the consent form was signed appears for your reference.

-
-
To indicate that another provider or staff member witnessed the informed consent, click Signatures.
The Signatures for [case name] dialog box appears and displays the provider's digital signature and the date that the patient signed the consent form.
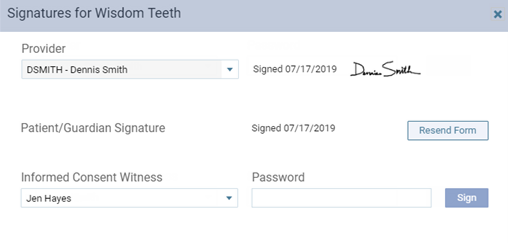
Note: If you need to resend the consent form, you can click (or tap) Resend Form.
-
Select the correct Informed Consent Witness, have the person enter his or her Password, and then click (or tap) Sign.
-
Close the Signatures for [case name] dialog box.
-
To have the patient sign a printed copy of the treatment plan (only if the patient did not sign the treatment consent form online), click (or tap) Preview, and then print the treatment plan with the signatures of the provider and witness. Have the patient look over the treatment plan, read the financial disclaimer and any treatment consent messages, and then sign the printed copy.
-
To indicate that the patient accepts the entire case (only if the patient did not sign the treatment consent form online), click (or tap) Back to Treatment Planner, and then select Accepted from the Status list.
-
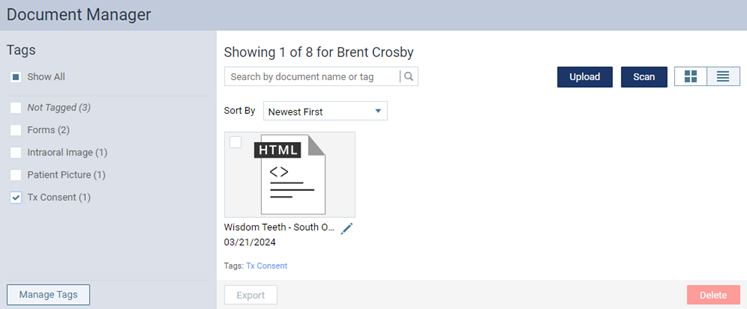
To save a copy of the printed treatment consent with the patient's signature (only if the patient did not sign the treatment consent form online), scan the signed treatment consent into the patient's Document Manager.
-
To view the treatment consent form that the patient signed online, do any of the following:
-
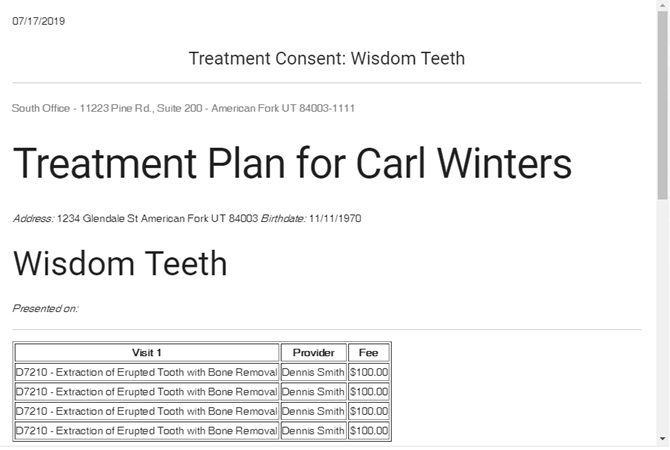
While viewing the case, click (or tap) the Consent form received on [date] link.
-
On a patient's Document Manager page, click (or tap) a document that has a "Tx Consent" tag.
-
In the Patient Forms section of a patient's Patient Information page, expand the Treatment Consent section, and then click (or tap) the treatment consent form.
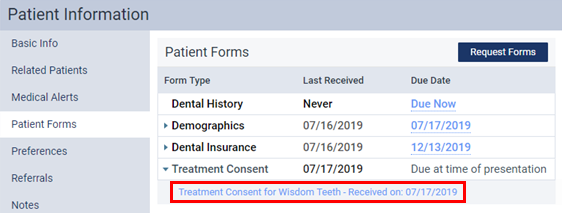
The Treatment Consent appears either in a dialog box or on a new browser tab.
-