Because you can link so many tasks and transactions in a dental office to an ADA procedure, Dentrix provides a Procedure Code Editor where you can customize certain criteria, such as fees, treatment area, names, and paint types, to fit the needs of your practice if the default settings are not sufficient.
To edit an ADA-CDT dental code
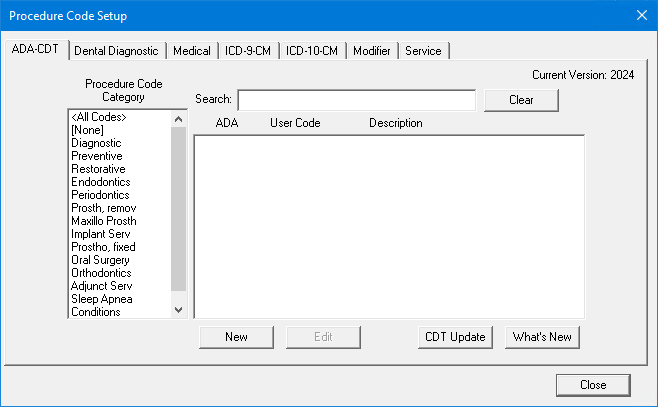
1. In the Office Manager, click Maintenance, point to Practice Setup, and then click Procedure Code Setup.
The Procedure Code Setup dialog box appears.
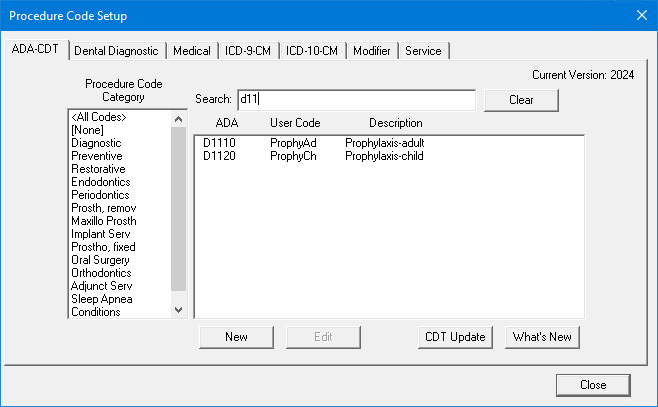
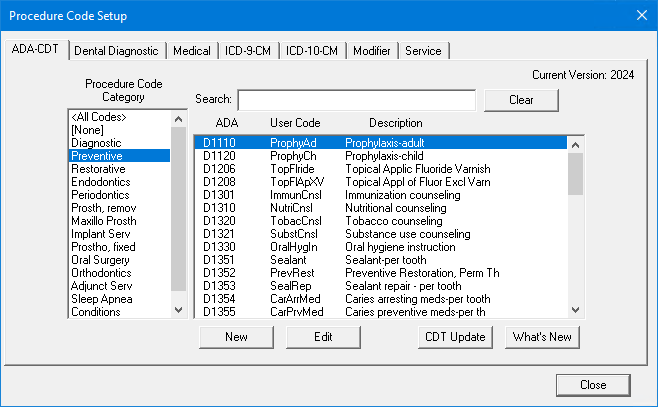
2. To edit a procedure code, do one of the following, and then select the desired code from the resulting list:
Type the first few characters of the ADA code, user code, or description in the Search text box.
Select a category under Procedure Code Category.
All procedure codes associated with that category appear in the right pane.
3. Select the procedure that you want to edit, and then click Edit.
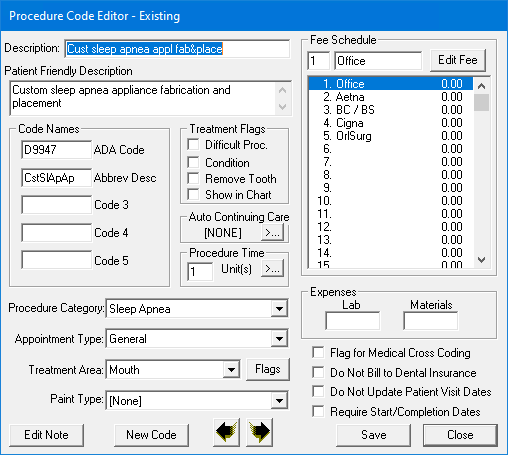
The Procedure Code Editor dialog box appears.
4. Do one or more of the following:
Description - Type a description for the procedure code.
Note: The procedure description appears in most Dentrix modules, on insurance claims, billing statements, and various reports. Descriptions are included with each default procedure and abbreviated as necessary.
Patient Friendly Description - Type a new or edit the existing description.
6. Under Treatment Flags, select one of the following to indicate how Dentrix handles the procedure:
Difficult Proc - Helps you create a quick, end-of-day call list. Dentrix adds an asterisk (*) next to a patient's phone number in the Day Sheet report if the patient has a procedure flagged as difficult posted to his or her chart.
Condition - Allows you to use the procedure codes to indicate the state of a patient's mouth. Dentrix posts conditions to the Patient Chart but not to the Ledger and does not associate a fee with a condition. Dentrix has already flagged procedures 15000 - 15115 as conditions. You can add conditions as needed.
Remove Tooth - Removes a selected tooth from the graphic Patient Chart when you post the flagged procedure as complete. The applicable Dentrix procedures, such as extractions, missing teeth, and so forth, have been flagged already.
Note: The Remove Tooth flag toggles between selected, cleared, and unavailable. The unavailable option is internal to Dentrix and must not be assigned manually to a procedure. You cannot leave the Remove Tooth option in the unavailable state. You must either select or clear the option to save your changes and exit the Procedure Code Editor.
Show in Chart - Select to list the procedure code under the corresponding category in the Patient Chart if the procedure code you are editing is commonly used in your office.
Note: If you make a change to a procedure code while the Patient Chart is open and then return to the Patient Chart and find that the change to the procedure code is not reflected, click Refresh from the File menu in the Patient Chart.
7. Do the following:
Auto Continuing Care - Attach a Continuing Care type.
Procedure Time - Set a procedure time.
Procedure Category - Select the appropriate category from the list.
Appointment Type - Select the appropriate type from the list.
Treatment Area - Select the area that the procedure applies to when you chart or enter it for a patient, and then click Flags to set a treatment area flag.
Paint Type - Select a paint type to indicate how Dentrix will paint the procedure on the tooth in the Patient Chart when you recommend or complete the procedure.
Note: You can customize paint types to fit the needs of your practice. To learn more, click Customizing paint types.
Fee Schedule - Assign a fee schedule.
Expenses - Do one or more of the following:
Lab - Type a lab expense for the procedure, if applicable.
Note: Dentrix uses this value for reference and prints it on the Procedure Code list. Dentrix does not include a lab expense with any default procedure. If necessary, you must add lab expenses when you install Dentrix.
Materials - Type a materials expense for the procedure, if applicable.
Note: Dentrix uses this value for reference and prints it on the Procedure Code list. Dentrix does not include a materials expense with any default procedure. If necessary, you must add materials expenses when you install Dentrix.
Flag for Medical Cross Coding - Select to bill the procedure to the patient's medical insurance.
Note: You can bill flagged procedures only to medical insurance.
Do Not Bill to Dental Insurance - Select to exclude the procedure from insurance claims.
Note: Selecting this option also prevents the procedure code from appearing on the Procedures not Attached to Insurance report.
Require Start/Completion Dates - Select to require start and completion dates for a course of treatment, such as crowns, dentures, and so on.
8. Click Edit Note to edit a procedure code note.
9. Click Save.
10. Do one of the following:
Click the Previous or Next buttons (left and right arrows respectively) to move to the next procedure numerically.
Click New Code to add a new procedure with the current procedure's category already selected.
11. Click Close.
The Procedure Code Setup dialog box appears.
Note: When you complete the last procedure in a category, click Close to save the information you just entered. Select the next category from the Procedure List.
12. Close the Procedure Code Editor and Procedure Code Setup dialog boxes.