

|
General tab (Patient Information Center)
You can access an overview of a patient's account information on the General tab of the Patient Information Center. On the General tab, you can view and update general information for a patient. The General tab is selected by default when you open the Patient Information Center.

The General tab consists of the following sections:
|
· Billing · Tracking |
Demographics
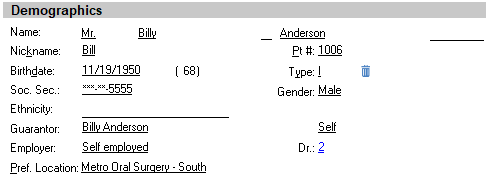
The demographics section provides the following options:
· Prefix - Select a prefix or title: Mr., Ms., Mrs., Dr., Fr., Sr., or Hon. To clear a previous selection, open the list, and then press the Backspace key. If you type your own prefix manually, you can type up to five characters.
· First name - Type the first name of the patient. This field has a limit of 20 characters. The patient is in collections if the backgrounds of the name fields and lists are red.
· Middle initial - Type the middle initial of the patient.
· Last Name - Type the last name of the patient. This field has a limit of 30 characters.
· Suffix - Select a suffix/title: Jr., Sr., III, IV, M.D., D.D.S., or D.M.D. To clear a previous selection, open the list, and then press the Backspace key. If you type your own prefix manually, you can type up to six characters.
· Nickname - Type the patient's nickname, which will be used in correspondence. This field has a limit of 40 characters.
· Pt # - Type the patient number. The value can also be assigned automatically, according to the auto-numbering preference setting for registering patients. This field has a limit of 15 characters.
· Birthdate - Type the patient's birth date in a mm/dd/yyyy format.
· Type - Select a patient type.
· Soc. Sec. - Type the patient's Social Security number. With a certain preference setting enabled, if you try to change the Social Security number to one that already exists, a message appears and states that the number is already in use; the name and Social Security number of the patient using that Social Security number are shown in the message; and the number you were trying to change goes back to the original number.
· Gender - Select the gender of the patient.
· Ethnicity - Select the patient's ethnicity.
· Guarantor - Double-click in this field, or click the corresponding Change button to open the Patient Lookup dialog box, from which you can look up, select, and paste in the name of the person responsible for the patient's balance. If the guarantor you are trying to paste in is not listed, you can add the person as a new guarantor.
· Relation - Select the patient's relationship to the guarantor: Self, Spouse, Parent, Child, Employer, Gov't. Agency, Friend, or Stepparent.
· Employer - Type the patient's employer or school. You can also double-click in the Employer field or click the corresponding Change button to open the Employers Table dialog box, from which you can look up, select, and paste in an employer name.
· Dr. - Double-click in this field, or click the corresponding Change button to open the Providers dialog box, from which you can look up, select, and paste in the provider number of the doctor assigned to the current patient.
· Pref. Location - The office location you prefer to visit for patient care.
Contact Information
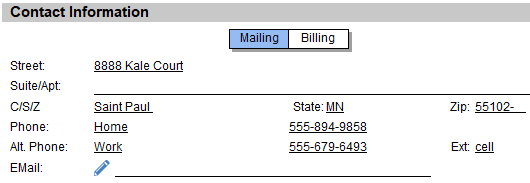
The Contact Information section provides the following options:
· Mailing - This option is selected by default. Type the mailing address for the patient. In the first two fields, type the street address, post office box, and/or apartment/suite number (if applicable). The maximum lengths for the address fields are 50 characters each. Then, type the city, state (in Canada, province), and ZIP Code (in Canada, postal code). You can also double-click the ZIP Code (or postal code) field to select and paste in a ZIP Code (or postal code); the city and state or (province) fields will be populated automatically. (Recall cards are sent to the mailing address.)
· Billing - Click this option to change the billing address if different from the mailing address. Type the billing address for the patient. In the first two fields, type the street address, post office box, and/or apartment/suite number. The maximum lengths for the address fields are 50 characters each. Then, type the city, state (in Canada, province), and ZIP Code (in Canada, postal code). You can also double-click the ZIP Code (or postal code) field to select and paste in a ZIP Code (or postal code); the city and state or (province) fields will be populated automatically. (Statements are sent to the billing address.)
Note: If the mailing or billing address are changed so that they are not the same, a message appears for you to verify that you want to keep them the same. Click Yes to keep the addresses identical or No to allow them to be different.
· Phone - Select the phone number type that is associated with the mailing or billing address (whichever is currently selected, as explained previously): Business, Emergency, Home, Work, Mobile, Cell, Pager, or FAX. Type the phone number and extension, if applicable. This phone number carries over to the Communications tab.
Note: If the phone number for the mailing or billing address is changed so that they are not the same, a message appears and asks if you want to keep them the same. Click Yes to keep the phone numbers identical or No to allow them to be different.
· Alt. Phone - You can set up an additional phone number for the mailing or billing address (whichever is currently selected). This phone number carries over to the Communications tab.
· Email - Type the patient's email address. This field has a limit of 60 characters. Also, you can click Send email to open your MAPI-compliant email program from which you can compose and send an e-mail message from the office to the email address entered.
Provider and Referral
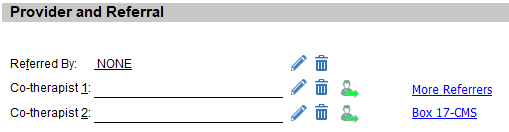
The Provider and Referral section provides the following options:
· Referred
By - Double-click in this field to look up, select, and paste in the
patient's referral source from the table of referrers. You can click the
Lookup button  to edit the referrer's information in the Edit Referrer dialog
box. You can click the Remove
button
to edit the referrer's information in the Edit Referrer dialog
box. You can click the Remove
button  to clear any
previous selection.
Also, you can select the Office
with which the referrer is associated. When merging a letter with a merge
field for a referrer's location, the location of the referrer selected
in the Office
list is inserted in the document instead of the main location (the first
tab in the Edit
Referrer
dialog box), if different.
to clear any
previous selection.
Also, you can select the Office
with which the referrer is associated. When merging a letter with a merge
field for a referrer's location, the location of the referrer selected
in the Office
list is inserted in the document instead of the main location (the first
tab in the Edit
Referrer
dialog box), if different.
· Co-therapist
1 - Double-click in this field to look up, select, and paste in another
professional who is working with this patient from the table of co-therapists.
You can click the Lookup button to edit the co-therapist's information
in the Edit Co-therapist dialog box. Click the Remove
button to clear any previous
selection. Also, you can click the Refer
Out button  to open the Referrals To dialog box to track the outbound
referrals for the current patient. The Refer
Out button has a red arrow instead of a green arrow if an outbound
referral is attached to the current patient.
to open the Referrals To dialog box to track the outbound
referrals for the current patient. The Refer
Out button has a red arrow instead of a green arrow if an outbound
referral is attached to the current patient.
· Co-therapist
2 - Double-click in this field to look up, select, and paste in another
professional who is working with this patient from the table of co-therapists.
You can click the Edit button to edit the co-therapist's information in
the Edit Co-therapist dialog box. Click the Remove
button to clear any previous
selection. Also, you can click the Refer
Out button to open the Referrals
To dialog box to track the outbound referrals for the current patient.
The Refer Out button has a red
arrow instead of a green arrow if an outbound referral is attached to
the current patient.
· More Referrers - Click this button to add additional referrers to the patient. You can also delete additional referrers and access additional referrers' information (in their respective Edit Referrer dialog boxes). Additionally, you can send letters to multiple referrers. The text of the More Referrers button is red if additional referrers have been attached to the patient's record.

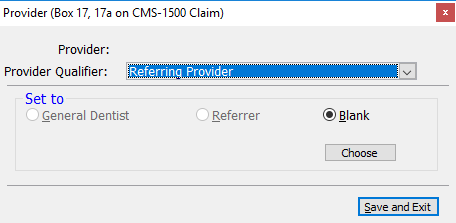
· Box 17-CMS - Click this button to select what shows in box 17 and 17a on medical claim forms. Next to Provider Qualifier, select Referring Provider, Ordering Provider, or Supervising Provider. Under Set to, select General Dentist, Referrer, or Blank; or click Choose to paste in a referrer from the referrer table. Then, click Save and Exit.
Billing

The Billing section provides the following options:
· Balance - The total balance for services billed to this patient, including patient and insurance portions.
· Patient - The portion of the balance that the patient is responsible for.
· Insurance - The portion of the balance that is estimated to be covered by insurance.
· Last Statement - Click the Log/Print button to open the Statement Log dialog box, from which you can view a list of statements that have been sent to the current patient or to generate a print preview of a statement by clicking the Print Quick Statement link at the top of the Statement Log dialog box. (Only statements that were generated with the Log to patient ledger option selected show in the statement log.)
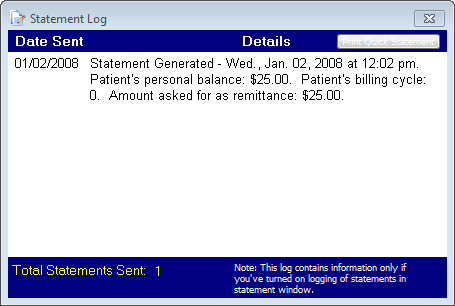
· Date Sent - The date the last statement was sent.
· Amount - The amount of the last statement sent.
· Payment Plan - If this check box is selected, the patient has a payment plan. Click Change to edit or create a payment plan.
· Billing Cycle - The patient's billing cycle or the frequency of payments.
· Aging - The total balance appears next to the appropriate range of days to indicate the age of the balance: 0-30, 31-60, 61-90 or 90+.
· Contract Plan - If this check box is selected, the patient has a contract plan. Click Change to edit or create a contract plan.
Tracking
![]()
The Tracking section provides the following options:
· Registered - The date the patient was registered with the practice. To change the date, click the box arrows after selecting the month, day, or year to increase or decrease the value.
· Last Appt - The date of the patient's last appointment. To change the date, click the box arrows after selecting the month, day, or year to increase or decrease the value.
· Treatment Plan - The green dot will light up and blink if the patient has an active treatment plan.
· Privacy Consent - The date that the privacy consent form was signed. To change the date, click the box arrows after selecting the month, day, or year to increase or decrease the value. You can set up a preference that controls the interval at which to update the date in the box.
· Medical
History - The date that the latest medical history was obtained.
Note: This date must be manually
entered in this field; it does not update automatically.
· Inactive Patient - Select this check box if you want to make the patient inactive. The check box is unavailable if the patient has a balance. When a message appears and asks if you want to inactivate all other patients on the current account without a balance or active contract plan, click Yes or No. When you inactivate a patient, the Control Panel of the Patient Information Center displays the message, "This Patient Account is Inactive!" if the patient is selected in the Patient Information Center. Inactive patients are highlighted in yellow in the Account Summary section.
If this patient is already inactive and you want to activate the patient account, clear the check box. When a message appears and asks if you want to activate all other inactive patients on the current account, click Yes or No.
Note: If you enable the Inactive Patient Reason option in General Preferences, you can run the Inactive Patient Report to view a list of all inactive patients. You can edit the inactive patient reasons used to filter this report.
· Date - The date the patient was inactivated.
· Reason - The reason the patient was inactivated.
· Appointment Book - Click this button to open the Appointment Book to the patient's next appointment.
· Cancellation Log - Click this button to view the patient's cancellation log on the Appointments tab of the Patient Information Center.
· HIPAA - Click this button to access or create a list of people with whom the patient has given approval for the office staff to discuss sensitive clinical and financial issues.
· Next Appt - The date of the patient's next appointment (if one has been scheduled) appears.
· Service - The appointment service for the next appointment (if one has been scheduled) appears.
· Fingerprint - If you have the Biometrics add-on enabled for this patient, click Scan or Don't Scan (the default).
Insurance
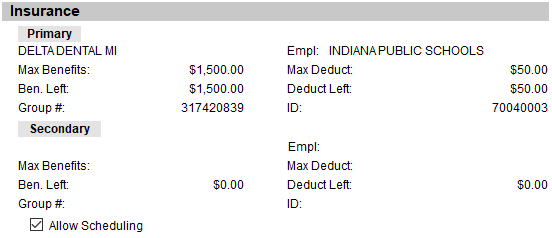
The Insurance section provides the following information:
· Prim. - The name of the primary insurance carrier.
· Max Benefits - The maximum annual benefits for the primary insurance profile.
· Ben. Left - The amount of unused benefits for the primary insurance.
· Group # - The group number for the primary insurance profile.
· Empl - The employer that the patient's primary insurance is through.
· Max Deduct - The maximum deductible for the primary insurance profile.
· Deduct Left - The amount of the deductible left for the primary insurance.
· ID - The patient's primary insurance identification number.
· Sec. - The name of the secondary insurance carrier.
· Max Benefits - The maximum annual benefits for the secondary insurance profile.
· Ben. Left - The amount of unused benefits for the secondary insurance.
· Group # - The group number for the secondary insurance profile.
· Empl - The employer that the patient's secondary insurance is through.
· Max Deduct - The maximum deductible for the secondary insurance profile.
· Deduct Left - The amount of the deductible left for the secondary insurance.
· ID - The patient's secondary insurance identification number.
Account Summary section
The Account Summary section displays each patient that is linked to the same guarantor as the patient being viewed, along with the following information: first name, last name, patient balance, insurance balance, total balance, due on date (when the patient is due for a recall), last recall date,next recall date, age, provider number (assigned in the blue section), and hygienist number (assigned on the Treatment Plans tab). The patient count, patient balance, insurance balance, and total balance for all the patients with the same guarantor as the patient being viewed, combined, are also displayed. Additionally, inactive family members are highlighted in yellow.

To switch between members of an account, double-click a name in the Account Summary section. The Patient Information Center changes accordingly.
To schedule appointments for some or all of the family members, click Family Scheduling.