

|
HIPAA button
You can add and delete entries from the list of approved contacts for discussing and viewing confidential patient information.
Adding contacts
You can add an entry to the list of approved contacts.
To add a contact
1. On the General tab, locate the Tracking section.
2. Click HIPAA.
The Patient HIPAA Contacts dialog box appears.
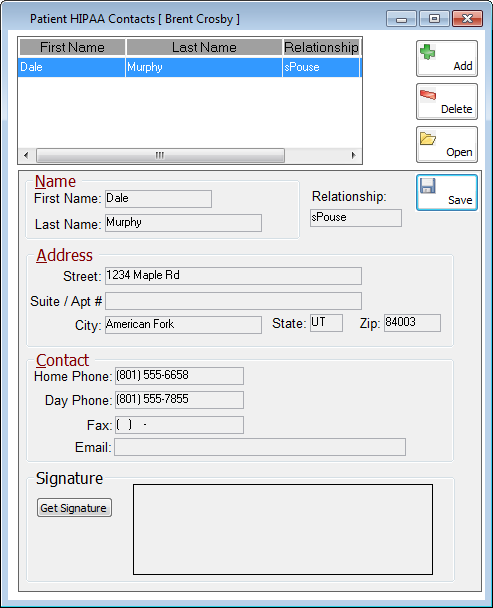
3. Click Add.
The bottom portion of the dialog box changes to a blank form.
4. Type the appropriate information:
· The first and last name of the person.
· The relationship of the person to the patient.
· The street address, the suite or apartment number, the city, the state, and the ZIP code of the person.
· The contact information of the person such as the home and day (work) phone numbers, fax number, and e-mail address.
5. Acquire a digitized signature of the person:
a. Click Get Signature to open the Signature Capture Tool.
b. Have the person use the stylus that comes with the signature pad to sign their name.
c. Click Accept to save the signature and close the dialog box. Click Erase to clear the entry if the person needs to re-sign. Click Cancel to close the dialog box without creating a digitized signature.
6. Click Save to add the person and his or her information and digitized signature to the list.
Note: If
there are any existing contacts in the Patient HIPAA Contacts dialog
box, the text on the HIPAA button is red  .
.
Deleting contacts
You can delete an entry from the list of approved contacts at any time.
To delete a contact
1. On the General tab, locate the orange section.
2. Click HIPAA.
The Patient HIPAA Contacts dialog box appears.
3. Select a name.
4. Click Delete.
A confirmation message appears.
5. Click Yes to permanently delete the entry.
Editing contacts
You can edit an entry in the list of approved contacts.
To edit a contact
1. On the General tab, locate the orange section.
2. Click HIPAA.
The Patient HIPAA Contacts dialog box appears.
3. Select a name.
4. Click Edit.
The form at the bottom of the dialog box becomes available.
5. Change the information as needed.
6. Click Save.
Need more help?
You can visit our website, contact OMSVision Customer Support, or suggest a new feature or improvement on User Voice.