Adding and editing a payment plan
You can set up and change financial arrangements for your patients.
To add or edit a payment plan
1. On the Financial tab, under Payment Plan, from the Change button menu, click Add or Edit.

2. If you are adding a payment plan, on the confirmation message that appears, click Yes to open the Edit Payment Plan dialog box. However, if you are editing an existing payment plan, the Edit Payment Plan dialog box opens without a message.

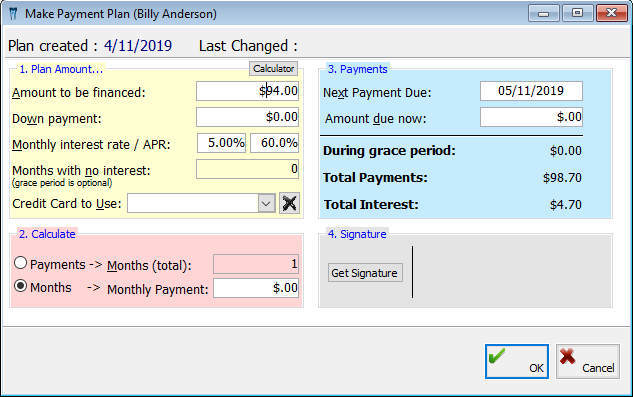
The dialog box displays the dates the plan was created and last changed.
Note: Click Calculator to open the Windows Calculator if you need it at any time.
3. Under 1. Plan Amount, set up the following options:
· Amount to be financed - Type the balance of the payment plan, minus the down payment in a $$,$$$,$$$.$$ format. By default, the field contains the patient's current balance.
· Down payment - Type the down payment for the payment plan in a $$,$$$,$$$.$$ format. This amount is not included in the principle.
· Monthly interest rate / APR - If you are to charge interest for this payment plan, type the interest rate to have the interest for each payment calculated automatically.
Note: Interest rate is different from a finance charge. If payments are not made on time and the balance meets the finance charge specification, the patient will receive a finance charge instead of an interest charge. Only those patients who are late on their payment will receive a finance charge statement.
· Months with no interest - Type the number of months during which interest will not be charged. The grace period is optional.
· Credit
Card to Use - Select a credit card that will be used for payments.
You can click the Remove button
 to clear any previous selection.
Note: If you are using Transaction Express, this option becomes Wallet to Use, and you can select a wallet from any family member to use for payment, and the name and billing address associated with the wallet will be used instead of the selected patient's billing information.
4. Under 2. Calculate, set up the following options:
· Payments - Click this button to calculate the payment amount, based on the number of months you enter in the Months (total) field, click this button.
· Months - Click this button to calculate the number of months for the payment plan, based on the monthly payment amount you enter in the Monthly Payment field.
5. Under 3. Payments, set up the following options:
· Next Payment Due - Type the date when the next payment is due in a mm/dd/yyyy format. The date defaults to a month after the payment plan was created.
· Amount Due Now - Type the amount due at this time in a $$$,$$$.$$ format. This amount is not included in the principle.
Note: The amount of the payment during the grace period when interest is not applied to the payment, the total amount of payments for this payment plan, and the total amount of interest for the payment plan appear for your reference.
6. Under 4. Signature, click Get Signature to acquire an electronic signature from the patient.
7. Click OK.
Need more help?
You can visit our website, contact OMSVision Customer Support, or suggest a new feature or improvement on User Voice.


