Viewing images for selected teeth
You can view images for selected teeth from a patient's clinical chart and progress notes.
To view images for selected teeth
-
If the correct patient is not already selected, use the Patient Search box to access the patient's record.

On the Patient menu, under Clinical, select Chart.
The patient's clinical record opens with the Chart tab selected.
-
Do one of the following:
-
Select one or more teeth with associated images, and then click (or tap) Image Peek. The button is available only if at least one tooth with an image is selected.

-
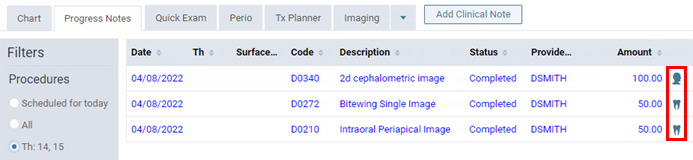
Select one or more teeth with associated images, and then select the Progress Notes tab. On the Progress Notes tab, click (or tap) the imaging icon next to a procedure.
-
Select one or more teeth with associated images, and then select the Quick Exam tab. On the Quick Exam tab, click (or tap) Image Peek (the button appears as a white tooth on a blue background
 if there is not enough room to display the button with a text label). The button is available only if at least one tooth with an image is selected.
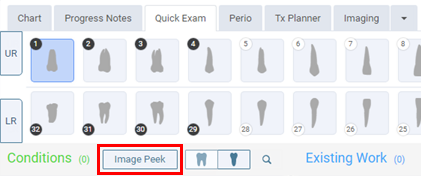
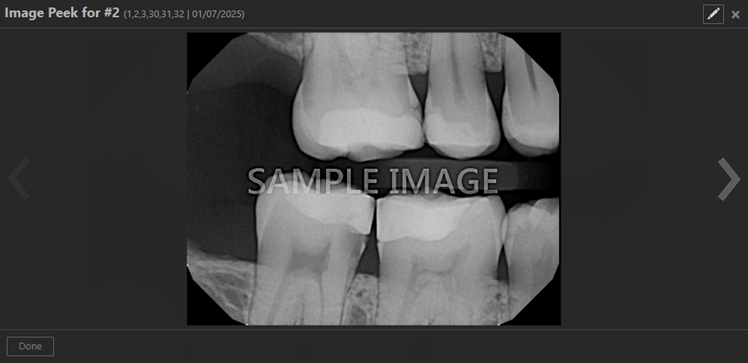
The Image Peek dialog box appears.
Notes:
-
If Dentrix Ascend Detect AI is activated, radiographic bone loss and caries indicators can appear on the image if the X-ray was submitted for analysis previously. You can hide and show findings and use the AIDE tool as needed.
-
If there are multiple images, use the Back and Forward buttons
 to navigate between the images.
 -
To edit the image that is currently being viewed, click (or tap) the Open for Editing button
 .
. -
The saved state of the Smaller/Larger button
 , which is available when you are viewing images, affects the size of images in the Image Peek dialog box. The state of the button is stored per computer (or device).
-
-
Click (or tap) Done.