Patient Clinical Report
The Patient Clinical Report displays information from a patient's clinical record for a specified date range.
Note: The printing of the report appears in the audit log.
To view and print the report
-
While viewing a patient's record, on the Patient menu, under Clinical, click (or tap) Print Clinical Report.
The patient's Patient Clinical Report page opens.
-
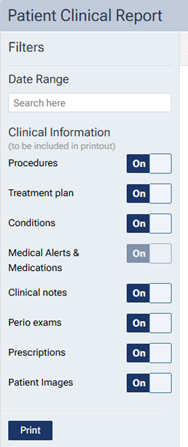
By default, the report will be generated for today's date. To specify a Date Range, click (or tap) in the Search here box, and then select Last 7 Days, This Month, Last Month, or Custom Range (select the starting and ending dates of the range).
-
Specify which clinical information you want to have appear on the report.
-
Procedures - Turn the switch On or Off to include procedures on or to exclude procedures from the report.
-
Treatment plan - Turn the switch On or Off to include treatment plan cases on or to exclude treatment plan cases from the report.
-
Conditions - Turn the switch On or Off to include conditions on or to exclude conditions from the report.
-
Medical Alerts & Medications - Active medical alerts and medications are always included on the report.
-
Clinical notes - Turn the switch On or Off to include clinical notes on or to exclude clinical notes from the report.
-
Perio exams - Turn the switch On or Off to include perio exams on or to exclude perio exams from the report.
-
Prescriptions - Turn the switch On or Off to include prescriptions on or to exclude prescriptions from the report.
-
Patient Images - Turn the switch On or Off to include images on or to exclude images from the report.
-
-
Set up the options on the following tabs (which correspond to each type of clinical information) as needed:
-
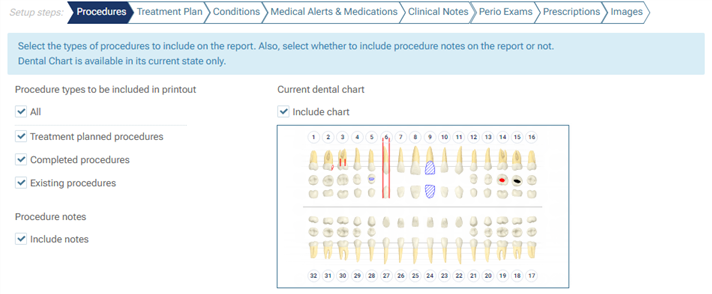
Procedures
If the Procedures switch is set to On, select the types of procedures that you want to include on the report: Treatment planned procedures, Completed procedures, and/or Existing procedures. Also, select or clear the Include notes checkbox to include procedure notes on the report or to exclude procedure notes from the report. Also, select or clear the Include chart checkbox under Current dental chart to include a graphic of the patient's current dental chart on the report (regardless of the specified date range for the report) or to exclude a dental chart graphic from the report.
-
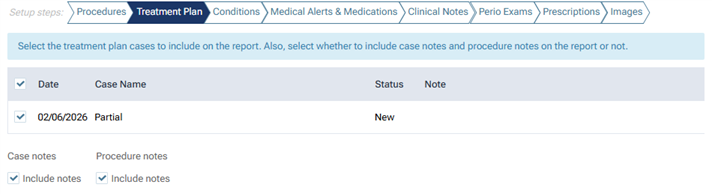
Treatment Plan
If the Treatment plan switch is set to On, select the treatment plan cases that you want to include on the report. The report displays the treatment-planned procedures by visit for each selected case. Select or clear the Include notes checkbox under Case notes to include case notes on the report or to exclude case notes from the report. Select or clear the Include notes checkbox under Procedure notes to include procedure notes on the report or to exclude procedure notes from the report.
-
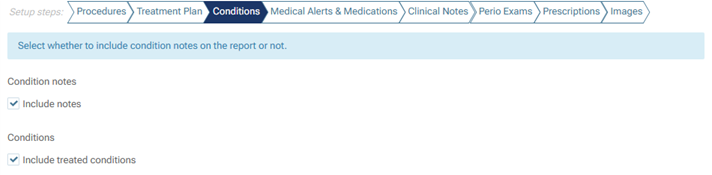
Conditions
If the Conditions switch is set to On, select or clear the Include notes checkbox to include condition notes on or to exclude condition notes on the report. Also, select or clear the Include treated conditions checkbox to include conditions that have been treated on the report or to exclude conditions that have been treated from the report.
-
Medical Alerts & Medications
Select or clear the Include expired checkbox to include expired medical alerts and medications on the report or to exclude expired medical alerts and medications from the report.

-
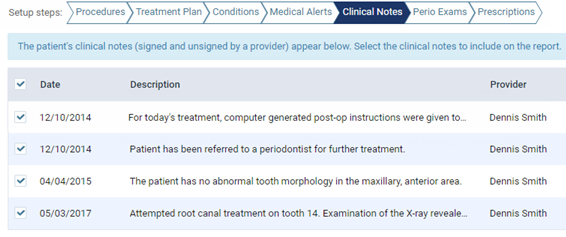
Clinical Notes
If the Clinical notes switch is set to On, select the clinical notes that you want to include on the report.
-
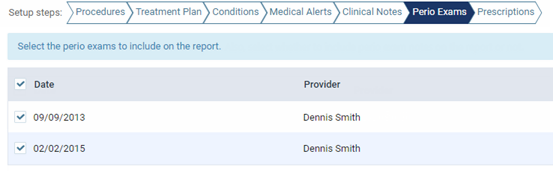
Perio Exams
If the Perio exams switch is set to On, select the perio exams you want to include on the report.
-
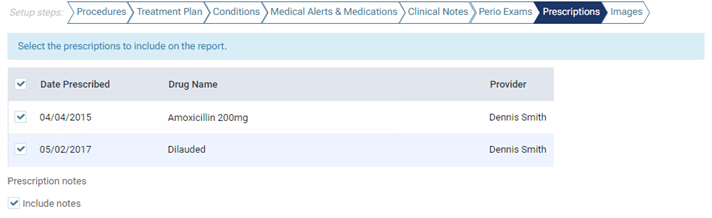
Prescriptions
If the Prescriptions switch is set to On, select the prescriptions that you want to include on the report. Also, select or clear the Include notes checkbox to include notes that have been added to the prescriptions on the report or to exclude notes that have been added to the prescriptions from the report.
-
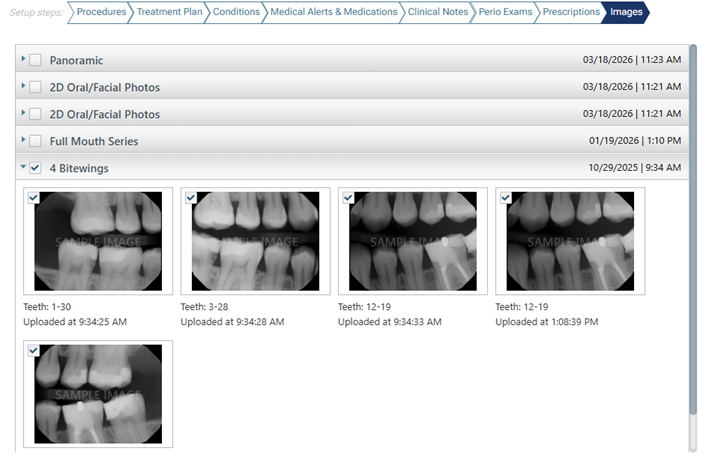
Images
If the Patient Images switch is set to On, do one of the following:
-
Select the checkbox of an imaging procedure. The procedure expands automatically to display the corresponding images. All images are selected for inclusion on the report. If necessary, clear the checkbox of any images that you want to exclude from the report.
-
Expand an imaging procedure to display the corresponding images. Select the checkbox of any images that you want to include on the report.
Repeat as needed to include other images on the report.
Notes:
-
If all the images for a procedure are selected, the images will appear together on the report (the entire series/set will be presented as one image). However, for any slot of the set/series with multiple images (images with the same assigned tooth numbers), only the top image of the stack will appear on the report.
-
If only some of the images for a procedure are selected, each image will appear separately on the report.
-
-
-
Click (or tap) Print.
A .pdf version of the report appears in a new browser tab or window. Also, a copy of the document is added to the patient's Document Manager.
Note: Each section of the report starts on a new page. After all the clinical information, a signature line for the patient and another for a provider or a staff member appear.
-
Using the browser's or the .pdf's printing tools, print the report. Alternatively, you can export the document from the patient's Document Manager and then print it.