Importing insurance information
With Dentrix Ascend Eligibility Essentials and Pro, after an eligibility verification, you can import deductible and benefit details, coverage exception details, certain plan settings (source of payment, coordination of benefits method, missing tooth clause, and crowns/bridges paid on) and/or the coverage table for a patient’s insurance plan.
Notes:
-
Insurance eligibility verification is available only for primary insurance plans.
-
The importing of insurance information from a supported payer can occur automatically if that functionality has been enabled for your location.
-
Dentrix Ascend does not import benefits from a response to an eligibility verification if benefits have not changed since the last import. The system will not prompt you to import benefit data when the data have not changed.
To import insurance information
-
Do one of the following:
-
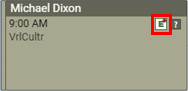
For an appointment tile on the Calendar page, if data are available for importing, the "E" icon is a green E with red dot on a white background. Click (or tap) the "E" icon.
-
For an appointment on the Insurance Eligibility page, if data are available for importing, an "E" icon (a green E with red dot on a white background) appears. Click (or tap) the "E" icon.
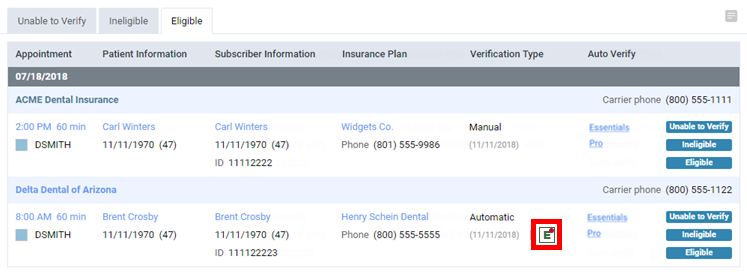
Note: The availability of the green "E" icon with a red dot is controlled by the "Import Insurance Benefit Details" security right (in the "Insurance" category).
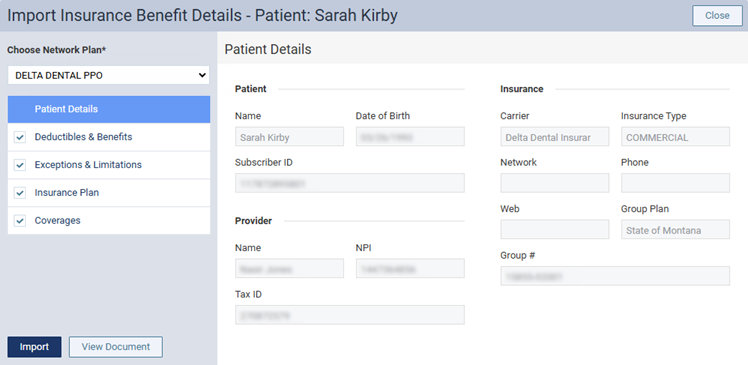
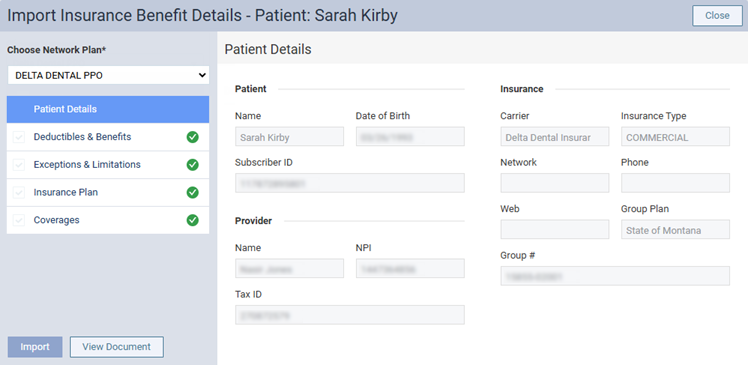
The Import Insurance Benefit Details page opens with the Patient Details displayed by default.
-
-
From the Choose Network Plan list, select the type of plan that corresponds to the correct network status (such as in-network or out-of-network).
Note: When eligibility results are received, the payer may include coverage information for more than one type of plan under its umbrella. Make sure you select the correct type of plan so the correct coverage details are imported.
-
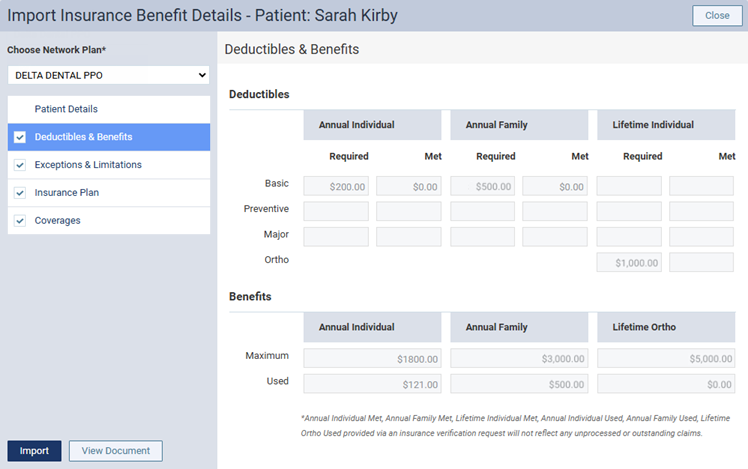
Select Deductibles & Benefits on the left to review the required and met deductibles and the maximum and used benefits.
-
Leave the checkbox next to Deductibles & Benefits selected if you want to import that data; otherwise, clear the checkbox.
-
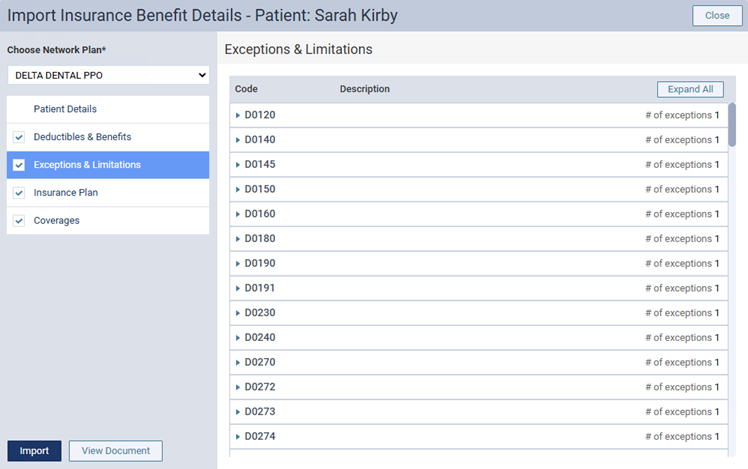
Select Exceptions & Limitations on the left to review the exceptions per procedure.
Notes:
-
The number of exceptions appears for each procedure in the list.
-
To collapse all exceptions at once, click (or tap) Collapse All.
-
To view the exceptions for a procedure and a description of each, click that procedure to expand it. An exception’s type can be one of "Frequency," "Age Limitation," or "Not Covered."

-
To expand all exceptions at once, click (or tap) Expand All.
-
-
Leave the checkbox next to Exceptions & Limitations selected if you want to import that data; otherwise, clear the checkbox.
-
Select Insurance Plan on the left to review the source of payment, coordination of benefits method, missing tooth clause, and crown/bridges paid on options.

-
Leave the checkbox next to Insurance Plan selected if you want to import that data; otherwise, clear the checkbox.
-
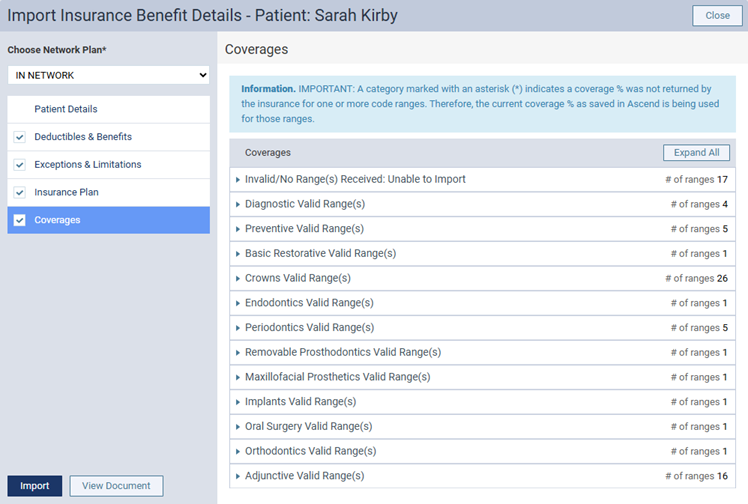
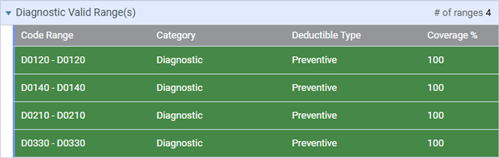
Select Coverages on the left to review the coverage table.
Notes:
-
The number of ranges appears for each category in the list.
-
To collapse all categories at once, click (or tap) Collapse All.
-
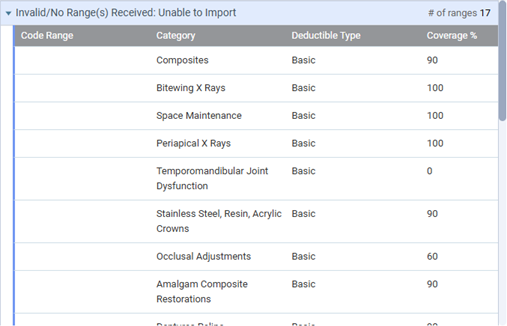
To view the ranges that cannot be imported, click Invalid/No Ranges(s) Received: Unable to Import to expand it.
-
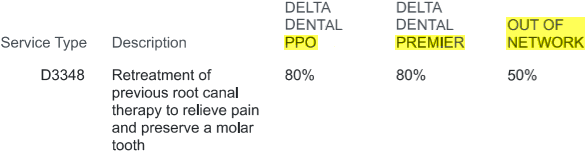
To view the ranges for a category, click that category to expand it. For each range, the starting and ending codes, category, deductible type, and coverage percentage appear. For each range, change any of the following as needed:
-
Deductible Type (select the correct type from the list).
-
Coverage % (enter a number from 0 to 100 in the box).
-
-
To expand all categories at once, click (or tap) Expand All.
-
-
Leave the checkbox next to Coverages selected if you want to import that data; otherwise, clear the checkbox.
-
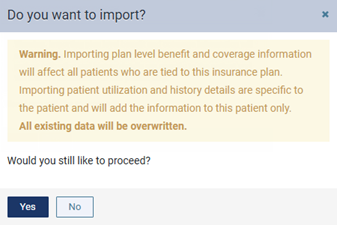
Click (or tap) Import.
A confirmation message appears.
Notes:
-
The plan-level deductible amounts (required amounts), benefit amounts (maximum amounts), and exceptions for the plan will be overwritten. This affects not only the current patient but all patients in any family who are covered by the plan.
-
The patient- and family-level deductible amounts (met amounts) and benefit amounts (used amounts) for the plan will be overwritten. This affects the current patient and any of his or her family members who are covered by the plan.
-
The coverage table, source of payment, and coordination of benefit method for the plan will be overwritten. This affects not only the current patient but all patients in any family who are covered by the plan.
-
-
Click (or tap) Yes.
When the import is successful, a green success message appears briefly, and a green checkmark icon appears next to Deductibles & Benefits, Exceptions & Limitations, Insurance Plan, and/or Coverages on the left.
-
Click (or tap) Close to return to the Calendar page.
The "E" icon on the appointment tile is now a white E on a green background
 . Also, if you started the import from the Insurance Eligibility page, you remain on that page, and the "E" icon (a green E with a red dot on a white background) no longer appears for the appointment.
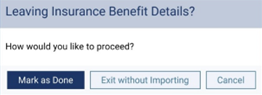
Note: If you click (or tap) Close prior to performing an import, a confirmation message appears so you can choose how to proceed. Click (or tap) one of the following buttons:
-
Mark as Done - You are returned to the Calendar page, and the "E" icon becomes a white E on a green background
-
Exit without Importing - You are returned to the Calendar page, and the "E" icon stays a green E with a red dot on a white background.
-
Cancel - You are returned to the Import Insurance Benefit Details page.
-