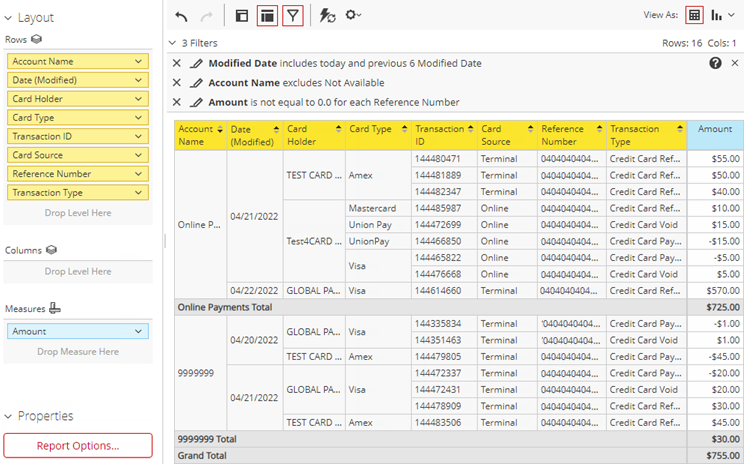
Credit Card Processed Payments Report
The Credit Card Processed Payments Report lists credit card payments (in-office or online) that have been posted, voided, or refunded within the past week using Dentrix Ascend Pay across multiple Worldpay accounts. You can use this report to help you reconcile credit card transactions in Dentrix Ascend with Worldpay reports.
Notes:
-
Transactions that have been processed in Dentrix Ascend appear on the Worldpay iQ and OmniFlex websites, but transactions that have been processed on the Worldpay OmniFlex website do not appear automatically in Dentrix Ascend. For every transaction that you process on the Worldpay OmniFlex website, enter the transaction in Dentrix Ascend, so the Dentrix Ascend reports match the Worldpay reports.
-
On the Worldpay iQ website (https://www.accessmyiq.com) and Worldpay OmniFlex website (https://www.virtualterminal.com), you can view transaction reports for Dentrix Ascend Pay. For questions regarding those reports, contact Worldpay customer service at (800) 846-4472.
-
Dentrix Ascend provides other reports that are not built exclusively for credit card transactions that have been processed using Dentrix Ascend Pay, but many reports in Dentrix Ascend include credit card payments, such as the Deposit Slip, the Payment Analysis Report, and any power report with payment type details.
Important: Differences between the Credit Card Processed Payments Report and the Integrated Payments Report:
|
Credit Card Processed Payments Report |
Integrated Payments Report |
|
Shows data for multiple Worldpay accounts at a time. |
Shows data for one Worldpay account at a time. |
|
Credit card payments are shown as negative values. |
Credit card payments are shown as positive values. |
|
Voids are shown as positive values. |
Voids are shown as negative values. |
|
Is customizable. |
Is not customizable. |
To generate the report
-
On the Home menu, under Reports, click (or tap) Power Reporting.
The Power Reporting page opens.
-
Click (or tap) the Credit Card Processed Payments icon.

The report appears.

-
The data from your database syncs with the reporting system automatically and displays the time of the last sync on the Data as of button. Data entered in Dentrix Ascend after the time shown will not be available on the report until the next sync. To view the time when the next sync is expected to occur, click (or tap) the Data as of button.

-
Using the analysis report builder tools, add data fields to the layout, and set up filters as needed.
-
To save the report as a template for later use, click (or tap) Save. In the Save Report dialog box that appears, enter a name for the report, select whether you want to save the report as one of your reports (available only to you) or as an organization report (available to all users), and then click (or tap) OK.


-
From the More actions and options button
 menu, click (or tap) an Export option to export the report as a .pdf, .xslx, or .csv file.