Adding credit cards on file
If you use Dentrix Ascend Pay for credit card payments, you can save credit cards on file (without having to post payments or create payment plans) as needed.
Notes:
-
Credit card information is not stored in Dentrix Ascend. It is stored by Worldpay for payment authorization. The information stored in Dentrix Ascend is a "tokenized" version of the data, which is a preferred method for in-app transactions. For an explanation of tokenization, see Credit Card Tokenization: What It Is, How It Works.
-
Viewing credit cards on file requires the "Review Saved Cards" security right. Managing credit cards on file requires the "Manage Saved Cards" security right.
-
After completing an online patient form, a patient can save a card on file with the office.
To add a credit card on file for an account
-
If the correct guarantor is not already selected, use the Patient Search box to access the guarantor's record.

-
Do one of the following:
-
On the Patient Information ribbon, click (or tap) the Edit Patient Information button
 .
.Note: If the ribbon is not visible, click (or tap) the arrow button below the Patient Search box.

-
On the Patient menu, under General, select Patient Information.
The guarantor's Patient Information page opens.

-
-
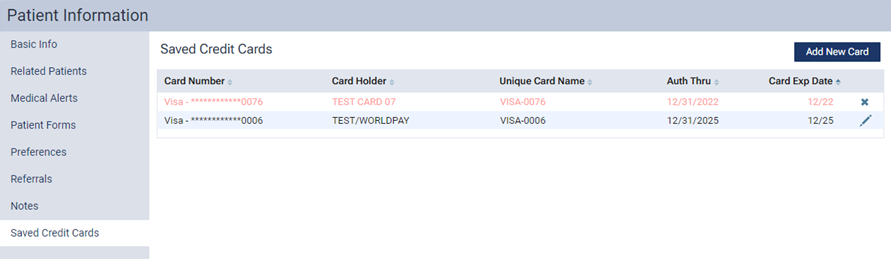
Select Saved Credit Cards on the navigation panel (on the left).
Note: You can manage cards on file only in a guarantor's record.
-
Do one of the following:
-
To add a card when the card is physically present, do the following:
-
Click (or tap) Add New Card.
The Add Credit Card dialog box appears.
-
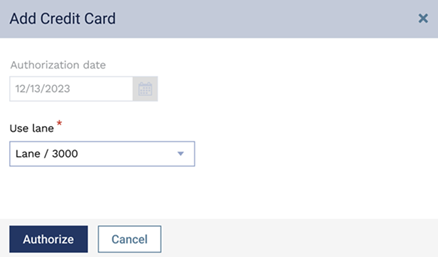
From the Use lane list, select the correct payment device.
-
Click (or tap) Authorize.
The Save Credit Card dialog box appears.
-
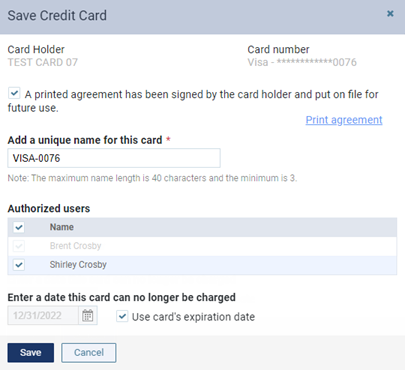
Set up the following options:
-
A printed agreement has been signed by the card holder and put on file for future use. - Selecting this checkbox acknowledges that a signed copy of the agreement will be provided to the guarantor and another will be kept on file.
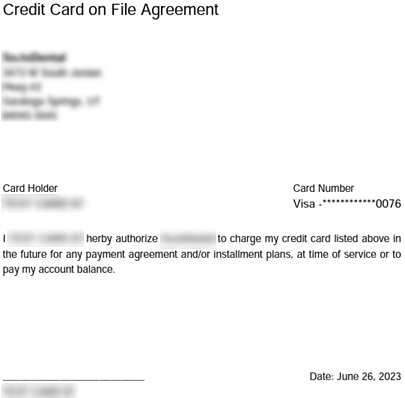
If you do not already have a signed agreement that authorizes you to charge the saved card, click (or tap) the Print agreement link to view the Credit Card on File Agreement on a new tab of your Web browser. Print the agreement, have the cardholder sign it, and then scan the document into the guarantor's record. Then, close the tab with the agreement to return to the tab with the Save Credit Card dialog box.
-
Add a unique name for this card - A unique name to identify the card in the future. The name can be three to 40 characters long.
-
Authorized users - The family members who are authorized to use this credit card for future payments. Because you can manage cards on file only in the guarantor's record, you cannot clear the guarantor's checkbox; however, you can select or clear any other family members' checkboxes as needed to respectively authorize or prohibit the use of this saved card by those patients for future payments.
-
Enter a date this card can no longer be charged - The date when you can no longer charge this card. Do one of following:
-
To use the expiration date of the card, select the Use card's expiration date checkbox.
-
To specify a date prior to the expiration date of the card, clear the Use card's expiration date checkbox, click in the date box, and then select the correct date on the calendar that appears.
-
-
-
Click (or tap) Save.
The credit card is added to the Saved Credit Cards list.
-
-
To add a card when the card is not physically present, do the following:
-
Click (or tap) Add New Card.
The Add Credit Card dialog box appears.

-
From the Use lane list, select Practice Pay (the virtual terminal).
-
Click (or tap) Authorize.
The Save Credit Card dialog box appears.

-
Enter the following card details:
-
Card Holder - The name on the credit card.
-
Card number (last 4) - The last four digits of the credit card number.
-
-
Set up the following options:
-
A printed agreement has been signed by the card holder and put on file for future use. - Selecting this checkbox acknowledges that a signed copy of the agreement will be provided to the guarantor and another will be kept on file.
Note: This checkbox is available only if the Card Holder and Card Number have been entered.
If you do not already have a signed agreement that authorizes you to charge the saved card, click (or tap) the Print agreement link to view the Credit Card on File Agreement on a new tab of your Web browser. Print the agreement, have the cardholder sign it, and then scan the document into the guarantor's record. Then, close the tab with the agreement to return to the tab with the Save Credit Card dialog box.
-
Add a unique name for this card - A unique name to identify the card in the future. The name can be three to 40 characters long.
-
Authorized users - The family members who are authorized to use this credit card for future payments. Because you can manage cards on file only in the guarantor's record, you cannot clear the guarantor's checkbox; however, you can select or clear any other family members' checkboxes as needed to respectively authorize or prohibit the use of this saved card by those patients for future payments.
-
Enter a date this card can no longer be charged - The date when you can no longer charge this card. Click in the date box, and then select a date on the calendar that appears.
-
-
Click (or tap) Save.
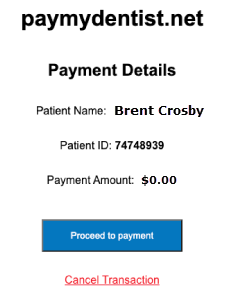
A paymydentist.net page opens on a new browser tab.
Notes:
-
The Payment Amount is $0.00 and cannot be changed. The credit card will not be charged; the system will only process a zero-dollar ($0) preauthorization.
-
The Practice Pay (virtual terminal) transaction will expire 10 minutes from the time that it is initiated, which means that you have to enter in the card information and complete the transaction within that time period.
-
-
Click (or tap) Proceed to payment.
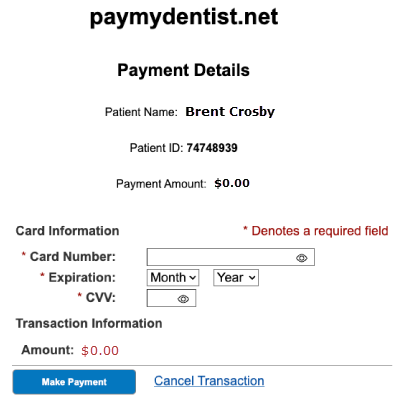
A summary of the payment details appears for your reference, and the options for entering credit card information appear.
-
Enter the Card Information:
-
Card Number
-
Expiration - Month and Year
-
CVV
-
-
Click (or tap) Make Payment.
When the transaction is processed successfully, a message appears.

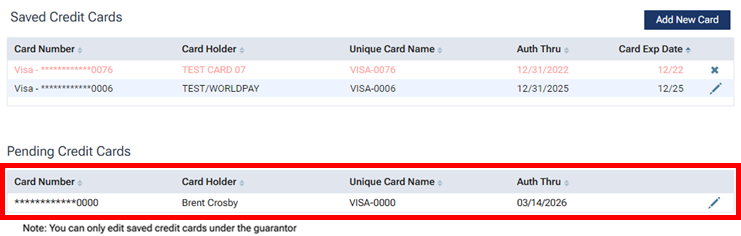
The credit card appears under Pending Credit Cards. Once Dentrix Ascend receives a notification from Worldpay that the authorization process is complete, the credit card will be added to the Saved Credit Cards list automatically.
-
-