Acquiring intraoral X-rays in Simple Mode
In the Modality view, there is a "Simple Mode" for acquiring intraoral X-ray images. This mode provides a streamlined acquisition workflow that includes simplified navigation, an interactive tooth chart, and device-based procedure buttons.
Note: When you use Simple Mode to acquire images, procedures are not posted to the patient's ledger.
To acquire intraoral X-rays
-
If the correct patient is not already selected, use the Patient Search box to access the patient's record.

-
On the Patient menu, under Clinical, select Chart, Progress Notes, Quick Exam, Perio, Tx Planner, or Imaging.
The patient's clinical record opens with the Chart, Progress Notes, Quick Exam, Perio, Tx Planner, or Imaging tab selected.
-
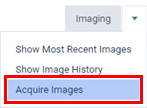
On the Imaging tab's menu, select Acquire Images.
Notes:
Alternatively, you can press Alt+X to start the acquisition process (instead of using the Acquire Images option on the Imaging tab's menu). To use this keyboard shortcut, you must be viewing the patient's clinical record (on the Chart, Progress Notes, Quick Exam, Perio, Tx Planner, or Imaging tab).
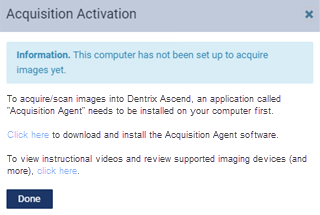
If the acquisition agent is not installed, the Acquisition Activation dialog box appears. Click (or tap) the Click here link to download the acquisition agent installer. Then, click (or tap) Done. After you install the acquisition agent and the drivers for your acquisition devices, you can begin acquiring images.
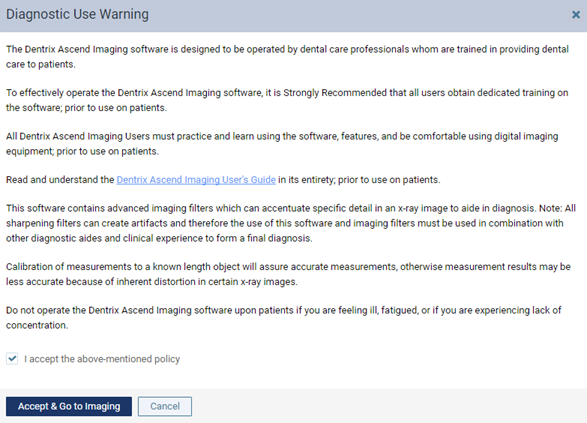
If you have not already accepted the diagnostic use policy, the Diagnostic Use Warning dialog box appears. To begin using the imaging features of Dentrix Ascend, you must select the I accept the above-mentioned policy checkbox, and then click (or tap) Accept & Go to Imaging.
The options for acquiring images become available.
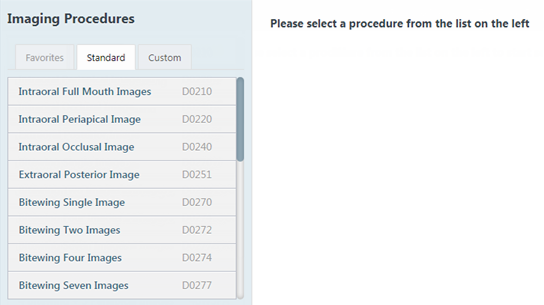
On the navigation panel, select one of the following tabs:
Favorites - This tab contains the imaging procedures for the current location that have been marked as favorites. This tab is available only if there are favorite imaging procedures for the current location. If there are favorite imaging procedures for the current location, this tab is selected by default.
Standard - This tab contains the standard imaging procedures that come with Dentrix Ascend Imaging. This tab is available for all locations. If there are not any favorite imaging procedures for the current location, this tab is selected by default.
Custom - This tab contains custom imaging procedures. This tab is available only if custom imaging procedures exist.
On the Custom tab, you can filter procedures according to the following options:
Organization - Displays all custom procedures that were created in your organization.
Location - Displays only the custom procedures that were created in the location that you are currently viewing.
User - Displays only the custom procedures that were created by the user whose account you are currently logged in with.
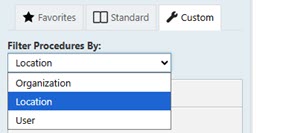
Note: By default, Location is selected the first time you access Imaging. Whichever option you select after that is saved for the next time you view the custom procedures list.
-
Select an imaging procedure that corresponds to the acquisition type for intraoral X-rays (such as 1 Bitewing or Full Mouth Series).
The options for the selected procedure become available.
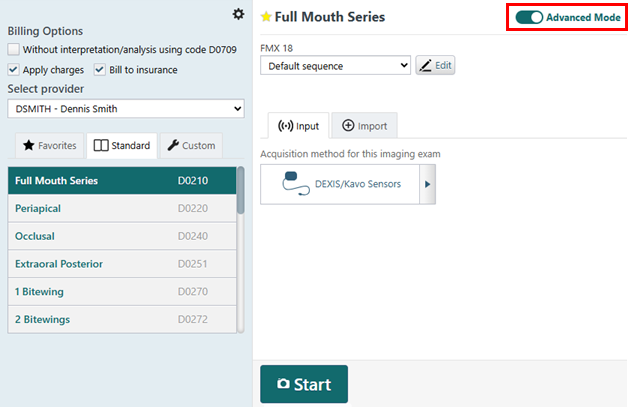
Note: Using Simple Mode for acquisitions is available only if you are using the Modality view. For information about switching to the Modality view, see the "Changing Dentrix Ascend Imaging settings" topic.
-
Turn off the Advanced Mode switch to enter Simple Mode.
-
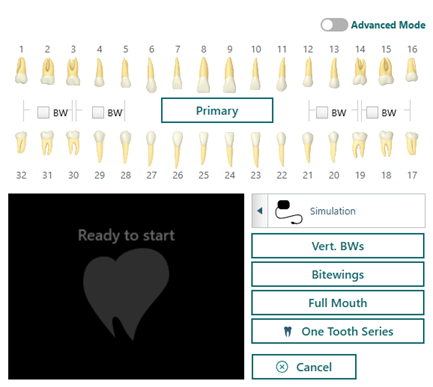
Make sure that the correct device is selected.
Note: You cannot use phosphor plates in Simple Mode. Directly integrated devices, TWAIN devices, importing from file, and simulations are supported.
-
Optionally, on the odontogram, do one of the following:
-
To start a single bitewing acquisition, select a BW checkbox.
-
To start a one-tooth acquisition, select an individual tooth.
The acquisition device becomes ready (green). Skip to step 10.
-
-
Click one of the procedure buttons.
Notes:
-
There are four procedure buttons by default ("Vert. BWs," "Bitewings," "Full Mouth," and "One Tooth Series").
-
You can customize any of the first three procedures ("Vert. BWs," "Bitewings," and "Full Mouth"). You can rename the procedure and/or customize the tooth numbers for each image in the series as needed. You cannot customize the "One Tooth Series" procedure.
-
You can define an additional procedure.
-
For information about editing or creating a procedure, see the "Customizing X-ray series for Simple Mode acquisitions" topic.
-
If you skipped step 8 and then click One Tooth Series, select a tooth on the odontogram, and then proceed to step 10.
The applicable teeth are selected on the odontogram, and the acquisition device becomes ready (green).
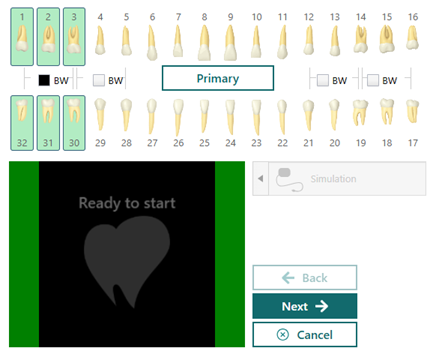
Note: For a series, you can click Back and Next to skip between the steps in the acquisition sequence as needed.
-
-
Acquire the individual image or each image of the series.