
When you post insurance payments, you can either post the total payment amount or itemize the payment. If the insurance carrier does not present you with an Explanation of Benefits (EOB) that shows itemized payment amounts for each procedure, you must post a total payment.
When you itemize payments, you enter the payment amount for each procedure attached to the claim. By itemizing payments you can track what insurance companies actually pay. Being able to accurately estimate how much an insurance company will pay for a procedure is extremely important when you present recommended treatment with insurance estimates to a patient and collect payment after treatment.
The following example demonstrates the benefits of itemizing payments:
An insurance company pays 50% on crowns. Of your normal $600 fee, the estimated amount that the insurance company will pay is $300 or 50%. However, when you receive payment, the insurance company informs you that the allowable charge for crowns is only $250. If you itemize the payment, that amount is saved. The next time a patient on this plan comes in for a crown, the estimate is $250 in coverage rather than $300.
Keeping this example in mind, we recommend itemizing payments when you post insurance payments.
To post an itemized insurance payment
1. With a patient selected, from the Ledger transaction log, double-click the claim that you want to enter a payment for.
Note: For information on how to create an insurance claim, see Creating primary dental insurance claims.
The Primary (or Secondary) Dental Insurance Claim window appears.

Note: For new offices, if you did not create the claim that you are posting payment for using Dentrix, post the insurance payment as a guarantor payment. You can add a payment type called "Insurance Payment" to distinguish these payments from patient payments. For more information on posting a guarantor payment, see Posting payments.
2. Click Enter Payment, and then click Itemize by Procedure.
The Itemize Payment dialog box appears.
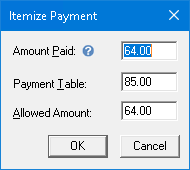
3. Do one of the following:
· The estimated insurance portion is automatically entered in the Amount Paid field. If the amount is correct, click OK.
· If the amount of the insurance check differs from what appears in the Amount Paid field, type the correct amount in the Payment Table field, and then click OK.
Note: Update the Payment Table only when the payment amount applies to all patients covered by that plan. For example, if the estimated insurance portion is different from the payment amount because money is being withheld toward a deductible or a patient has exceeded his or her maximum benefit, you should not update the Payment Table.
4. Repeat this process for all other procedures attached to the claim.
The Total Insurance Payment dialog box appears.
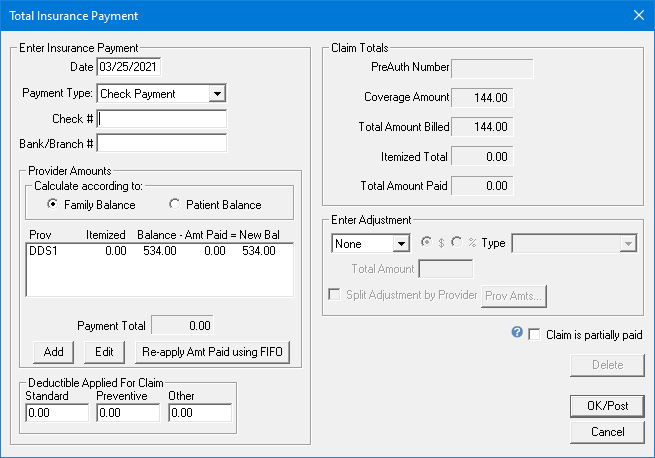
5. Use the following options to enter a payment:
· Payment Type - Select a type from the list:
· Check Payment - Select if the payment was made by check.
· Electronic Payment - Select if the payment was electronic.
· Credit Card Payment - Select if the payment was made by credit card, type the last 4 digits of the credit card number and a description of up to 20 characters (credit card type, insurer's name, or any other description to help you remember) in the corresponding fields.
· Check # - Type the check number of the insurance payment. You can enter up to 20 characters.
· Bank/Branch # - Type the Bank or Branch number of the insurance payment. This number prints on the Dentrix Deposit Slip.
· Provider Amounts -
· Family Balance - Select to add the amount owed the provider to the patient's family balance.
· Patient Balance - Select to add the amount owed the provider to the patient's balance only.
· Deductible Applied For Claim - If the patient paid a deductible, type the amount in the appropriate text box.
· Standard
· Preventive
· Other
6. If you do not bill your patient directly, such as with some preferred provider (PPO) plans, create an adjustment to offset any remaining balance.
Note: You can adjust a payment by a dollar amount or a percentage.
7. Click OK/Post