Entering tooth notes
Tooth notes in ClinicalVision are notes associated with a specific tooth. You can add multiple notes on any given day for a tooth.
To enter a tooth note
On the Task pane of the hard tissue or periodontal chart, click View.
The Notes: List section appears.
_-_notes_-_callout.png)
Do one of the following:
From the Notes menu, point to New > Manual Note, and then click Blank Note.
From the Notes menu, point to New > Manual Note, and then click the name of a note template (if any).
Right-click any note, point to New > Manual Note, and then click Blank Note.
Right-click any note, point to New > Manual Note, and then click the name of a note template (if any).
The Notes: Text Note section replaces the Notes: List section.
.png)
Do one of the following:
From the Note Type list, select the tooth number for the note.
Select a tooth on the graphical chart to put the correct selection in the Note Type list.
Type the text of the note.
Note: With a certain setting enabled, rich text formatting tools are available so that you can format the text instead of having only plain text.
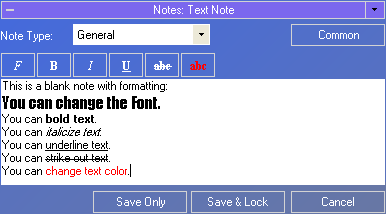
Click one of the following save options:
Save Only - Saves the note but does not prevent it from being edited later in the day.
Save & Lock - Saves the note and prevents it from being edited in the future. This option does not prevent the note from being deleted later in the day.
After attaching a note to a tooth, a note symbol appears next to the tooth in the graphical chart.
.png)
Need more help?
You can visit our website or contact OMSVision Customer Support.