

|
Adding and editing users
Create a user account for each person who needs to access the program. After user accounts have been set up, each user must to log on to use the program.
You can add and edit user accounts as needed if you are an administrator.
Note: The first user you create should have level 9 access because a user must have that level to access the security options and add other users.
To add or edit a user
1. From the File menu, click Security. This option is available only if your user account has an access level of nine.
The Log On Codes Table window appears.
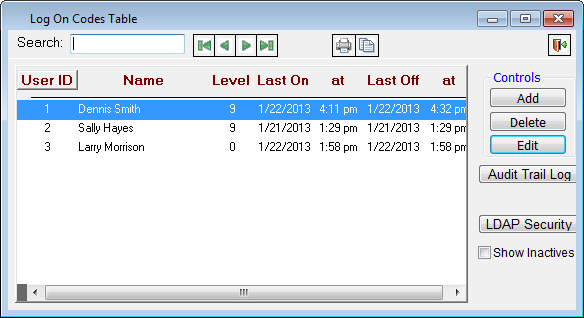
2. Click Add to add a user. Or, select the desired user, and then click Edit to edit an existing user.
The Edit Log On Code dialog box appears.

3. Set up the following options:
· Identification
· User name - Type the first, middle, and last name of the employee. The first name field has a limit of 20 characters. The last name field has a limit of 30 characters.
Note: The User ID is generated automatically and cannot be edited. The program assigns the next available number when a user is added: the first user created is 1; the second, 2; and so forth.
· Employee Name - Select the employee
account (which is used by the Time
Clock) you want to link to this user account (which is used for logging on).
You can click the Remove button
 to clear any previous selection.
· Security
· User Name – Type a user name for the user. This field has a limit of 150 characters.
· Password – Type the user’s password in the Password and Verify fields. The password fields have a limit of 20 characters.
· Level – Select the access level (0 - 9) that you want to give the user, depending on the type of functions that person performs.
· Allow exporting to Outlook - Select this option if you want to allow this user account to export data to Outlook.
· Settings - Select the Active User check box if the user should have rights to access the program (this is the default). Clear the check box if you want to inactivate the user account and not allow the user access to the program. .
Note: Make sure you don’t inactivate all user accounts after creating them. If you do, you will not be able to log in to the software.
· Fingerprint - If the fingerprint recognition feature has been enabled, the Fingerprint (Biometrics) options are available. Click Scan to allow the user to log on with a fingerprint scanner or Don't Scan not to allow the user to log on with a fingerprint scanner.
4. Click OK.
Need more help?
You can visit our website, contact EndoVision Customer Support, or suggest a new feature or improvement on User Voice.