

|
Treatment planning by shortcut
You can treatment plan procedures by using shortcuts.
To treatment plan by shortcut
1. Select a provider for the treatment.
2. From the hard tissue chart, on the Task pane, click Add.
The Add New Items section appears.
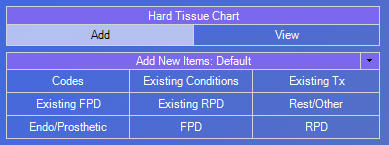
3. Click a category to view a list of shortcuts associated with that category.
The Shortcuts section appears.
.png)
4. Click a shortcut to view the available settings for that shortcut. Shortcut settings that are configured at the time of posting the treatment appear on the Task pane.
5. Under Status, click Plan to open a menu, and then click the treatment plan number you want to assign to the treatment plan. You can assign up to 10 different treatment plans to a patient.
6. Configure the Details and Codes as applicable:
· Rest/Other
· Tx Restore - Click the material: Amalgam, Porcelain, Resin, Acrylic, Metallic, Sedative, Gold, or Unknown. Select the appropriate tooth on the graphical chart. Click the surfaces on the tooth in the graphical chart or on the diagram under Details. Select one of procedure Codes. Click Add to add the restorations.
· Tx Crown - Click the material: Amalgam, Porcelain, Resin, Acrylic, Metallic, Sedative, Gold, or Unknown. Select the appropriate tooth on the graphical chart. Select one of procedure Codes. Click Add to add the crowns.
· Tx Onlay - Click the material: Amalgam, Porcelain, Resin, Acrylic, Metallic, Sedative, Gold, or Unknown. Select the appropriate tooth on the graphical chart. Click the surfaces on the tooth in the graphical chart or on the diagram under Details. Select one of procedure Codes. Click Add to add the onlay for the tooth.
· Tx Veneer - Click the material: Resin or Porcelain. Select the appropriate tooth on the graphical chart. Select one of procedure Codes. Click Add to add the veneer.
· Tx Sealant - Select one of procedure Codes. Select the appropriate tooth on the graphical chart. Click the surfaces on the tooth in the graphical chart or on the diagram under Details. Click Add to add the sealants.
· Tx Extract (Entire Tooth) - Select the appropriate tooth on the graphical chart. Select one of procedure Codes. Click Add to indicate that the entire tooth has been extracted.
· Tx Extract (Surface or Root) - Select the appropriate tooth on the graphical chart. Click the roots and/or surfaces on the tooth in the graphical chart or on the diagram under Details. Select one of procedure Codes. Click Add to indicate that the tooth, surfaces, and/or roots were extracted.
· Tx Hemisection - Select the appropriate tooth on the graphical chart. Click the roots on the tooth in the graphical chart or on the diagram under Details. Select one of procedure Codes. Click Add to add the hemisection for the tooth.
· Watch - Select the appropriate tooth on the graphical chart. If the advanced watch feature is enabled, a dialog box appears and prompts you to type a description for the watch. After you enter a description, click OK.
Note: The status for a watched tooth can only be "Existing" by default and will change from "Completed" to "Existing" automatically.
· Endo/Prosthetic
· Tx Apico - Select the appropriate tooth on the graphical chart. Click the roots on the tooth in the graphical chart or on the diagram under Details. Select one of procedure Codes. Click Add to add the apicoectomy.
· Tx Retro - Select the appropriate tooth on the graphical chart. Click the roots on the tooth in the graphical chart or on the diagram under Details. Select one of procedure Codes. Click Add to add the retrograde.
· Tx Cope (M) - Click the material: White Plastic or Metallic. Select the appropriate tooth on the graphical chart. Select one of procedure Codes. Click Add to add the copings.
· Tx Cope (F) - Select the appropriate tooth on the graphical chart. Click the material: White Plastic or Metallic. Select one of procedure Codes. Click Add to add the copings.
· Cast P&C - Select the appropriate tooth on the graphical chart. Click the roots on the tooth in the graphical chart or on the diagram under Details. Select one of procedure Codes. Click Add to add the cast post and core.
· Prefab P&C - Click the core material: Resin or Amalgam. Select the appropriate tooth on the graphical chart. Click the roots on the tooth in the graphical chart or on the diagram under Details. Select one of procedure Codes. Click Add to add the the pre-fabricated post and core.
· Tx Denture - If you want to add a maxillary denture, select a maxillary tooth on the graphical chart; or if you want to add a mandibular denture, select a mandibular tooth on the graphical chart. Select one of procedure Codes. Click Add to add the denture.
· Tx Implant - Select the appropriate tooth on the graphical chart. Select one of procedure Codes. Click the Add button to add the implants.
· Tx Splint - Select the appropriate teeth on the graphical chart. Select one of procedure Codes. Click the Add button to add the splint.
· Root Canal - Click the material: Gutta Percha, Silver Point, Paste. Select the appropriate tooth on the graphical chart. Click the roots on the tooth in the graphical chart or on the diagram under Details. Select one of procedure Codes. Click Add to add the root canal.
· Fixed Partial Denture (FPD) - To add a Fixed Partial Denture (for example a bridge), complete the following:
a. Select the TxFPD-T shortcut.
b. Under Status, click Plan to open a menu, and then click the treatment plan number you want to assign to the treatment plan. You can assign up to 10 different treatment plans to a patient.
c. Select the appropriate teeth for the bridge in the graphical chart.
A black outline appears around the selected teeth.
.png)
d. Add pontics to the bridge:
i. Click the Tx FPD-P (pontic) shortcut to populate pontic settings in the Task pane.
ii. Under Status, click Plan to open a menu, and then click the treatment plan number you want to assign to the treatment plan. You can assign up to 10 different treatment plans to a patient.
iii. Under Details, click the pontic material: Amalgam, Porcelain, Resin, Acrylic, Metallic, Sedative, Gold, or Unknown.
iv. Select one of the outlined teeth from step c.
v. Click Add to add the pontic.
The pontic appears on the graphical tooth chart.
.png)
e. Add crowns to the bridge (optional):
i. Click the Tx FPDCR (Crown) shortcut to populate crown settings in the Task pane.
ii. Under Status, click Plan to open a menu, and then click the treatment plan number you want to assign to the treatment plan. You can assign up to 10 different treatment plans to a patient.
iii. Under Details, click the bridge material: Amalgam, Porcelain, Resin, Acrylic, Metallic, Sedative, Gold, or Unknown.
iv. Select one of the outlined teeth from step c.
v. Click Add to add the crown.
The crown appears on the graphical tooth chart.
.png)
f. Add 3/4 crowns, onlays, and inlays to the bridge (optional). Repeat step d to add 3/4 crowns (shortcut TxFPD3Q), onlays (shortcut TxFPD-O), and inlays (shortcut TxFPD-I) to the bridge.
· Removable Partial Denture (RPD) - To add a Removable Partial Denture (for example, a partial), complete the following:
a. Select the TxFPD-T shortcut.
b. Under Status, click Plan to open a menu, and then click the treatment plan number you want to assign to the treatment plan. You can assign up to 10 different treatment plans to a patient.
c. Select the appropriate teeth for the partial.
d. Click Add to add the partial.
The added procedure appears in the Chart History section (D5211, for maxillary teeth; D5212, for mandibular teeth). Be aware that nothing visually changes on the graphical chart.
e. Add pontic(s) to the partial:
i. Click the Tx RPD-Pon (Pontic) shortcut to populate pontic settings in the Task pane.
ii. Under Status, click Plan to open a menu, and then click the treatment plan number you want to assign to the treatment plan. You can assign up to 10 different treatment plans to a patient.
iii. Select one of the teeth selected in step c to designate that tooth as a pontic.
.png)
f. Add a T-clasp, C-clasp, Precision, or Other attachment:
i. Click the appropriate shortcut:
· T-Clasp - TxRPD-TCL
· C-Clasp - TxRPD-CCL
· Precision Attachment - TxRPD-Pre
· Other Attachment - TxRPD-Oth
ii. Under Status, click Plan to open a menu, and then click the treatment plan number you want to assign to the treatment plan. You can assign up to 10 different treatment plans to a patient.
iii. Select one of the teeth selected in step c to add the attachment to the tooth.
.png)
Need more help?
You can visit our website, contact EndoVision Customer Support, or suggest a new feature or improvement on User Voice.