

|
Changing ClinicalVision settings
You can set up ClinicalVision preferences and defaults in the Settings dialog box. Each ClinicalVision setting will either be global, user-specific, or workstation-specific. Global and user settings are stored in the database and apply to all computers on the network. Workstation settings are stored on each computer and apply to only that computer. User settings follow each user to all computers on the network. Global settings in ClinicalVision can be modified only if an administrative user is logged in.
To change program settings
1. From the Tools menu, click Settings.
The Settings dialog box appears.
2. Set up the options on the following tabs:
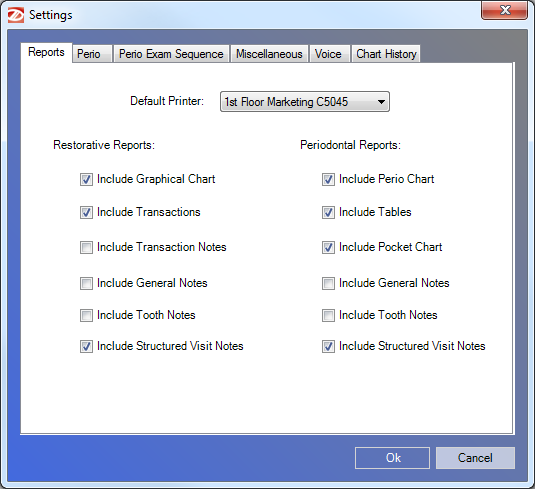
· Reports - You can set up the default settings for printing from the clinical chart and periodontal chart:
· Default Printer - Select the default printer you want to be selected by default to print from the clinical chart or periodontal chart.
· Restorative Reports - Select the options that you want selected by default when printing from the clinical chart.
· Include Graphical Chart - Prints the graphical chart.
· Include Transactions - Prints all transactions visible at the time the report is printed.
· Include Transaction Notes - Prints notes associated with transactions listed in the report.
· Include General Notes - Prints general patient notes.
· Include Tooth Notes - Prints tooth notes.
· Include Structured Visit Notes - Prints Structure Visit notes.
· Periodontal Reports - Select the options that you want selected by default when printing from the periodontal chart.
· Include Perio Chart - Prints the graphical chart.
· Include Tables - Prints the numerical chart.
· Include Pocket Chart - Prints the graphical chart and the last three pocket chart exams together.
· Include General Notes - Prints general patient notes.
· Include Tooth Notes - Prints tooth notes.
· Include Structured Visit Notes - Prints Structure Visit notes.
· Perio - You can set up periodontal chart preferences:
· Show MGJ Trace - Select this option if you want to see the line graph on the graphical chart for MGJ.
· Display MGJ from FGM - Select this option if you want to calculate the MGJ from the FGM and show the values.
· Pocket Depth Warning - Type the level after which to warn you that the pocket depth is deeper than normal (for example, if you type 3, pocket depth values of 4 and higher are displayed with the Warning Pocket Color).
· Normal Pocket Color - Double-click the color box to open the Color dialog box. Choose a color, and then click OK to set the pocket depth color that is displayed up to the Pocket Depth Warning level. The default color is black.
· Warning Pocket Color - Double-click the color box to open the Color dialog box. Choose a color, and then click OK to set the pocket depth color that is displayed for readings entered above the Pocket Depth Warning level. The default color is red.
· Perio Exam Sequence - By default, the auto-advance feature is set to advance from tooth 1 to 16 (facial), 16 to 1 (lingual), 17 to 32 (facial), 32 to 17 (lingual)-F1, L16, F17, L32; but, you can change the default settings:
a. The Current Sequence, if one exists, is displayed, but you can change it. Click Reset to populate the list box with the possible sequences.
b. Click each sequence in the order you want to perform default exams.
c. Click Ok to save the sequence, Reset to clear your selections, or Cancel to exit the dialog box without saving the sequence changes.
· Miscellaneous - You can set up appearance and other options:
· Chart History Below Chart - Select this option to have the chart history appear below the graphical chart of the hard tissue chart when you maximize the ClinicalVision window size (if your display's resolution is high enough). With this check box cleared, the notes appear below the graphical chart when you maximize the window.
· Simplified UI - A workstation-specific setting that disables gradients and visual styles (for toolbars, menus, and status bars), which require more computer resources than other window elements. For thin-client installations or older computers, you can turn on this setting to improve performance.
Note: You must close and re-open the program to see the changes.
· Clinical Shading - Select this option if you want to display clinical shading on the graphical chart in the hard tissue Chart by default.
· Gradient Color 1 - Double-click the color box to open the Color dialog box. Choose a color, and then click OK to set the first color for the gradient of the background color for ClinicalVision.
· Gradient Color 2 - Double-click the color box to open the Color dialog box. Choose a color, and then click OK to set the second color for the gradient of the background color for ClinicalVision.
· Start In Periodontal Chart - Select this option if you want the periodontal chart displayed by default instead of the hard tissue chart each time you open ClinicalVision.
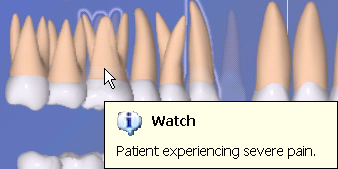
· Enable Advanced Watch - Select this option if you want to enable the advanced watch feature. Enabling this feature allows you to attach brief descriptions to watched teeth. Watch descriptions are entered at the time of adding a "watch" to a tooth.
To view a watched tooth's description, from the graphical chart, position the pointer over a watched tooth.
· Lock manual notes after (days) - Selecting this option means that any manual notes will be locked and unavailable for editing after the specified number of days.
· Default Dentition - Select a default dentition for patients: primary, permanent, based on age, or chosen each time.
· Primary Dentition Age - If Default Dentition is set to "Age Based," from the Primary Dentition Age list, select the primary dentition age (for example, if you select 13, patients that are 13 years of age and older are assigned primary dentition by default.
· Watch Color - Select whether you want the color of a watched tooth to be black or white.
· Note Format - Select whether you want general charting notes, transaction notes, and note templates to be plain text or rich text.
Note: Switching between the different format settings does not affect notes already saved. The formatting of those notes are preserved.
· Lock unsigned SVNotes after (days) - Selecting this option means that any unsigned structured visit notes will be locked and unavailable for editing after the specified number of days.
· Use X for Extracted Teeth - Select this check box to have an X appear where there is an existing extracted tooth on the graphical chart of the hard tissue chart (an extracted tooth still appears dimmed).
· Shade Completed Extraction X - Select this check box to have an X appear where there is an extracted tooth (extracted at your office) on the graphical chart of the hard tissue chart (an extracted tooth still appears dimmed). This option is available only if Use X for Extracted Teeth is selected.
· Hide Missing Teeth - Select this check box not to show a dimmed tooth where there is an extracted or missing tooth on the graphical chart of the hard tissue chart. An X may still appear in the missing or extracted tooth's location on the graphical chart according to the Use X for Extracted Teeth Shade and Completed Extraction X options.
· Manual and/or Structured visit notes - Select one of the following:
· Use Manual Notes Only - To enter only manual notes from this point on. Structured visit notes that were entered previously are still visible.
· Use Structured Visit Notes Only - To enter only structured visit notes from this point on. Manual notes that were entered previously are still visible.
· Use Manual and Structured Visit Notes - To enter both types of notes from this point on.
· Open Notes Expanded - With this check box selected, when you open ClinicalVision, the text of all the notes in the Notes list is visible. With this check box cleared, only the header of each notes is visible. In either case, you will be able to expand and/or collapse all or specific notes as needed. This setting affects only the hard tissue chart. From the Save expand settings for list, select whether this setting is global or workstation-, location-, or user-specific.
· Voice - You can set up voice recognition options. In order to use the ClinicalVision voice recognition feature, your computer must have the Microsoft SAPI 5.1 voice recognition engine installed. Most Microsoft Windows operating systems come with the SAPI 5.1 voice recognition engine already installed (for details on how to install the Microsoft voice recognition engine, contact Technical Support at 800-323-3370).
· Voice Recognition Enabled on Start - Select how you want voice recognition to behave when you open ClinicalVision:
· Prompt - To have a message appear that asks if you want to enable voice recognition each time you open ClinicalVision.
· Yes - To always have voice recognition be enabled each time you open ClinicalVision.
· No - To never have voice recognition be enabled each time you open ClinicalVision.
The voice recognition status appears on the status bar.
· Speech Feedback Enabled - If you have speakers or headphones connected to the computer, you the voice recognition engine will repeat back to you commands that are recognized.
· Chart History - The default settings for the Chart History section of the clinical chart can be changed on this tab. Changes made here in the Settings dialog box affect the defaults set up from the Chart History menu.
3. Click OK.
Need more help?
You can visit our website, contact EndoVision Customer Support, or suggest a new feature or improvement on User Voice.