You can edit dental diagnostic codes as needed.
Note: Information on the codes and descriptions can be obtained using reference books provided by the ADA. Please contact your local chapter of the American Dental Association for assistance.
To edit a dental diagnostic code
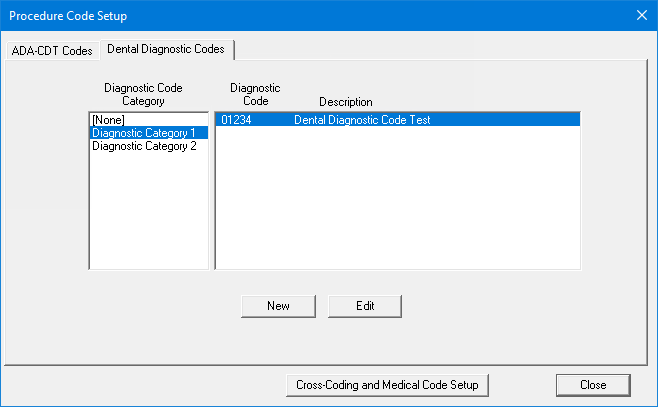
In the Procedure Code Setup dialog box, select the Dental Diagnostic Codes tab.

In the Diagnostic Code Category list, select a category
The corresponding diagnostic codes appear in the list to the right.
Select a diagnostic code.
Click Edit.
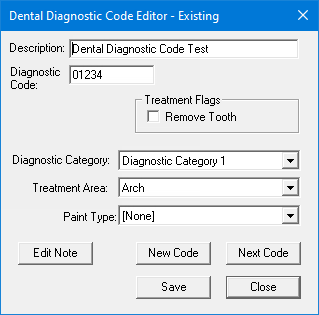
The Dental Diagnostic Code Editor - Existing dialog box appears.

Change any of the following options as needed:
Description - The description for this diagnostic code is displayed in most of the Dentrix Enterprise modules and on insurance claims, billing statements, and various reports.
Diagnostic Code - The standard ADA dental diagnostic code is displayed in most of the Dentrix Enterprise modules and on insurance claims and some reports that are run by procedure range.
Remove Tooth - With this checkbox selected, when this diagnostic code is charted, the corresponding tooth is removed from the graphical chart in Chart.
Diagnostic Category - The category for this diagnostic code. In the Practice Definitions, you can customize the diagnostic code categories to fit your practice's needs.
Treatment Area - The treatment area that corresponds to the area of the mouth to which this diagnostic code applies. Select one of the following options:
Surface - Applies to one surface of a tooth.
Tooth - Applies to a tooth.
Mouth - Applies to the whole mouth, no specific area in the mouth (such as for a product that you sell), or possibly a tooth range.
Root - Applies to a tooth.
Quadrant - Applies to a quadrant in the mouth (for example, UL for the upper-left quadrant).
Sextant - Applies to a sextant in the mouth (for example, S1 for the first sextant).
Arch - Applies to an arch in the mouth (for example, upper or maxillary).
Other.
Paint Type - The paint type that indicates how the diagnostic code will be painted on the graphical chart in Chart. Select a paint type or [None].
Note: You can define paint types in the Practice Definitions.
Diagnostic Code Notes - A diagnostic code can have a progress note. To add or edit notes, do the following:
Click Edit Note.
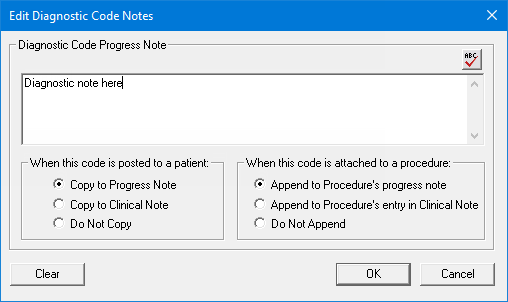
The Edit Diagnostic Code Notes dialog box appears.

Set up the following options:
Procedure Code Progress Note - In the box, change and/or enter the text for the progress note.
Notes:
To
check the spelling of the note text, click the Check
Spelling button ![]() (this button is available only if a certain preference
setting has been enabled).
(this button is available only if a certain preference
setting has been enabled).
To delete the entire note, click Clear.
When this code is posted to a patient - With a progress note entered, these options are available. Select one of the following options:
Copy To Progress Note - Whenever the diagnostic code is charted for a patient, the progress note will be included automatically with the diagnostic code.
Copy to Clinical Note - Whenever the diagnostic code is charted for a patient, the progress note will be added automatically to the clinical note for that day.
Do Not Copy - Whenever the diagnostic code is charted for a patient, the progress note will not be included automatically with the diagnostic code or copied automatically to a clinical note.
When this code is attached to a procedure - With a progress note entered, these options are available. Select one of the following options:
Append to Procedure's progress note - Whenever the diagnostic code is linked to a procedure for a patient, the diagnostic code's progress note will be appended automatically to the procedure's progress note.
Append to Procedure's entry in Clinical Note - Whenever the diagnostic code is linked to a procedure for a patient, the diagnostic code's progress note will be added automatically to the clinical note for the procedure for that day.
Do Not Copy - Whenever the diagnostic code is linked to a procedure for a patient, the diagnostic code's progress note will not be appended automatically to the procedure's progress note or copied automatically to a clinical note for the procedure.
Click OK.
You are returned to the Dental Diagnostic Code Editor - Existing dialog box.
Click Save.
A confirmation message appears
Click Yes.