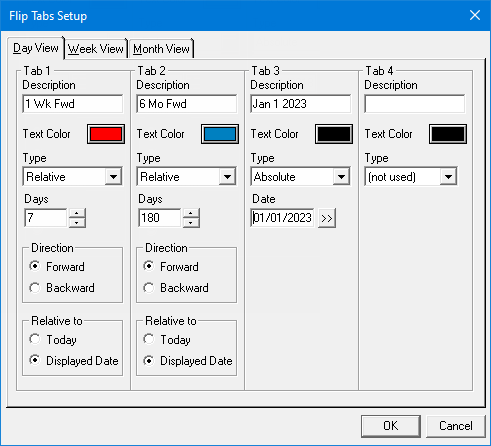
A flip tab acts like a bookmark. It allows you to jump forward or backward several days, weeks, or months in Appointment Book, according to a specified length of time, such as seven days, two weeks, or six months. You can customize the flip tabs for Appointment Book as needed.
Notes:
Flip tabs are workstation specific. Workstation-specific settings apply to all clinics and users, regardless of Appointment Book view being used, but only on this computer.
Configuring the flip tabs for Appointment Book requires the "Appointments, Setup Clinic" security right.
No flip tabs are set up with the initial installation of Dentrix Enterprise.
To set up a flip tab
In Appointment Book, on the Setup menu, click Flip Tabs Setup.
If applicable, do one of the following:
If the Password - Appointments, Setup Clinic dialog box appears, user verification has been assigned to the "Appointments, Setup Clinic" task. Do one of the following:
If your user account has been granted the "Appointments, Setup Clinic" security right, enter your credentials in the User ID and Password boxes, and then click OK.
If your user account has not been granted the "Appointments, Setup Clinic" security right, have a user with permission temporarily override this restriction so you can set up flip tabs this one time. The overriding user enters his or her credentials in the User ID and Password boxes and then clicks OK.

If a message appears, informing you that you do not have rights to this operation, your user account has not been granted the "Appointments, Setup Clinic" security right. To have a user with permission temporarily override this restriction so you can set up flip tabs this one time, do the following:
On the message, click Yes.

In the Password - Appointments, Setup Clinic dialog box, the overriding user enters his or her credentials in the User ID and Password boxes and then clicks OK.

The Flip Tabs Setup dialog box appears.

Click the Day View, Week View, or Month View tab to set up flip tabs for the corresponding Appointment Book view.
For each flip tab that you want to create or change (you can have up to four), set up the following options:
Description - In the box, enter a short description for the flip tab (for example, "1 Week" or "6 Months"). The description can be up to 15 characters in length.
Text Color - To assign a color to the text description of the flip tab, do the following:
Click the colored button.
The Color dialog box appears.

Note: The text on an appointment is black, so select a light color that contrasts enough with the black text.
Do one of the following:
To use a basic color as is, under Basic colors, select the desired box.
To define and use a custom color, do the following:
Under Basic colors, select the box of a color that is similar to the one you want to define.
Click Define Custom Colors to expand the dialog box.

Notes:
If you know the specific HSL color values you want, enter them in the Hue, Sat (for saturation), and Lum (for luminosity) boxes.
If you know the specific RGB color values you want, enter them in the Red, Green, and Blue boxes.
Click anywhere on the rainbow swatch, or drag the cross hairs  to any location on the rainbow swatch.
Click anywhere on the narrow horizontal luminosity bar, or drag the arrow  up or down to brighten or darken the color.
Click Add to Custom Color.
Under Custom colors, select the box of the newly-added color.
Click OK.
Type - From the list, select one of the following types:
Absolute - Requires you to specify a certain calendar date, such as 11/11/2018. An absolute tab will always jump to that specific date in Appointment Book. Do one of the following:
In the Date box, enter the correct date in a mm/dd/yyyy format.
Click the Date search button ![]() , select the correct date from the calendar that appears, and then click OK.
, select the correct date from the calendar that appears, and then click OK.

Relative - Requires you to specify a certain number of days, weeks, or months. Do the following:
Enter the number of Days, Weeks, or Months (depending on the flip tab).
Select a Direction option: Forward, to go forward by the specified number of days, weeks, or months in Appointment Book; or Backward, to go backward by the specified number of days, weeks, or months.
Under Relative to, select whether the tab will move you relative to the current date or relative to the date being displayed in Appointment Book.
Note: A relative tab will jump you to a date relative to the current date or the displayed date. For example, if today's date is January 1st, a relative tab set to move you seven days forward relative to today will move you to January 8th when you click it; then, if you click the tab again, you will remain on the 8th. However, a relative tab set to move you seven days forward relative to the displayed date, will move you to the 8th when you click it; then, if you click the tab again, the tab will move you to the 15th (another seven days ahead).
Click OK.