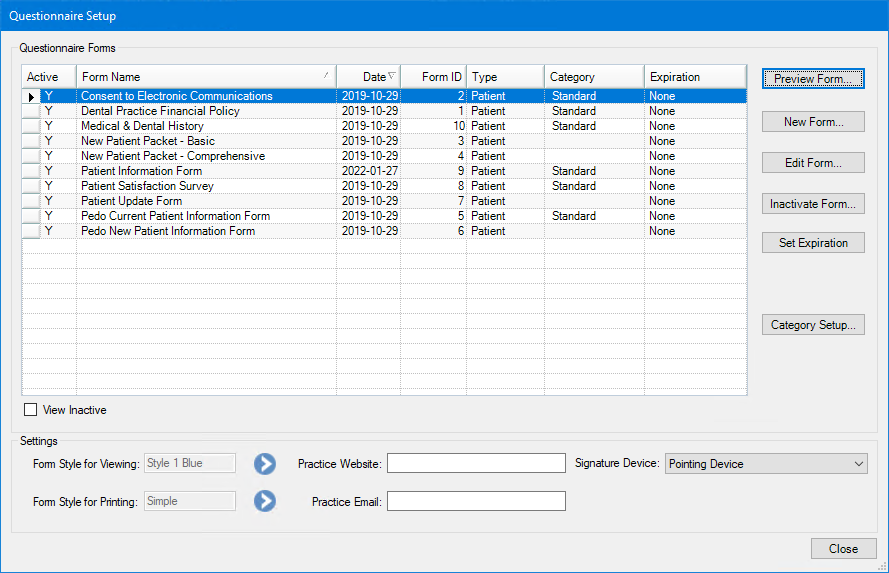

You can create an unlimited number of custom questionnaires to fit the needs of your office. In the Questionnaire Setup dialog box, you can preview and print questionnaire forms, create new questionnaire forms, edit questionnaire forms, inactivate questionnaire forms, and set up form categories.
By default, Dentrix includes the following patient questionnaire forms and provider/staff questionnaire form:
· Consent to Electronic Communications
· Dental Practice Financial Policy
· Medical & Dental History
· New Patient Packet – Basic
· New Patient Packet – Comprehensive
· Patient Information Form
· Patient Satisfaction Survey
· Patient Update Form
· Pedo Current Patient Information Form
· Pedo New Patient Information Form
· Provider/Staff Information Form
You can edit these forms from the Questionnaire Setup dialog box.
Note: The Medical and Dental History form is inactive by default to give you the opportunity to verify that the medical alerts in the form match the medical alerts you have set up for your practice in the Office Manager. To activate the form, select it from the list, click Edit Form, and click Yes.
To set up a questionnaire
1. In the Edit menu, click Questionnaire Setup.
The Questionnaire Setup dialog box appears.

2. The Questionnaire Setup dialog box displays up to 20 questionnaire forms that have been created for your office and also displays the following important information about those forms:
· Active - Tells you whether a form is active. A "Y" in this column indicates that a form is active. An "N" indicates that a form is inactive. By default, only active questionnaire forms appear. For more information about inactivating a questionnaire form, see Inactivating questionnaire forms.
· Form Name - Displays the full name of the questionnaire form.
· Date - Displays the date the questionnaire form was last changed or the date the form was created if it has not been changed.
· Form ID - Lists the unique ID for each form and each version of a form. Otherwise, only the most recent version of the form displays.
· Type - Displays whether the form is a patient questionnaire form or a provider/staff questionnaire form.
· Category - Displays the category that you have placed the form in. For more information about assigning forms to a category, see Setting up categories.
· Expiration - Displays the length of the expiration period for your patients' responses to a form. (To change the expiration period, see steps 5 and 6.)
Note: Click the heading of any of the columns in the Questionnaire Setup dialog box to sort the forms by that information.
3. Select View Inactive if you want to include inactive forms in the list of forms.
4. Under Settings, you can change the following options:
· Form Style for Viewing – Click the search button and select the style of the form that you want to use from the Questionnaire Form Style for Viewing dialog box. You can choose from 27 styles.

· Form Style for Printing – Click the search button and select the style of the form that you want to use from the Questionnaire Form Style for Printing dialog box. You can choose from 27 styles.

· Practice Website – Type your practice's website address if you want it to appear on the form you selected.
· Practice Email – Type your practice's email address if you want it to appear on the form you selected.
· Signature Device – Select the type of electronic signature device that you will use to sign forms:
· Pointing Device (default)
· Interlink ePad
· Interlink ePad II
Note: This is a computer-specific setting, so the signature device you select here will also be the signature device for all other modules that accept electronic signatures on this computer.
5. To set an expiration period for responses, click Set Expiration.
The Set Expiration For Responses dialog box appears.

6. To set an expiration period, select Expire every, and then set the number of months that you want to pass before requiring patients to update their responses to the selected form.