Performing Weekly Tasks
This document provides instructions for the tasks that should be done weekly.
1. Reports
Viewing the Aged Receivables Report
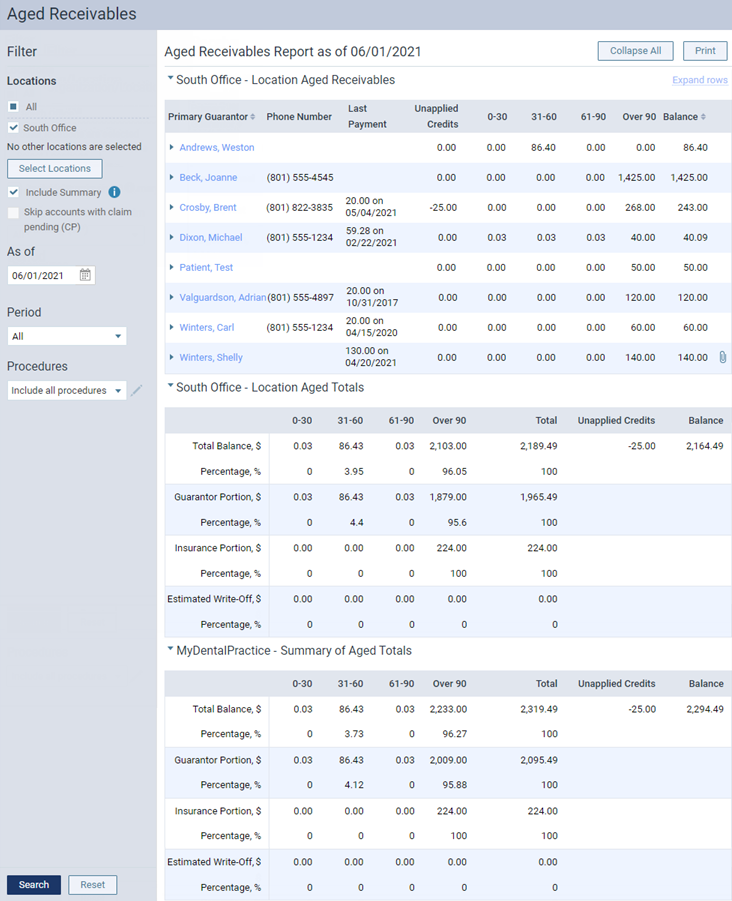
Aged Receivables Report
The Aged Receivables Report displays the aged balances of accounts and the total aging of all receivables as of today or for a specified aging bracket. You can send this report to your accountant monthly.
To view the aged receivables report
-
On the Home menu, under Reports, select Aged Receivables.
The Aged Receivables page opens.
-
Set up the following options:
-
Locations - The aged receivables and aged totals will be calculated for the selected locations. Do any of the following:
-
Select the All checkbox to view aged totals for all locations. Aged receivables will not be displayed. Clear the checkbox to quickly remove all location selections.
-
Select or clear the checkbox next to the current location's name to show or hide the aged receivables and aged totals for that location.
-
Click (or tap) Select Locations to select the locations whose aged totals you want to view. If more than one location is selected, the aged receivables will not be displayed. If only one location is selected, the aged totals and aged receivables will be displayed.
Note: Only locations that you have access to are available.
-
-
Include balances over 1 year - This checkbox allows older data to be included or excluded:
-
With this checkbox selected, the report can include account balances over 365 days old, and the report is limited to no more than 10 locations.
-
With this checkbox clear, the report includes account balances up to 365 days old.
-
-
Include Summary - Select this checkbox to view the sum of the aged totals for the selected locations.
Note: If you have access to 40 or more locations, this checkbox is not available.
-
Skip accounts with claim pending (CP) - Select this checkbox to not include accounts (a guarantor and all patients with that person specified as their guarantor) that have pending claims. Clear this checkbox to include accounts on the report regardless of claim status. The number of claims that are associated with a given account appear in the CP column on the report.
-
As Of - Leave the current date entered, or click (or tap) in the box to select a different date. The calculation of the aged receivables will include the current revision or a past revision of transactions, depending on which revision was in effect on or before the specified date.
-
Period - Select the age of account balances to include:
-
All - Includes balances that are 0-365 days old; however, if the Include balances over 1 year checkbox is selected, balances of any age are included.
-
Over 30 - Includes balances that are 31-365 days old; however, if the Include balances over 1 year checkbox is selected, any balances that are 31 days and older are included.
-
Over 60 - Includes balances that are 61-365 days old; however, if the Include balances over 1 year checkbox is selected, any balances that are 61 days and older are included.
-
Over 90 - Includes balances that are 91-365 days old; however, if the Include balances over 1 year checkbox is selected, any balances that are 91 days and older are included.
Aged receivables will be calculated according to the selected age and the As Of date.
-
-
Billing Type - To filter the report by billing type, do any of the following on the Billing Type list as needed:
-
Select the Select All checkbox to include all billing types.
-
Clear the Select All checkbox to quickly remove all billing type selections, and then select the checkbox of each billing type that you want to include.
-
With multiple billing types selected, clear the checkbox of each of those billing types that you want to exclude.
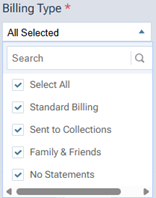
The report will include an account only if it has been assigned at least one of the selected billing types.
Notes:
-
If the list of billing types is long, you can use the Search box to narrow down the list. As you type in the box, the list displays only the billing types whose names contain those characters.
-
At least one billing type must be selected for the report.
-
-
Procedures - Filter the report to include all procedures, to include only orthodontic procedures, to exclude all orthodontic procedures, or to include or exclude any set of procedures. You can customize the procedure filter presets to suit your preferences.
Note: The procedure filter presets are also used by the Provider A/R Totals Report, so changes made to the presets from the Aged Receivables Report affect the Provider A/R Totals Report.
-
-
Click (or tap) Search.
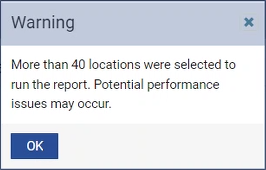
Note: If you have selected more than 40 locations for this report, a warning appears, stating that there are potential performance issues if you run the report for that many locations. If you want to return to the report options to reduce the number of locations for this report, click the X in the upper-right corner of the message; otherwise, click (or tap) OK to acknowledge the risk and run the report anyway.
Wait for the report to load. This can take from one to five minutes, depending on the date range.
-
Do any of the following:
-
To print the report, click (or tap) Print.
-
To export the report, click (or tap) Export. The current page as it is displayed is downloaded as a .csv file. You can open the .csv file in a spreadsheet program. The first row contains the report title and date. The second row contains the location and period filters in use. The third row is blank. The fourth row contains the column headers. Each subsequent row contains details of each guarantor/account on the report.
-
Notes:
-
You can click (or tap) the name of a guarantor on the report to open his or her ledger in a new browser tab.
-
If there is a Statement icon
 next to a guarantor's Balance, you can click (or tap) it to open the most recent statement that was generated for that account.
 -
To view the guarantor, insurance, and write-off portions of the aging and total balance of an account, expand that guarantor's row.

Viewing the Referral Analysis Report
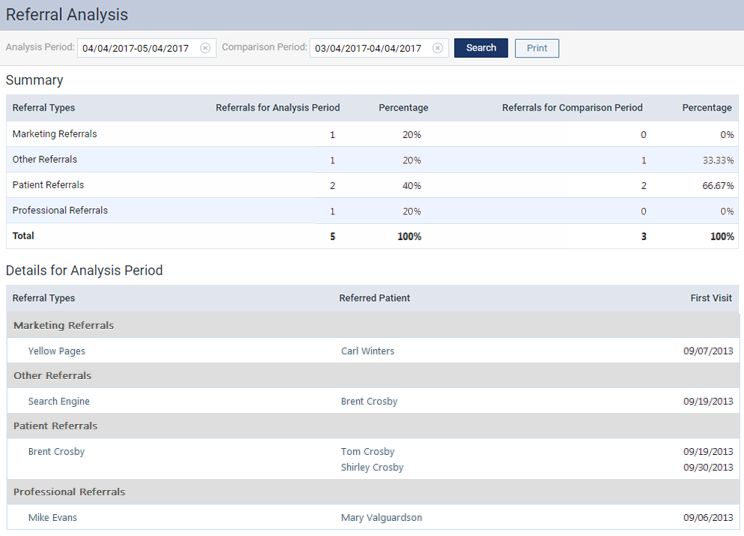
Referral Analysis Report
The Referral Analysis Report displays an analysis of professional, marketing, patient, and other referrals that led to new patients being seen in all locations of your organization. The report displays the number and percentage of each referral type within a specified analysis period. The statistics for referrals within another specified period that you want to compare to the analysis period also appear. Additionally, for the analysis period, the referred patients and their first visit dates appear for each referral type.
Note: Only patients with a First Visit Date entered in their patient records will be counted on the report.
To view the Referral Analysis Report
-
On the Home menu, under Reports, select Referral Analysis.
The Referral Analysis page opens.
-
Set up the following options:
-
Analysis Period - The date range to analyze. The default period is the past 30 days. You can change the date range as needed.
-
Comparison Period - The date range to compare to the specified analysis period. The default period is 30 days just before the default analysis period. You can change the date range as needed.
-
-
Click (or tap) Search.
-
To print the report, click (or tap) Print.
2. Billing statements
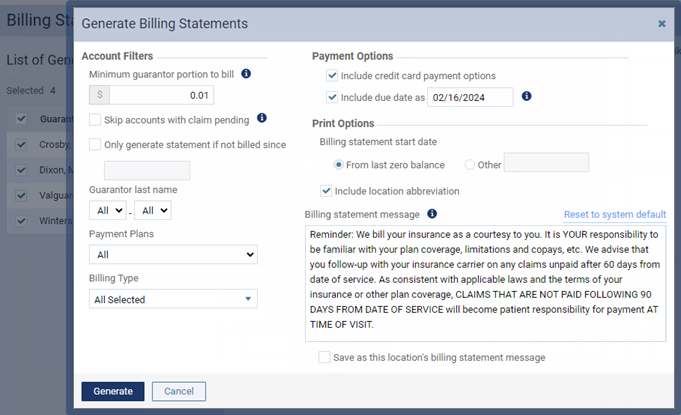
Generating billing statements
Generating a batch of billing statements
You can generate a batch of billing statements, review any of the statements, and then send all or only specific statements electronically, print all or only specific statements in-office to mail them, or use Dentrix Ascend's print-and-mail statement fulfillment service to have all or only specific statements printed and mailed.
Notes:
-
For each statement that you choose to print, a guarantor must have a street address, city, state, and ZIP Code entered in his or her record. If this information is missing, Dentrix Ascend will warn you so you know to update the guarantor's information before printing the statements, and entries for the statements will not be recorded in the patients' communication (connection) history.
-
For each electronic statement that you choose to send, a guarantor must have mobile phone number or email address entered in his or her record. If this information is missing, Dentrix Ascend will warn you so you know to update the guarantor's information before sending the statements, and entries for the statements will not be recorded in the patients' communication (connection) history.
To generate billing statements
-
If you are not already viewing the correct location, select it on the Location menu.
Note: Statements are generated only for guarantors with a preferred location that matches the selected location, but a statement may include transactions from multiple locations.
-
On the Home menu, under Location, select Billing Statements.
The Billing Statements page opens, and the Generate Billing Statements dialog box appears.
-
Set up the following options:
-
Minimum guarantor portion to bill - To generate billing statements only for accounts with a guarantor portion that is greater than or equal to a certain amount, type the desired dollar amount (0.01 or greater). To not filter by a minimum guarantor portion, type 0.00.
-
Skip accounts with claim pending - To generate billing statements for only those accounts that do not have an outstanding claim, select the checkbox. To generate billing statements for accounts with and/or without an outstanding claim clear the checkbox.
-
Only generate statement if not billed since - Select this checkbox to generate billing statements only if a statement has not been generated for an account after the specified date. By default, this filter uses a date that is one month prior to today's date, but you can change it to a different date. This filter is especially useful if you want to make sure that you are not resending a statement inside of a billing cycle time frame.
-
Guarantor last name - To generate billing statements only for accounts with a guarantor whose last name begins with a letter in a specified range, select a letter for the start of the range and a letter for the end of the range. To use an open-ended range, leave All selected in either of the lists, and select a letter from the other list. To not filter by guarantor last name, leave All selected in both lists.
-
Payment Plans - Select whether to generate billing statements for accounts with and/or without a payment plan.
-
Billing Type - Do one of the following:
-
To generate billing statements for accounts whose guarantor has been assigned any billing type, make sure All Selected appears; if it does not, on the list, select the All checkbox.
-
To generate billing statements only for accounts whose guarantor has been assigned one of the billing types you specify, on the list, do one of the following:
-
If all types are selected, clear the All checkbox, and then select the checkboxes of only the billing types you want to include.
-
If all or some types are selected, clear the checkboxes of the billing types you do not want to include.
-
If some types are selected, select the checkboxes of the billing types you want to include.
-

Note: If the list of billing types is long, you can use the Search box to narrow down the list.
-
-
Include credit card payment options - Select this checkbox to have credit card payment options appear on statements.
-
Include location abbreviation - With this checkbox selected, the location abbreviation of the applicable rendering location (if an abbreviation has been set up for that location) appears next to each procedure on the statement.

-
Include due date as - Select this checkbox to have the specified date entered as the due date on statements.
Note: You can choose a date that is 1 to 180 days in the future. However, industry consultants recommend that the due date be 30 days, which is the default.
-
Billing statement start date
-
From last zero balance - Select this option to include transactions that were entered on an account's ledger since the account last had a zero balance.
-
Other - Select this option to include transactions that were entered on an account's ledger since the date you enter. The current date is entered by default, but you can change the date.
Notes:
-
Statements will include only the current version of transactions. Statements will not include transaction history or cancellations.
-
On each statement, a balance forward amount will appear for the corresponding account's balance up to the specified date.
-
-
Billing statement message - Do one of the following:
-
Leave the default billing statement message for the current location entered. The message will appear at the bottom of all billing statements that are generated.
-
If there is no billing statement message entered, enter the message that you want to have appear at the bottom of all statements that are generated during the current print session, or leave it blank to not have a message appear.
-
Change the existing billing statement message to have that text appear at the bottom of all statements that are generated during the current print session.
-
Clear the text to not have a billing statement message appear during the current print session.
Notes:
-
If you have made any changes to the billing statement message (or if there is not a message) and want reset the text back to the system default, click (or tap) the Reset to system default link.
-
If you have made any changes to the billing statement message and want to save the text as the new default billing statement message for the current location, have the Save as this location's billing statement message checkbox selected when you click (or tap) Generate.
-
There is no limit to the length of the billing statement message, but (depending on the number of procedures and the length of the message) all of the message's text might not fit on the last page of the printed billing statement.
-
Only the first 450 characters of the statement message can be transmitted with an electronic statement.
-
-
-
Click (or tap) Generate.
Tips:
-
As the billing statements are being processed, you can navigate to another part of Dentrix Ascend at any time; the processing of the statements will continue.
-
While the statements are being processed, no other user can access the Billing Statements page. If a user attempts to do so, an error message will appear and display your user name to indicate that you are currently generating statements.
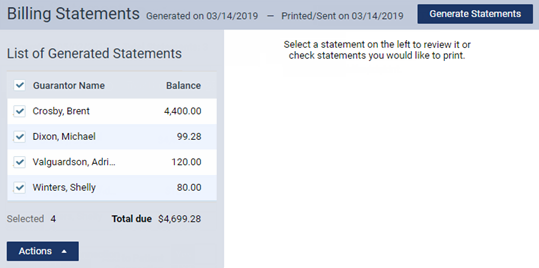
When the batch of statements has been generated, a list of guarantors for the statements that were generated appears. Next to each guarantor's name is the amount of the corresponding statement. Also for your reference, the following information appears near the top of the page: the date that the batch of statements was generated, the number of statements in the batch, and total dollar amount for those statements.
Note: To change the statement date, message, and/or payment options after you have generated the batch of statements, click (or tap) Generate Statements, and then repeat steps 2-3.
-
-
Select the name of any guarantor listed to view the corresponding billing statement.

Tips:
-
If the statement is longer than one page, click (or tap) the Page Number button
 that corresponds to the page that you want to view.
 -
To toggle between viewing only the statement and viewing the statement and the list of guarantors, click (or tap) the Zoom button
 .
.
-
-
For any guarantor who you do not want to receive a billing statement, clear the corresponding checkbox.
Note: As you clear and select the checkboxes of guarantors in the list, the Selected and Total due figures near the top of the List of Patients are updated automatically to reflect your selections.
Tips:
-
While you are viewing the Billing Statements page, no other user can access the page. If a user attempts to do so, an error message will appear and display your user name to indicate that you are currently reviewing statements.
-
If you navigate to another part of Dentrix Ascend at any time during the review, the state of the review (the settings that you have specified, all of the statements in the batch, and which statements are selected for printing) is saved for the next time you return to the Billing Statements page or until you generate a new batch of statements.
-
-
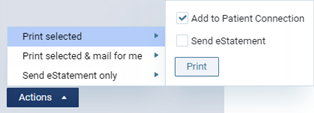
Do one of the following:
-
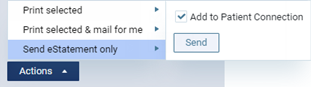
Print statements for the selected guarantors, and optionally send electronic statements (e-statements) to the selected guarantors:
-
From the Actions button menu, point to (or tap) Print.
-
To record a summary of each statement in the connections history and save a copy of each statement in the Document Manager for the corresponding guarantor and for any other patients who have that guarantor, leave the Add to Patient Connection checkbox selected. To not record each statement as a patient connection or save a copy of each statement, clear the checkbox.
-
To send electronic statements (e-statements) to the selected guarantors, in addition to printing the statements, select the Send eStatement checkbox. To not send e-statements, leave the checkbox clear.
-
Click (or tap) Print.
-
-
Use Dentrix Ascend's print-and-mail statement fulfillment service to print and mail statements for the selected guarantors (terms, conditions, and fees apply), and optionally send electronic statements (e-statements) to the selected guarantors:
-
From the Actions button menu, point to (or tap) Print selected & mail for me.
Note: This option is available only if your assigned user role has the "Send batch of Print & mail for me statements" right.
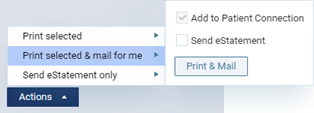
Note: The Add to Patient Connection checkbox is always selected. A summary of each statement will be recorded in the patient's connections history and a copy of each statement will be saved in the Document Manager for the corresponding guarantor and for any other patients who have that guarantor.
-
To send an electronic statement (e-statement) to the patient, in addition to having the statement printed and mailed for you, select the Send eStatement checkbox. To not send an e-statement, leave the checkbox clear.
-
Click (or tap) Print & Mail.
If you have not accepted the terms and conditions while logged in to the current location, the Pricing Details - Print & Mail for Me Option dialog box appears.
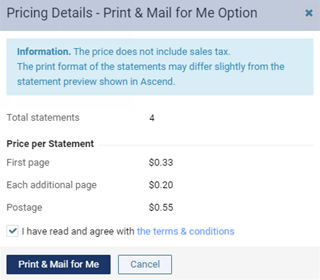
Note: You do not have to accept the terms and conditions again for this location unless the terms and conditions change, such as if the pricing changes.
-
To read the terms and conditions, click (or tap) the the terms & conditions link. The document opens on a new browser tab.
-
To accept the terms and conditions, select the I have read and agree with the terms & conditions checkbox.
-
Click (or tap) Print & Mail for Me.
-
-
Send electronic statements (e-statements) to the selected guarantors:
-
From the Actions button menu, point to (or tap) Send eStatement only.
-
To record a summary of each statement in the connections history and save a copy of each statement in the Document Manager for the corresponding guarantor and for any other patients who have that guarantor, leave the Add to Patient Connection checkbox selected. To not record each statement as a patient connection or save a copy of each statement, clear the checkbox.
-
Click (or tap) Send.
-
If you chose to print the statements, one .pdf file that contains a statement for each of the selected guarantors opens on a new browser tab so you can print those statements.
Notes:
-
Each statement starts on a new page of the document, and a statement may be longer than one page.
-
Printed statements fit in #9 single- and dual-window envelopes and #10 single-window envelopes.
-
If the Add to Patient Connection checkbox was selected, the "last billed date" is updated for the selected guarantors and all patients who have those guarantors, which affects which statements get generated if you generate a batch of statements in the future using the Only generate statement if not billed since option.
-
3. Recare
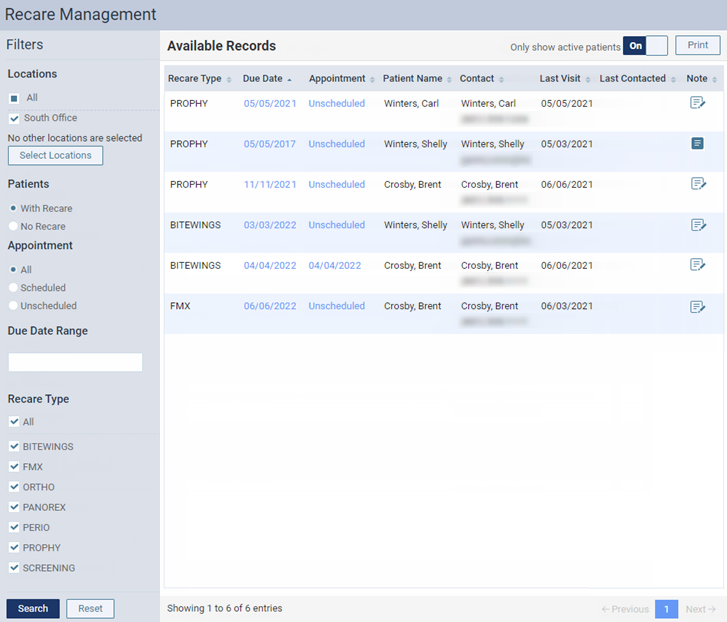
Viewing the Recare Management Report
Recare Management Report
The Recare Management Report lists the patients with and/or without recare attached and who have and/or do not have scheduled recare appointments.
To run the report
-
On the Home menu, under Reports, select Recare Management.
The Recare Management page opens.
-
Set up the following Filters as needed:
-
Locations - Select All to view recare types for all locations, or select specific locations to view recare types for only those locations (only locations that you have access to are available). The report uses the location in which a given recare type was added to a patient record. It does not use the patient's preferred location, unless the patient does not have a given recare type attached, or the location of his or her recare appointment.
-
Patients - Select whether you want to view only patients with one or more recare types attached or only patients without any recare types attached.
-
Appointment - Select whether you want to view all recare patients (with and without a scheduled recare appointment), only patients with a scheduled recare appointment, or only patients without a scheduled recare appointment.
-
Due Date Range - Enter a date range to view only those recare patients that have a due date within the specified date range.
-
Recare Type - Select the All checkbox to view patients with any recare type attached, or clear the checkboxes that correspond to the recare types that you want to exclude from the report, respectively.
-
-
Click (or tap) Search
-
To print the report, click (or tap) Print.
Tips:
-
If an automated reminder was sent to a patient, the Last Contacted column indicates whether the communication was sent by text or email and when it was sent.
-
You can group patients by family by clicking (or tapping) the Patient Name column header to sort the list by last name.
You can do any of the following while viewing the report:
-
You can either leave the Only show active patients filter set to On to view only active patients in the list or switch the filter to Off to view active and inactive patients in the list. If the option is set to Off, any inactive patients in the list will appear in gray text.
-
You can click (or tap) any date link in the Due Date column to go to the corresponding patient's Recare page.
-
You can click (or tap) any Unscheduled link in the Appointment column to open the Calendar page to the due date for the corresponding recare for the patient.
-
You can click (or tap) any date link in the Appointment column to open the Calendar page to the corresponding patient's appointment.
-
You can click (or tap) any note icon in the Note column to view, edit, or add information (such as thoughts, progress, and next steps) regarding the corresponding recare for the patient. You can refer to and update the notes as needed when you communicate or follow up with the patient.

If the icon is a white notebook with a pencil, there is not a note for the corresponding recare for the patient.

If the icon is a blue notebook, there is a note for the corresponding recare for the patient.
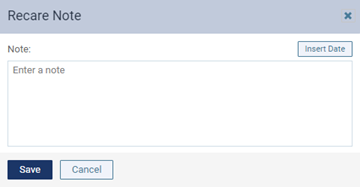
In the Recare Note dialog box, enter or edit text. To insert today's date where the text cursor is located in the box, click Insert Date. Then, click Save.
4. Letters and postcards
Creating recipient lists for letters
Creating recipient lists for letters
Using criteria filters you specify, you can generate a recipient list of patients who should receive a letter or postcard that contains patient and practice information that has been merged into a letter template.
To create a recipient list
On the Home menu, under Location, select Letters.
The Letters page opens.
-
Select the type of letter template that you want to create a recipient list for. You can choose from the following types of letter templates (which are contained in sections that you can expand and collapse): Appointment Reminder, Birthday, Collection, Labels, Miscellaneous, New Patient Welcome, Recare Appointment Reminder, Recare Due, and Referrals.
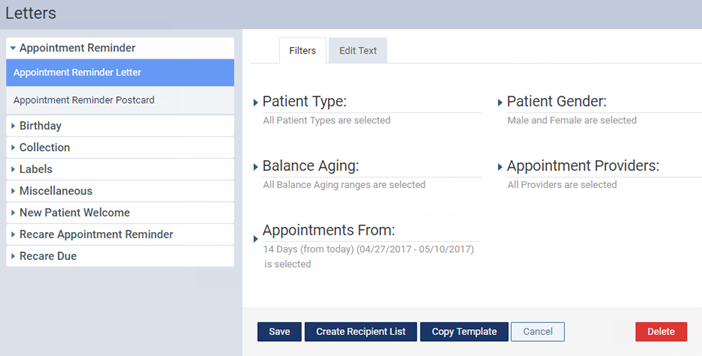
-
Change the filters and/or content of the letter template as needed.
-
Click (or tap) Create Recipient List.
A progress indicator appears as Dentrix Ascend processes the letter merge, and then the Recipient List appears.
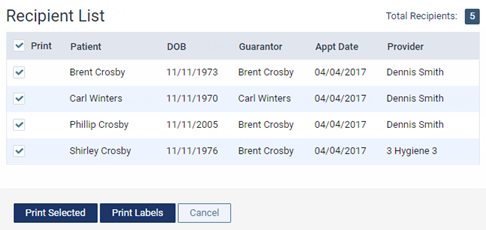
-
Select or clear the Print checkbox at the top of the list selected to include or exclude all patients who are listed, or select or clear the Print checkboxes next to the names of the patients who you want to include or exclude.
-
Click (or tap) Print Selected to view the letters or postcards for the selected patients as a .pdf file that you can print or save.
-
If applicable, click (or tap) Print Labels to print mailing labels to put on envelopes or postcards for the selected patients.