Searching for available appointment times
You can search for openings on your calendar where you can schedule appointments.
To search for available appointment times
-
Do one of the following:
-
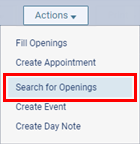
On the Schedule menu, select Search for Openings.
-
If you are viewing the Calendar page, on the Actions menu, select Search for Openings.
-
If you are viewing a patient's Appointments page, click (or tap) Search for Openings.

The Search for Openings page opens.
-
-
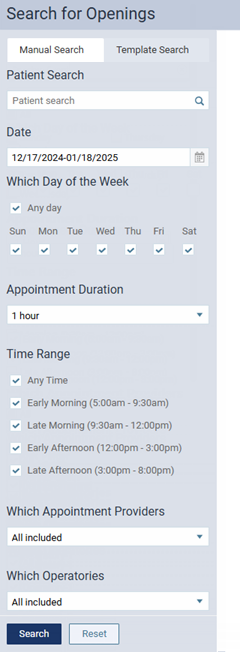
Set up the Manual Search or Template Search filters that you want to use to search for open time slots.
Set up the following options:
-
Manual Search - Select this tab to perform a search for openings based on operatory or provider availability:
-
Patient Search - The name of the patient whose record you last accessed appears by default; or if no patient has been selected since the last time you logged in, the field is blank. The name entered, if any, will be used by default on the appointment you schedule by using this search tool. To clear a patient's name from the field, click (or tap) the Remove button
 next to his or her name. To select a different patient's name, begin typing the desired name in the field to view a list of matches, continue typing to narrow the results, and then click (or tap) the appropriate name.
Note: With a patient selected, the selections for the Which Day of the Week and Time Range filters correspond to that patient's preferences by default. Also, any changes that you make to any of the filters persist for the next time you search for openings with that patient selected until you log off.
-
Date - The date range within which to search for open times. By default, the range is 31 days from today. To change the date, click (or tap) in the box to view a two-month calendar, select the desired Start date and End date, and then click (or tap) Done.
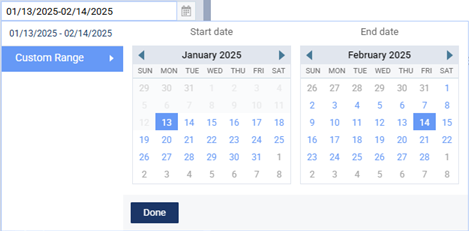
Note: The Date is remembered per Dentrix Ascend user. The specified date is the default for the next time you search for openings, regardless of which computer you use.
-
Which Day of the Week - The Monday, Tuesday, Wednesday, Thursday, and Friday checkboxes are selected by default. Select the Any day checkbox to include all days of the week in your search. Select or clear the checkbox of any day of the week that you want to include in or exclude from the search. Open times for only the specified days will appear in the results list.
-
Appointment Duration - The 1 Hour option is selected by default. Select the length of time required for the appointment that you want to schedule. Depending on your location's scheduling time increments, you can choose a length of time from 10 or 15 minutes to 3 hours, in 10 or 15 minute increments. Open times that are of the specified length will appear in the results list.
-
Time Range - Any time is selected by default to include all times of the day in your search. Select or clear the checkbox of any time range (Early Morning, Morning, Early Afternoon, and Late Afternoon) that you want to include in or exclude from the search. Open times within only the specified time ranges will appear in the results list.
-
Which Appointment Providers - Do one of the following:
-
To include open times for all providers (according to their working hours) in the results list, select All included.
-
To include open times for only the specified providers (according to their working hours) in the results list, select or clear the checkbox of any provider who you want to include in or exclude from your search.
-
To search only by operatory availability (not by provider availability), do not select any providers. If no providers are selected, a Provider column does not appear in the results list. Not selecting any providers allows you to double-book a provider when you are viewing the results list.
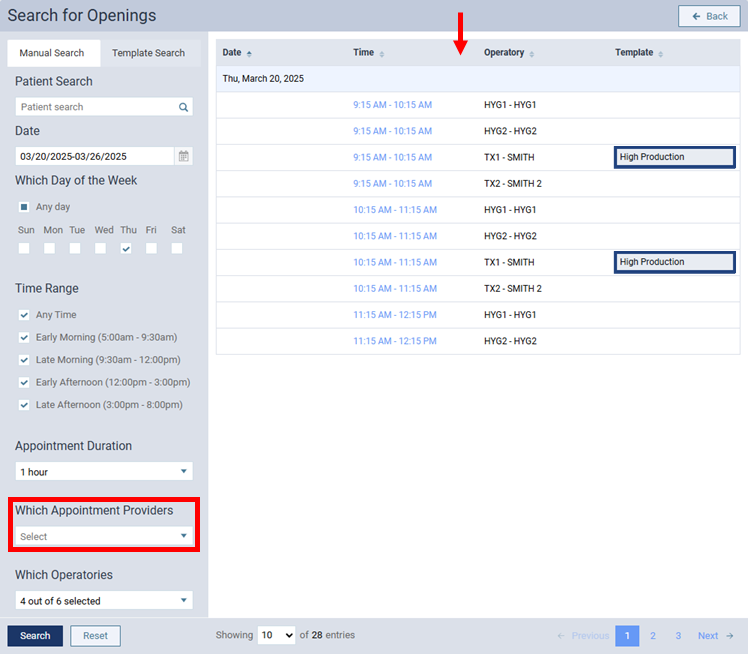
Note: However, if at least one provider and one operatory are selected for your search, openings based on operatory and provider availability will appear in the results list.
-
-
Which Operatories - All included is selected by default to include all operatories in your search. On the list, select or clear the checkbox of any operatory that you want to include in or exclude from the search. Open times for only the specified operatories will appear in the results list.
-
-
Template Search - Select this tab to perform a search for openings based on scheduling templates or operatory availability (not provider availability):
-
Patient Search - The name of the patient whose record you last accessed appears by default; or if no patient has been selected since the last time you logged in, the field is blank. The name entered, if any, will be used by default on the appointment you schedule by using this search tool. To clear a patient's name from the field, click (or tap) the Remove button
next to his or her name. To select a different patient's name, begin typing the desired name in the field to view a list of matches, continue typing to narrow the results, and then click (or tap) the appropriate name.Note: With a patient selected, the selections for the Which Day of the Week and Time Range filters correspond to that patient's preferences by default. Also, any changes that you make to any of the filters persist for the next time you search for openings with that patient selected until you log off.
-
Date - The date range within which to search for open times. By default, the range is 31 days from today. To change the date, click (or tap) in the box to view a two-month calendar, select the desired Start date and End date, and then click (or tap) Done.
Note: The Date is remembered per Dentrix Ascend user. The specified date is the default for the next time you search for openings, regardless of which computer you use.
-
Which Day of the Week - The Monday, Tuesday, Wednesday, Thursday, and Friday checkboxes are selected by default. Select the Any day checkbox to include all days of the week in your search. Select or clear the checkbox of any day of the week that you want to include in or exclude from the search. Open times for only the specified days will appear in the results list.
-
Appointment Duration - The 1 Hour option is selected by default. Do one of the following:
-
Select the length of time required for the appointment that you want to schedule. Depending on your location's scheduling time increments, you can choose a length of time from 10 or 15 minutes to 3 hours, in 10 or 15 minute increments. Open times that are of the specified length will appear in the results list.
-
Select the Template Length option. With this option selected, an opening is included in the results only if (1) the total duration of any of the selected templates for the Schedule Template filter is not longer than the opening and (2) nothing is booked on the template.
-
-
Schedule Templates - All included is selected by default to include all scheduling templates in your search. On the list, select or clear the checkbox of any template that you want to include in or exclude from the search. Open times for only the specified templates will appear in the results list.
-
-
-
Click (or tap) Search.
Note: You can click (or tap) Reset to put the filters back to their default values so that you can set up a different search.
The first page of results that match the specified criteria appears.
Notes:
-
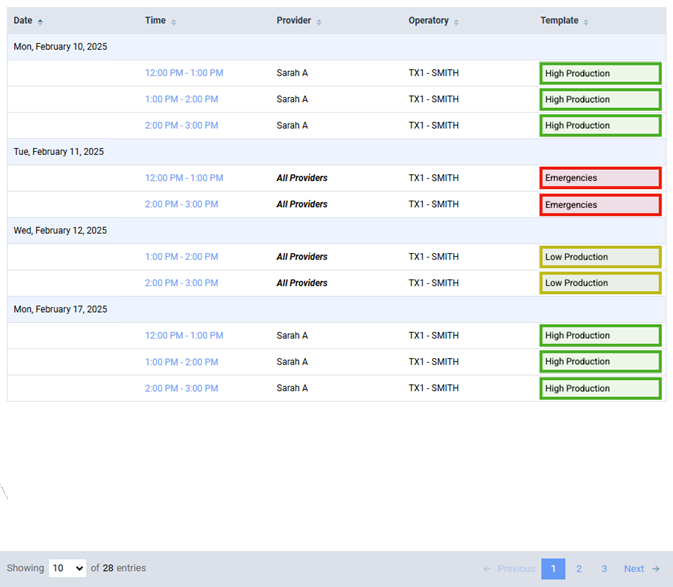
The results are grouped by day.
-
The results are paginated. To navigate between pages, click (or tap) Previous, Next, or a page number in the lower-right corner.
-
By default, 10 results per page appear, but you can specify how many results per page to view by selecting a different number from the Showing list in the lower-left corner.
-
The results show openings by a specified appointment duration (for example, if the appointment duration is 30 minutes in the filters, openings every 30 minutes appear in the results).
-
-
As needed, sort the list by date, time, provider, operatory, or schedule template name by clicking (or tapping) the applicable header. When you click (or tap) a header that is not already the one being used to sort the list, the list is sorted in ascending order by that column. Click (or tap) the same header again to sort the list in descending order by that column.
-
Click (or tap) the desired Time link to go to that opening on the Calendar page.