Requesting a patient form be redone
While you are reviewing a patient form, you can send a request to redo the form. If it has been no longer than one month since the the form was completed originally, the form in the online portal is pre-filled with all the patient’s previous responses so the patient can quickly correct or update inaccurate or incomplete information instead of having to start from scratch.
Notes:
-
The form in the portal will be pre-filled with information from the patient's record, as with any form, but by requesting a redo, the form also includes the patient's responses to all questions, including custom questions.
-
The form in the portal will be pre-filled with the patient's previous responses for up to one month from the date of the form's original completion (the "Received" date). That one-month time limit resets each time you request a redo.
-
The original version of the completed form remains in the patient's record when you send the request to redo the form. When the patient completes the form again, the new version is saved in the patient's record as a separate entry.
To send a request to redo a form
-
Do one of the following:
-
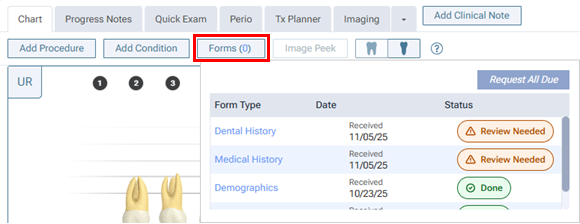
While viewing the Chart tab of a patient's clinical record, click (or tap) Forms and then a completed form.
Do the following:
-
If the correct patient is not already selected, use the Patient Search box to access the patient's record.

On the Patient menu, under Clinical, select Chart.
The patient's clinical record opens with the Chart tab selected.
-
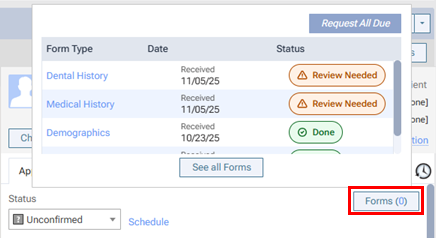
Click (or tap) Forms to view a pop-up box that displays the published patient forms that are applicable for the patient. If a form has a "Done" or "Review Needed" Status, click (or tap) the form's name in the Form Type column or the form's status icon in the Status column.
-
-
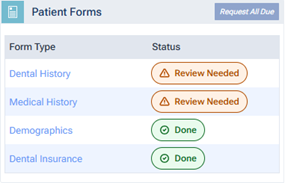
While viewing a patient's Overview page, in the Patient Forms box, click (or tap) a completed form.
Do the following:
-
If the correct patient is not already selected, use the Patient Search box to access the patient's record.
-
If the patient's Overview page is not already open, do one of the following:
-
Click (or tap) the Patient menu.
-
On the Patient menu, under General, select Overview.
The patient's Overview page opens.
-
-
The Patient Forms box displays the published patient forms that are applicable for the patient. If a form has a "Done" or "Review Needed" Status, click (or tap) the form's name in the Form Type column or the form's status icon in the Status column.
-
-
While viewing the Patient Forms section of a patient's Patient Information page, click (or tap) a completed form.
Do the following:
-
If the correct patient is not already selected, use the Patient Search box to access the patient's record.
-
Do one of the following:
-
If the patient's Overview page is not already open, on the Patient menu, under General, select Overview. The patient's Overview page opens. Click (or tap) the title bar (at the top) of the Patient Forms box.
The patient's Patient Information page opens with Patient Forms selected on the navigation panel (on the left).
-
On the Patient menu, under General, select Patient Information. The patient's Patient Information page opens. Select Patient Forms on the navigation panel (on the left).
-
-
The patient forms that are associated with the patient's record appear. If a form has a "Done" or "Review Needed" Status, click (or tap) the form's View icon
 in the Actions column.
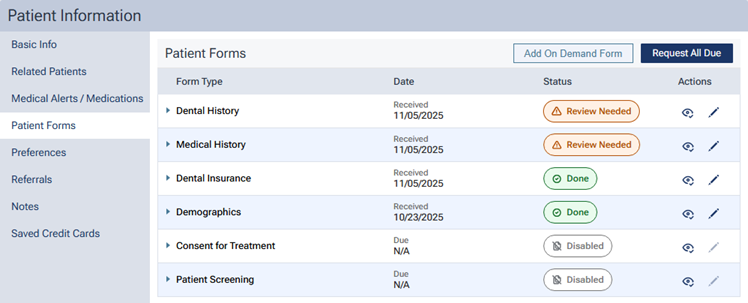
-
-
While viewing a patient's appointment, click (or tap) Forms and then a completed form.
Do the following:
-
Do one of the following:
-
Click (or tap) the Schedule menu.
-
On the Schedule menu, select Calendar.
The Calendar page opens.
-
Click (or tap) an appointment.
The Appointment Information panel opens.
-
Click (or tap) Forms to view a pop-up box that displays the published patient forms that are applicable for the patient.
-
If a form has a "Done" or "Review Needed" Status, click (or tap) the form's name in the Form Type column or the form's status icon in the Status column.
-
-
While confirming a patient's appointment, click (or tap) Forms and then a completed form.
Do the following:
-
On the Schedule menu, select Unconfirmed Appointments.
The Unconfirmed Appts page opens.
-
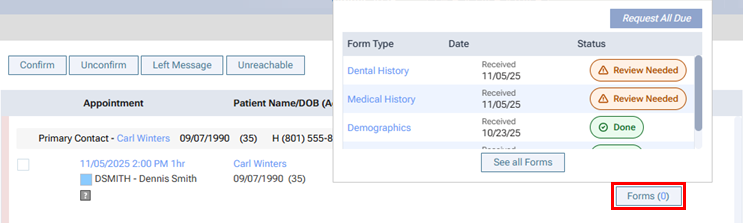
Click (or tap) Forms to view a pop-up box that displays the published patient forms that are applicable for the patient.
-
If a form has a "Done" or "Review Needed" Status, click (or tap) the form's name in the Form Type column or the form's status icon in the Status column.
-
-
While viewing a patient's appointment card on the routing panel, click (or tap) Forms and then a completed form.
Do the following:
-
Locate the patient's appointment card.
-
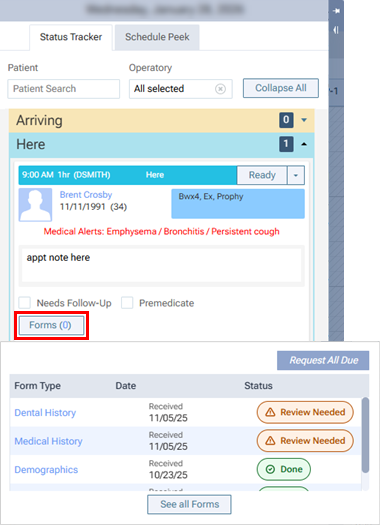
Click (or tap) Forms to view a pop-up box that displays the published patient forms that are applicable for the patient.
-
If a form has a "Done" or "Review Needed" Status, click (or tap) the form's name in the Form Type column or the form's status icon in the Status column.
-
The completed form appears in the Review Form dialog box.

-
-
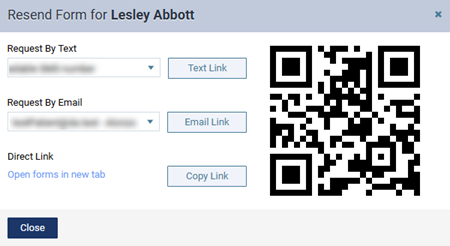
Click Resend Form.
The Resend Form for [Patient Name] dialog box appears.
-
Do one of the following:
-
To send the portal link to a mobile phone number, select the desired number from the list, and then click (or tap) Text Link. This button is available only if the patient has a mobile phone number entered in his or her record. The mobile phone numbers of the patient and his or her primary contact are available for selection.
-
To send the portal link to an email address, select the desired address from the list, and then click (or tap) Email Link. This button is available only if the patient has an email address entered in his or her record. The email addresses of the patient and his or her primary contact are available for selection.
-
To copy the portal link to the Windows Clipboard, click (or tap) Copy Link. You can then paste the link in a document or email message for the patient.
-
To open the patient's portal on another tab of your Web browser (for instance, if you are opening it on a practice-owned mobile device that the patient can use to complete forms in the office; be sure to close any other Dentrix Ascend tabs before giving the device to the patient), you can click (or tap) the Open forms in new tab link.
-
To access the patient's portal link on a mobile device, use the camera on that device to scan the QR code, and then tap the link that appears on the mobile device.
Important:
-
Since using a mobile device to scan a QR Code to open a patient's portal registers that mobile device with Dentrix Ascend, you should use a mobile device that is owned by your practice.
-
Using a QR code requires that your mobile device meet the following specifications: for an Apple device, iOS 11 and the Safari browser; or for an Android device, Android 4 or newer and the Chrome browser.
-
-
-
Click Close.