Printing claims
You can print claims that were created previously but not sent to insurance carriers.
Note: Printing a claim with a Queued status will stop the claim from being sent to the carrier.
To print a claim
-
Do one of the following:
-
How to get there
-
On the Home menu, under Insurance, click (or tap) Unsent Claims.
The Unsent Claims page opens.
On the Unsent Claims page, click (or tap) a claim. Claims displayed in the color green have a Ready status.
Important: Fix the problems for claims with a Warning (yellow) and/or Needs Attention (red) status before attempting to print the corresponding claim. To view and edit claim details, click (or tap) a claim.

-
-
How to get there
-
If the correct patient is not already selected, use the Patient Search box to access the patient's record.
Note: You can include inactive patients in the search results by setting the Include inactive patients switch to On.
-
On the Patient menu, under Insurance, click (or tap) Insurance Claims.
The patient's Insurance Claims page opens.
On a patient's Insurance Claims page, click (or tap) a claim with a status of Unsent.

-
-
How to get there
-
If the correct patient is not already selected, use the Patient Search box to access the patient's record.
Note: You can include inactive patients in the search results by setting the Include inactive patients switch to On.
-
Do one of the following:
-
On the Patient menu, under General, click (or tap) Overview. The patient's Overview page opens. Click (or tap) the Ledger box.

-
On the Patient menu, under Financial, click (or tap) Ledger.
The patient's Ledger page opens.
-
On a patient's Ledger page, click (or tap) a claim with a status of Unsent.

-
The Claim Detail dialog box appears.

-
-
If the claim does not have any electronic attachments, to create a .pdf file of the claim, which you can print, click (or tap) Print.
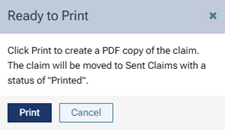
A Ready to Print message appears.

-
Click (or tap) Print.
A .pdf file is created and appears on a new browser tab.
Note: For a pre-printed Denti-Cal claim form, the .pdf file has claim information only (no boxes, lines, or labels).
-
Click the Print this file button
 .
.A print preview appears.
-
If the claim is to be printed on a pre-printed Denti-Cal claim form, put a pre-printed Denti-Cal claim form sheet of paper in your printer; otherwise, make sure that there is a blank sheet of paper in your printer.
-
Make sure that the correct printer is selected, and then click Print.