Manually posting a payment for a claim on an ERA
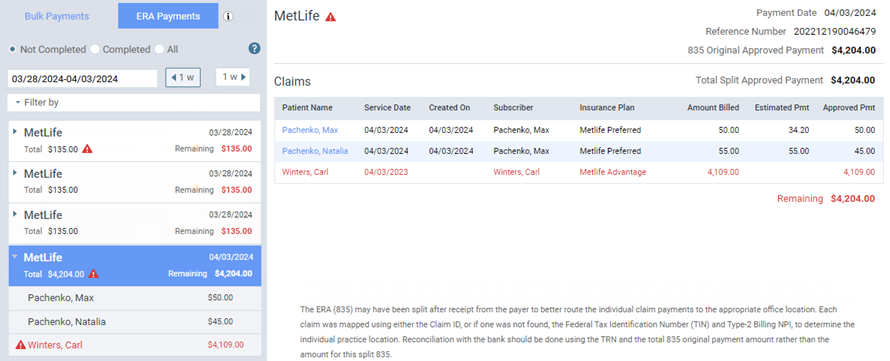
You can manually post a payment for each claim that pertains to an ERA that Dentrix Ascend receives through the clearinghouse.
To manually post a payment for a claim on an ERA
-
How to get there
-
If you are not already viewing the correct location, select it on the Location menu.
-
On the Home menu, under Insurance, click (or tap) Bulk/ERA Insurance Payments.
The Bulk/ERA Insurance Payments page opens.

-
Select the ERA Payments tab on the left panel.
ERAs for claims that correspond to the current location appear.
On the ERA Payments tab of a location's Bulk/ERA Insurance Payments page, click (or tap) an ERA on the left panel.

On the left panel, the patient name and payment amount of each claim that pertains to the selected ERA appears.

-
-
On the left panel, select a claim. On the right, the details of the claim appear.

-
If the selected claim on the ERA is not matched to a claim in Dentrix Ascend, you must match the claim manually to post a payment to it; otherwise, skip this step.
-
Click Enter Claim Payment.
The Enter Claim Payment dialog box appears and is pre-populated with information from the ERA.

Notes:
-
You can move the Enter Claim Payment dialog box by dragging it by the title bar (position your pointer over the title bar to see the move cursor).
-
You can resize the Enter Claim Payment dialog box by dragging the bottom edge of the dialog box up or down (position your pointer over the bottom edge to see the resize cursor).
-
The Enter Claim Payment button and the other buttons (Quick-Post Claim Payment, Next Claim, and Prev. Claim) are not available until you close the Enter Claim Payment dialog box by clicking Save or Cancel.

-
-
Except for the claim, make changes to the payment details as needed.
-
Record denial codes as needed.
-
Click Save.
Notes:
-
A green check mark symbol appears next to the claim on the left panel to indicate that an insurance payment has been posted for that claim.

-
If insurance payments have been posted for all the claims on an ERA, Dentrix Ascend automatically marks the ERA as Completed. To view a completed ERA, on the left panel, select the Completed option.

-