Managing ERA payment options
You can configure how Dentrix Ascend handles the posting of insurance payments for claims that pertain to a given ERA that is received through the clearinghouse. You allow quick and/or automatic postings of payments. Also, you can allow partial payments for quick/automatic postings.
Notes:
-
Managing ERA payment options requires the "Manage ERA Payment Options" security right.
-
The ERA payment options apply to all locations in your organization.
-
All quick/automatic postings are recorded in the audit log.
To change the ERA payment options
-
On the Home menu, under Insurance, click (or tap) Bulk/ERA Insurance Payments.
-
The Bulk/ERA Insurance Payments page opens.

-
Select the ERA Payments tab on the left panel.

-
Click (or tap) Manage ERA Payment Options.
The ERA Payment Options dialog box appears.

-
Set up the following options as needed:
-
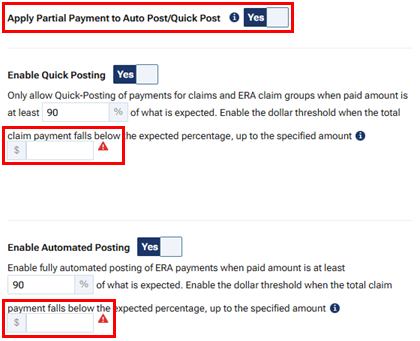
Apply Partial Payment to Auto Post/Quick Post:
-
With the switch set to No, the automatic or quick posting of a partial payment for a claim on an ERA never occurs.
-
With the switch set to Yes, the automatic or quick posting of a partial payment for a claim on an ERA can occur if the approved payment amount on the ERA is (a) below the specified percentage of the amount expected from insurance but (b) more than the specified dollar amount threshold.
Notes:
-
If Enable Quick Posting is set to Yes, a dollar amount threshold is required (the box cannot be empty).
-
If Enable Automated Posting is set to Yes, a dollar amount threshold is required (the box cannot be empty).

-
-
-
Enable Quick Posting:
-
With the switch set to No, the quick posting of a payment does not occur.
-
With the switch set to Yes, one of the following occurs:
-
If the approved payment amount on the ERA is greater than or equal to the specified minimum percentage of the amount expected from insurance, the quick posting of a payment occurs.
-
If the approved payment amount on the ERA is less than the specified minimum percentage of the amount expected from insurance:
-
If the dollar amount threshold is not specified, the quick posting of a payment does not occur.
-
If the approved payment amount on the ERA is less than or equal to the specified dollar amount threshold, the quick posting of a payment occurs.
-
If the approved payment amount on the ERA is greater than the specified dollar amount threshold:
-
With Apply Partial Payment to Auto Post/Quick Post set to Yes, the quick posting of a partial payment occurs (the Additional payment(s) expected later from insurance checkbox is selected automatically for the payment).
-
With Apply Partial Payment to Auto Post/Quick Post set to No, the quick posting of a payment does not occur.
-
-
-
-
-
Enable Automated Posting:
-
With the switch set to No, the automatic posting of a payment does not occur.
-
With the switch set to Yes, one of the following occurs:
-
If the approved payment amount on the ERA is greater than or equal to the specified minimum percentage of the amount expected from insurance, the automatic posting of a payment occurs.
-
If the approved payment amount on the ERA is less than the specified minimum percentage of the amount expected from insurance:
-
If the dollar amount threshold is not specified, the automatic posting of a payment does not occur.
-
If the approved payment amount on the ERA is less than or equal to the specified dollar amount threshold, the automatic posting of a payment occurs.
-
If the approved payment amount on the ERA is greater than the specified dollar amount threshold:
-
With Apply Partial Payment to Auto Post/Quick Post set to Yes, the automatic posting of a partial payment occurs (the Additional payment(s) expected later from insurance checkbox is selected automatically for the payment).
-
With Apply Partial Payment to Auto Post/Quick Post set to No, the automatic posting of a payment does not occur.
-
-
-
-
Note: Also, see the topic about the additional criteria for determining if a quick/automatic payment is posted.
-
-
Click (or tap) Save.
Notes:
-
In your location's inbox, you can view the ERAs that have been received.
-
There is an indicator to help you identify payments that were posted automatically or quickly for claims on ERAs versus payments that were posted manually. (For more information about quickly posting payments, see the topics about quickly posting a payment for a claim on an ERA and quickly posting a payment for all claims on an ERA.) For an automatically or quickly posted payment, an "A" appears in the following areas:
-
The entry in a patient's ledger.

-
The upper-right corner of the Edit Payment dialog box.

-