Importing images
You can import image files (.bmp, .png, .jpg, and .tiff files), CAD/CAM scan files (.sty and .ply files), and 3D volume files (.dcm files) from third-party imaging programs to attach to a patient's record in Dentrix Ascend Imaging. Images that have been exported from a third-party imaging program can be for work performed outside the office (such as by a specialist) or for existing work performed by another office (before the patient became a patient of record with your office). When you receive those image files, you can import them as existing procedures or completed procedures.
To import images
-
If the correct patient is not already selected, use the Patient Search box to access the patient's record.
Note: You can include inactive patients in the search results by setting the Include inactive patients switch to On.
-
On the Patient menu, under Clinical, select Chart, Progress Notes, Quick Exam, Perio, Tx Planner, or Imaging.
-
On the Chart, Progress Notes, Perio, Tx Planner, or Imaging tab of a patient's clinical record, on the Imaging tab's menu, select Acquire images.

The options for acquiring images become available.

-
On the navigation panel, select one of the following tabs:
-
Favorites - This tab contains the imaging procedures for the current location that have been marked as favorites. This tab is available only if there are favorite imaging procedures for the current location. If there are favorite imaging procedures for the current location, this tab is selected by default.
-
Standard - This tab contains the standard imaging procedures that come with Dentrix Ascend Imaging. This tab is available for all locations. If there are not any favorite imaging procedures for the current location, this tab is selected by default.
-
Custom - This tab contains custom imaging procedures. This tab is available only if custom imaging procedures exist.
On the Custom tab, you can filter procedures according to the following options:
-
Organization - Displays all custom procedures that were created in your organization.
-
Location - Displays only the custom procedures that were created in the location that you are currently viewing.
-
User - Displays only the custom procedures that were created by the user whose account you are currently logged in with.

Note: By default, Location is selected the first time you access Imaging. Whichever option you select after that is saved for the next time you view the custom procedures list.
-
-
-
Select the correct imaging procedure.
Note: Each procedure corresponds to a particular acquisition type: individual intraoral X-ray, intraoral X-ray series, extraoral X-ray, intraoral photo, extraoral photo, set of photos, CAD/CAM scan, or 3D volume.
The options for the selected procedure become available.

-
Under Billing Options, set up the following options:
-
Without interpretation/analysis - If no interpretation or analysis of the acquired images will be done in your office, to use the alternative procedure code for the selected imaging procedure, select the Without interpretation/analysis using code [code] checkbox.
Note: The alternative code that appears varies according to the selected procedure.
-
Apply charges - To post the fee for the selected procedure (such as D0210 for a full mouth series), select the checkbox. To post a zero amount for the procedure, clear the checkbox.
-
Bill to insurance - Specify whether you want to bill or not bill the patient's insurance carrier for the procedure by selecting or clearing the checkbox.
-
Select provider - Select the provider who you want to associate with the procedure.
Note: Only providers who have access to the current location and who are flagged as charting providers are available. Also, the provider who is selected by default is determined by the current location's Default procedure provider setting.
-
-
Set up the acquisition options that correspond to the acquisition type of the selected procedure.
Intraoral X-ray
Do the following:
-
If applicable for the selected procedure, on the Tooth chart, select the correct teeth:
-
For an individual bitewing image, at least one tooth of the maxillary arch and at least one tooth of the mandibular arch must be selected.
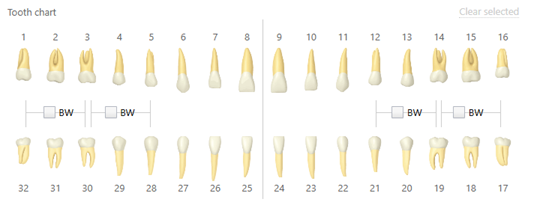
Note: The BW checkboxes are available for quickly selecting the most common teeth for bitewings.

-
For an individual periapical or occlusal image, at least one tooth of the maxillary or mandibular arch must be selected.

Note: The brackets are available for quickly selecting posterior teeth on both arches.

Note: To deselect all selected teeth, click (or tap) the Clear selected link.
-
-
Make sure that the Enable auto-repeat checkbox is not selected.

-
Do one of the following:
-
On the Input tab, select the Import From File device on the Available Devices menu if it is not already selected.

Note: For the complete list of acquisition devices that are supported by Dentrix Ascend Imaging, see the "Supported Acquisition Devices" section.
-
On the Import tab, select one of the following options:
-
Existing Procedure - Use this for a procedure that was performed prior to today (and may already have been billed to the patient's insurance carrier). Specify the date that the procedure was performed.
Note: With this option selected, the Apply charges and Bill to insurance checkboxes under Billing Options become unavailable because the procedure will be posted with a zero dollar fee and will not be billed to insurance. The procedure (which will have an "Existing" status) will appear in the patient's clinical record but not on the patient's ledger.
-
Completed Procedure - Use this for a procedure that you are performing. Today's date and time will be associated with the procedure.
Note: The procedure (which will have a "Completed" status) will appear in the patient's clinical record and on the patient's ledger.

-
-
Intraoral X-ray series
Do the following:
-
Specify the acquisition sequence:
-
For a full-mouth series, from the sequence list, select Default sequence or a custom order (if available).

-
For a 2-bitewing series, select the 2BW Center, 2BW Left, or 2BW Right option. Then, from the sequence list, select Default sequence or a custom order (if available).

Note: Tooth numbers (using default sequence):
-
Center - (1) 3, 4, 5, 28, 29, 30; and (2) 12, 13, 14, 19, 20, 21.
-
Left - (1) 12, 13, 14, 19, 20, 21; and (2) 14, 15, 16, 17, 18, 19.
-
Right - (1) 1, 2, 3, 30, 31, 32; and (2) 3, 4, 5, 28, 29, 30.
-
-
For a 3-periapical series, select the Maxillary or Mandibular option. Then, from the sequence list, select Default sequence or a custom order (if available).

-
For a 4-bitewing + 3-periapical series, select the Maxillary or Mandibular option. Then, from the sequence list, select Default sequence or a custom order (if available).

-
For a 4-bitewing + 4-periapical series, select the 4BW + 4PA or 4BW + 4PA Alt option. Then, from the sequence list, select Default sequence or a custom order (if available).

-
For a 7-bitewing + 3-periapical series, select the Maxillary or Mandibular option. Then, from the sequence list, select Default sequence or a custom order (if available).

-
For other series (such as 4-bitewing, 7-bitewing, 2-bitewing + 2-occlusal, 2-bitewing + 2-periapical, 4-bitewing + 2-periapical, and 4-bitewing + 6-periapical), from the sequence list, select Default sequence or a custom order (if available).

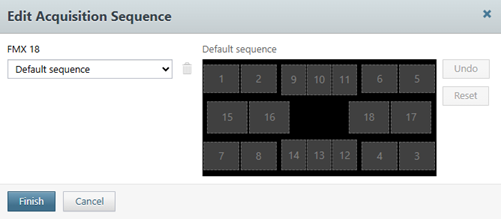
Note: To manage the acquisition sequences for the selected imaging procedure, do the following:
-
Next to the sequence list, click (or tap) Edit.

The Edit Acquisition Sequence dialog box appears.
-
Do any of the following:
-
To add a sequence, do the following:
-
Click (or tap) each placeholder of the sequence diagram in the order that you will acquire the images.

To undo previous order selections, click (or tap) Undo as needed. To undo all order selections, click (or tap) Reset.
-
When you finish specifying the order for all placeholders, to save the custom sequence for future use, enter a name for the sequence in the Start typing a new name box, and then click (or tap) Save as ([sequence name]).

-
-
To delete a custom sequence, with that sequence selected in the sequence list, click (or tap) the blue Delete button
 , which then turns red, and then click (or tap) the button again.
-
-
Click (or tap) Finish.
-
-
Do one of the following:
-
On the Input tab, select the Import From File device on the Available Devices menu if it is not already selected.

Note: For the complete list of acquisition devices that are supported by Dentrix Ascend Imaging, see the "Supported Acquisition Devices" section.
-
On the Import tab, select one of the following options:
-
Existing Procedure - Use this for a procedure that was performed prior to today (and may already have been billed to the patient's insurance carrier). Specify the date that the procedure was performed.
Note: With this option selected, the Apply charges and Bill to insurance checkboxes under Billing Options become unavailable because the procedure will be posted with a zero dollar fee and will not be billed to insurance. The procedure (which will have an "Existing" status) will appear in the patient's clinical record but not on the patient's ledger.
-
Completed Procedure - Use this for a procedure that you are performing. Today's date and time will be associated with the procedure.
Note: The procedure (which will have a "Completed" status) will appear in the patient's clinical record and on the patient's ledger.

-
-
Extraoral X-ray
Do the following:
-
Do one of the following:
-
On the Input tab, select the Import From File device on the Available Devices menu if it is not already selected.

Note: For the complete list of acquisition devices that are supported by Dentrix Ascend Imaging, see the "Supported Acquisition Devices" section.
-
On the Import tab, select one of the following options:
-
Existing Procedure - Use this for a procedure that was performed prior to today (and may already have been billed to the patient's insurance carrier). Specify the date that the procedure was performed.
Note: With this option selected, the Apply charges and Bill to insurance checkboxes under Billing Options become unavailable because the procedure will be posted with a zero dollar fee and will not be billed to insurance. The procedure (which will have an "Existing" status) will appear in the patient's clinical record but not on the patient's ledger.
-
Completed Procedure - Use this for a procedure that you are performing. Today's date and time will be associated with the procedure.
Note: The procedure (which will have a "Completed" status) will appear in the patient's clinical record and on the patient's ledger.

-
-
Intraoral/extraoral photos
Do the following:
-
If you are importing a set of intraoral or extraoral photos using a custom imaging procedure, from the sequence list, select Default sequence or a custom order (if available).

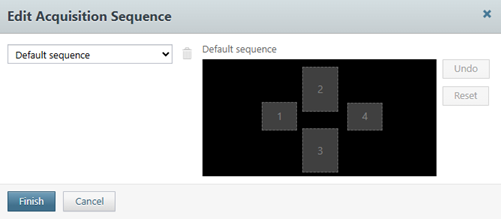
Note: To manage the acquisition sequences for the selected imaging procedure, do the following:
-
Next to the sequence list, click (or tap) Edit.

The Edit Acquisition Sequence dialog box appears.
-
Do any of the following:
-
To add a sequence, do the following:
-
Click (or tap) each placeholder of the sequence diagram in the order that you will acquire the images.

To undo previous order selections, click (or tap) Undo as needed. To undo all order selections, click (or tap) Reset.
-
When you finish specifying the order for all placeholders, to save the custom sequence for future use, enter a name for the sequence in the Start typing a new name box, and then click (or tap) Save as ([sequence name]).

-
-
To delete a custom sequence, with that sequence selected in the sequence list, click (or tap) the blue Delete button
 , which then turns red, and then click (or tap) the button again.
-
-
Click (or tap) Finish.
-
-
Do one of the following:
-
On the Input tab, select the Import From File device on the Available Devices menu if it is not already selected.

Note: For the complete list of acquisition devices that are supported by Dentrix Ascend Imaging, see the "Supported Acquisition Devices" section.
-
On the Import tab, select one of the following options:
-
Existing Procedure - Use this for a procedure that was performed prior to today (and may already have been billed to the patient's insurance carrier). Specify the date that the procedure was performed.
Note: With this option selected, the Apply charges and Bill to insurance checkboxes under Billing Options become unavailable because the procedure will be posted with a zero dollar fee and will not be billed to insurance. The procedure (which will have an "Existing" status) will appear in the patient's clinical record but not on the patient's ledger.
-
Completed Procedure - Use this for a procedure that you are performing. Today's date and time will be associated with the procedure.
Note: The procedure (which will have a "Completed" status) will appear in the patient's clinical record and on the patient's ledger.

-
-
CAD/CAM scan
Do the following:
-
Do one of the following:
-
On the Input tab, select the Import From File device on the Available Devices menu if it is not already selected.

Note: For the complete list of acquisition devices that are supported by Dentrix Ascend Imaging, see the "Supported Acquisition Devices" section.
-
On the Import tab, select one of the following options:
-
Existing Procedure - Use this for a procedure that was performed prior to today (and may already have been billed to the patient's insurance carrier). Specify the date that the procedure was performed.
Note: With this option selected, the Apply charges and Bill to insurance checkboxes under Billing Options become unavailable because the procedure will be posted with a zero dollar fee and will not be billed to insurance. The procedure (which will have an "Existing" status) will appear in the patient's clinical record but not on the patient's ledger.
-
Completed Procedure - Use this for a procedure that you are performing. Today's date and time will be associated with the procedure.
Note: The procedure (which will have a "Completed" status) will appear in the patient's clinical record and on the patient's ledger.

-
-
3D image/volume
Do the following:
-
In the Acquisition type list, select the procedure that will be posted.

-
With Mandible, Maxilla, Both Jaws, or TMJ selected in the Acquisition type list, the applicable teeth are selected on the Tooth chart automatically for your reference. However, if Limited Field of View is selected, select the correct teeth on the Tooth chart by clicking (or tapping) one of the teeth in each applicable sextant or by clicking (or tapping) somewhere within the square bracket of each applicable sextant.

Note: To deselect all selected teeth, click (or tap) the Clear selected link. The link is available only if you have selected teeth manually.
-
If no interpretation or analysis of the acquired 3D volume will be done in your office, to use the alternative procedure code for the selected procedure in the Acquisition type list, clear the With interpretation/analysis checkbox.

Note: The codes for the procedures in the Acquisition type list change as you select or clear the With interpretation/analysis checkbox.
-
Do one of the following:
-
On the Input tab, select the Import From File device on the Available Devices menu if it is not already selected.

Note: For the complete list of acquisition devices that are supported by Dentrix Ascend Imaging, see the "Supported Acquisition Devices" section.
-
On the Import tab, select one of the following options:
-
Existing Procedure - Use this for a procedure that was performed prior to today (and may already have been billed to the patient's insurance carrier). Specify the date that the procedure was performed.
Note: With this option selected, the Apply charges and Bill to insurance checkboxes under Billing Options become unavailable because the procedure will be posted with a zero dollar fee and will not be billed to insurance. The procedure (which will have an "Existing" status) will appear in the patient's clinical record but not on the patient's ledger.
-
Completed Procedure - Use this for a procedure that you are performing. Today's date and time will be associated with the procedure.
Note: The procedure (which will have a "Completed" status) will appear in the patient's clinical record and on the patient's ledger.

-
-
-
-
Click (or tap) Start, and then import one or more images according to the acquisition type of the selected procedure.
Intraoral X-ray
Do the following:
-
In the Import File dialog box that appears, select the correct image file.

-
Click (or tap) Open.
The image is saved to the patient's record.
Then, if you are importing in endo mode, the Import File dialog box re-opens; otherwise, ignore the following steps.
-
While in endo mode, repeat steps a-b as needed to import additional images.
-
When you are finished importing in endo mode, in the Import File dialog box, click (or tap) Cancel. Then, click (or tap) Finish Acquisition.
Intraoral X-ray series
Do one of the following:
-
If you selected the Import from File option on the Input tab in step 7, do the following:
-
In the Import File dialog box that appears, select the correct image file.

-
Click (or tap) Open.
The image is saved to the patient's record, and a preview of the image appears. Also, the program advances to the next step in the acquisition sequence automatically, and the Import File dialog box re-opens.

The current step in the acquisition sequence and the applicable teeth are selected for your reference.

-
Repeat steps a-b until you finish importing images for the series.
Note: To stop the acquisition session before you finish acquiring the entire series, in the Import File dialog box, click (or tap) Cancel to pause the acquisition, and then click (or tap) Finish Acquisition. You can resume the incomplete exam later if necessary.
-
-
If you selected an option on the Import tab in step 7, do the following:
-
Click (or tap) Start Importing.

The Import File dialog box appears.

-
Select the correct image file, and then click (or tap) Open.
The image that you imported appears as a thumbnail image on the panel at the bottom of the Dentrix Ascend Imaging program.

-
Repeat steps a-b until you finish importing images for the series.
-
After all the images have been imported. One at a time, drag the thumbnail images from the panel to the correct boxes of the template.

-
Do any of the following as needed:
-
To stack multiple images in one template slot, drag either a thumbnail image from the panel at the bottom or an image from a template slot to a template slot that already has an image assigned. That image is put on the top of the image stack for that template slot (but you can choose a different image to be on top).
-
To choose the top image for a template slot with multiple images, navigate between the images in the stack by clicking (or tapping) the corresponding Next or Previous button as needed. The image that is visible in the stack when you click (or tap) Begin Uploading will be set as the top image of the stack (but you can choose a different image to be on top later).

-
To change the orientation of an image in the template, navigate to the desired image in the stack for a template slot (if multiple images are assigned to that template slot), select the image to view the toolbar, and then click (or tap) any of the available buttons as needed: Flip Horizontal, Flip Vertical, Rotate Counterclockwise (90 degrees), and/or Rotate Clockwise (90 degrees).

-
To remove an image from the template, navigate to the desired image in the stack for a template slot (if multiple images are assigned to that template slot), and then drag the image back to the panel at the bottom.
-
-
Click (or tap) Begin Uploading to save the mounted images to the patient's record.

-
If not all thumbnail images have been mounted to the template when you click (or tap) Begin Uploading or Cancel, a message appears, stating that unassigned images will not be saved to the patient's record.

Click one of the following buttons:
-
Send to Recovery - To save the unassigned images. You can assign them to the patient later using the existing functionality for recovering images.
-
Discard Images - To delete the unassigned images permanently.
-
Stay on Page - To return to where you were so you can assign unassigned images or make other changes.
-
-
If any images fail to upload, a message appears and provides the option for you to recover the images. Click (or tap) Recover Images to begin the recovery process.
-
Extraoral X-ray
Do one of the following:
-
In the Import File dialog box that appears, select the correct image file.

-
Click (or tap) Open.
The image is saved to the patient's record.
Intraoral/extraoral photo
Do one of the following:
-
If you selected the Import from File option on the Input tab in step 7, do the following:
-
In the Import File dialog box appears that appears, select the correct image file.

-
Click (or tap) Open.
The image appears as thumbnail image on the snapshot panel at the bottom of the Dentrix Ascend Imaging program.

-
For each additional image that you want to import, click (or tap) Start Acquisition, and then repeat steps a-b.
The imported images appear as thumbnail images on the snapshot panel at the bottom of the Dentrix Ascend Imaging program.

-
On the snapshot panel, clear the checkbox of each snapshot that you do not want to save.

-
Click (or tap) Assign Images.
-
Do any of the following:
-
To save one or more snapshots as intraoral images and assign tooth numbers, select the snapshots that pertain to the same teeth (deselect snapshots that do not pertain to the same teeth), and then drag them to the Select Teeth, UR/UL/LR/LL, Upper Jaw, or Lower Jaw box.

If you drag snapshots to the Select Teeth box, select the applicable teeth, and then click (or tap) Assign Teeth.

-
To save one or more snapshots as extraoral images, select the snapshots that are extraoral images (deselect snapshots that are not extraoral images), and then drag them to the Extraoral Photos box.

-
To save the snapshots on the snapshot panel as intraoral images but not assign tooth numbers at this time, leave those snapshots on the snapshot panel.
Assigned intraoral images appear on the left side of the preview area; extraoral, on the right.

Note: If you have a mix of intraoral and extraoral images, they map to one procedure (D0350), which will appear in the progress notes with two icons. Also, you can delete or reassign the intraoral or extraoral exam as needed in the future.
-
-
Click (or tap) Begin Uploading to save the images to the patient's record
-
If any images fail to upload, a message appears and provides the option for you to recover the images. Click (or tap) Recover Images to begin the recovery process.
-
-
If you selected an option on the Import Images tab in step 7, do the following:
-
In the Import File dialog box appears that appears, select the correct image file.

-
Click (or tap) Open.
The image appears as thumbnail image on the snapshot panel at the bottom of the Dentrix Ascend Imaging program.

-
For each additional image that you want to import, click (or tap) Start Importing, and then repeat steps a-b.
The imported images appear as thumbnail images on the snapshot panel at the bottom of the Dentrix Ascend Imaging program.

-
On the snapshot panel, clear the checkbox of each snapshot that you do not want to save.

-
Click (or tap) Assign Images.
-
Do any of the following:
-
To save one or more snapshots as intraoral images and assign tooth numbers, select the snapshots that pertain to the same teeth (deselect snapshots that do not pertain to the same teeth), and then drag them to the Select Teeth, UR/UL/LR/LL, Upper Jaw, or Lower Jaw box.

If you drag snapshots to the Select Teeth box, select the applicable teeth, and then click (or tap) Assign Teeth.

-
To save one or more snapshots as extraoral images, select the snapshots that are extraoral images (deselect snapshots that are not extraoral images), and then drag them to the Extraoral Photos box.

-
To save the snapshots on the snapshot panel as intraoral images but not assign tooth numbers at this time, leave those snapshots on the snapshot panel.
Assigned intraoral images appear on the left side of the preview area; extraoral, on the right.

Note: If you have a mix of intraoral and extraoral images, they map to one procedure (D0350), which will appear in the progress notes with two icons. Also, you can delete or reassign the intraoral or extraoral exam as needed in the future.
-
-
Click (or tap) Begin Uploading to save the images to the patient's record
-
If any images fail to upload, a message appears and provides the option for you to recover the images. Click (or tap) Recover Images to begin the recovery process.
-
Set of photos
Do one of the following:
-
If you selected the Import from File option on the Input tab in step 7, the first step in the acquisition sequence is selected automatically (as indicated by the green, numbered box) on the sequence diagram, and the applicable teeth are selected on the Tooth status chart for your reference.

Do the following:
-
In the Import File dialog box that appears, select the correct image file.

-
Click (or tap) Open.
The image is saved to the patient's record, and a preview of the image appears. Also, if the image that you just acquired was not for the last step in the acquisition sequence, the next step is selected automatically (as indicated by the green, numbered box) on the sequence diagram, and the applicable teeth are selected on the Tooth status chart for your reference.

-
Repeat steps a-b until you finish importing images for the set.
Note: To stop the acquisition session before you finish acquiring the entire series, in the Import File dialog box, click (or tap) Cancel to pause the acquisition, and then click (or tap) Finish Acquisition. You can resume the incomplete exam later if necessary.
-
-
If you selected an option on the Import tab in step 7, do the following:
-
Click (or tap) Start Importing.

The Import File dialog box appears.

-
Select the correct image file, and then click (or tap) Open.
The image that you imported appears as a thumbnail image on the panel at the bottom of the Dentrix Ascend Imaging program.

-
Repeat steps a-b until you finish importing images for the set.
-
After all the images have been imported. One at a time, drag the thumbnail images from the panel to the correct boxes of the template.

-
As needed, do any of the following:
-
To stack multiple images in one template slot, drag either a thumbnail image from the panel at the bottom or an image from a template slot to a template slot that already has an image assigned. That image is put on the top of the image stack for that template slot (but you can choose a different image to be on top).
-
To choose the top image for a template slot with multiple images, navigate between the images in the stack by clicking (or tapping) the corresponding Next or Previous button as needed. The image that is visible in the stack when you click (or tap) Begin Uploading will be set as the top image of the stack (but you can choose a different image to be on top later).

-
To change the orientation of an image in the template, navigate to the desired image in the stack for a template slot (if multiple images are assigned to that template slot), select the image to view the toolbar, and then click (or tap) any of the available buttons as needed: Flip Horizontal, Flip Vertical, Rotate Counterclockwise (90 degrees), and/or Rotate Clockwise (90 degrees).

-
To remove an image from the template, navigate to the desired image in the stack for a template slot (if multiple images are assigned to that template slot), and then drag the image back to the panel at the bottom.
-
-
Click (or tap) Begin Uploading to save the mounted images to the patient's record.

-
If not all thumbnail images have been mounted to the template when you click (or tap) Begin Uploading or Cancel, a message appears, stating that unassigned images will not be saved to the patient's record.

Click one of the following buttons:
-
Send to Recovery - To save the unassigned images. You can assign them to the patient later using the existing functionality for recovering images.
-
Discard Images - To delete the unassigned images permanently.
-
Stay on Page - To return to where you were so you can assign unassigned images or make other changes.
-
-
If any images fail to upload, a message appears and provides the option for you to recover the images. Click (or tap) Recover Images to begin the recovery process.
-
CAD/CAM scan
Do the following:
-
In the Import File dialog box that appears, select the correct image files.

-
Click (or tap) Open.
The selected scans appear as thumbnail images on the panel at the bottom of the Dentrix Ascend Imaging program.
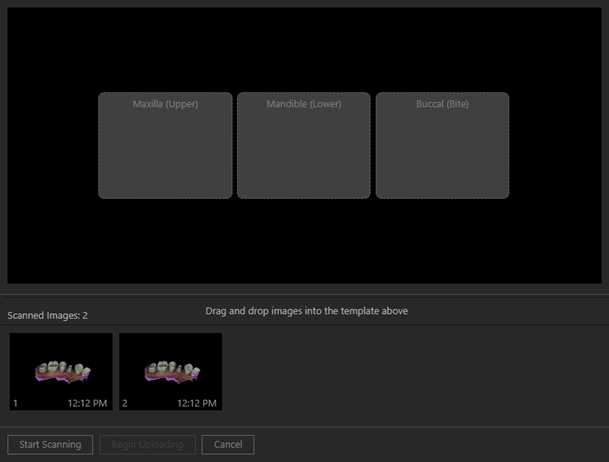
Note: If a scan has metadata that indicates the orientation (upper, lower, or bite), the image is automatically mounted in the correct slot of the template; however, you can drag the image to another box if necessary. If all the scans are mounted automatically, and you do not need to move any to other orientation boxes, you can skip to step e.
-
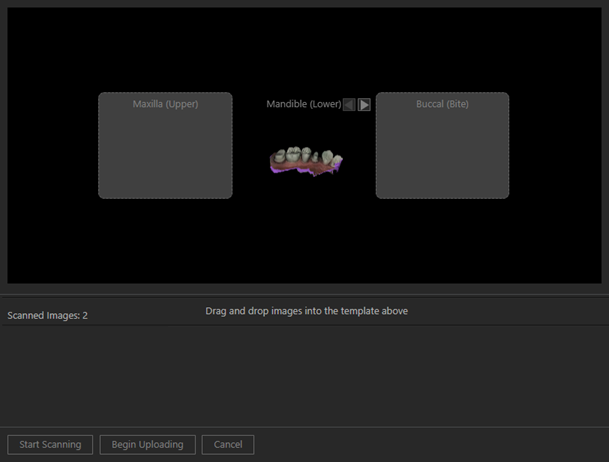
One at a time, drag the thumbnail images from the panel to the correct orientation box of the template: Maxilla (Upper), Mandible (Lower), or Buccal (Bite).
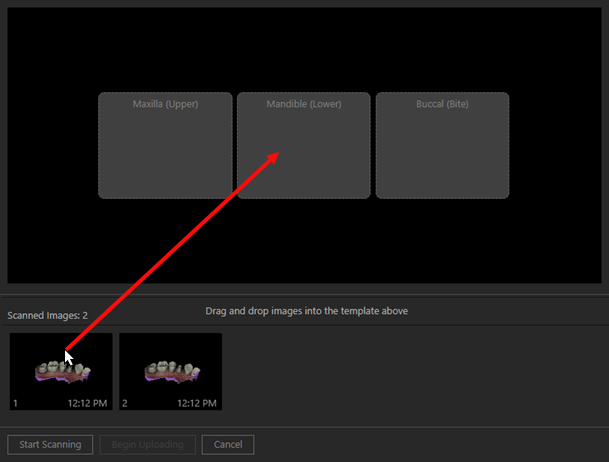
Note: For a template slot with multiple images, you can navigate between the images in the stack by clicking (or tapping) the corresponding Next or Previous button as needed.

-
Click (or tap) Begin Uploading to save the mounted images to the patient's record.
-
If not all thumbnail images have been mounted to the template when you click (or tap) Begin Uploading or Cancel, a message appears, stating that unassigned images will not be saved to the patient's record.

Click one of the following buttons:
-
Send to Recovery - To save the unassigned images. You can assign them to the patient later using the existing functionality for recovering images.
-
Discard Images - To delete the unassigned images permanently.
-
Stay on Page - To return to where you were so you can assign unassigned images or make other changes.
-
3D image/volume
Do the following:
-
In the Import File dialog box appears that appears, select the correct image file.
Without DICOM support

With DICOM support

-
Click (or tap) Open.
The image is saved to the patient's record.
-
-
Do one of the following as needed:
-
For a series of X-ray images or an individual X-ray image, assign tooth numbers as needed.
For each image that needs tooth numbers assigned to it, do the following:
-
If there are multiple image thumbnails, under Image Navigator, click (or tap) an image thumbnail; otherwise, if there is only one image thumbnail, skip this step.
A larger version of the current image appears in the viewing area.

-
Click the Edit button
 .
.The Assign Tooth Numbers dialog box appears.

-
To change dentition, click (or tap) the Toggle primary/permanent link to show a tooth chart and the dentition buttons, select the applicable teeth, and then click (or tap) the Permanent or Primary button. Repeat this process as needed to change the dentition of other teeth. Then, click (or tap) the Back to assignment link.

-
Select the correct tooth numbers.
-
Click (or tap) Assign Teeth.
-
-
For a set of photos or an individual photo, assign tooth numbers as needed.
For each image that needs tooth numbers assigned to it, do the following:
-
If there are multiple image thumbnails, under Image Navigator, click (or tap) an image thumbnail; otherwise, if there is only one image thumbnail, skip this step.
A larger version of the current image appears in the viewing area.

-
Click the Edit button
 .
.The Assign Tooth Numbers dialog box appears.

-
To change dentition, click (or tap) the Toggle primary/permanent link to show a tooth chart and the dentition buttons, select the applicable teeth, and then click (or tap) the Permanent or Primary button. Repeat this process as needed to change the dentition of other teeth. Then, click (or tap) the Back to assignment link.

-
Select the correct tooth numbers.
-
Click (or tap) Assign Teeth.
-
-
For a CAD/CAM scan, assign tooth numbers as needed.
Do the following:
-
Click the Edit button
 .
.The Assign Tooth Numbers dialog box appears.

-
To change dentition, click (or tap) the Toggle primary/permanent link to show a tooth chart and the dentition buttons, select the applicable teeth, and then click (or tap) the Permanent or Primary button. Repeat this process as needed to change the dentition of other teeth. Then, click (or tap) the Back to assignment link.

-
Select the correct tooth numbers, or deselect tooth numbers as needed.
-
Click (or tap) Assign Teeth.
-
-
For a 3D image or volume, change the assigned tooth numbers as needed.
Do the following:
-
Click the Edit button
 .
.The Assign Tooth Numbers dialog box appears.

-
To change dentition, click (or tap) the Toggle primary/permanent link to show a tooth chart and the dentition buttons, select the applicable teeth, and then click (or tap) the Permanent or Primary button. Repeat this process as needed to change the dentition of other teeth. Then, click (or tap) the Back to assignment link.

-
Select the correct tooth numbers, or deselect tooth numbers as needed.
-
Click (or tap) Assign Teeth.
-
-