Filling openings
You can fill openings in your schedule with future appointments that have been marked ASAP and past appointments that have a status of Broken or No Show.
Note: This tool for filling openings ignores recare appointments.
To fill openings
-
Do one of the following:
-
Click (or tap) the Schedule menu.
-
On the Schedule menu, select Calendar.
The Calendar page opens.
-
-
Navigate to the day or week that has open appointment times that you want to fill.

-
On the Actions menu, select Fill Openings.
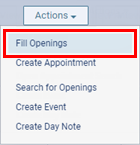
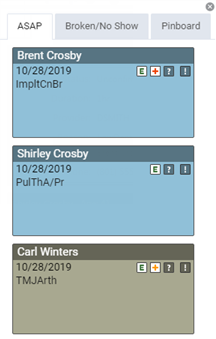
A panel opens. The panel displays future appointments (relative to the day or week currently being viewed) for which the ASAP checkbox is selected. The panel also displays past appointments (relative to the day or week currently being viewed) that have a status of Broken or No Show. Recare appointments are not included.
-
On the ASAP and Broken/No Show tabs, as you go down the list of appointments, use the phone number that is displayed on each appointment to contact the corresponding patient.
Tip: To open the Overview page of the patient's record on the Patient tab, click (or tap) the patient's name at the top of an appointment.
-
If a patient agrees to reschedule his or her appointment, do one of the following:
-
Click (or tap) the appointment.
-
Click (or tap) the Schedule link.
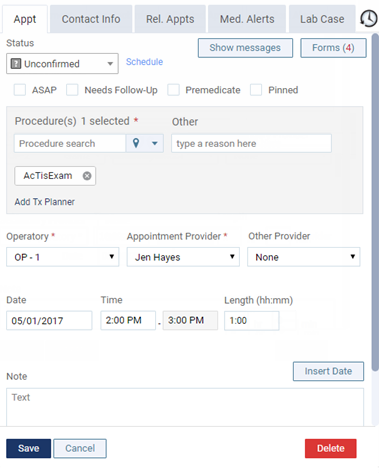
The Appointment Information panel opens.
-
-
Change any of the appointment information, such as the procedure, provider, operatory, date, or time, as needed.
Set up the following options:
-
Status - Select a different status if necessary. The corresponding status icon appears on the appointment (for example, Unconfirmed is a question mark
 ).
). -
ASAP - Select this checkbox if the patient wants to be contacted if an earlier date and/or time becomes available. With this option selected, the patient will show on the ASAP List. With this option selected, the patient will show on the ASAP List, and an ASAP icon
 appears on the appointment.
 -
Needs Follow-up - Select this checkbox if any of the procedures for this appointment require you to follow up with the patient after his or her visit. The patient will show up on the Patient Follow-up list after his or her appointment.
-
Premedicate - Select this checkbox if the patient prefers to be medicated before any of the procedures are performed or if any of the procedures require premedication.
-
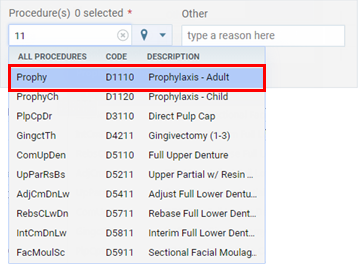
Procedure(s) - Click (or tap) in the box, begin typing procedure code, multi-code, or description, continue typing as needed to narrow the results, and then select the appropriate procedure from the results list. To select other procedures, repeat this process.
Tip: To remove a procedure from the appointment, click (or tap) the corresponding Remove button
 .
. -
Add Tx Planner - Click (or tap) this link to select one or more visits with treatment-planned procedures that you want to attach to the appointment, and then click (or tap) Update appointment.

-
Other - Enter a reason, other than that of the selected procedures, for the appointment.
-
Operatory - Select a different operatory from the list. Alternatively, to quickly change the operatory, click (or tap) and hold and then click (or tap) an open time slot in a different operatory.
-
Appointment Provider - Select a different appointment provider from the list (only providers who have access to the current location are available). Alternatively, if you are viewing the schedule by provider, to quickly change the provider, click (or tap) and hold and then click (or tap) the column of a different provider. Only providers who have access to the current location are available. The exception to this is when a provider is associated with the appointment and no longer has access to the current location; that provider is available in the list unless you select a different provider and then save the change.
-
Other Provider - Select a secondary provider, such as a hygienist, for the appointment from the list. A colored box
 (determined by the provider color assigned to this provider) appears on the appointment. Only providers who have access to the current location are available. The exception to this is when a provider is associated with the appointment and no longer has access to the current location; that provider is available in the list unless you select a different provider and then save the change.
 -
Date - Click (or tap) in the box to select a different date. Alternatively, if you are viewing the schedule by week, to quickly change the date, click (or tap) and hold and then click (or tap) an open time slot on a different date.
-
Time - Click (or tap) in the box, and then change the time. Alternatively, to quickly change the time, click (or tap) and hold and then click (or tap) a different open time slot.
Tip: You can enter a time using various formats. For example, you can type 08:30, 8:30a, or 8:30 AM; 8a or 8am; 13:30, 1:30p, or 1:30 PM; or 1p or 1pm.
-
Length - By default, the length of the appointment is determined by the location's default appointment length, but you can change the length as needed. The end time of the appointment changes accordingly.
-
Note - Enter a note regarding the appointment.
Tip: You can quickly change the appointment date, time, operatory, and/or provider by clicking (or tapping) an open time slot on the schedule in the column of any provider or operatory (depending on whether you are viewing the schedule by provider or operatory) on any day of the displayed week (if you are viewing the schedule by week) or on the displayed date (if you are viewing the schedule by day).
-
-
Click (or tap) Save.