Deposit slip
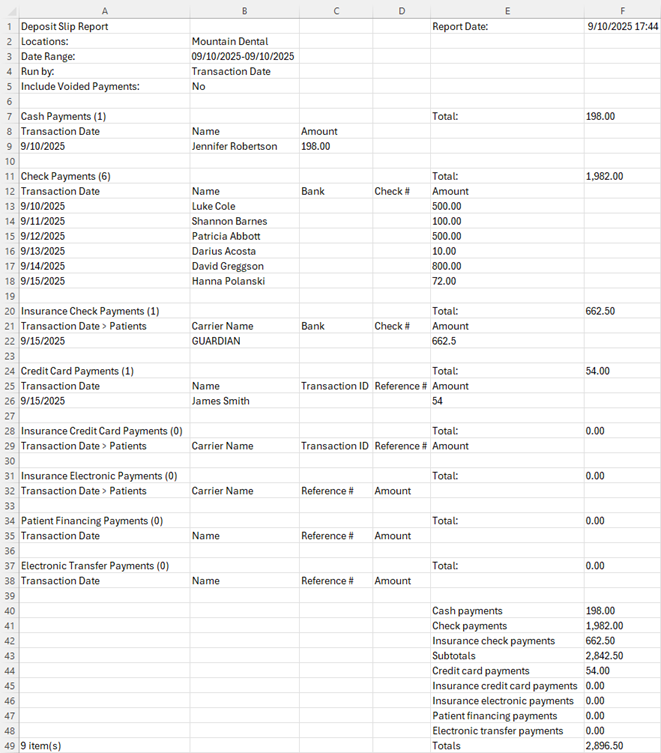
You can view and print a deposit slip for a specified date or date range. The deposit slip includes patient payments (cash, checks, credit cards, patient financing, and electronic transfers), bulk insurance payments (checks and electronic transfers), and individual insurance payments (checks and electronic transfers). The deposit slip also displays totals for each type of payment.
To print a deposit slip
-
On the Home menu, under Reports, click (or tap) Deposit Slip.
The Deposit Slip Report page opens.

-
The date of the deposit slip is today by default, but you can change the date. To change the date, click (or tap) in the Date Range box, and then select a date or date range.

Note: You can create a deposit slip for one of the pre-defined dates or date ranges, for a Specific Date, or for a Custom Range.

-
Under Run by, select whether you want to run the deposit slip by Transaction date or the Modified date period.
Note: The transaction date is different from the created/modified date in the following instances:
-
When posting a payment, you backdate it.
-
When editing a payment, you change the Transaction date, Amount, Check #, Reference #, Bank/branch #, Applied amounts, Tags, or Deductibles.
-
-
Under Payment Methods, the All checkbox is selected by default, so the deposit slip will include all forms of payments except voided payments. To include voided payments, select the Include voided payments checkbox. To exclude certain forms of payment, clear the corresponding checkboxes.
-
Click (or tap) Search.
Note: Depending on the date range of the report and the number of records that must be checked, it may take 1-5 minutes for the report to load. Please be patient. If you leave the page before the report loads, you will have to regenerate the report.
The report details appear.

Note: If the Include voided payments checkbox was selected, voided payments appear in the Credit Card Payments section. For each voided payment, "Voided" appears in red text in the Status column (which is an additional column that appears only if the deposit slip includes voided payments).

-
Under Insurance Check Payments and Insurance Electronic Payments, to view the patient name that is associated with an individual insurance payment or the patient names and the corresponding portions that are associated with a bulk insurance payment, expand that payment's row.


Note: To expand or collapse all payment rows in a section, click (or tap) the Expand rows link or the Collapse rows link, respectively.
-
Do any of the following:
-
To generate a .pdf file of the deposit slip as viewed, click (or tap) Print. The .pdf file appears on a new browser tab so you can print or download a copy of the deposit slip.
-
To export the report, click (or tap) Export. The current page as it is displayed is downloaded as a .csv file. You can open the .csv file in a spreadsheet program. The first row contains the report title and date. The next several rows contain the filters in use. The subsequent rows contain details of each transaction on the report (grouped by payment type), totals for each payment type, and a grand total.

-