After you have entered treatment into the Patient Chart, you can make editing changes as needed. However, you cannot edit procedures attached to an insurance claim until you delete the claim. For more information on deleting insurance claims, please refer to Deleting primary claims and Deleting secondary claims. Once you delete the claim, you can edit the procedure.
Notes:
Changes to completed procedures are locked out after they are moved into history during the month-end update routine. You cannot edit or delete procedures in history. However, you can remove procedures in history from the Patient Chart by invalidating the procedure.
If you posted the procedure but it is not listed in the Progress Notes, make certain that you selected the correct View options in the Progress Notes Control Box or the View menu.
To edit treatment
1. Select a patient.
2. From the Progress Notes panel, double-click the treatment that you want to edit.
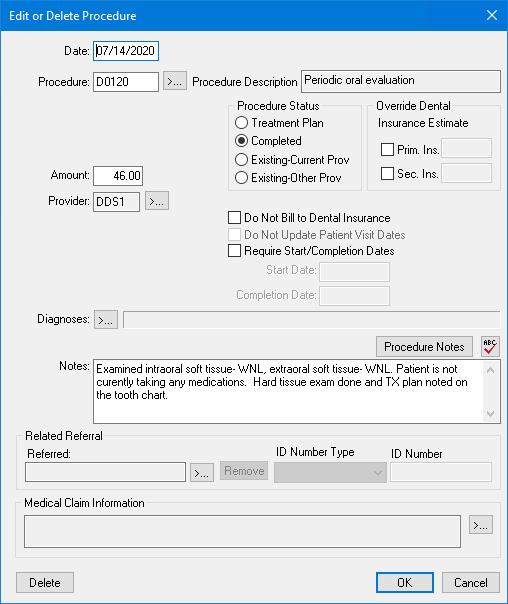
The Edit or Delete Procedure dialog box appears.
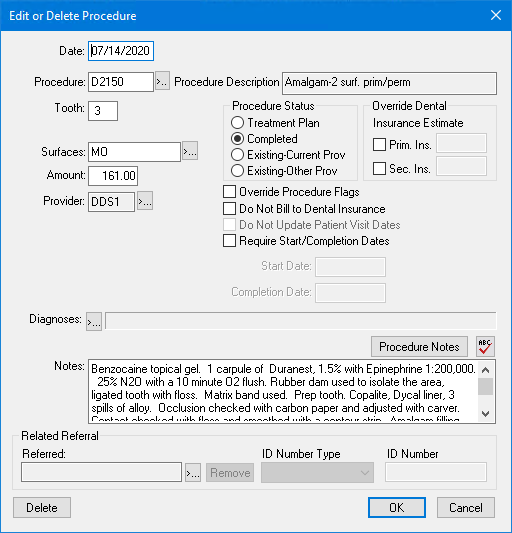
3. Do one or more of the following:
Date - Delete the existing date and type the correct date.
Procedure - Delete the existing code and type the correct code or click the search button and select the correct code.
Tooth - Type the correct tooth number.
Surfaces - Type or select the correct surfaces.
Amount - Delete the existing amount and type the correct figure.
Provider - Click the search button, select the correct provider, and click OK.
Diagnoses - Click the search button, select the appropriate diagnostic code, and click OK.
Procedure Status - Select the correct status from the list.
Note: To post a procedure to the Ledger, click Set Complete in the Progress Notes toolbar.
Override Dental Insurance Estimate - Select Prim Ins or Sec Ins and type the correct amount.
Override Procedure Flags - Select to ignore the default procedure flags.
Do Not Bill to Dental Insurance - Select to prevent a claim from being submitted to the patient's dental insurance.
Require Start/Completion Dates - Select if the patient's insurance company requires start and completion dates for claims and then type the appropriate dates.
Referred - Click the search button to add a related referral to the procedure. Select the appropriate referral source. Select an ID Number Type and type the ID Number if necessary. (You can only select an ID Number Type and ID Number if the referral source was a Referred By Doctor/Other.)
Medical Claim Information - Click the search button.
Note: The Medical Claim Information group box only appears if the procedure code has been cross coded.
The Medical Claim Information dialog box appears.
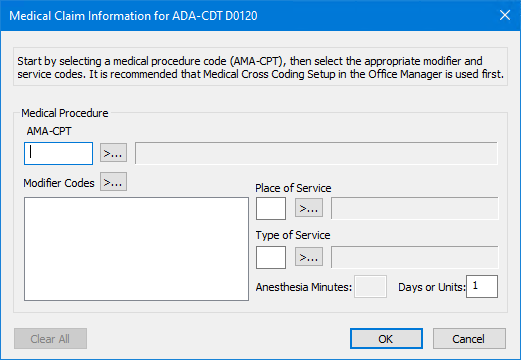
AMA CPT - Click the search button and select the appropriate code from the AMA-CPT Codes dialog box.
Modifier Codes - Click the search button and select the appropriate code from the Select Modifier Code(s) dialog box.
Place of Service - Click the search button and select the appropriate code from the from the Select Place of Service Codes dialog box.
Type of Service - Click the search button and select the appropriate code from the Select Type of Service Codes dialog box.
Anesthesia Minutes - Type the number of minutes.
Days or Units - Type the number of units.
Clear All - Click to clear the medical codes.
4. When you are finished making changes, click OK.