

|
Electronic Claims
You can view the electronic claims that you have batched for sending at any time.
To use the e-claims batch
1. From the Report menu, point to Insurance, and then click Electronic Claims.
The Claims Table [Electronic Claims] dialog box appears. The claims to be processed, and those that have been processed but not yet deleted, are listed in the upper-left list box with the indication of whether this claim is tagged for deletion (you can select or clear the check box), patient name on the claim, date the claim was generated, ADA code, internal insurance code, tooth number (if required for the procedure), name of primary insurance carrier (and if applicable, the secondary and tertiary carrier names), indication of whether a claim or pre-treatment estimate is being processed, indication of whether the claim is to be printed (you can select or clear the check box), the type of insurance claim form being generated for the primary insurance carrier (and if applicable, the secondary, tertiary, and quaternary carriers), and location where the claim is being processed.
You must have a modem attached to the computer from which you are transmitting e-claims, and that computer must be connected to the Internet.
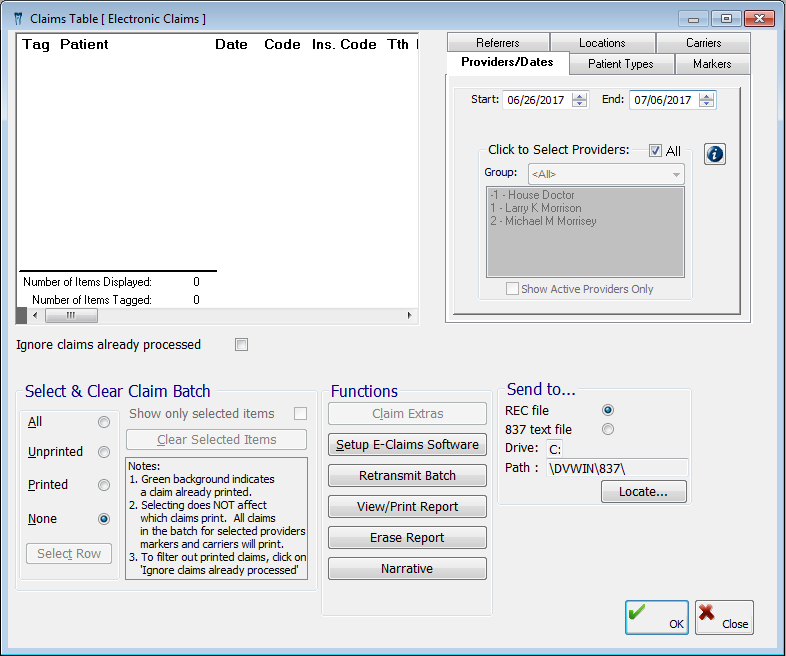
Notes:
· Claims with a green background have already been sent.

· Selecting a claim does not affect whether it gets sent or not (only claims in the batch for selected providers, markers, carriers, and locations will be sent).
2. Filter what claims appear in the list:
· Standard filter tabs - Set up the standard filter tabs as needed to view claims for specific providers, patients with certain markers, specific insurance carriers, and/or specific locations.
· Ignore claims already processed - Select this check box to hide claims that have already been processed.
· Send/Print tagged claims only - Select the check boxes of only the claims that you want to view, and then select the Send/Print tagged claims only check box to view only those claims in the list (after that, you can clear the check box of any claims as needed).
· Show only selected items - Select the check boxes of only the claims that you want to view, and then select the Show only selected items check box to view only the tagged claims (claims with a check mark) in the list (after that, you can clear the check box of any claims as needed). This option is available only if at least one claim is tagged with a check mark.
Tip: The following Select & Clear Claim Batch options allow you to select and deselect the check boxes of claims:
· All - Select this option to select the check box of all claims listed.
· Unprinted - Select this option to clear the check box of only unsent claims.
· Printed - Select this option to clear the check box of only claims that have been sent.
· None - Select this option to clear the check box of all claims.
· Tag Row/ Untag Row - Depending on whether or not a selected claim is tagged, the text on this button reads, "Tag Row" or "Untag Row." With a claim selected (the check box may be selected or clear), click this button to tag or untag that claim (select or clear the check box , respectively).
3. Perform any of the following Functions as needed for the claims listed:
· Clear Selected Items - With the check box of any claims that you want to remove from the batch (before sending the claims that you want to submit) selected, click Clear Selected Items.
· Claim Extras - With a claim selected (the check box may be selected or clear), click Claim Extras to open the Claim Extras dialog box to can set up additional information for that claim. For information about claim extras, see the topic about adding procedures to a treatment plan.
· Setup E-Claims Software - Click this option to set up the e-claims software (this needs to be done only once on any computer from which you transmit e-claims).
· Retransmit Batch - Click Retransmit Batch to browse for and open the batch file to be retransmitted. Click OK when the transmission is complete.
· View/Print Report - Click View/Print Report to view a print preview of the report that details e-claim transmissions.
· Erase Report - Click Erase Report to erase the report that details e-claim transmissions.
· Narrative - With a claim selected (the check box may be selected or clear), click Narrative to open the Attach Claim Narrative dialog box to attach narratives to that claim. For information about narratives, see the topic about adding procedures to a treatment plan.
· Send to REC file - For customers
who are not using Henry Schein's eServices for electronic claims, this
is a proprietary Henry Schein file format for electronic claims and the
default option that you should use.
Note: Do not change from using
this option without first contacting your electronic claims clearinghouse
to verify that the 837 file format will work.
· Send to 837 text file - For customers who are not using Henry Schein's eServices for electronic claims, this is an industry standard file format that may work for sending claims to your electronic claims clearinghouse. Before selecting this option, check with your electronic claims clearinghouse to verify that the 837 file format will work for you.
4. Click OK to send the claims.
Tip: After sending claims, return to the Claims Table [Electronic Claims] dialog box to verify that the claims that you just sent appear with a green background. Select the check boxes of those claims, and then click Clear Selected.
Need more help?
You can visit our website, contact OMSVision Customer Support, or suggest a new feature or improvement on User Voice.