

|
Adding procedures to a treatment plan
You can add procedures to a treatment plan.
Note: A patient can have up to 10 treatment plans: 0 - 9. Treatment plan 0 is the plan agreed to by the patient and is the only plan that can coordinate with the Appointment Book. Treatment plans 1 through 9 are used only for presenting alternative options to the patient.
To add procedures
1. On the Treatment Plans tab, right-click a white area in the Treatment Plan section (or from the Treatment Plans menu on the Control Panel), point to Treatment Plan, and then click Add to add procedures to the treatment plan.
If the patient has medical insurance coverage, the Choose Up To 4 Diagnosis Codes dialog box appears; otherwise, the Add To Treatment Plan window appears, so skip steps 2 - 4.
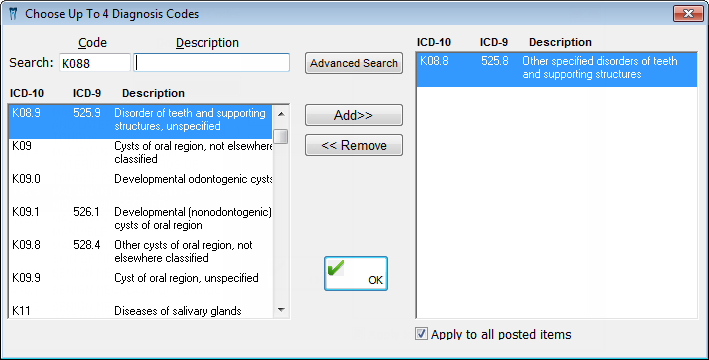
2. For each diagnosis code (ICD10 and ICD-9) that you want to include, select that code in the left list box, and then click Add to move the code into the right list box.
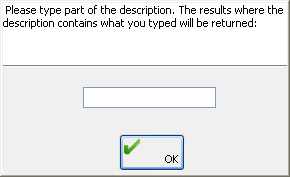
Tip: To search for a diagnosis code, type the Code or first word of the Description. You can also click Advanced Search, type any part of the description that corresponds to the diagnosis code you want to search for, and then click OK.
3. If you want the selected diagnosis code to apply to all of the procedures for this treatment planning session, select the Apply to all posted items check box. This option is available only if only one diagnostic code has been selected.
4. Click OK.
The Add To Treatment Plan window appears.

5. To manually calculate and enter insurance estimates for procedures you are going to plan, select the Estimator Off check box. This option is unavailable if Do not use Estimator and/or Estimate by percentage of UCR? is selected in the Edit Insurance Profile dialog box for the patient's insurance carrier.

6. For
the line item (the new line item has a pointing hand icon  next to it),
do the following:
next to it),
do the following:
a. The default date in the Planned For box is the date the plan is created. If the created date of the treatment is a different date, enter that date.
b. Select the treating or rendering Provider's number, or leave the default (from the blue section on the General tab of the patient's Patient Information Center) selected.
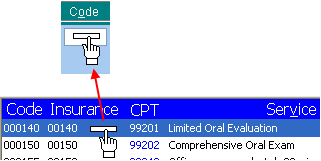
c. Type a procedure code from the fee schedule in the Code field, or double-click in the field to select and paste in a procedure. There is a preference setting that allows you to choose whether you want the ADA or CDT code for a procedures to show in the Code field when adding a treatment plan and on printed treatment plans.
Tip: You can drag a procedure from the bottom pane of the window into the Code field. (See step 7.)
d. When you add a procedure, and the patient has an insurance profile that is a Medicaid Plan, a dialog box appears so that you can enter the pre-authorization number for the treatment.
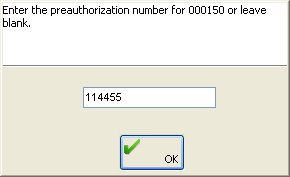
With a certain preference setting enabled, for any additional procedures (with a fee greater than $0) that you treatment plan on a given day, the field in the dialog box that appears and asks you for the pre-authorization number is automatically populated with the number you entered for the previous procedure. Enter a different number if necessary, and then click OK.
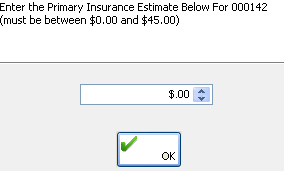
e. If the Estimator Off check box is selected, when you add a procedure code, a dialog box appears so that you can enter an insurance estimate for each of the patient's insurance carriers. Enter an amount (or leave $0.00 entered), and then click OK.
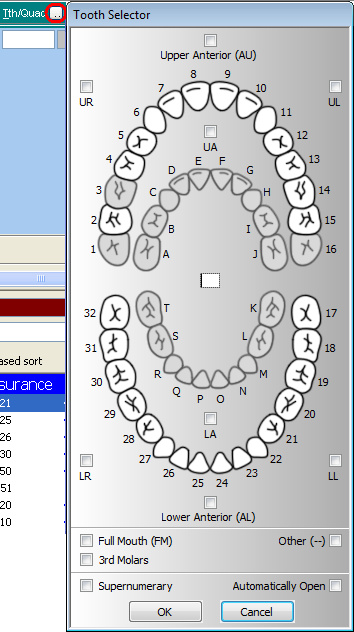
f. From the Tth/Quad list, select or type the appropriate tooth number or quadrant, if applicable. Also, for a procedure that requires a tooth number, to post the procedure to multiple teeth at one time, click the button next to Tth/Quad, select the teeth, and then click OK.
Tip: You can use the numbers on the number keypad as shortcuts to select a quadrant as follows:
1=Lower Left (LL)
2=Upper Anterior (UA)
3=Lower Right (LR)
5=Full Mouth (FM)
7=Upper Left (UL)
8=Lower Anterior (LA)
9=Upper Right (UR)
Note: Pressing the numbers on top of the keyboard selects the tooth number instead of the quadrant.
g. After adding a procedure, from the Surf/Root list, select the appropriate surface or root, if applicable.
h. Type the fee to Charge, or leave the default charge from the fee schedule entered in the field.
i. If the patient has insurance coverage, select the Pretreat check box to have a pre-treatment estimate be generated automatically.
j. In the Appt # field, enter a phase to assign the procedure to that phase, or leave the default value of 1 entered.
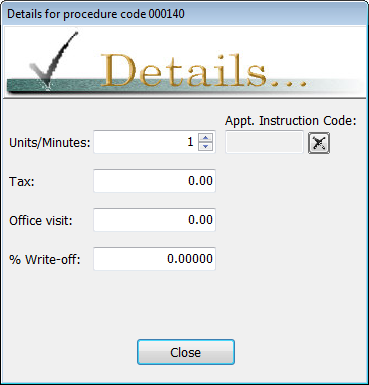
k. Click Details if you want to set any of the following options for the procedure:
· Units/Minutes – Enter the number of time units for the procedure.
· Tax – Type the tax rate.
· Office Visit – Type the office visit fee.
· % Write-off – Type the write-off percentage. This is accounted for automatically.
· Appt. Instruction Code – Click in the field, and then double-click a code.
l. For a patient with medical insurance coverage, if you want to cross code the ADA code being planned to the corresponding CPT codes, click X-Code.
m. For a patient with medical insurance coverage, you can select up to four (ICD) Diagnosis codes to a procedure. For each of the first three selections that you make, as you make a selection from the menu, a new menu appears after the previous one automatically. Also, if there are multiple procedures listed, the first time you change one of the diagnostic codes in a column of (ICD) Diagnosis codes, a message appears and asks if you want to change the diagnostic codes in that column for the other procedures to be the same as the code you have just changed; click Yes to change the other codes in the same column or No to change only the one that you changed.
7. To add a new line item, do any of the following:
· Click the Create a new procedure line button.

(The new line item has a pointing hand icon next to it.)
· To use a procedure from the bottom pane of the window, click a category (yellow folder) to view the procedures associated with that category, and then drag a procedure from the list onto an empty spot where the line items are listed (or double-click the procedure).

Tips:
· To change the fee schedule being viewed, type a Fee Schedule #.

· To have the most frequently used codes in a selected category appear at the top of the list, select the Experience-based sort check box.

· To have only the most recent codes from all procedure categories appear in the list, select the Recent codes check box.
· To view the procedures that have a description that most closely matches specific text, in the Service field on the blue header of the procedure list, type the name of a service, and then select the Service Search Filter check box.

· To duplicate
a procedure, select a line item (the pointing hand icon appears next
to the selected line item), and then click the Duplicate
selected line button to add a new item with all the same information
as the original except the treatment area (for example, the tooth number)

Note: You can select more than one item at a time by clicking each line item that you want to delete. Click a line item again to deselect it.
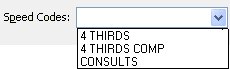
· To plan multiple procedures at once, from the Speed Codes list, select a speed code.
8. To
delete a line item, select a line item (the pointing hand icon appears next
to the selected line item), and then click the Delete
selected line button.

Note: You can select more than one item at a time by clicking each line item that you want to delete. Click a line item again to deselect it.
9. Use the Options button menu to perform additional treatment plan-related tasks.

Click any of the following options:
· Notes - To create a note for a selected procedure.

· Medical Prescriptions - To write a medical prescription for the patient.
· Dental Labs - To view, add, edit, or delete lab information.
· Narratives - To select a narrative and/or enter customized text to attach to a selected procedure. Narratives appear on dental claim forms.
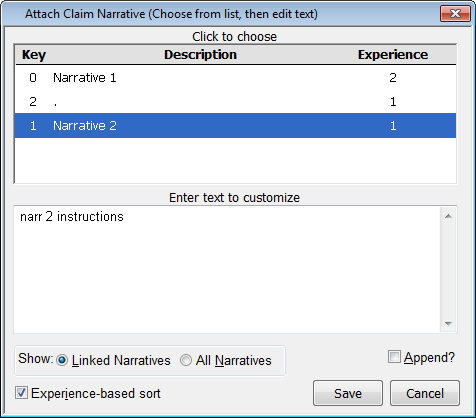
Select Experience-based sort to show the most commonly selected narratives, click a Show option (Linked Narratives or All Narratives), select a narrative and/or type customized text, select Append? to have the next narrative you select be added to the current narrative instead of replace the current narrative, and then click Save.
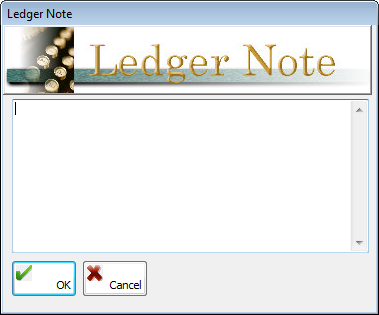
· Ledger Note - To add a ledger note.
· Missing Teeth - To specify any missing or extracted teeth for the patient.
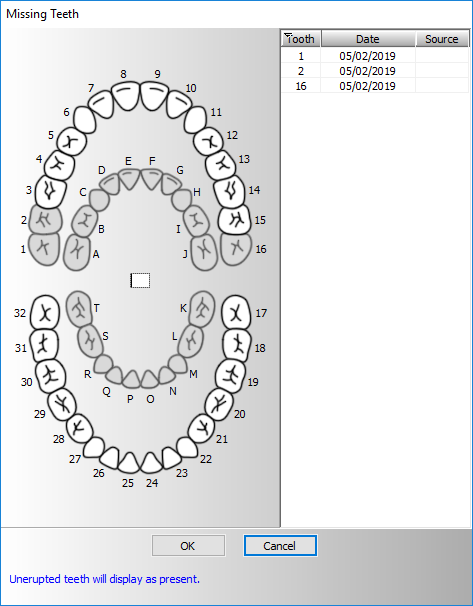
Select the teeth that are missing or extracted to remove them from the chart and add them to the list on the right. Previously extracted teeth associated with a Ledger entry are shown with a check mark. When you are finished, click OK.
Note: You can still post procedures to missing teeth if the code allows it.
· Diagnosis Codes - To add diagnosis codes.
· Modifiers/Cross-Coding - To cross-code the ADA code being planned to the corresponding CPT codes.
10. Set up any of the following options:
· Tx. Counselor – Select a treatment counselor to attach to the procedures being planned. You can click the Remove button to clear any previous selection.

· Description – If necessary, change the description of the selected procedure.
· Location – Select the location where the all procedures of the treatment are to be performed.
· Place of Service – Select the place of service for medical claim forms. The default for the list can be set up for each location.
· Box 49 on ADA form - Select the option that you want to have appear on medical claim forms in box 49: Office, Hospital, ECF, or Other.
11. To view any recalculation notes attached to a procedure in a treatment plan, click Recalc Notes for that procedure.
12. Click the Exit/Continue button.
One of two results occurs:
· If the
button is an open door icon  , there
are no procedures being added to the treatment plan, so the Add To
Treatment Plan window closes. Ignore the steps that follow.
, there
are no procedures being added to the treatment plan, so the Add To
Treatment Plan window closes. Ignore the steps that follow.
· If the
button is a check mark icon  , there are
procedures for the treatment plan. The Finish
Treatment Plan dialog box appears.
, there are
procedures for the treatment plan. The Finish
Treatment Plan dialog box appears.
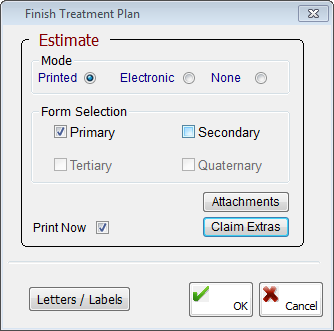
13. Set up the following options to create a pre-treatment estimate:
· Mode – Select the type of pre-treatment estimate: Printed, Electronic, or None.
· Form Selection – Select the coverage options that correspond to the carriers for which you want to generate a pre-treatment estimate: Primary, Secondary, Tertiary, or Quaternary. These options are available only if the selected Mode is not None.
· Print Now – Select this check box if you want to print the pre-treatment estimates after you click OK. For Canadian pre-determinations, this check box is labeled Print/Submit Now; select it to print or submit the pre-determinations after you click OK. This check box is available only if the selected Mode is Printed.
· Attachments - Click this button to add attachments to the pre-treatment estimate. This button is available only if the selected Mode is not None.

Click Attachments to attach a file that has been saved on your computer, a document or image in the patient's Document Center, or an image that you capture from a third-party digital imaging program, a Windows program, or a file. Then, click OK to save the attachments with the pre-treatment estimate.
Note: You can attach only images (.jpg file type only) and plain text files (.txt file type only) to electronic pre-treatment estimates.
· Claim Extras – Click this button to set up extra information for the pre-treatment estimate. This button is available only if the selected Mode is not None.
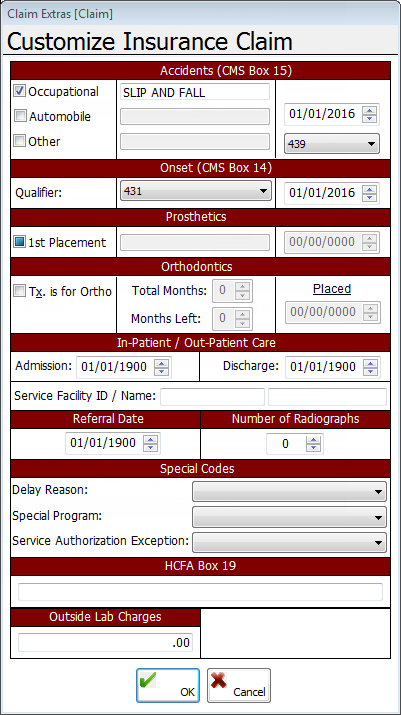
The dialog box provides the following options:
· Accidents - If the patient's treatment is necessary due to an accident, select Occupational, Automobile, and/or Other, type a description for any selected option, and then enter the date of the accident in the box in a mm/dd/yyyy format. If a date is entered, select the qualifier (for example, 439, which is “Accident”) that will appear in box 15. The date will also appear in the box.
· Onset – Enter the date of the accident. If a date is entered, select the Qualifier (for example, 431, which is “Onset of current symptoms or illness”) that will appear in box 14. The date will also appear in the box.
· Prosthetics - Leave the 1st Placement check box selected if this is not applicable or if this is the patient's first prosthetic treatment, or clear the option if this is not the patient's first prosthetic treatment. If the option is cleared, type a description and the date of the placement.
· Orthodontics - Select Tx. is for Ortho if this is an orthodontic treatment. Then, you can enter the Total Months, Months Left, and Placed date.
· In-Patient/Out-Patient Care - Enter the Admission and Discharge dates. Also, enter the Service Facility ID and Name.
· Referral Date - Enter the date of the referral.
· Number of Radiographs - Enter the number of radiographs.
· Special Codes - Select the Delay Reason, Special Program, and Service Authorization Exception.
· HCFA Box 18 - Type what you want to have appear in box 19 on the medical claim form.
· Outside Lab Charges - Type the outside lab charges.
Note: The options under Estimates in the Finish Treatment Plan dialog box are available only if the patient has insurance coverage and the Pretreat check box was selected for at least one procedure of the treatment plan.
14. Click Letters / Labels if you want to choose letters and/or label sets to print after creating the treatment plan. Select the check boxes of the desired letters, and then click Save.

15. Click OK.
16. For Canadian pre-determinations, if a confirmation message appears, click Yes to continue with or No to stop the pre-determination submission. (The appearance of this message is controlled by a preference.)
17. Also for Canadian pre-determinations, if there is no secondary insurance attached to the patient, a message appears and asks if you want to assign secondary coverage. Click Yes to stop the submission and set up the patient's secondary insurance or No to continue.
Note: The status of the pre-determination is "incomplete" while you are waiting for the CDA to respond. Once you receive a response, you can print the response and give it to the patient before he or she leaves the office. You can also look at the response to see if it is rejected, fix the error, and then resubmit the pre-determination.
Need more help?
You can visit our website, contact OMSVision Customer Support, or suggest a new feature or improvement on User Voice.